
Product Tips & Answers

Quick Guide to Adding & Expiring Users in Intellect
In this Topic Hide
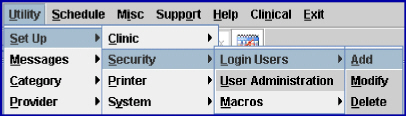
1. Select Utility --► Set Up --► Security --► Login Users --►Add.
NOTE: It may be helpful to review the Modify screen of an existing user with similar job duties to determine the security level for the new user.
2. The Add SECURITY screen displays:
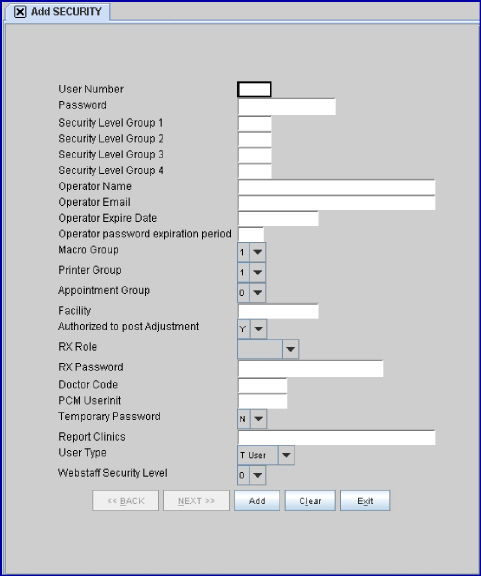
3. The following fields MUST be completed on the Add SECURITY screen:
3.1 User Number: Automatically assigned.
3.2 Password: Enter a unique password between 3 to 10 characters (letters and/or numbers). This field may be set to a temporary password which the user will be prompted to change at login.
3.3 Security Level Group 1 (2, 3, 4): All four fields must contain a security level between 0 and 100.
3.3.1 General recommendations for security levels by job duties:
System Administrators 100
Billers 71
Schedulers 51
VIEW only 11
3.3.2 Default security levels for common menu options:
VIEW 10
MODIFY 40
ADD 50
DELETE 60
NOTE: Users are only able to access menus if the menu security level is lower than the user's security level.
3.4 Operator Name: Enter the user's name in upper/lower case letters.
3.5 Operator Expire Date: Leave blank
3.6 Operator password expiration period: Leave blank
3.7 Macro Group: Defaults to '1.'
3.8 Printer Group: Defaults to '1.'
3.8.1 NOTE: User's default printer may be set through Utility --► Set Up --► Printer --► Report menu.
3.9 Appointment Group: Defaults to '0.'
3.10 Facility Leave blank.
3.11 Authorized to Post Adjustment:
3.11.1 For billing staff, set to 'Y' (yes) to allow posting of contracted insurance adjustments. 3.11.2. Set to 'N' (no) for any staff not authorized to post payments & adjustments.
3.12 Temporary Password: If set to 'Y' (yes), the user will be prompted to change their password when they log in.
3.13 Report Clinics: Leave blank.
4. The following fields may be left BLANK if not using the related feature:
4.1 Operator Email: Enter the practice email, if using email features such as appointment reminders and recall letters.
4.2 For users accessing the INTELLECT ePrescribing feature:
4.2.1 RX Role: Select from the drop-down.
4.2.2 RX Password: Enter a unique password that is NOT the same as the <Password> field.
4.2.3 Doctor Code: If <RX Role> is 'MidLevel', enter the Provider Code of the supervising provider.
4.3 For PCM Users only, the following fields link the PCM Task Manager to the task screen in Intellect.
4.3.1 PCM UserInit: Enter the 6 character PCM UserInit, and then enter the PCM password when the prompt appears.
4.3.2 User Type: Select PCM user type from drop-down list.
4.4 Webstaff Security Level: For access to WebStaff, select from the drop-down.
5. Click [Add] to save the password and then add another new user or click [Exit] to close the screen.
1. Prime Clinical Systems recommends that user logins are NOT deleted from Intellect. Expiring the user's login:
1.1 Maintains a record of user name linked to an operator number.
1.2. Prevents operator numbers and passwords from being re-used for new users.
1.3 Disables access to Intellect for the password linked to the operator number.
NOTE: Operator numbers appear in the patient's appointment history and billing activity on the ledger.
2. Select Utility --► Set Up --► Security --► Login Users --► Modify.
3. The Modify SECURITY screen displays.
4. User Number: Enter the user's operator number or search for the user.
4.1 Press [F2] twice to open the Searching SECURITY window and display all User Numbers/Operator Names.
4.2. Highlight and select the user number using either of the following:
4.2.1 Double-click on a user with the mouse.
- OR -
4.2.2 Use the down arrow key to highlight the user and press [Enter].
4.3 When the cursor focus returns to the <User Number> field, press [Enter].
5. Operator Expire Date: Enter the date when access to Intellect is no longer allowed for this user.
6. Click [Modify] to save the changes.
For detailed instructions, please see the online documentation through the Help --►Online Documentation menu or go to www.primeclinical.com click [Client Login] then OnSTAFF/Intellect Info > Documentation > OnSTAFF Intellect > Online Documentation.