
![]()
OnSTAFF Intellect
IMPORTANT PROGRAM MODIFICATIONS
This update list includes the features and modifications made in the current update. Please review the entire document and pay close attention to the any items which have ATTENTION before the description of the feature as these will IMMEDIATELY affect Billing:
Effective version 9.04.02
Registration
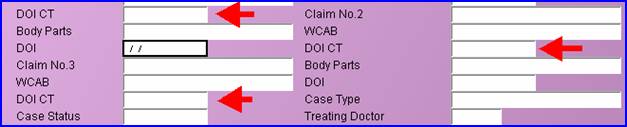
Registration --► Worker --►Worker Insurance --►Insur Add
PCS added 3 instances of optional new fields to the database which may be used for Workers Registration Insurance when treating Continuous Trauma cases. The fields will NOT automatically be added to the screen. If you wish to have these fields added to your screen see the On-line document on adding/removing fields Utility --► Set Up --►Screen Fields or call support for assistance.
![]()
Registration --► Regular or Worker --►Patient or Worker
New functionality for an optional field
For MIRCal OSHPD to satisfy the new language reporting requirements the optional field <Language > should be added to the Patient Registration screen
MIRCal filers should then complete this field for all patients seen after January 1, 2009.
The field may be added as a drop down or a text entry; contact PCS support for help.
The following list contains the code options:
ENG English LAO Laotian
ARA Arabic HMN Miao, Hmong
ARM Armenian KHM Mon-Khmer, Cambodian
CHI Chinese NAV Navajo
FRE French PER Persian
CPF French Creole POL Polish
GER German POR Portuguese
GRE Greek RUS Russian
GUJ Gujarathi SCR Serbo-Croatian
HEB Hebrew SPA Spanish
HIN Hindi TGL Tagalog
HUN Hungarian THA Thai
ITA Italian URD Urdu
JPN Japanese VIE Vietnamese
KOR Korean YID Yiddish
999 Unknown
Registration --► Regular--►Patient--►Modify <Patient Stmt Override>:
Prior to this update, the <Patient Stmt Override> field was not accepting option N when in the Modify screen. This has been corrected in the update.
Registration --►Worker--►Worker--►Add:
When adding a new worker’s compensation patient, the program was not saving the Referral or PCP information. This has been corrected in the update. This problem happened only when in Worker --►Add; it was not a problem in Worker --►Modify.
Charges
Charges --►Charge
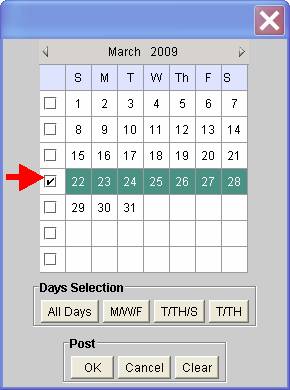
When Utility--►Procedure--►Procedure <Calendar Y/N> = “Y”, the Charges --►Charge Calendar pop up now has Check Boxes which allow the poster to select a week at a time
Charges --►Modify
Previously under certain circumstances the <POS> column field (Place of Service) or <Days/Units> (in the Payment History display) could be modified and left blank. This has been corrected and these fields will no longer accept blank values.

Charges --►Modify
A new option is now available. In Charges --►Modify when “N” is typed in the Command Column with a procedure highlighted, the <Apply To All> check box is now available. If selected, any changes made to the charge record fields displayed with an * (asterisk) will be applied to all the charges currently displayed in the entire Charge/Modify session. You still must press [Enter] at the Approved Amount field for the changes to be saved. This option applies only to these fields: <Pay Plan>, <Insurance>, <Sec. Insurance>, <Category Code>, <Billing Date>, and <Sec Bill Date>.

Payment Menu
Payment --► Open Item
When posting payments for a Company Account, the <Name> field value will change to display the patient name of the highlighted record. Company accounts previously displayed the Company Name throughout the posting session.

Payment --►Open Item
The <Message> field will now accept a blank (null) as a value. Prior to this update, to remove an existing code you needed to replace it with a new code. Now you may leave the field blank. Changing the Message code still requires a transaction posted to the record (a payment, an adjustment, or a comment entered) and committed.

Billing
NDC: billing on paper and electronically for procedures requiring NDC information:
Effective April 1, 2009, Medicaid and other insurance carriers will be requiring NDC information for both paper and electronic billing. NDC information may be billed for both Professional and Institutional billing.
The Deficit Reduction Act (DRA) of 2005 required State Medicaid agencies to provide for the collection of NDCs on all claims for certain physician-administered drugs for the purpose of billing manufacturers for Medicaid drug rebates.
Follow this simple three screen process to set up your system for appropriate physician-administered drugs for paper and electronic claims submission.
1. Utility --►Procedure --►Procedure
This may be a single procedure panel or part of an exploding panel containing multiple procedures. Complete the screen as normal with the following fields included:
Status ![]()
Set this field to “N”. It is used to include the necessary NDC information when billing.
QTY (Y/N/X) ![]()
This field determines whether the cursor will stop at the QTY field when posting charges.
Set to “Y” if you will need to adjust quantities during charge posting without affecting the charged amount.
Set to “X’ if you will need to adjust the quantity during charge posting and multiply the charged amount.
This field works in conjunction with Utility/Procedure <Global Y/N>. Refer to the OnLine documentation for Utility/Procedure before making any changes.
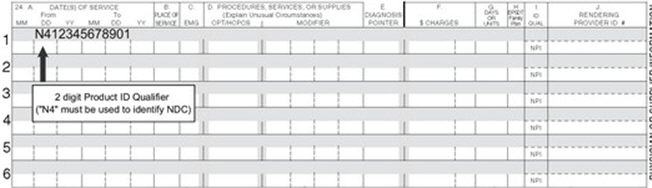
NDC Number ![]()
Enter the 11 digit NDC code, do NOT enter hyphens or the NDC Qualifier. The National Drug Code number and Qualifier are submitted in the electronic claim Loop 2410, Segment LIN, or will print on paper billing as shown in our example below.
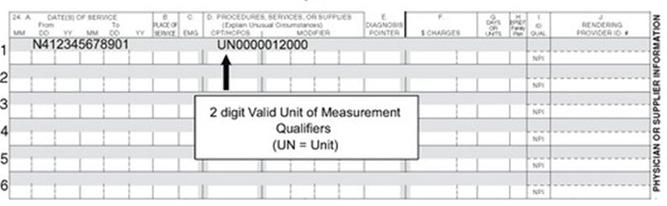
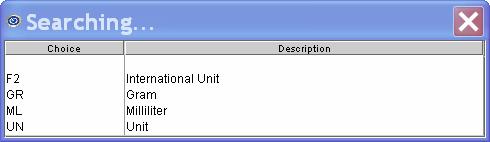
Unit of Measure ![]()
The Unit of Measure is required when an NDC Code is present. Select the Composite Unit of Measure Qualifier that applies. The Unit of Measure is submitted in the electronic claim Loop 2410, Segment CTP05, or will print on paper billing as shown in our example below.
F2 = International Unit
GR = Gram
ML = Milliliter
UN = Unit
NDC Unit Value ![]()
To calculate the NDC Unit Value divide the volume of medication as packaged (ie: per vial) by the volume per billable unit. For example:
HCPC code is per 10mg per unit billed
The product comes as a dry powder injection of 500mg
500mg per vial divided by 10mg per unit = 50 NDC Unit Value.
Complete the NDC Unit Value field with the total number of units administered per vial = 50. The NDC number is submitted in the electronic Loop 2410, Segment CTP04.
2. Charges --► Encounter
Create a record on the appropriate encounter screen dependent upon the type of billing when required by your practice. Complete the <Rx Number >
![]()
Use the unique identification number assigned by the pharmacy or supplier for the prescription. The Rx Number is submitted in the electronic Loop 2410, Segment REF02 with Qualifier XZ automatically added by Intellect.
3. Charges --► Charge
Post charges as usual. Be sure to complete the <EN#> field with the encounter number containing the RX number for this patient.
![]()
Modify the amount in the <QTY> field if necessary.
![]()
Paper Claims
Professional Billing CMS 15000 (HCFA)
Box 24A (in the gray shaded area) prints the NDC number proceeded by the "N4" qualifier.
Box 24D (in the gray shaded area) prints the quantity proceeded by the Unit of Measure qualifier.
Institutional Billing UB04
Box 43, the Description field, will print the N4 Qualifier, NDC number, Unit of Measure and the Quantity.

Internal Control Number and Frequency Code on paper claim:
You may now include the Internal Control Number and the Frequency Code on your paper claim if completed on Charges--► Encounter <Claim Frequency Code> & <Internal Control Number> fields. Prior to this update these claims were used only for electronic billing.
The Claim Frequency Code is used to advise the payor that the claim is either:
1 Original Submission (default used for electronic claims)
6 Corrected Claim
7 Replacement Claim
8 Void
The Internal Control Number is assigned by the payor and is usually found on the Explanation of Benefits.
NOTE: If you wish to utilize this feature, call PCS Support to have these fields added to your paper claim forms.
Billing --► Insurance MediCal Institutional Billing – limit of 15 lines per claim:
This update was added in order to accommodate Medi-Cal billing restrictions for Dialysis claims on UB-04, which limit charge lines to 15 instead of the usual 22. When printing the UB04 form, select Form Type “A”. The Utility--► Insurance screen does not require any change.
![]()
Management Menu
Management --►Analysis
There are some reports which print only one page (for example, Analysis Report EE, FF, GG, and HH). These did not have a report Total when printing (there would only be a total per page). This has been corrected and the report Total has been added.
Utility Menu
ATTENTION:
New Fields:
We’ve added several new fields to the Utility Procedure screen for NDC billing. Please read the section on NDC billing in this document for complete information.
Utility --►Procedure – new field: ![]()
A new field has been added to the Utility --►Procedure screen called <NDC Unit Value >.
ATTENTION: New Field:
Utility --►Procedure – new field: ![]()
A new field has been added to the Utility --►Procedure screen called <Unit of Measure>. The options for this field are:
Utility --►Procedure
A new functionality has been added to the Utility --►Procedure screen field <Cost>.
The <Cost> is used when an NDC Code is present. A procedure must be created with Utility --►Procedure <Status> = “N”. Please read the section on NDC billing in this document for complete information.
Utility --►Procedure
When Utility--►Procedure <Calendar Y/N> = “Y”, the Charge --►Charge Calendar pop up now has Check Boxes which allow the poster to select a week at a time.

Utility --►Tools --►Configuration
Three new fields have been added to be used when the client's database server and the task server are different. The fields are: Onstaff Server Address, Report Port, and Task Manager Port.
These are the Values:
Onstaff Server Address localhost
Report Port 6234
Task Manager Port 6233
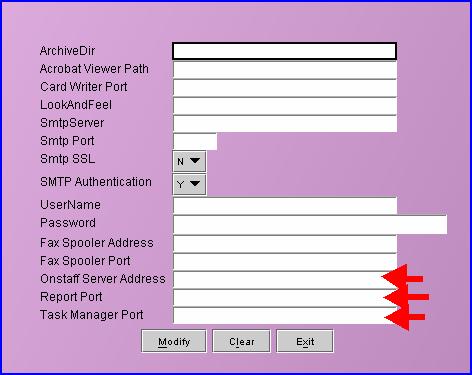
These fields should be modified ONLY if the Database Server and Intellect Server are separate. Most systems are set up with the Database and Intellect Tasks running on the same server, and should be left with the default settings. Do not change them unless instructed to do so by Prime Clinical Systems.
Utility --►Set Up --►Clinic – new field: ![]()
For use with the Credit Card Authorization, this new field was added for the credit card authorization company’s URL address. Because the vendor may have a different URL when submitting test records versus production records, we made the URL link accessible. This field must be completed before you can utilize the Credit Card Authorization feature.
Utility --►Set Up --►User Interface – new field: Font Size: ![]()
Intellect now has the ability to increase the Font Size. The change was not in the first edition of the Release Notes and was added 4/6/2009.
The setting is on the Utility --►Set Up --►User Interface. Font Size 12 is the default for Intellect screens. Selecting a larger number will increase the Font Size. Selecting a smaller number will decrease the Font Size.
NOTE: If you increase the font size too large for your screen size - you may need to scroll left & right, and/or up & down.
Schedule
Schedule --►Appointment --►Full Day
Intellect has two new label formats which may be printed for a patient with a scheduled appointment. When the user right clicks on a scheduled appointment and selects Print--►Label the Page Set Up dialog box is displayed.
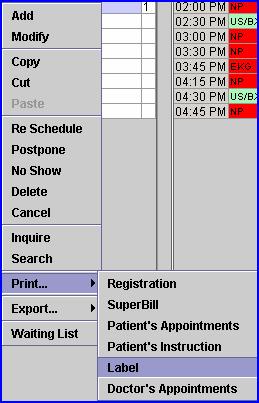
Select “Dymo” (if available) from the Printer option.
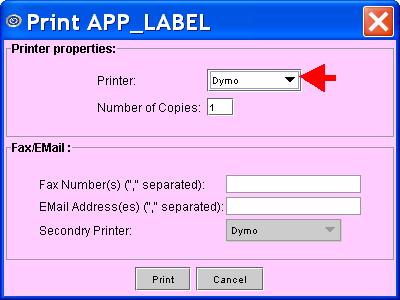
This feature may be used with only the Dymo Label printer; it will not work with a dot matrix or laser printer.
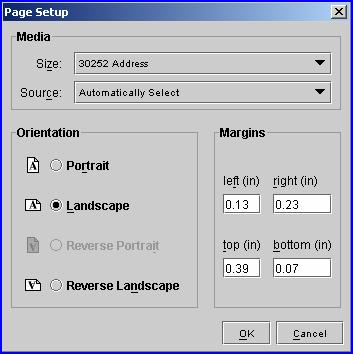
Complete the Page Setup information as shown in the example above.
NOTE: Every time a label is printed, it is required to select the margin settings (Landscape may be saved, but the Margin settings need to be selected each time).
The label will print up to 25 characters of the Patient Name, up to 25 characters of the Patient’s Street Address, up to 12 characters of the City and 5 characters of the Zip Code.
Schedule --►Appointment --►Full Day
Prior to this update, if you log out of one clinic and directly into another without closing the Full Day Schedule then when you log into the new clinic, Intellect was not clearing the schedule and the previous clinic schedule would display. This has been corrected in the update.
Schedule --►Appointment --►Print – Status = All
Prior to this update when printing an appointment and selecting <Status> = All, the program would print only appointments with status = Added and Modify. This has been corrected in the update. The report will now print all the status types: Added, Modify, Resched, Postpn, Delete, Cancel and NoShow.
NOTE: If you would like to have the Status added to your appointment list, call our support department.