Intellect™
IMPORTANT PROGRAM MODIFICATIONS
Complete Release Notes
These Release Notes include the features and modifications made since January 2009.
Print, sign, and return the Update Authorization form to PCS prior to your update. ALWAYS complete the Authorization form and return it to PCS so we can update your Client Record with the version number to which you are updating. Knowing your version number is necessary if we find a critical error in the program and need to update clients with specific versions.
If your version is less than 9.12.01, click here.
If your version is 9.12.01 or greater, click here.
If you are updating your server yourself, refer to the instructions for updating your server, restarting Services, and updating workstations.
If your version is less than 9.12.01, click here.
If your version is 9.12.01 or greater, click here.
The update may include items labeled: ATTENTION. These will IMMEDIATELY affect Billing and other daily tasks. Please be sure to notify all departments which will be affected.
This update may include new features labeled: BETA TEST. These are new features which require additional testing in a real, live environment. If you are interested in being a Beta Test site, please contact Prime Clinical System for additional information and set up.
PCS suggests you provide each department a copy of the Release Notes so they are aware of the changes which may affect their department.
In order to be aware of ALL changes in the software, please read all release notes from the version you are currently on through to the version to which you are updating.
Version 9.12.13
Known Issues for Version 9.12.13
1. NEW FIELDS Charges--►Encounter--►Ambulance
Sometimes it is not possible to enter the insurance end date in the patient demographic screen. If you experience this issue, please call for support assistance as we may be able to resolve the problem without an update.
2. Charges--► Charge Receipt
This option did not run because the <Category> field was missing from the screen. This problem can be fixed with an SQL; you do not need an update. Please call PCS Support for more information.
Version 9.12.12
Known Issues for version 9.12.12
1. When posting payments and check Print Bill: the Printer Dialog box pops up but nothing will print. This has been fixed in the patch, and the version remains 9.12.12.
2. Under specific circumstances charges imported from PCM would fail due to the operator password. This has been fixed in the patch, and the version remains 9.12.12.
3. Billing--►Statement--►Batch or Group of Patients
When statements are created, both paper and XML, the Amount entered in the second screen of the ledger may be incorrect or left blank. The statements are correct; the error only affects the Ledger.
4. Billing--►Follow Up--►Batch or Group of Patients
At the <Insurance Type> field when the All Insurances is selected, the job fails. The error will not affect printing for a specific group of claims; i.e., P1 insurances, or S1 insurances.
Version 9.12.11
Known Issues in Version 9.12.11:
1. The update process on Linux servers may cause a problem with the ability to print from Intellect due to changes in the Utility--►Set Up--►Printer--►Report table. Clients with a Linux server should NOT update their own system without advising Prime Clinical beforehand so this problem can be avoided. There is no fix required for this issue. If you have a Linux server be sure to have a current, verified Back Up prior to update so if the Printer Report table is over written PCS can restore the file from the Back Up.
2. A few clients updated to the 9.12.10 version had issues with XML Statements or Electronic Data Interchange tasks due to a change in the ftp.info file. If you are updating your system yourself – PCS recommends you contact us first so we may copy the ftp.info file before you update. If a change occurs in your ftp file we can recover from the copied file.
3. Appointment--►Appointment History
The 'Time' column in the patient appointment history incorrectly displayed the appointment time for afternoon appointments. For example, an appointment at 12:15 in the afternoon should display as shown below: 12:15PM. In the 9.12.11 version it displayed as: 00:15PM. This has been corrected in the 9.12.12 version.

Version 9.12.10
Known Issues in this Version:
1. The update process on Linux servers may cause a problem with the ability to print from Intellect due to changes in the Utility--►Set Up--►Printer--►Report table. Clients with a Linux server should NOT update their own system without advising Prime Clinical beforehand so this problem can be avoided. There is no fix required for this issue. If you have a Linux server be sure to have a current, verified Back Up prior to update so if the Printer Report table is over written PCS can restore the file from the Back Up.
2. PCS suggests that if your office uses the XML feature to wait until a patch is available before updating your system. This issue was resolved in a patch, and the version remains 9.12.10. To prevent possible problems we suggest that PCS make a copy of the ftp.info file prior to your update, so if needed we can recover using the copied file.
ATTENTION New Selection Options for Drop-Down Lists
On the Registration, Billing, Management, and Schedule Reports screens, the one- and two-character code choices on the drop down lists have been replaced with descriptive word choices, making the code selection more intuitive and user-friendly. The drop down list descriptions for the code choices have remained the same, allowing correlation between the old and new code choices. And, in most cases, the new code begins with the old code so selecting an option using keystrokes should work the same.
Although PCS has done extensive testing for automated tasks, we ask that you pay particularly close attention to your automation until you are certain all automated tasks are running properly. If you feel there may be a problem with your automated tasks, please call PCS support and open a new reference.
If your office had any drop down selections customized, the update will overwrite the custom changes. PCS requests you take screen shots of any field with drop down selections which you have asked to have modified. The following two fields are the most commonly customized fields along with a screen shot of the selections which are standard in Intellect. If your list does not match the following, take a screen shot of your screen prior to the update.
Registration --►Regular --►Patient Insurance screen <Primary/Secondary> field:
Billing --►Insurance <Primary/Sec/All> or Billing --►TeleCom --►Submit Claims <Primary/Sec/All> field:
Version 9.12.10
BETA NEW FEATURE WebStaff
WebStaff provides remote access to your appointment schedule via the internet. From anywhere, at anytime you may open a web browser, enter the WebStaff address, complete your Login and Password, and you’re connected.
In addition to reviewing your schedule, you can also add, modify or delete an appointment, and enter charges to import into Intellect. To utilize this feature you must have a port opened in the Firewall and forward it to the Intellect server.
There are no additional set up or support fees required, though training time is billable. If you are interested, please contact PCS Training Department to receive a quote. Documentation is available for your review in the Intellect Online Documentation.
Version 9.12.13
FIX Registration --►Regular – Patient Insurance Screen Warning
When modifying a patient insurance record, the following message would pop up even when not applicable:
This has been corrected in the current version.
NEW FIELDS Registration --►Patient --►Regular --►Modify Insurance, and Worker--►Modify Insurance
We added two fields to the insur_info table: ins_who_modified and ins_date_modified to track the most recent change. The new fields will keep track of the last person to make a change and last date of a patient insurance record modification.
The program will compare the fields in insur_info and in_care_of and then only if information has been changed will the program update the two new fields. If there is no change, the new fields will not be updated.
Addendum – This addition was in the 9.12.12 release on 11/24/2010 but had not been implemented at that time.
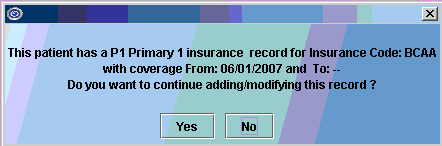
FIX Registration --►Regular --►Patient Insurance
In prior versions when searching for ‘P1 Primary 1’, the message RECORD NOT FOUND was displayed. This has been corrected.
Addendum – This correction was added to the 9.12.13 release on 01/05/2011.
Version 9.12.11
NEW FIELDS Registration --►Patient --►Regular --►Modify Insurance, and Worker--►Modify Insurance
Two fields were added to the insur_info table: ins_who_modified and ins_date_modified to track the most recent change. The new fields will keep track of the last person and last date of a patient insurance record modification.
The program will compare the fields in insur_info and in_care_of and then only if information has been changed will the program update the two new fields. If there is no change, the new fields will not be updated.
Addendum:
The fields have been added to the database but the programming has not yet been completed. It is expected to be available in the 9.12.13 version.
Version 9.12.10
NEW Registration--► Worker
Previously, the <Hospital> field was not available on the Worker Compensation patient registration screen; it was only available when registering regular, non-worker comp patients. Effective this update, the field is now available. It will NOT be inserted into the WC Registration screen. If you would like it added, please call PCS support or training for assistance.
FIX Registration--►Worker
In the previous version, the STP doctor name was displaying the name of the provider entered in PCP field. This has been corrected in this update. The error did NOT affect anything other than the display in the Worker Compensation registration screen.
NEW OPTIONAL FIELD Registration--►Worker --►Worker
An optional <First Exam> field has been added to the Worker Compensation patient demographic table. The update will NOT automatically insert this field into your screen. The data entered into the new field will NOT automatically print on your Worker Compensation forms. If you would like this field added to the screen for your practice, please contact Prime Clinical support for a quote.
FIX Registration--► Worker --►PR2 Form, PR3 Form, PR4 Form and STPR
Previously these forms printed for expired insurances. As of this update, the ‘Search’ option will now only print the current insurance and not the expired insurances.
Version 9.12.09
NEW OPTION Registration--►Worker --►Worker – Tracer HCFA
In the past, it was not possible to produce Tracer HCFA forms for worker’s comp patients. As of this version, this option has now been added. To print a Tracer HCFA form when completing the Billing/Insurance/Batch of Patients or Group of Patients screen, select form type 1 (for Red and White HCFA form) or 2 (for Black and White generated form).
ATTENTION NEW OPTION Registration--►Regular --►Patient – <Ethnicity> field
The length of the Ethnicity field has been increased to 6 characters to support the full Ethnicity Codes list. Your current Ethnicity codes will not be replaced with the new list in the Intellect update. If your office would like the complete list call our support department for assistance. If your office uses Patient Chart Manager: updating to version 5.5.507 (this version will be available in August 2010) or greater will replace your existing codes with the new list.
![]()
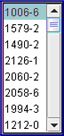
Clicking directly on the field or pressing [F2] with the pointer on the <Ethnicity> field will display a complete list of choices and their descriptions. A partial list is displayed below:
Version 9.12.01
FIX Registration--►Worker
In the past, when trying to modify the Worker’s Insurance on Windows 2008 servers, there would be ambiguity errors. This has now been corrected.
FIX Registration--►Worker--►Insurance
In the past when insurance was modified, the [NEXT] button wouldn’t take you to the next insurance screen; it would only display the P1 insurance. This has now been corrected.
FIX Registration-►Registration-►Print
In a previous update an error occurred when searching for a patient the Printer Dialog box would not pop up, and you were not able to print a Registration form. This has been fixed with the update.
NEW OPTION Registration--►Regular--►Patient - <Hispanic> field
The <Hispanic> field is now available as an optional field on the Regular Patient registration screen. The <Hispanic> field accommodates the UDS report question of, “Do you consider yourself to be Hispanic?”.
![]()
![]()
Select [Yes] if the patient considers himself/herself to be Hispanic
Select [No] if the patient does not consider himself/herself to be Hispanic
NOTE: This field is optional and therefore will not automatically be inserted on your patient screen. If you are interested in having the Hispanic field added please contact Prime Clinical Systems.
Version 9.10.21
Registration--►Authorization:
There was a problem with the form which was corrected in the update.
Registration--►Worker--►Worker Insurance--►Insur Add
PCS added three optional new fields to the database which may be used for Workers Registration Insurance when treating Continuous Trauma cases. The fields will NOT automatically be added to the screen. For more information, or if you wish to have these fields added to your screen, call support or see the On-line documentation on adding/removing fields at Utility--►Set Up--►Screen Fields.
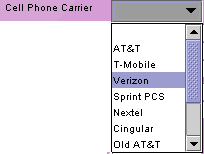
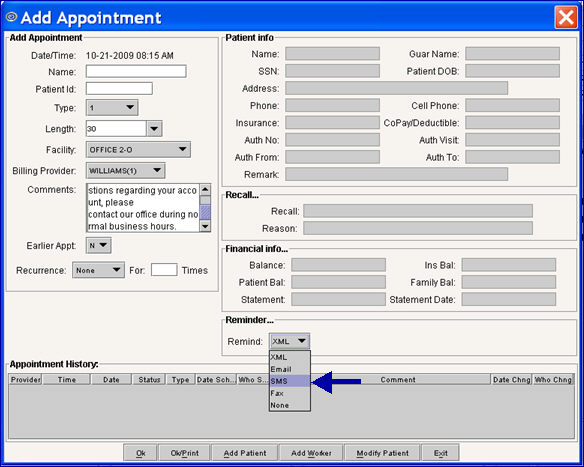
Registration--►Regular--►Patient--►Add
The <Cell Phone Carrier> field has been added to the Add Patient screen, as shown below.
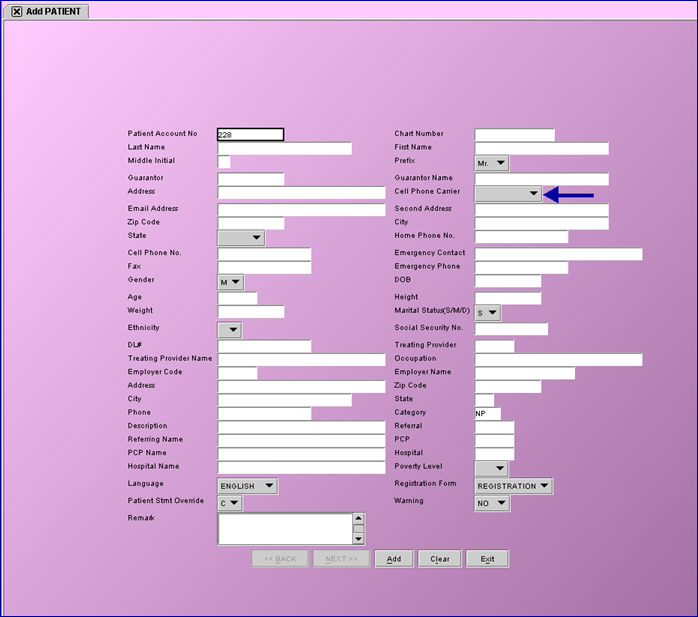
The <Cell Phone Carrier> field makes it possible to send text message appointment reminders to patients’ cell phones. To send text messages:
1. At the <Cell Phone Carrier> field, click on the arrow for a drop-down list of cell phone carriers and then select the appropriate carrier.
2. Set up the reminder method. This is done by accessing Schedule --►Appointment --►Full Day --►Add Appointment and then selecting the new option of SMS from the <Remind> field pull-down list, as shown below.
Version 9.09.23
Registration --►Worker--►PR4 Form
In the past there was a column ambiguity error for Windows 2008 servers if the PR4 task was set to run on the server or when logged on to the server. This has now been fixed.
Registration --►Regular--►Patient
The Ethnicity field has now been expanded to two characters to accommodate a longer list of ethnicity options. The following options have been added and/or changed for the Ethnicity field:
1 American Indian/Alaskan Native
9 Native Hawaiian
10 More than one
11 Unreported/Refused to report
Registration --►Regular--►Patient
A <Residing At> field has been added to the database for the Patient screen. This is an optional field available by request only. Pressing F2 in this field displays the following list:
Not applicable – leave blank
1 House/Apartment
2 Homeless Shelter
3 Doubling Up
4 Street
5 Substance Abuse Program
6 Transitional Housing Program
7 Other
Version 9.03.25
Registration --► Regular --►Worker Insurance --►Insur Add
PCS added 3 instances of an optional new field to the database which may be used for Workers Registration Insurance when the client treats Continuous Trauma cases. The fields will NOT automatically be added to the screen as many Worker Compensation clients will not need them. If you wish to add the fields to the screen see the On-line document on adding/removing fields Utility --► Set Up --►Screen Fields
![]()
Registration --► Regular --►Patient or Worker
New functionality for an optional field
For MIRCal OSHPD to satisfy the new language reporting requirements the optional field <Language > should be added to the Patient Registration screen
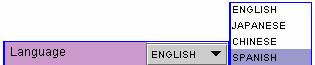
MIRCal filers should then complete this field for all patient’s seen after January 1, 2009.
The field may be added as a drop down or a text entry; contact PCS support for help.
The following list contains the codes:
ENG English LAO Laotian
ARA Arabic HMN Miao, Hmong
ARM Armenian KHM Mon-Khmer, Cambodian
CHI Chinese NAV Navajo
FRE French PER Persian
CPF French Creole POL Polish
GER German POR Portuguese
GRE Greek RUS Russian
GUJ Gujarathi SCR Serbo-Croatian
HEB Hebrew SPA Spanish
HIN Hindi TGL Tagalog
HUN Hungarian THA Thai
ITA Italian URD Urdu
JPN Japanese VIE Vietnamese
KOR Korean YID Yiddish
999 Unknown
Version 9.02.10
Find Duplicate Patient
The Possible Duplicate Patient(s) selection window, which is displayed in Registration --► Patient Add --►Find Possible Duplicate Patient(s) after selecting the [Search] button,has two new columns to help you properly identify the patient: <DOB> and <Home Phone>.
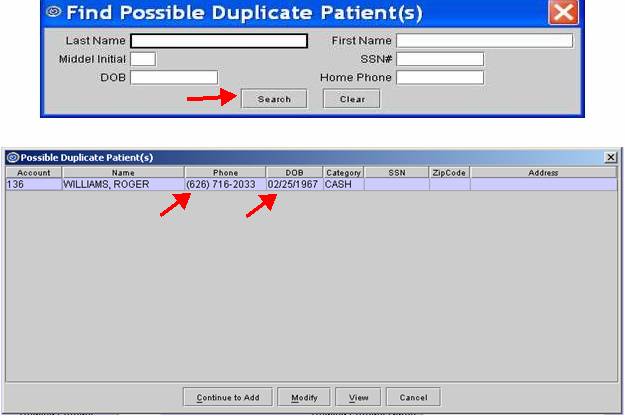
NOTE: The option to enable the "Find Possible Duplicate Patient(s)" feature is located in Utility --►Set Up --►Parameter --►Modify <Check Pt Duplicate>.
Version 9.12.13
NEW FIELDS Charges--►Encounter--►Ambulance
Three new fields were added to the Add Ambulance screen, as shown below. They are not used at this time, and are not required in the ANSI 4010, but were added to the screen in Version 9.12.13 in preparation for the ANSI 5010 837 electronic claims submission file. If these fields are completed, they will be informational only until the 5010 release in 2011.
Origin Zip ![]()
City ![]()
State ![]()
FIX Charges
Under specific circumstances charges imported from PCM would fail due to the operator password. This has been fixed in the patch, and the version remains 9.12.12.
Version 9.12.12
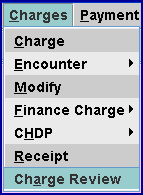
NEW OPTION Charges --►Charge Review
NOTE: Although the menu option was available in version 9.12.11, programming was not completed until version 9.12.12.
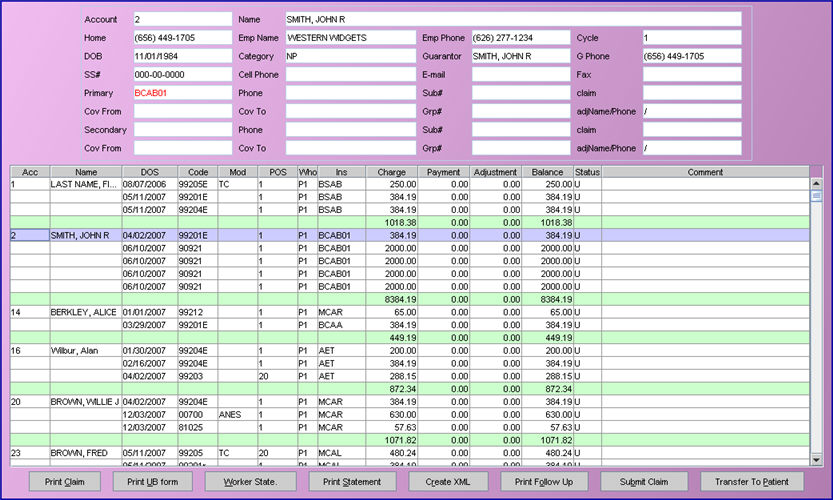
Charge Review is a new feature designed for clients who post charge data in Patient Chart Manager or WebSTAFF and import them into Intellect. This option allows clients to review the claims on screen and then change the responsibility to either put the claims on hold or release them for billing. Most clients who import charges have the Who column (responsibility) set to Y when imported so they may review the claims before billing. The Charge Review feature will let you easily ‘Tag’ charges to set the Who to P1, P2, P3, etc, or G. If your office imports charges with the Who column set to P1, you can ‘Tag’ charges on which you wish to Hold billing by using Charge Review.
When charges are imported to Intellect, the primary and secondary insurance in the charge record is set to the P1 and S1 insurances. When using the Charge Review feature to change the responsibility to P2, the primary and secondary insurance in the charge record will be automatically changed to the P2 and S2 insurances.
The Charge Review feature is located on the Charges menu:
After selecting the menu option, the following screen will be displayed:
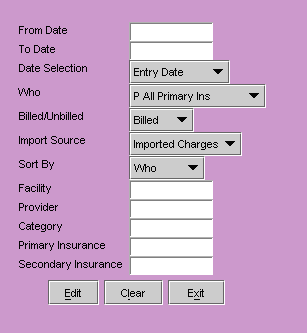
Complete the screen as needed to select the charges you wish to review.
<From Date> Enter the beginning date for the range of charges you wish to review.
<To Date> Enter the ending date for the range of charges you wish to review.
<Date Selection> The field will default to the Entry Date. Accept the default or use the drop down list to make an alternate selection.
<Who> Select which Who values to review. Accept the default P All Primary Ins or use the drop down list to make an alternate selection.
<Billed/Unbilled> Select which type of charges to review. Accept the default Billed or use the drop down list to make an alternate selection.
<Import Source> Select which type of charges to review. Accept the default Imported Charges or use the drop down list to make an alternate selection.
<Sort By> The field will default to the Who. Accept the default or use the drop down list to make an alternate selection.
<Facility> Limits the results by specific charge facility.
<Provider> Limits the results by specific charge provider.
<Category> Limits the results by specific patient category.
<Primary Insurance> Limits the results by specific primary insurance.
<Secondary Insurance> Limits the results by specific secondary insurance.
After completing the above fields the system will search for results, displaying the following:
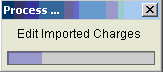
When the task is completed the following screen will display:
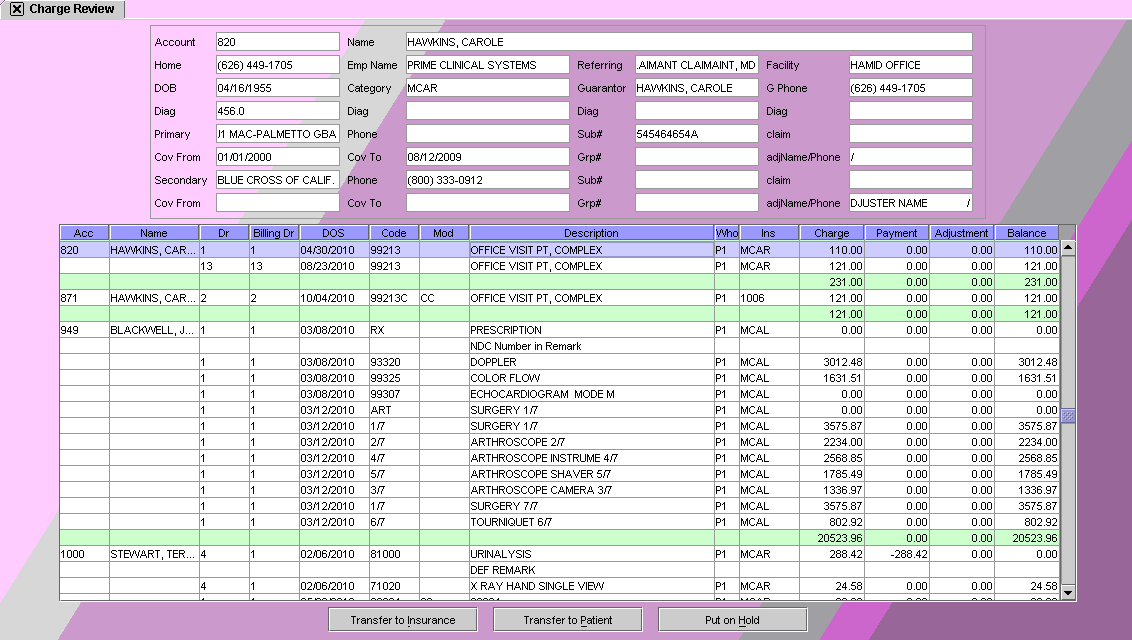
Charges on this screen may be modified. For example, many clients who enter charge data in PCM and import the data to Intellect choose to have the Who set to Y to hold the billing until they are able to review the charges and release them to bill. The information in the fields at the top of the screen will change based on the patient record highlighted.
To select charges for modification, tag multiple line items and/or multiple patients by highlighting the record and pressing the letter T.
The three buttons at the bottom of the Charge Review screen perform as follows:
[Transfer to Insurance] will default to P1 Primary 1. Selecting one of the options from the drop down will change the Who value and shift the responsibility to the patient’s insurance:
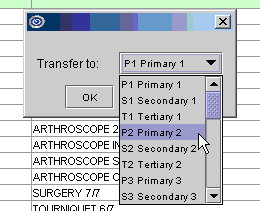
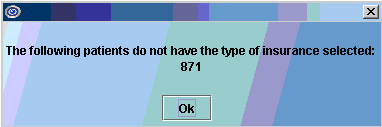
You must select a valid option for the highlighted records. If a valid option is not selected, the following message will display:
[Transfer to Patient] will change the Who value to G and shift the responsibility to the patient.
[Put on Hold] will change the Who value to Y meaning the charges will be on hold. No billing or statements will be generated for the charges until the Who column is changed to either an insurance responsibility or patient responsibility.
MODIFICATION Charges --►Modify --►N (Information)- Panel Code
When posting charges the procedure code is used to determine many aspects of the claim. PCS has recommended clients do NOT modify the Panel (Procedure Code) through the ‘Information’ option.
Due to issues related to the Panel (Procedure Code) being modified we have suppressed the option. Effective this update, you will no longer be able to modify the Panel code, but will need to delete the existing record and post the correct code.
Charges --►Modify --►N - Information

Version 9.12.11
NEW FEATURE Charges --►Charge Review
Charge Review is a new feature designed to allow clients who post charge data in Patient Chart Manager or Web Staff, and import them into Intellect, to review the claims on screen and, when needed, change the responsible party before the claims are billed.
MODIFICATION Charges --►Charge --►N (Information) and Charges --►Modify --►N (Information)- <Panel Code>:
When posting charges, the procedure code is used to determine many aspects of the claim. PCS has recommended clients do NOT modify the Panel (Procedure Code) through the ‘Information’ option.
Due to issues related to the Panel (Procedure Code) being modified, we have suppressed the option. Effective this update, you will no longer be able to modify the Panel Code, but will need to delete the existing record and post the correct code.
Charges --►Charge --►N - Information

Charges --►Modify --►N - Information

Addendum:
This change was applied only to Charges--►Charge--►N in version 9.12.11. Changes to Charges--►Modify--►N was not completed until version 9.12.12.
Version 9.12.10
FIX Charges --►Charge - <Provider>
In a recent update, when posting charges and there was nothing defaulted in the <Provider> field, the program popped up the message “Please Complete the Field” before getting to the field. This has now been corrected so that the message does not pop up until pressing [Enter] at the <Provider> field when it is blank.
MODIFICATION Charges --►Charge – Posting Medications
Previously before posting a Medication, a diagnosis or charge had to be posted first. With this update, you can now post a Medication without entering a diagnosis or charge first.
MODIFICATION Charges --►Finance--► Insurance and Patient
Previously, charges with a debit balance were not taken into consideration when calculating either Insurance or Patient Finance Charges. Effective with this update, two changes have been made to the program when there is a credit balance:
1 - If a charge has both a credit and debit payment posted, both will be considered when calculating the Finance Charge. For example, a charge for $125.00 is posted to a patient account and a payment of $50.00 is posted leaving a balance of $75.00. The check is returned for insufficient funds so the payment is backed out and the account again has a balance of $125.00. The Finance charge will be applied to the $125.00 balance.
2 - The patient’s overall balance will be used to calculate the Finance charge. For example, a patient has two charges: one has a debit balance of $100.00 and the second has a credit balance of $20.00. Regardless if the two charges have the same or different dates of service, the overall balance of $80.00 will be used to calculate the Finance charge.
Version 9.12.09
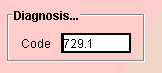
FIX Charges --►Charge Modify- Diagnosis code
The previous update would not allow more than 3 digits to be entered for a Diagnosis while in the Charge Modify screen. This problem has been corrected.
FIX Charges --►Charge – Super Bill numbers
The previous update would not allow charges to be committed when using Super Bill numbers. When attempting to commit a charge the error message “POST CHARGE TRANSACTION WAS NOT COMMITTED” would display. When Super Bill numbers were not used, charges committed correctly. This problem has now been corrected.
FIX Charges --►Encounter --►Generic - <Authorized Visits Left>
In prior versions, the<Authorized Visits Left> was only reduced by 1, regardless of the method used to post charges in one entry session with multiple dates of service. This was problematic for clients who have authorizations for hospital stays with a limited number of approved dates in the hospital (for example, 5 dates of service were posted in one single entry session). Clients would add the encounter and complete the <Authorized Visits Left> and <Total Authorized Visits> with the authorized number of days BUT the <Authorized Visits Left> would only be reduced by 1 even though, according to our example above, it should be reduced by 5 since there were 5 dates of service posted.
This problem has now been corrected and will reduce the <Authorized Visits Left> by the number of unique ‘From Dates’.
NOTE: If posting a single line item with multiple dates of service using <From Date> and <To Date>, the program can only reduce the <Authorized Visits Left> by one visit.
NOTE: If posting for the same date of service during a different entry session, the program will reduce the <Authorized Visits Left>. The program is not able to review all charges previously posted and committed.
Version 9.12.08
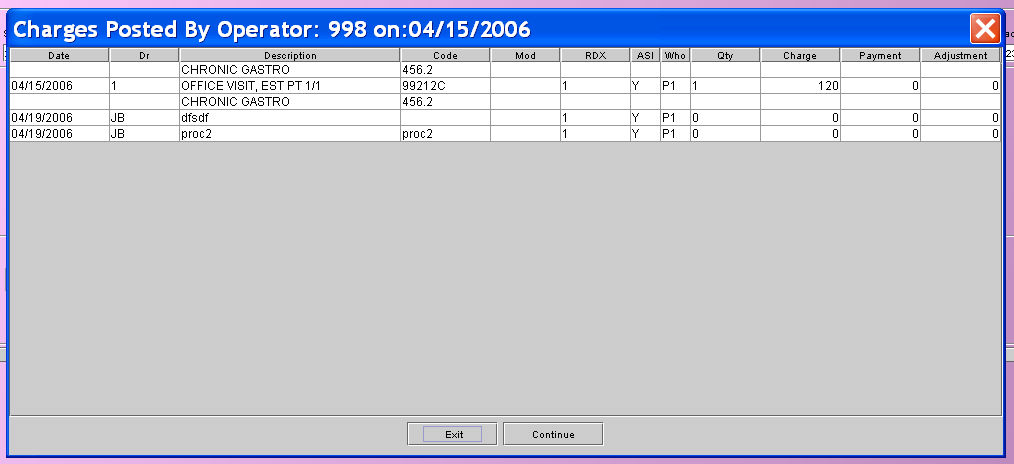
NEW FEATURE Charges --►Charge – duplicate posting
In this version, when posting charges in Charges--►Charge, a pop-up will display when posting a duplicate charge. This feature works similar to the Duplicate pop up at the SB field.
After filling the <Panel> and <From Date/To Date> fields, the system will display the following pop-up message if a charge for the same Panel, DOS and Provider were previously posted.
Selecting [Yes] will allow the operator to continue posting the service.
Selecting [No] will return the focus to the <Panel> field.
Selecting [View Charges] will display the following screen:

Selecting [Exit] will return the focus to the <Panel> field.
Selecting [Continue] will allow the operator to continue posting the service.
NEW FEATURE Charges --►Charge and Charges --►Modify – diagnosis code
In Charges --►Charge and Charge--►Modify you can now modify a diagnosis code rather than delete it.
If your office is using the Claim Scrubbing feature, we recommend your office always use the modify diagnosis feature. If you delete an invalid diagnosis and post another ICD9 code to replace it, the Claim Scrubbing feature will still submit the deleted ICD9 code.
To modify a diagnosis from the Command Column, press the letter M (modify); the focus will move to the Diagnosis field. Press the [Delete] key to remove the existing diagnosis, type in the new/correct diagnosis, then press the [Enter] key.
Charges/Charge Charges/Modify

NOTE: If your office no longer wants to allow operators to delete diagnoses: you can increase the security level for that task. The executable name for this task is: Charge/ Modify/Delete WARNING: this executable restricts deleting the diagnosis, charge and remark.
FIX Charges --►Modify--►Payment History
Selecting the [Payment History] button with the focus on a charge will display all payments. Prior to the update, if you selected M to modify, the line did not allow modify the Source Payment Code. Though it did allow Modify the Source of Adjustment code. It has been fixed.
FIX Charges--►Charge – when posting a Payment or Adjustment
When posting the Payment and/or Adjustment at the same time as posting the Charges, in some circumstances the Commit All option would fail, displaying an error/exception message. If the Commit All option was selected again, the task would commit/save but the Payment and/or Adjustment would not save correctly in all tables. This would result in an out-of-balance condition when comparing reports as part of the close date routine. This error has been corrected in the update.
MODIFICATION Charges--►Charge –Claim Scrubbing comment
When a claim is scrubbed, a comment is inserted into the Ledger – Messages screen. Prior to this version, the Flag for the comment was T. Because Flag T is used for another purpose, the claim scrubbing Flag was changed. Effective this update it will now be Flag V.

Version 9.12.1
BETA NEW FEATURE Charges--►Charges - Claims Scrubbing
A new [Scrub] button has been added to the Charges screen to facilitate claims scrubbing. This feature is a real-time accuracy check that can be used while entering charges. The scrubber checks:
Validity of Codes: verifies the CPT, ICD9, Modifier and Place of Service codes submitted are valid codes.
Suspicious units (Medically Unlikely Edits, or MUE): verifies the validity of the units submitted for a CPT code.
CCI Edits: This includes over 1 million edits published by the Centers for Medicare and Medicaid, which adds edits on a monthly basis.
Age and Gender: the age and gender of the patient will be validated against the codes submitted.
RVU Ordering: will notify if the highest RVU procedure is not the first procedure submitted. Only the first procedure is verified.
The [Scrub] button is located in the bottom right corner of the Charges screen, as shown below:

To use Claim Scrubbing, you must be running Intellect software version 09.12.01 or greater. Additionally, the server and each workstation which will use the Claim Scrubbing feature must have a current jre file. The file is included in the program update, and is located in the home/staff/app/tmp folder, named jre1.6.zip. Manually unzip the file by right clicking and selecting Extract All. Failure to do this will result in the error message "Could not find trusted certificate".
Before using this feature, the system needs to be set up as follows:
1. Sign-up with Silver Bill-It at http://www.silverbillit.com.
2. Set up an Insurance Co. Code called CCI. This is not a real insurance company, but a CCI insurance code needs to be set up for scrubbing to work.
2.1 Go to Utility--►Insurance--►Insurance--►Add.
2.2 To set up the CCI insurance code, only the following fields need to be filled:
<Insurance Co. Code>: Enter CCI
<Name>: Enter CCI – do not delete
2.3 Click on the [Add] button.
3. After the CCI insurance company code has been added, the CCI insurance needs to be set up at Utility--►Insurance--►Tele Com--►Add. The only fields that need to be filled in on this screen are as follows:
<Insurance Code>: Type in CCI
<Login>: Enter the login as given to you by the vendor.
<Password>: Enter the password as given to you by the vendor.
<Transmission Method>: From the drop-down list, select Silver Bill.
<FTP Site>: Select the Silver Bill-It site as shown below:
![]()
4. Once the claims scrubbing feature has been set up, it can be used on the Charges screen located at Charges--►Charges.
NEW OPTION Charges--►Encounter--►Generic--►<Medicare Status> field
Medicare status codes are required for Charpentier claims (in all other circumstances, these codes are optional). To accommodate the status codes, the <Medicare Status> field now has a drop-down screen as shown below:
![]()
![]()
With the pointer in the <Medicare Status> field, press [F2] to display descriptions for each of the choices:
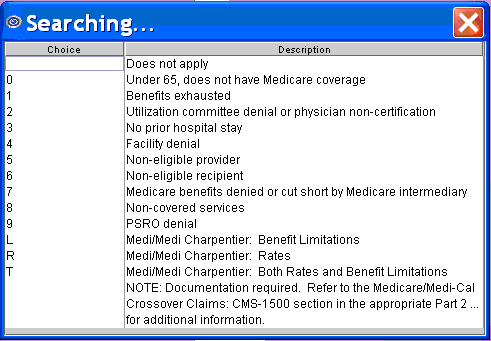
NOTE: For all options except ‘0’, documentation is required. Refer to the Medicare/Medi-Cal Crossover Claims: CMS-1500 Section in the appropriate Part 2 Manual for additional information.
NEW FIELD Charges--►Encounter--►OB/GYN
A new field, as shown below, has been added to the Add OBGYN screen.
![]()
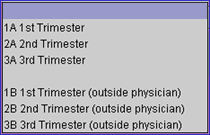
This field is used primarily with UDS reports. Only ONE response is allowed per pregnancy.
If the patient’s first appointment for this pregnancy was in your office, choose from:
1A First Trimester
2A Second Trimester
3A Third Trimester
f the patient’s first appointment for this pregnancy was by a physician OUTSIDE your office, choose from:
1B First Trimester (outside physician)
2B Second Trimester (outside physician)
3B Third Trimester (outside physician)
Version 9.10.21
Charges --►Charge --►Dr field – edit fixed:
When posting charges, the focus stops at the <Dr> field after a Panel Code has been entered. In the past, Intellect always displayed a warning alert and prevented the entry of an invalid Utility/Provider/Code. However, a recent update no longer prevented the operator from posting with an invalid provider code. The alert displayed, but after closing the alert box the focus advanced to the <Billing Prv> field and allowed the operator to post with an invalid provider code. This bug has now been corrected.
Effective this update, if an invalid provider code is entered, the following alert window will display:
. 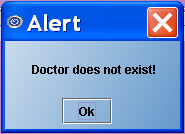
After selecting [Ok], the focus will return to the Dr. field.
NOTE: The same Alert window at Billing Prv was not affected in the earlier update.
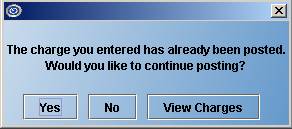
Charges --►Charge --►SB number field – new edit:
A new edit has been added to Intellect when posting charges using the system-assigned Superbill Number. If the Superbill was previously posted, the system will display the following Alert:
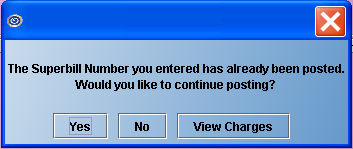
[Yes] Clicking on [Yes] will allow the operator to continue posting the charges. The focus will advance to the Provider field.
[No] Clicking on [No] will return the focus to the <SB> field, clearing the value.
[View Charges] Clicking on [View Charges] will display a window listing the charges previously posted using the same Superbill Number. See example below:
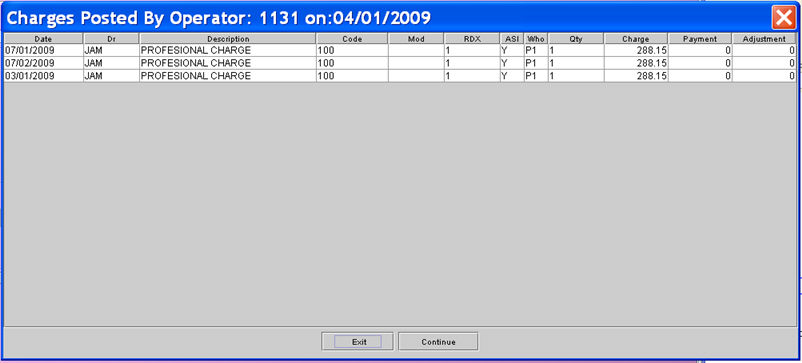
[Exit] Clicking on [Exit] or pressing the [Enter] key will return the focus to the <Batch> field.
[Continue] Clicking on [Continue] will allow the operator to continue posting the charges.
Charges --► Charge – identifying the Pay Plan
Based on your system set up when charges are posted, Intellect records many pieces of information regarding the patient, insurance, and charge as it was at the time of posting. Some examples are: the patient’s category code, primary insurance, approved amount, the percentage of the approved amount the primary insurance is expected to pay, and if the patient has a capitated plan is the charge a ‘carve out’ procedure, etc. Much of this is calculated using information set up in a Pay Plan table. The program uses a defined hierarchy to determine which Fee Schedule and/or Pay Plan to use. Another level has been added to the hierarchy to determine which, if any, Pay Plan code to apply. For an example, look at the prior version and current version of Calculating the Approved:
Prior to this update:
To match the services posted with a Pay Plan and Fee Schedule, Intellect would look first to find a match in the Utility --►Procedure --►Fee Schedule table with the Provider/Dr (not the Billing Provider), Patient Primary Insurance and posted Procedure code (not the Panel Code). If a match was not found, the program would retrieve the Patient Insurance screen <Pay Plan> code.
Effective this update:
If a match is not found in the Utility --►Procedure --►Fee Schedule table and the Patient Insurance screen <Pay Plan> field is blank or the code entered is invalid, Intellect will use the Provider code entered during Charge posting to match to the Utility--► Insurance--► Pay Plan --►Pay Plan <Code> field. If the Provider code matches the Pay Plan Code, Intellect will use that pay Plan record.
From this point forward Intellect works as it previously has.
Identifying Carve Out services:
Prior to this update: To determine whether a procedure should be carved out when the patient’s Category <Type> is P or Q, Intellect retrieves the Patient Insurance screen <Pay Plan> code.
Importing charges from the PCM program into Intellect:
When importing data from PCM, the Intellect program verifies specific data elements to ensure charges are posted to the correct account. One of those fields was the patient’s middle initial. When the middle initial was not imported, importing charges would fail. The program has been modified to accommodate this.
NOTE: With this version, Intellect will verify only the patient name, SSN, and DOB.
Version 9.09.23
Charges --►Charge – Superbill Number Error Message
When a client enters a superbill number and there are charges for the superbill in the database, the following error message is displayed:
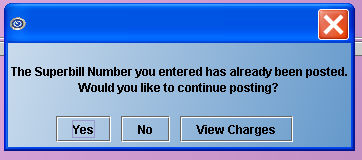
Yes: When ‘Yes’ is selected, the Superbill Number gets posted a second time.
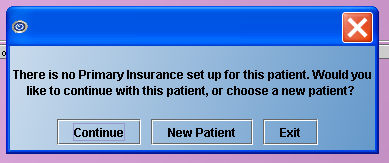
If the patient does not have insurance, the following screen is displayed, giving the client the options to continue with the superbill, set up a new patient, or simply return to the Charge screen.
No: Selecting ‘No’ returns you to the Charge screen.
View Charges: When <View Charges> is selected, a dialog box is displayed which lists all the charges for that superbill. The dialog box can be closed by clicking on the X in the top right corner, or by pressing either the [Esc] or [] key. A sample dialog box follows.
Version 9.08.03
Charges --►Modify--►Information (N)--► <Who>--► Apply to All
The Apply to All feature now also includes the <Who> field, in addition to the <Pay Plan>, <Insurance>, <Sec. Insurance>, <Category Code>, <Billing Date>, and <Sec Bill Date> fields. Selecting Apply to All affects all the charges displayed on the Charge--►Modify screen for the fields listed above, including charges that were posted at different times.
NOTE: You must press the [Enter] key at the <Approved Amount> field for the changes to be saved. Do NOT use the tab or your mouse as those key strokes will not save the changes.
Version 9.03.25
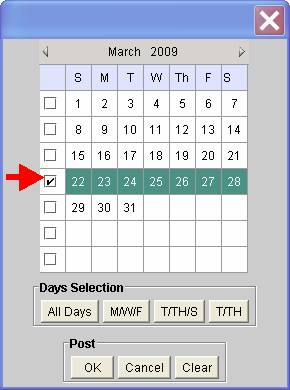
Charge --►Charge
When Utility--►Procedure <Calendar Y/N> = “Y”, the Charge --►Charge Calendar pop up now has Check Boxes which allow the poster to select a week at a time
Charge --►Modify
Previously under certain circumstances the <POS> column field (Place of Service) or <Days/Units> (in the Payment History display) could be modified and left blank. This has been corrected and these fields will no longer accept blank values.

Charge --►Modify
New option available
Charge --►Modify when “N” is typed in the Command Column with a procedure highlighted the <Apply To All> check box is now available. If selected: any changes made to charge record displayed will be applied to all the charges currently displayed in the entire Charge/Modify session. You still must press [Enter] at the Approved Amount field for the changes to be saved. This option applies only to these fields: <Pay Plan>, <Insurance>, <Sec. Insurance>, <Category Code>, <Billing Date>, and <Sec Bill Date>.

Version 9.02.10
New Intellect Feature
Charges--►Charge Calendar Pop Up at From Date:
When posting procedures where Utility --► Procedure <Calendar Display> =”Y” yes, a calendar will display in the Charge screen to select the date of service(s) used instead of typing in the date of service. This feature will also allow the user to select multiple days to apply the charge for this procedure.
Utility --► Procedure <Calendar Display>
![]()
Use this option for procedures which commonly have recurring charges such as Dialysis treatments, Allergy Injections, Physical Therapy, Hospital Visits, etc.
See the on-line documentation under Charges--►Charge and Utility--►Procedure --►Procedure --►<Calendar Display> for complete details.
Charges--►Charge Warning for Wrong CPT for the Age of the patient:
There was an error in the program which has been fixed with this update.
Charges--►Encounter DME Oxygen
In order to comply with current requirements, a new field (DME Form Code) has been added to the Charges--►Encounter DME Oxygen screen.
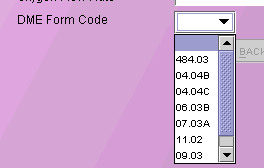
Use this drop down to select the appropriate form for the equipment involved with the encounter.
Charges--►Encounter DME Oxygen
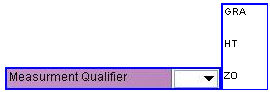
The Charges--►Encounter DME Oxygen fields <Report Transmission Code> and <Measurement Identifier > have been revised to present the user with more concise selections.
![]()
Charges--►Encounter UB Encounter
Clarification of the UB Bill Type
Intellect has three fields will determine which 3 digit Bill type will appear on Institutional Loop 2300 CLM05-3 and CLM05-5 or UB-04 Paper Form Locater 4.
Charges --► Encounter --► UB Encounter <Bill Type>
Charges --► Encounter --► UB Encounter <Claim Frequency Code>
Utility --► Set Up --► Clinic <Facility Identification Number>
1. If there is a UB encounter attached to the claim during posting (or Charges --► Modify), then Intellect first checks Charges --► Encounter --► UB Encounter <Bill Type> for three digit value.
1.1 If there is a value then these three digits will be used first, unless Charges --► Encounter --► UB Encounter <Claim Frequency Code> has a value different than the third digit. This value will override the third digit (Claim Frequency Code).
2. If there IS NOT ANY UB encounter attached to the claim during posting (or Charges --► Modify), OR if Charges --► Encounter --► UB Encounter <Bill Type> is blank then Intellect checks. Utility --► Set Up --► Clinic <Facility Identification Number>.
2.1 If there is a value then these three digits will be used , unless Charges --► Encounter --► UB Encounter <Claim Frequency Code> has a value different than the third digit. This value will override the third digit (Claim Frequency Code).
3. If Charges --► Encounter --► UB Encounter <Bill Type> and Utility --► Set Up --► Clinic <Facility Identification Number> are both blank then no file for electronic submission will be created.
Version 9.12.13
FIX Payment--►Open Item
When posting payments and check Print Bill: the Printer Dialog box pops up but nothing will print. This has been fixed in the patch, and the version remains 9.12.12.
Version 9.12.10
FIX Payment --►Open Item – using Jump and Tag
In the previous version, the Jump or Tag options were not updating the Message or Who columns correctly if the default values were modified when posting the payments. This has been corrected in the update.
MODIFICATION Payment --►Open Item – Print Bill (Secondary Claim)
Previously when posting Primary Insurance payments through Open Item and the patient has secondary insurance, if the Print Bill box was checked the claim would have all charges on the screen where Who = S1 (or S2, etc.) print on the claim. Effective this release, only the charges which had a change made to them will print. For example, a patient has five charges displayed for the same date of service and one had already been paid by the primary insurance with Who = S1. Today you post the primary payment to the remaining 4 and click Print Bill. The claim for the secondary insurance will print ONLY the 4 changes where payment was posted today.
MODIFICATION Payment --►Auto Payment – Report Header/Fields
The following changes were made to the Automatic Payment Journal report:
The Deductible column was moved to the left
The Patient’s Name is only listed once
In the ACN column the HIC number is only shown once
The code in the Check/CCN column now displays as it comes from the insurance company and is only listed once
Version 9.12.08
NEW Payment--►Auto Payment
To meet new requirements for ERA with Capario, Prime Clinical has made changes to the Intellect program.
Version 9.12.03
NEW FEATURE Payment --►Open Item – displays Copay and Deductible:
It is now possible to see what the deductible and copay are for insurances other than the primary (P1) insurance. After pressing [Enter] on your keyboard after entering an amount in the <Amount Paid> field, Intellect will display a new popup screen to select the payment source. An example is shown below:

Choose the desired source and press [Enter] again to populate the <Deductible> and <Copay> fields in the Payment --► Open Item screen, as shown below. The information for the <Deductible> and <Copay> fields is pulled from the selected insurance.
For example, in the first sample screen above, you can select the secondary (S1) insurance and the <Deductible> and <Copay> fields will be populated with the deductible and copay of the S1 insurance. If you select CPAY, GUAR or REFUND, the program will display the Deductible and Copay for the patient’s current primary (P1) insurance.
Version 9.12.01
FIX Payment--►Apply Receipt
In prior versions, OSI was not able to post receipts based on ‘Entry Date of Receipt’. This has now been corrected.
In prior versions, Apply Receipt was not noting in the treatment history file that the source of payment was from the patient. Therefore, if printing only insurance payments on the HCFA claim form, the payment was including the patient payments posted using Apply Receipt. This has been corrected in the update.
MODIFIED FEATURE Payment--►Open Item
To simplify payment posting when a deductable has been applied we’ve implemented two changes in Payment Open Item if using Method A (in the header section of the screen), and Command column option M.
1. Prior to this update the program always calculated the Payment when using the above combination by multiplying the Approved by the Percentage.
Effective this update if you enter a 0 (zero) in the Payment column: the program will not over- ride the zero payment you entered by calculating the Approved times the Percentage.
2. Prior to this update the payment would calculate by multiplying the Approved by the Percentage. If a Deductable was entered: the payment was not reduced.
Effective this update if you enter a Deductable amount: the program will calculate the payment by multiplying the Approved by the Percentage then subtracting the Deductable. In this case do NOT enter a zero in the payment column.
Version 9.08.03
Payment--►Open Item – Refund:
Intellect has a new Refund option under Payment--►Open Item. The Refund option is now included on the pop-up screen which lists available payment and adjustment sources for the patient.

Using the new Refund option, Intellect will be able to report on any refunds posted if entered as a negative amount in the payment field, as shown below.

NOTE: For the program to track refunds using the new payment source option, the entry MUST be posted in the Payment column.
NOTE: The Refund option is not linked to the Message--►Remark <Security Level> feature. At this time there is not a security setting to limit who may post a Refund.
Version 9.03.25
Payment --► Open Item
When posting payments for a Company Account, the <Name> field value will change to display the patient name of the highlighted record. Company accounts previously displayed the Company Name through out the posting session.

Payment --►Open Item
The <Message> field will now accept blank (null) as a value. Prior to the update to remove an existing code you needed to replace it with a new code. Now you may leave the field blank. Changing the Message code still requires a transaction posted to the record (a payment, an adjustment, or a comment entered) and committed.

Version 9.02.10
New menu Option
Payment --►Apply Receipt

This menu option is used to post and/or review patient payments entered in Schedule --► Appointment --► Receipt <Bal Payment Amount> and/or <Copay Amount>.
NOTE: After a receipt has been posted: the record is flagged preventing Apply Receipt from posting the same payment more than once.
See the on-line documentation under Payment --► Apply Receipt for complete details.
Ledger Menu
Version 9.12.11
MODIFICATION Ledger--►Create Coll File and Review Coll File
Several fields were modified in this update:
• To make the screen easier to read: the ‘total’ line separating each patient is now displayed in green.
• You may now move focus by clicking on a desired line. Previously the program required you to use the down arrow to move focus.
• The <C> (command) column on left side of the table has been removed, though all the same features are still available.
• The column heading <Proc> was changed to <Code>
• Column <Mod> was added to display the Modifier Code
• Column <POS> was added to display the Place of Service Code
Version 9.12.10
Known Issue in this Version 6.
There was an error when running Ledger --►Create Collection when selecting <Primary/Secondary> selecting ‘All Insurances’ which resulted in the message ‘Either there are no records with these conditions or a file with the same criteria has already been created and the records are still ‘Unworked’ or the message ‘There are no records with these conditions’. The problem has been corrected and is in version 9.12.11 released on 11/16/2010.
MODIFICATION Ledger --►Open Item/Accounting--►Print - <Balance>
In the past a <Balance> field displayed on the Ledger--►Open Item screen but was not available for use. This field (see below) has now been activated with the options shown.
![]()
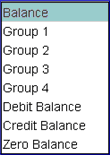
Accept the Balance default, or use the drop down list to make another selection. Click on the field, or press the [F2] key to display the valid choices.
Version 9.12.09
FIX Ledger--►Collection Report
In the prior version when trying to print from Ledger--►Collection using option S or J, an error message would display stating it was an invalid column number. This has now been fixed.
Version 9.12.08
FIX Ledger--►Collection Report
In the past when trying to print from Ledger--►Collection Report using option S or J, an error message would display stating it was an invalid column number. This has now been fixed.
Version 9.12.1
FIX Ledger--►Accounting and Open Item--► Display --►Comment screen
When claims are billed the amount is placed in the comment line on the second screen of both Ledgers. However, an incorrect claim amount was inserted when the Utility Telecom <Special Requirement> field was set to “U”. Note: “U” is used only for electronic billing of Institutional Claims summarized by Revenue Code. This has now been fixed.
MODIFIED FEATURE Ledger--►Accounting and Open Item--► Display --►’V’
If a remark was entered in the Ledger for a specific charge (by highlighting the charge and pressing A) the letter R is displayed in the far, right column of the Accounting Ledger.
![]()
When pressing ‘V’ in the command line of the charge Intellect displays the remark.
![]()
In the past when pressing ‘Q’ in the command line, the focus would go to the doctor/balance screen. With this update, pressing ‘Q’ will work the same as pressing ‘B’ in that it returns the focus to the first screen of the Accounting Ledger.
Version 9.10.21
Ledger --►Collection --►J – Report:
The collection report, which can be run by entering J in the command column [C] in the reminder screen, prints the records for all the users, not just the person printing the report. Now only the reminders set by the current user will print. Note: This same report can be run from Reminder upon Login, J report.
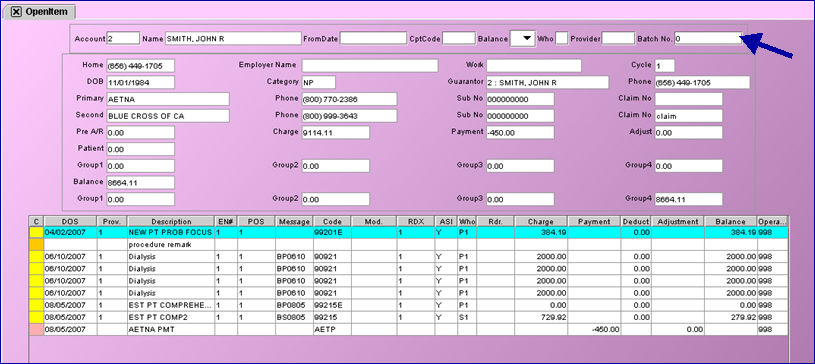
Ledger --►<Batch No.>:
A <Batch No.> field has been added to both the Accounting and Open Item screens. The <Batch No.> field can be used to limit the amount of items displayed. For example, entering 20 in the <Batch No.> field will display only those payments entered in batch number 20. The batch number can be either alpha or numeric and can be set up from either the Payment or Charges option. If payments have been entered into the system with a batch number, the batch number will display in the <Batch No.> field as you move up and down the table. The <Batch No.> is also shown in the last column of the Journal Report when it is saved as an Excel file.
Version 9.09.23
Ledger --►Collection Report
Two lines have been added to the length of the Collection Report so that blank pages do not print in between the report pages.
Version 9.12.13
NEW Billing--►Insurance--►Group of Patients –Pre-Billing Report Headings
Some of the columns on the Pre-Billing Report include two types of data and the headings for these columns have now been placed in two rows.
Additionally, the wording has changed in some of the headings on the Pre-Billing Report. The headings with wording changes are as follows:
Pt Name/Ref Dr is now Pt Name/Ref Prv
Sex/Who is now Gender/Who
Sub#/Dr-FromDOS is now Submitter#/TxPrv/FromDOS
Group/BDr-ToDOS is now Group#/BIPrv/ToDOS

MODIFICATION Billing --►TeleCom --►Submit Claims - CHDP Form
In the electronic file for CHDP, the program was transmitting the patient’s social security number. This was modified to transmit the <Subscriber No.> from the Patient Insurance screen.
MODIFICATION Billing --►Follow Up
When printing follow up letters, a record is inserted in Ledger--►Remarks screen. The program was inserting the total cost of the charge(s). Effective this update, the program will print the remaining balance of the charge(s).
![]()
FIX Billing--►Statement--►Batch or Group of Patients: Comment Amount
When statements are created, both paper and XML, the Amount entered in the second screen of the ledger may be incorrect or left blank. The statements are correct; the error only affects the Ledger. This was corrected and is in a patch, the version number remains 9.12.12. The patch will NOT correct the Amount displayed in the second screen of the ledger for statements printed, it will affect only the statements printed after the patch is updated to your system.
Version 9.12.12
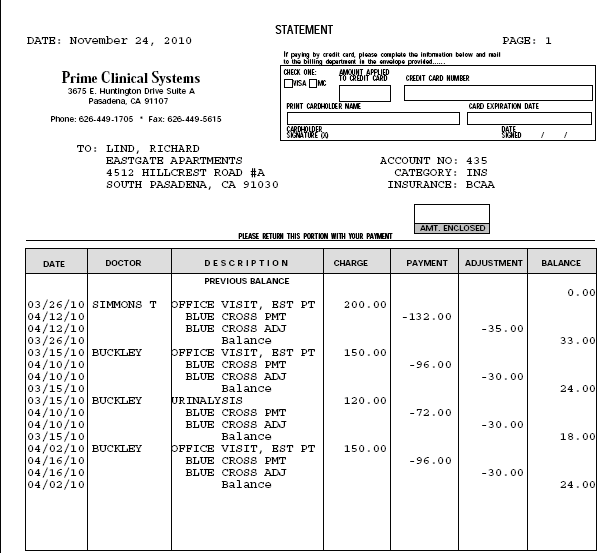
MODIFICATION Statement --►Batch and Group of Patients
Statements which print the Payment and Adjustment detail as a separate line will now print the Balance on a separate line too. Until now, the balance printed on the same line as the Charge. Clients reported this was confusing for many of their patients, therefore we made this change.
The format of your current statement will not change, only the balance line has been added as shown in the example below:
Version 9.12.10
Known Issue in This Version:
Billing --►Insurance --►PreBilling Report, HCFA, Red HCFA, Printing from PreView options. AND Billing --►Statement print option.
When the task is set to run on the Server in some situations the task would fail. This has been fixed in the patch, and the version remains 9.12.10.
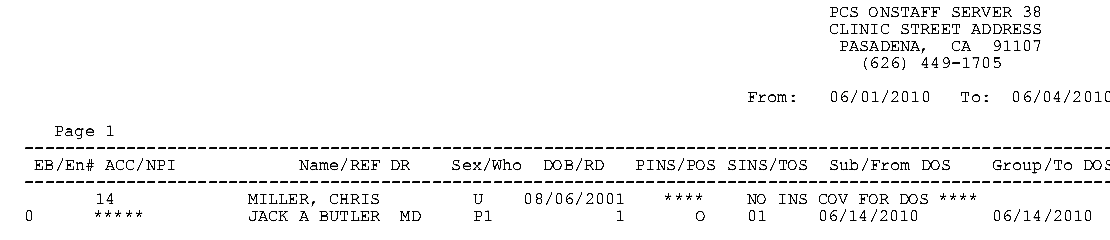
MODIFICATION Billing --►Insurance --►Group of Patients – PreBilling report
On the Pre-Billing Report several column headers have been changed for clarity:
Name/DR was changed to Pt Name/Ref Dr
ACC/UPIN was changed to Acct/Ref NPI
SS/FROM was changed to Sub#From DOS
Group/To was changed to Group/To DOS
Additionally, some acronyms and abbreviations have also been changed for consistency.
MODIFICATION Billing --►Insurance --►Group of Patients – PreBilling report
Previously if the Subscriber Number was not completed on the patient’s Primary Insurance screen, the column would be left blank. Effective this update the report will now display ***** to bring attention to the missing information.
MODIFICATION Billing --►Insurance --►Group of Patients
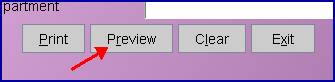
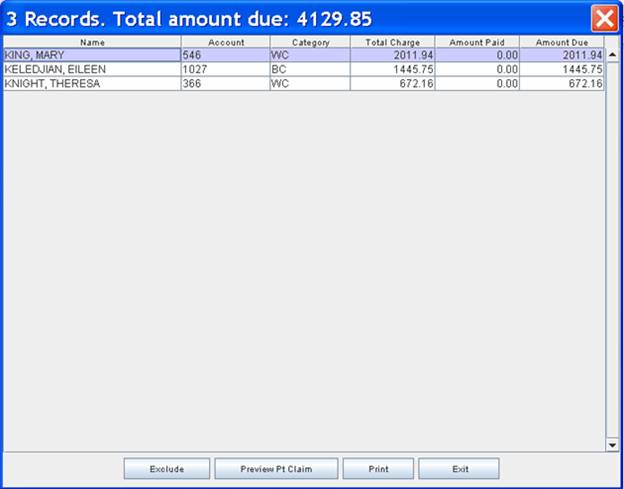
Intellect now has a new [Preview] button at the bottom of the screen which allows you to preview your billing as it would print on HCFA/CMS1500, UB04 forms or other billing forms.
This button has been added as another tool available to verify the accuracy of claims before billing. Clicking on [Preview] brings up a screen:
The information on this screen is a list of claims ready to be printed or sent electronically and is initially displayed in Name order, from A-Z. The order of the information may be changed per column headings. For example, clicking on the Account column heading will display the screen information in account number order from the lowest number to the highest; double-clicking on the Account column heading will display the information in account number order from the highest to lowest account number.
The buttons at the bottom of the screen affect the screen information as follows:
[Exclude]: Clicking on an account and then clicking the [Exclude] button will change the highlighting color, indicating this account will not be included when the displayed claims are printed. Highlighting an entry will NOT change the patient set up or prevent future claims from printing; it only affects the current claim file. If the screen is closed without printing claims, the record(s) do NOT stay highlighted and the claims will print.
NOTE: If a patient is listed more than one time in the Preview List and if one record is selected to Exclude, it will exclude all claims from printing for that account number.
[Preview Pt Claim]: Clicking on an account and then clicking the [Review Detail] button will display a claim for the selected account.
[Print]: Clicking the [Print] button will display a print dialog box, enabling the printing of all non-excluded claims.
[Exit]: Clicking on the [Exit] button returns the user to the Print Group of Patients screen.
NOTE: The Preview option does not apply to Pre-Billing reports or Ingenix Message.
ATTENTION MODIFICATION Billing --►Telecom --►Submit Claims --►Batch and Group of Patients
Previously, when billing the secondary carrier the electronic claim would bill using the same procedure code as the primary insurance. Effective this version, the secondary claim will be billed using either Utility--►Procedure <Code R>, <Code C> or <Code E>, dependent on the Utility--►Insurance <Code R/C/E> field for the secondary insurance.
ATTENTION MODIFICATION Billing --►Telecom --►Submit Claims --►Batch and Group of Patients
To meet the requirements for Cahaba billing, an optional data segment in the electronic claim file has been removed.
NEW OPTION Billing --►Statement --►Group of Patients
A new [Preview] button was added to the Print Group of Patients screen.
Clicking on [Preview] brings up the following screen:
The information on this screen is a list of billing statements ready to be printed and is initially displayed in Name order, from A-Z. The order of the information may be changed per column headings. For example, clicking on the Account column heading will display the screen information in account number order from the lowest number to the highest; double-clicking on the Account column heading will display the information in account number order from the highest to lowest account number.
The buttons at the bottom of the screen affect the screen information as follows:
[Exclude]: Clicking on an account and then clicking the [Exclude] button will change the highlighting color, indicating this account will not be included when the displayed billing statements are printed. Highlighting an entry will NOT change the patient set up or prevent future statements from printing; it only affects the current statement file. If the screen is closed without printing statements, the record(s) do NOT stay highlighted and the statements will print.
NOTE: If you want to stop all statements from printing for an account, go to the patient’s demographic screen and select the desired option from the <Patient Stmt Override> field drop-down options. <Patient Stmt Override> is an optional field and may not be displayed on your screen. To have the field added, contact our support or training departments for assistance.
NOTE: If a patient is listed more than one time in the Preview List: if one record is selected to Exclude it will exclude all statements from printing for that account number.
[Preview Pt Stmt]: Clicking on an account and then clicking the [Preview Pt Stmt] button will display a billing statement for the selected account.
[Print]: Clicking the [Print] button will display a print dialog box, enabling the printing of all non-excluded patient statements.
Note: This feature works when printing paper statements; it does not support XML statements.
[Exit]: Clicking on the [Exit] button returns the user to the Print Group of Patients screen.
MODIFICATION Billing --►Statement where Utility/Set Up/Parameter <Number of Cycles> is completed:
Previously, patients registered on the 29th, 30th or 31st of the month would all be added to cycle 1 if Utility Set Up Parameter <Cycle> = Y or X. To more evenly distribute patients, this has been changed so that patients registered on the 29th will be added to cycle 1, patients registered on the 30th will be added to cycle 2, and if registered on the 31st patients will be added to cycle 3.
This will NOT reassign the cycle numbers on existing patients, but will affect only patients registered after the update. If Utility Set Up Parameter <Cycle> = X, the cycle number is changed based on the last payment.
MODIFICATION Billing Statement where Utility --►Set Up --►Parameter <Cycle> = X
Previously, if the <Cycle> field on the Parameter screen was set to X, the patient’s cycle was changed to the current date when a payment was posted. With this update, the patient cycle will be changed ONLY if, after committing, the Who Column will be a ‘G’. Following are examples of how this change will affect the patient cycle:
If the Who Column was a G and the patient made a partial payment, and the Who remains a G: the patient cycle will be changed.
If the Who Column was a P1 or S1 and the insurance payment was posted changing the Who to a G: the patient cycle will be changed.
NOTE: This change does NOT affect the patient cycle when <Cycle> is set to Y or N.
Version 9.12.09
MODIFIED OPTION Billing --►Insurance – Pre Billing Report
Changes have been made to the report column headings of the Pre-Billing report. The headings that have changed are indicated on the chart below and two of the changes are shown on the partial report which follows.
|
Old |
New |
|
Acc/UPIN |
Acc/NPI |
|
Name/Dr |
Name/REF DR |
|
SS/From Dos |
Sub/From DOS |
Version 9.12.06
FIX Billing —►Company—►Batch or Group of Patients
In the previous update, the <Balance> field on the Company Statement screen was not applying the condition to exclude zero balances. This has been corrected in this update.
Version 9.12.05
ATTENTION
NEW FEATURE: Billing—►Telecom—►Submit Claims—►Batch and Group of Patients
The program will now include the CN1 segment in the claim level of the 837 file. Loop Segment when billing all 2nd electronic claims.
Version 9.12.04
ATTENTION
NEW FEATURE: Billing—►Telecom—►Submit Claims—►Batch and Group of Patients: secondary billing
The program will now include the amount the primary insurance applied to the patient’s deductible in the 837 (outgoing claims) file, Loop 2300, CAS 6 Segment. This occurs when either:
The deductible was manually entered by the operator when posting payments through Payment—►Open Item
Payments and adjustments were applied using Payment—►Auto Payment feature and the deductible was defined in the ERA/ERN file.
Version 9.12.02
FIX: Billing--►Tele Com --►Submit Claims – Electronic Billing of Secondary Claims
Previously, the Utility--►Insurance secondary insurance address was not submitted, and the payor office code was submitted as Paper in the COBA segment. In this update the payor office code has been included in the secondary electronic claims. When the payor office code is included, the address is not required. The secondary electronic billing issue has been fixed in the update.
Version 9.12.1
NEW OPTION: Billing--►Insurance - Paper Claim
ATTENTION Due to changes to the MediCal Anesthesia billing requirements for Box 19, effective by MediCal 11/1/2009, it is no longer necessary to print the Anesthesia Start and Stop times, and Total time.
NEW FEATURE: Billing--►Statement
When printing the patient name and address on the patient statement, Intellect now has the ability to print the first name and last name separately.
NOTE: The change has NOT been applied to your statement. If you would like to have the formatting of the patient name modified please contact Prime Clinical Systems.
FIX Billing --►Statement --►Batch or Group of Patients – Statement Grouping by Provider
Effective this update: if the Utility Provider <Statement Group> field was left blank or set to 0, causing the treatment history record to have an invalid group code, when printing statements the program will group the charges in Statement Group 1.
NOTE: This change affects only charges when at the time of posting the Utility Provider Statement Group field was left blank, or had an invalid option entered.
FIX Billing --►Worker --►Attorney
In the past, under specific circumstances, the Attorney Statement would not print. This has been corrected.
Verion 9.10.21
Billing --►Company --►Statement:
The Company Statement is being modified. If your office uses Company Statement, we request that you speak with a support agent before updating your server.
Billing --►Telecom --►Submit Claims: error for segment PWK
There was an error when submitting electronic claims in the PWK segment in either Loop 2300 or 2400. The segment has up to 9 elements. Intellect was submitting 7, causing what should have been the 8th element to be in the 6th element location. This has been modified in the update.
NOTE: Example of incorrect segment: PWK*OZ*FX*AC*
Example of correct segment: PWK*OZ*FX***AC*
Billing --►Telecom --►Submit Claims --►Batch or Group of Patients:
Electronic billing can now use Secure File Transfer Protocol (SFTP) with Central Coast Alliance. If your office is interested in submitting to Central Coast Alliance using SFTP, please contact Prime Clinical Systems Support Department for assistance in setting up your system.
Billing --►Statement --►XML for outsourced claims:
There was an error in a recent update which prevented the XML file from being submitted to the outsourced vendor. The XML statement file was created and placed in the appropriate Intellect directory, but Intellect did not attempt to send the file via File Transfer Protocol. The error has been corrected in this version.
Version 9.08.28
Billing --►Telecom --►Electronic Billing
Prior to this update, Electronic Claims were sorted by the patient account number and the date the charges were posted. Because some clearinghouses and/or payers require procedures to be transmitted in the order of entry, Intellect now accommodates that requirement effective with this version. The Electronic Claims will now be sorted by the patient account number, the date the charges were posted, and the order in which the procedures were entered.
Billing --►View Claim Files
Under the Billing tab, there is a new View Claims Files option which helps track billing when bills are submitted using the Group of Patients option. Clicking on View Claims Files brings up the following screen.
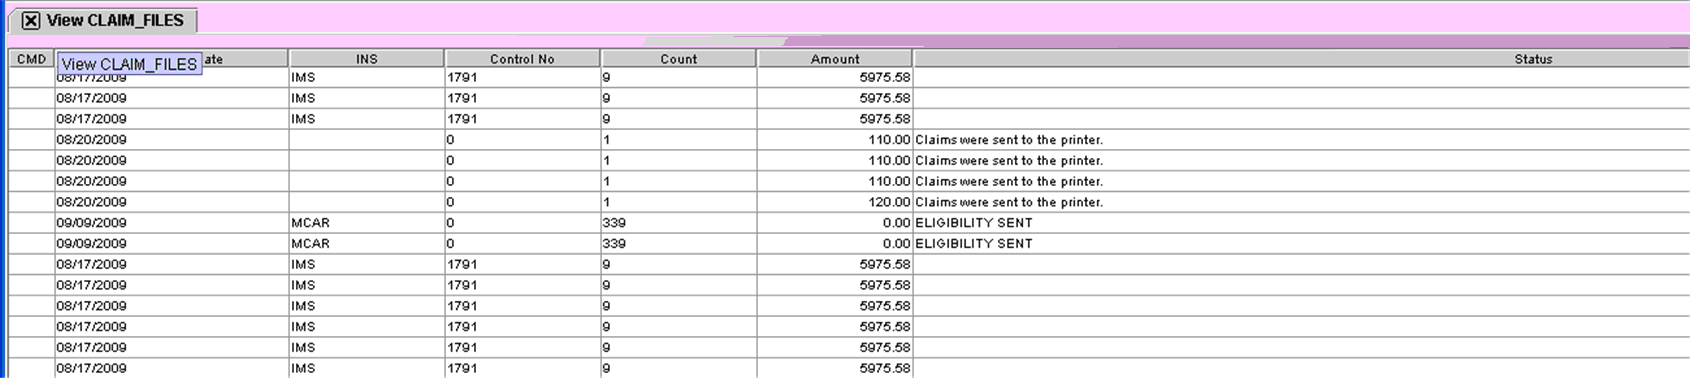
CMD: This field allows input for electronic billing only. Pressing F2 displays the following three options:
V: Displays the way the claim file went to the clearinghouse.
9: This references a 997 report. A 997 report is only available if billing was done directly with an insurance carrier such as Medicare and not through a clearinghouse. When viewing the 997 report, if there is an ‘A’ on the line beginning with AK9, everything went through and the word ACCEPTED will display in the Status column on the screen. An ‘R’ displayed on the line beginning with AK9 indicated something was rejected in the billing and the word REJECTED will display in the Status column on the screen.
A: Displays an Acknowledgement Report if a report is available (if no Acknowledgement Report is available, an error message will be displayed). After viewing the Acknowledgement Report, it can be closed three ways: 1) Click on the Close button at the bottom of the screen, 2) Click on the X in the top right corner of the screen, or 3) Press [ESC].
Submission Date: The date the billing task ran.
INS: Indicates the insurance company to which the claim was billed. Common abbreviations used by Prime Clinical are MCAL for MediCal, IMS for Caparrio, etc., but insurance identifiers vary based on how they are set up by individual clients.
Control No.: A control number generated by Prime Clinical for the group of patients’ bills being submitted.
Count: The number of bills submitted.
Amount: The total dollar amount of the group of bills submitted. Note: If a bill is transmitted electronically and there is a number in both the Control No. and Count columns but there is a zero in the Amount column, the transmission either failed or the clearinghouse has not yet processed the submission.
Status: Indicates the status of the submitted bill(s). If there is nothing displayed in the Status column, the clearinghouse or insurance company did not include the control number (see above) in their report. Status messages are as follows:
Claims were sent to printer: Displays when printing paper claims.
Statements were sent to the printer: Displays when printing patient statements to paper.
ACCEPTED: Displays when everything went through on an electronically submitted group of bills. This is displayed in conjunction with a 997 report. A 997 report is only available if billing was done directly with an insurance carrier such as Medicare and not through a clearinghouse.
REJECTED: Displays when there was an error with an electronically submitted group of bills. This is displayed in conjunction with a 997 report. A 997 report is only available if billing was done directly with an insurance carrier such as Medicare and not through a clearinghouse. If you get this message, please call Prime Clinical.
ELIGIBILITY SENT: Displays when an electronic billing transmission has been sent but there has not been a response from either the clearinghouse or the insurance company.
Billing --►Insurance --►Batch of Patients
In the past, if the Coverage From and To dates were blank, the CHDP billing failed. This has now been fixed.
Billing --► Worker--► Letter
To comply with recent Worker’s Comp requirements, there are now 15 forms available for use with Worker’s Comp billing. The new and/or updated forms are: QME109, IMC1002, QME122, QME112, DWC100, DWC6, QME110, QME111, DEU101, DWC10232.1, DWC10232.2, DWC10323.1, DWC10323.2, 10770.5, and 10770.6. Please note that all forms other than DWC10232.1, DWC10232.2, DWC10323.1, DWC10323.2, 10770.5, and 10770.6 have the document separator attached, which is form DWC10232.2.
Version 9.08.03
ATTENTION:
Billing --►Company (Statement) --► Batch and Group of Patients --►<Sort>/<Option>:
Intellect renamed the <Sort> field to <Option>. Following are the effects of the change:
• The Company statement will now ALWAYS print in alphabetical order by the Patient’s Name
• A blank line will be inserted between each unique patient name, making the statement easier to read.
• The <Option> field will give you two types of Company Statements to select from:
N = Open Item Company Statement
D = Regular Company Statement
Please refer to the following examples of the two formats now available:
<Option> N Open Item Company Statement

<Option> D Regular Company Statement
Version 9.03.25
Billing --► Insurance
In order to accommodate Medi-Cal billing restrictions for Dialysis claims on UB-04, which limit charge lines to 15 instead of the usual 22, users will be able to select Form Type “A”. The Utility--► Insurance screen does not require any change.
![]()
Version 9.02.10
CHDP ELECTRONIC SUBMISSION
CHDP ELECTRONIC SUBMISSION
CHDP electronic claims may now be submitted electronically and are submitted using the same Utility --► Insurance --► Tele Com set up as Medi-Cal or Medicaid. To submit you will need to complete the following set up in your system:
• Create CHDP Insurance record with:
<Submitter Co> same as Medi-Cal or Medicaid
<Payer and Office Code> same as Medi-Cal or Medicaid
<Electronic Billing> = “C” If you do not have option ‘C’ call Prime Clinical Systems support for assistance.
• CHDP electronic submission Billing --►Tele-Com --►Submit use:
<Carrier Type> = "C"
< Claim Type> number indicator 4
<Insurance Code> enter the new Utility --►Insurance code you set up for CHDP billing.
Complete other fields on the screen the same as usual.
• Patient Registration – use the new Utility --►Insurance code you set up for CHDP billing.
• Charges which were entered prior to using the new
For the CHDP electronic billing in Intellect: only one NPI number is submitted. Depending upon how you are registered: you may need to bill using either <Group NPI> or Individual Provider <NPI.>
When setting up: always add a Provider --►Provider or Provider --►Facility record with the required NPI number in the Group NPI field - even if you need to bill with the Individual Provider NPI
NOTE: If you plan to begin sending electronic claims for CHDP: please call our support department: as an option for Utility --►Insurance <Electronic Billing > for ‘C’ will need to be added for your drop down selection.
Version 9.12.13
NEW FIELD Management --►Analysis --►Utilization – <Charges Status>
A new field has been added allowing operators to apply a condition which limits which charges to include in the report.
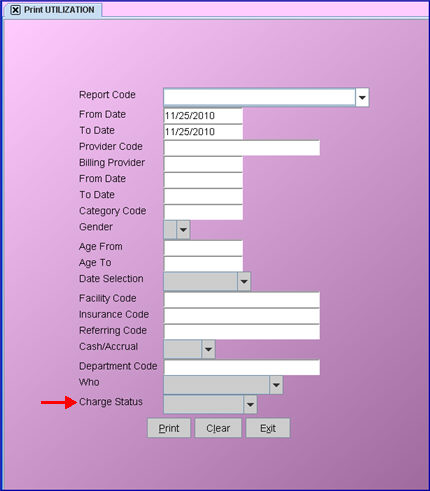
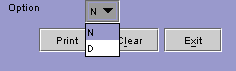
Charge Status: ![]()
Accept the Blank default, which will print active charges, or use the drop down list to make another selection. Click on the field, or press the [F2] key to display the valid choices.
Selecting either the Blank default or the Active Charges option prints the same information as was printed prior to the addition of the <Charge Status> field.
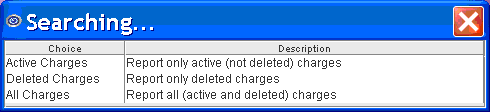
Note: The date range fields work exactly as they did before. For example, if Charge Status = Deleted Charges, the program will print all charges that have been deleted which fall within the first date range, and the payment & adj columns will reflect the activity based on the completion of both the date ranges. Refer to the date range field information in the online documentation for details on how the date ranges work.
MODIFICATION Management --►Analysis - Payment Analysis by Clinic and Payment Analysis by Provider, and Adjustment Analysis by Clinic and Adjustment Analysis by Provider Reports
Software prior to Version 9.12.13 did not apply the Category condition to the following report options: Payment Analysis by Clinic, Payment Analysis by Provider, Adjustment Analysis by Clinic, and Adjustment Analysis by Provider. Effective Version 9.12.13, the Category Condition is applied to these reports based on the current Category assigned in the Patient Demographic screen.
FIX Management --►Analysis- Adjustment by Clinic
In some circumstances the report would fail, displaying the message ‘ora00933:sql not command properly ended’. The error has been fixed in this update.
FIX Management--►Check Slip--►Insurance
The option to Sort by = Posting Order was not working properly. This was corrected and is in a patch; the version number remains 9.12.12.
Version 9.12.12
NEW REPORTS and MODIFICATION Management--►Analysis--►Utilization
Two Utilization reports were added to the program:
Panel Utilization by Clinic
Panel Utilization by Provider
The Panel Utilization reports are identical to the other Utilization reports, but are summarized by the Panel Code.
Additionally, the following reports were corrected:
Procedure Utilization by Clinic
Procedure Utilization by Provider
In prior versions, these reports incorrectly summarized by the Panel Code. Now they summarize by Procedure, as indicated in their title.
Version 9.12.11
NEW REPORTS and MODIFICATION Management--►Analysis--►Utilization
NOTE: Two reports have been added to the database and corrections made to two other reports, but the programming was not completed until the 9.12.12 version.
.
Version 9.12.10
Known Issue in This Version:
The Insurance Percentage field is being left blank on the Management Receivable report. If your clinic uses this report, PCS suggests that you wait until a patch is available before updating your server. This was due to a field not being updated in the program. This has been fixed in the patch, and the version remains 9.12.10.
NEW FEATURE Management --►Financial – group by Billing Group
The Financial Report has now been changed such that a user can use the <Billing Group> field in the Provider screen to group Providers.
The Financial report will then group the Providers on the report and give a subtotal for the DAY/MONTH/QTR/YR.
FIX Management --►Aging --►Report Aging
FIX Management --►Balance --►Balance
In version 9.12.08 there was a Known Issue where leaving the <All/Patient/Insurance> and <Sort By> fields blank when printing either the Balance or Aging report could cause the task to fail. This issue has been corrected as both fields now have default options.
FIX Management --►Detail
In the past, there was a bug that added the same charge several times per each payment. This has now been fixed so that the payments and adjustments appear on the line below the line showing the charge.
FIX Management --►Statistical Report
In prior versions, this report displayed line items where the overall balance was $0. This has now been corrected so that $0 balances are not included if the count in the Total column is greater than zero.
Version 9.12.09
NEW OPTION Management --►Journal – Option B
The Journal for report code B (Clinic with Batch No.) can now be exported to Excel.
MODIFICATION Management --►Check Slip
Modifications have been made to the Management --►Check Slip option. Instead of selecting the format of the report via the <Option> field, the <Option > field was eliminated and six NEW SUBOPTIONS were added for this purpose, as shown below:
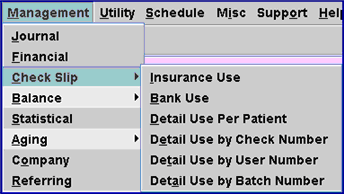
Insurance Use: Returns a report with a single line for each entry showing check Number (or Credit Card) and the dollar amount.
Bank Use: Returns a report with any payments to multiple accounts with the same check. It shows the Check Number (or Credit Card) and the combined dollar amount, and is always sorted by Check Number.
Detail Use Per Patient: Returns a report with entries for each account and includes a breakdown per patient with the patient name displayed.
Detail Use by Check Number: Returns a report with entries for each account with patient name displayed, but grouped and subtotaled by Check number.
Detail Use by User Number: Returns a report with entries for each account with patient name displayed, but grouped and subtotaled by User number.
Detail Use by Batch Number: Returns a report with entries for each account with patient name displayed, but grouped and subtotaled by Batch number.
The NEW FIELD <Unapplied Receipts> has been added to all Check Slip report screens except for Detail Use by Batch Number, although the new feature will only apply to the Detail Use By Patient option. The new field is useful only if your office uses the Schedule --►Appointment --►Receipt option and post the payments collected using the Payment --►Apply Receipt feature. If so, the payments received and entered in Receipt which have NOT yet been posted through Apply Receipt will print on the Check Slip Unapplied Credits report. This feature is being added to help reconcile your bank deposit.
NOTE: The program uses the date range entered on the Check Slip screen (shown below) for both the Check Slip report and the Unapplied Credits report. This means either your entry date must be current to the calendar date or that you enter a date range which includes both the System Posting date and Calendar date.
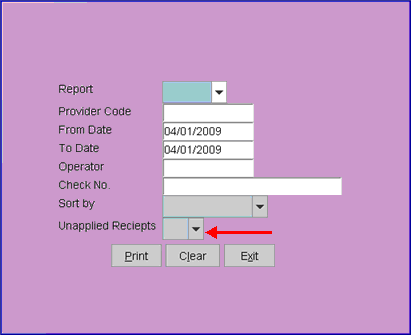
<Unapplied Receipts>: The choices for this field are No and Yes. Select No if you do NOT want to print a report with the unapplied receipts, or select Yes if you want the unapplied receipts report.
Additionally, a FIELD MODIFICATION has been made to the <Report> field. The single-character code choices on the drop down list have been replaced with complete word choices, making the code selection easier.
Version 9.12.08
NEW COLUMN Management --►Analysis --►Utilization - Average
A column titled Average has been added to all the Utilization reports, with the exception of Report Code W – Diagnosis by Clinic or Single Provider.
The column calculates how long, on average, it has been from the Date of Service to the most recent payment or adjustment posted.
NEW OPTION Management --►Aging --►Misc Aging Report - Year
A new drop down option of Year has been added to the <Group By> field which makes it possible to show the aging as it was at the last date of each year.
![]()
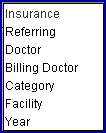
The options for the <Group By> field are defined below:
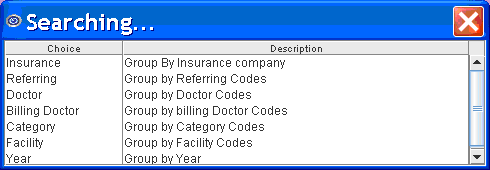
The aging is based on date-of-service (DOS). For example:
A $100.00 charge was posted in 2008 and no payments or adjustment were posted: 2008 balance = $100.00
In 2009 a $75.00 payment was posted, the balance on the report for 2008 stays $100.00, and 2009 will be $25.00
In 2010 a $10.00 payment was posted. The balance on the report for 2008 stays $100.00, and 2009 stays $25.00, and 2010 will be $15.00
MODIFICATION Management --►Aging --►Report Aging
Known Issue in Version 9.12.08:
Management --►Aging --►Report Aging: report failing
If the <All/Patient/Insurance> or <Sort By> fields were left blank when printing either the Balance or Aging report, the task may fail and display the following two messages:
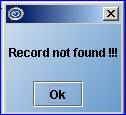
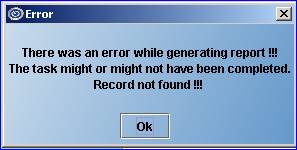
To prevent this error, you must select a valid option from the drop down windows.
Two changes were made to this option:
The single-character code choices on the drop-down lists for the <Aging>, <All/Patient/Insurance>, and <Sorted By> fields have been replaced with complete word choices, making the code selection easier. The list of codes with their descriptions (accessed by pressing [F2] or by clicking on the field) has also been improved.
A new Balance option has been added to the <Sorted By> field on both of these screens. This new option sorts the records by the balance, listing highest to lowest.
![]()
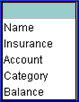
The options for the <Sorted By> field are defined below:
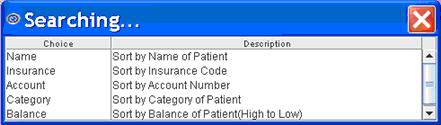
NEW OPTION Management --►Balance --►Balance
Known Issue in Version 9.12.08:
Management --►Balance --►Report Aging: report failing
If the <All/Patient/Insurance> or <Sort By> fields were left blank when printing either the Balance or Aging report, the task may fail and display the following two messages:
To prevent this error, you must select a valid option from the drop down windows.
Two changes were made to this option:
A new Balance option has been added to the <Sorted By> field on both of these screens. This new option sorts the records by the balance, listing highest to lowest.
![]()
The options for the <Sorted By> field are defined below:
The single-character code choices on the drop-down lists for the <Aging>, <All/Patient/Insurance>, and <Sorted By> fields have been replaced with complete word choices, making the code selection easier. The list of codes with their descriptions (accessed by pressing [F2] or by clicking on the field) has also been improved.
NEW OPTION Management --►Financial
Effective with a previous update, the amount printing in the Current Deletions at the bottom of the Financial Report was rounding up or down the cents portion of the charge. For example, if a charge for 111.11 was posted, committed, and then deleted, the Financial Report would show Today’s Charges = 111.11, but Current Deletions = 110.00 and the Net Charges were then off by 11 cents. The program was rounding down if the cents were less than 50, and up if it was more.
When a charge is posted and deleted on the same system entry/posting date, the total of those deleted charges is printed in the Today's Deletions column for each provider, and also in the Totals section at the end of the report. The Total Deletions field at the bottom, and the column for the doctors Today’s Charges and Today’s Deletions were all correct.
This problem has been corrected in this version, though charges deleted prior to the update will remain as they are. The change will affect only charges deleted after the update.
Version 9.12.06
CHANGE Management—►Statistical – Reports renamed
Previously, the Statistical report drop-down list had single letter codes assigned to the reports. This has been modified and the code replaced with a descriptive word. Following is the list of the prior codes and new descriptors:
C Clinic
A All Providers
P Provider
G Category
Y Group by Who column
NEW OPTIONS Management —► Statistical – Two new reports
Both reports use the patient primary insurance and facility linked to the charge at the time of posting.
Group by Insurance Category: Selecting this report option returns a single report for the clinic, with the aged balance per Aging Group as defined in Utility/Category. The balances are grouped and printed as a single line per Insurance Category, using the insurance at the time the charge was posted. This report option uses the recently-added <Category> field in the Utility/Insurance screen.
Group by Facility: Selecting this report option returns a single report for the clinic, with the aged balance per Aging Group as defined in Utility/Category. The balances will be grouped and printed as a single line per Facility, using the facility entered in Charges/Charge at the time the charge was posted.
Version 9.12.05
FIX Management—► Financial report
The prior version had an error in the Financial report: when closing the day the Current Deletions column was not re-set to zero This error has been fixed in the current version.
Version 9.12.04
FIX Management—►Aging—►Report Aging – <Inactive From>
In the past the Report Aging was looking for patients who have been seen after the date in the <Inactive From> field instead of patients who haven’t been seen since the date in the <Inactive From> field. This has been fixed.
Version 9.12.02
FIX Management--►Journal
Journal H – Payment History. When selecting to print for a specific operator, the program was selecting the operator who posted the charge, not the operator who posted the payment. This has been corrected in this version.
FIX Management--►Detail
In some circumstances, when Management --► Detail Report Code C was requested and the task was set to run as a local task, the report could not be printed. The issue has now been resolved in this version.
Version 9.12.01
FIX Management--►Analysis report code HH
In a prior version, the Adjustment by Provider report was not printing when the <To Date> selected was still open. This bug has been fixed.
NEW FEATURE Management--►UDS Report – New Reports
Uniform Data System (UDS) reports allow you to print out patient information based on several criteria. Six Uniform Data System (UDS) reports have been added to the Management menu: Patients by Zip Code, Patients by Age by Gender, Patients by Race and Language, Patients Characteristics, Patients by Diagnosis and CPT, and Patients Quality of Care Indicators. These correlate to UDS reports and can be accessed as shown below.
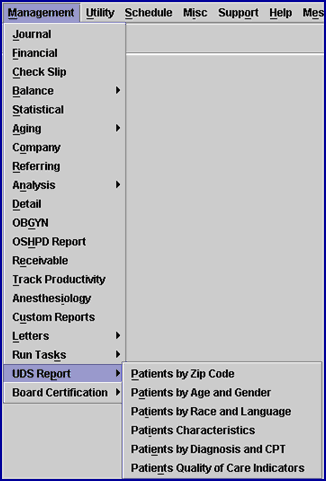
A brief description of each report follows. For additional information on setting up and running these reports, please contact PCS support or consult the online documentation: Management--►UDS Report.
1. Patients by Zip Code
For patients that have had charges within the date range, the Patients by Zip Code report, which correlates to UDS Report Patients by Zip Code, gives a unique patient count displayed by home address zip code. If the zip code field on the Registration screen is left empty, a total for unknown zip codes appears as the last entry and the zip code column will be blank as it matches the value entered in the zip code field on the Registration screen. This report can be limited by Facility or the Category of the patient at the time charges were posted.
2. Patients by Age and Gender
For patients that have had charges within the date range, the Patients by Age and Gender report, which correlates to UDS Report Table 3A: Patients by Age and Gender, offers a unique patient count by age and gender. The information on the report is displayed by age for each year up to 24-years old. After 24-years-of-age, the age is displayed in age groups. Each age listing is divided by male and female. The patient’s age is calculated for the date entered in the <Date> field (6/30/YYYY) when selecting the report.
3. Patients by Race and Language
For patients that have had charges within the date range, the Patients by Race and Language report, which correlates to UDS Report Table 3B: Patients by Hispanic or Latino Identity/Race/Language, displays patient information by both race and language, and gives a unique patient count for all patients whose language is NOT English. This information is picked up from the Patient <Ethnicity> and <Language> fields.
4. Patients Characteristics
The Patients Characteristics report provides patient counts for UDS Report Table 4. This report presents the Table 4 information in four sections. Each section is listed below, along with its' selection criteria:
1. Income as Percent of Poverty Level
This part of the report groups the patients based on the patient's poverty level.
2. Principal Third Party Medical Insurance Source
Line 7 of this section includes all patients set in any of the conditions that follow:
Patient Category type = G (Patient/Guarantor)
Patient Category type not = C (Company Account)
Patient without insurance coverage = P1 and coverage to is completed in P2 or P3.
Line 8a-12 groups the patients based on their insurance category, as set up in Utility>Insurance, for patients where:
Patient Category type not = G (Patient/Guarantor)
Patient Category type not = C (Company Account)
Patient has only one Primary insurance (P1) where <Coverage To> is blank
3. Managed Care Utilization
This section is left blank.
4. Characteristics-Special Populations
Lines 14 and 15 are based on the Patient <Status> field
Lines 17-22 are based on the Patient's living value shown in the <Residing At> field
Line 24 calculates the number of patients with Place of Service = School , as set up in Utility--►Facility
5. Patients by Diagnosis and CPT
For patients that have had charges within the date range, the Patients by Diagnosis and CPT report provides patient and visit counts for UDS Report Table 6A based on the <UDS Group> setting in Utility/Diagnosis and Utility/Procedure. All services and diagnosis codes billed by the practice are not included on this report.
6. Patients Quality of Care Indicators
For patients that have had charges within the date range, the Patients Quality of Care Indicators report provides patient counts for UDS Report Table 6B. This report presents the Table 6B information in four sections. Each section is listed below, along with its' selection criteria:
Age of Prenatal Patients, where the data is based on patients within a range of ICD9 Codes.
Trimester First Seen for Prenatal Care, where the patients are grouped based on the value of the Trimester in the Encounter Screen
Childhood Immunizations, indicated on line 10, which displays the patients that had CPT codes with a <UDS Group> of UDS 24.
Pap Tests, indicated on line 11, which displays the patients that had CPT codes with <UDS Group> of UDS 23.
For more information about UDS reporting requirements, refer to the U.S. Department of Health and Human Services information at http://hrsa.gov/data-statistics/health-center-data/reporting.
FIX Management--►Track Productivity
The Track Productivity report would sometimes encounter a problem when running the task on the server. This has now been fixed.
FIX Management--►Journal
When printing a journal and selecting Sort Option F, order of posting, the report was not sorting in the correct order. This has been fixed in the update.
FIX Management--►Detail
When requesting the Detail report option P or A, it printed the charges, payments, and adjustments separately instead of having them all together. This has now been fixed.
NEW OPTION Management--►Board Certification
A new Board Certification option has been added to the Management menu which allows providers to send an excel file to certification boards on-line. This option has the two sub-options of Board Report and Board Excel File that can be accessed as shown below.
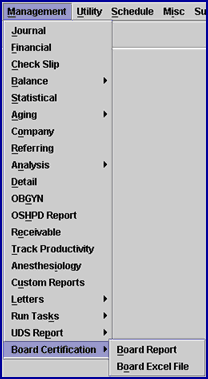
The Board Report option provides a printed report which also includes data that is not required in the Excel file but may be useful if your office is reviewing records; for example, Patient Name, Date of Birth, and the Facility Code. Running this report is optional to print, and is not a requirement of board certification.
The Board Excel File formats the Board Report into Microsoft Office Excel format. Note that this report includes only the required information of Case#, Age, Gender, DOS, ICD-9 Code, and CPT, E&M or HCPCS Codes. Headings must be manually entered by your office before submitting the file to the certification board.
For additional information on setting up and running these reports, please contact PCS support or consult the online documentation.
Version 9.10.21
Report printing:
Previously, Intellect did not permitting reports with more than 32,700 rows to be exported into Excel. This has been modified in the current version.
NOTE: Be aware that the Excel standard imposes a maximum limitation of 65000 rows per sheet.
Version 9.08.28
Management--► Journal
In the past, the Journal report didn’t display the second page of the report as Page 2 – the numbering skipped from Page 1 to Page 3. This has now been corrected.
Management--► Analysis--► Detail
It is now possible to import Detail reports to Excel. From the Print Detail screen, click on the [Print] button and select Excel from the drop-down menu as shown below.
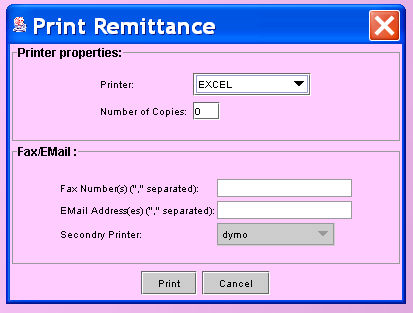
Version 9.08.03
Management --►Journal – new report with Batch Number:
To assist in locating the Charges--►Charge <Batch No> assigned to posted charges, Intellect has added <Option B> under Management--►Journal. The journal is identical to selection C except the column description has been replaced with Batch No.
The report includes records for charges, payments, and adjustments, and may be used in combination with other fields on the screen. In the following example, the clinic’s report was printed for only Batch No C123.
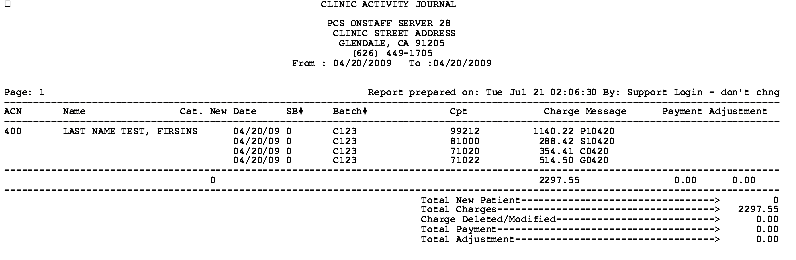
Version 9.08.03
Management--►Journal--►Option H:
<Option> H on the Print Journal screen had a problem when printing ‘Server Side’. This problem has been resolved with this update.
Version 9.08.03
Management--►Financial – additional information added to clinic total section:
On the last page of the Financial Report, additional items have been added to the totals section. A Key section is also included which explains each item that has been added. The following example shows the totals section of the Financial Report and the key:
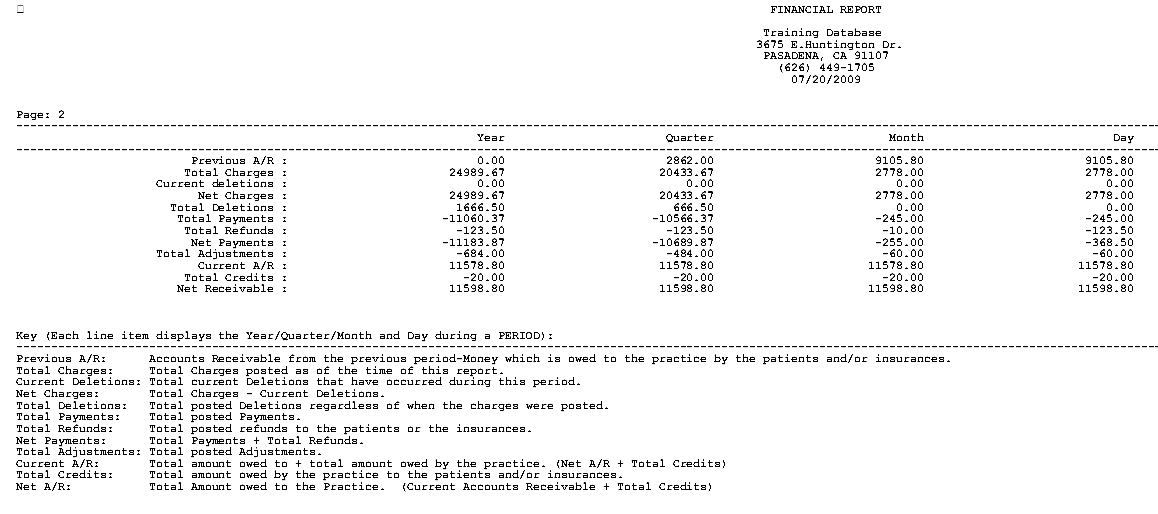
Because the example is hard to read, the following is a typed example of the key:
Key (Each line item displays the Year, Quarter, Month, and Day during a PERIOD):
PERIOD: Based on the last time closed for this Year, Quarter, Month or Day
Previous A/R: Accounts Receivable from the previous period – Money which is owed to the Practice by the patient and/or insurance
Total Charges: Total Charges posted as of the time of this report.
Current Deletions: Total current Deletions that have occurred during this period.
Net Charges: Total Charges – Current Deletions. ‘-‘= minus
Total Deletions: Total posted Deletions regardless of when the charges were posted.
Total Payments: Total posted Payments
Total Refunds: Total posted Refunds for patients and/or insurances.
Net Payments: (Total Payments + Refunds)
Total Adjustments: Total posted Adjustments.
Current A/R: (Total amount owed to practice + total amount owed by the practice). (Net A/R + Total Credits)
Total Credits: Total amount owed by the practice to a patient and/or insurance.
Net A/R: Total Amount owed to Practice. (Current Accounts Receivable + Total Credits.)
Version 9.08.03
Management --►Receivable –
In the past, when printing the report some columns were left blank. The error has been corrected in this version.
Version 9.08.03
Management --►Letters
Emailing Patient News Letters:
You may now email your office News Letter to patients who have a completed email address on file in Intellect. Newsletters can be created using software such as Microsoft Word or Excel, or scanning a newsletter and attaching the .PDF file, etc. Create your newsletter, and then complete the following set up in Intellect:
Utility--► Set Up--► Security--► Login Users:
<Operator Email>
![]()
The field must be completed for the operator who submits the email request.
The <Operator’s Email> must be the same ‘registered’ DSL <Username> email address located under Utility--►Tools--►Configuration.
Utility--►Tools--►Configuration:
<SmtpServer>
![]()
Type the address for the mail server’s out going email.
<Smtp Port>
![]()
If the email server accepts port 25, leave unchanged, otherwise type in the required port number.
<Smtp SSL>
![]()
![]()
The default is “N” - No SSL required. If the email server requires SSL, use the drop down to select “Y” - Yes.
<SMTP Authentication>
![]()
![]()
This option is used in Email setup where the mail server requires login and password authorization.
Accept the default "Y" use authentication or use the drop down list to make an alternate selection.
<User Name>
![]()
Type the user name for the email server account.
<Password>
![]()
Type the password for the email server account if required.
Registration--►Regular--►Patient or Registration--►Worker--►Worker:
<Email Address>![]()
or <Email> ![]()
Type the patient’s email address or the email address where Newsletters may be sent for this patient.
NOTE: This email address may be used for several types of correspondence in Intellect, e.g. News Letters, Patient Statements, Follow-Up Letters and Appointment Recall Reminders.
Version 9.08.03
Management--► Letters--►News Letter Report--►Print – Printing patient email address lists:
You may print a list of patients either with a completed email address on file, or a list of patients without an email address on file. The list can be filtered by completing the following fields.
NOTE: The patient’s email address is entered in Registration--►Regular--►Patient--► <Email Address> or Registration--►Worker--►Worker <Email> field in the demographic screen.
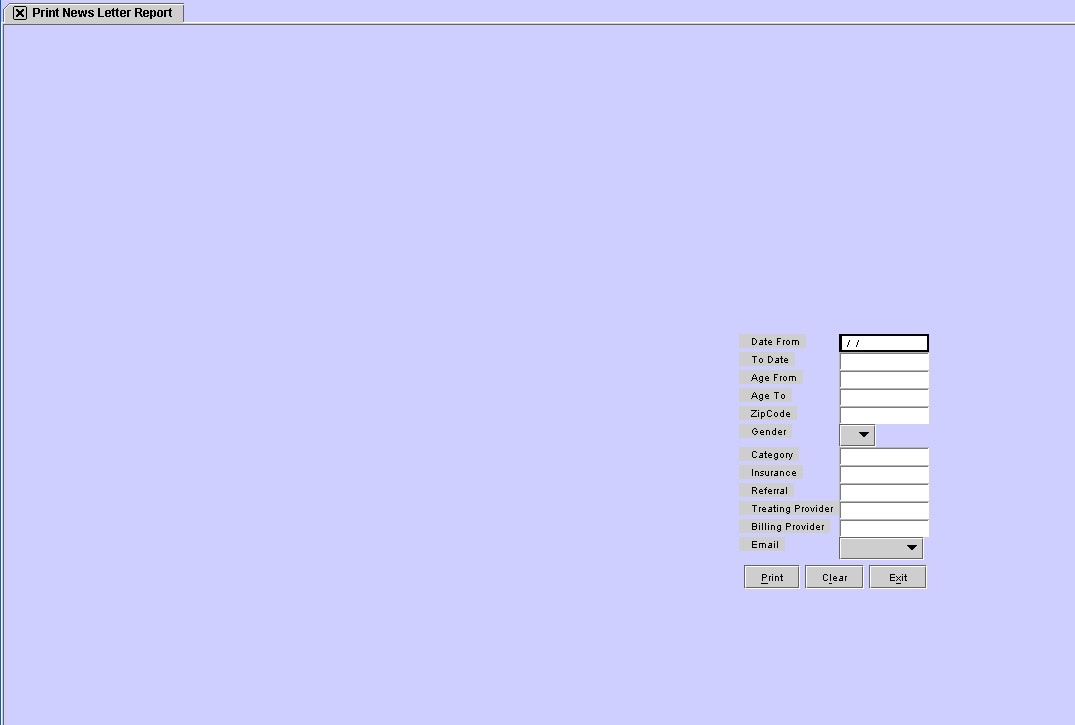
To print either list, go to Management --►Letters--►News Letter Report and complete the screen as follows:
<Date From>
![]()
This field is required and will default to the current calendar date if left blank. You may accept, modify, or clear this field. This will select patients that have a date of service between the <From/To> date selected.
<Date To>
![]()
This field is required and will default to the current calendar date if left blank. You may accept, modify, or clear this field. This will select patients that have a date of service between the <From/To> date selected.
<Age From>
![]()
This field is Optional (leave blank if not applicable)
This is the youngest age, in whole years, if there is a need to filter the results by age determined by the patient’s age at this time. The default is all ages (leave blank).
<Age To>
![]()
This field is Optional (leave blank if not applicable)
This is the maximum age, in whole years, if there is a need to filter the results by age determined by the patient’s age at this time. The default is all ages (leave blank).
<Zip Code>
![]()
This field is Optional (leave blank if not applicable)
Enter a zip code if there is a need to filter the results by a patient’s zip code. The default is all zip codes.
<Gender>
![]()
This field is Optional (leave blank if not applicable)
Enter a gender if there is a need to filter the results by a patient’s gender. The default is all genders.
<Category>
![]()
This field is Optional (leave blank if not applicable)
Enter a specific Category if there is a need to filter the results by Category. The default is all categories.
<Insurance>
![]()
This field is Optional (leave blank if not applicable)
Enter an insurance company if there is a need to filter the results by insurance company. The default is all insurances.
<Referral>
![]()
This field is Optional (leave blank if not applicable)
Enter a Referral Code if there is a need to filter the results by a referral. The default is all referring doctors.
<Treating Provider>
![]()
This field is Optional (leave blank if not applicable)
Enter a treating provider code if there is a need to filter the results by a treating provider. The default is all treating providers.
<Billing Provider>
![]()
This field is Optional (leave blank if not applicable)
Enter a billing provider code if there is a need to filter the results by a billing provider. The default is all billing providers.
<Email>
![]()
There are three options for email:
• Accept the default of [Blank} which will display both patients that have an email address and patients that do not have an email address.
• Have – Selecting this option prints a listing of patients which have the Registration--►Patient--► <Email Address> or Registration--►Worker--►Worker <Email> field in the demographic screen completed.
• Do Not Have – Selecting this option allows reports to be printed for patients that do not have an email address in the system.
Version 9.08.03
Management --►Letters--►News Letter – Sending the News Letter
News Letters may be emailed to patients who have an email address in the system. Email addresses can be entered at Registration--►Regular--►Patient--► <Email Address> or Registration--►Worker--►Worker <Email>. Once an email has been entered, complete the following fields to filter the patients who will be sent your News Letter.
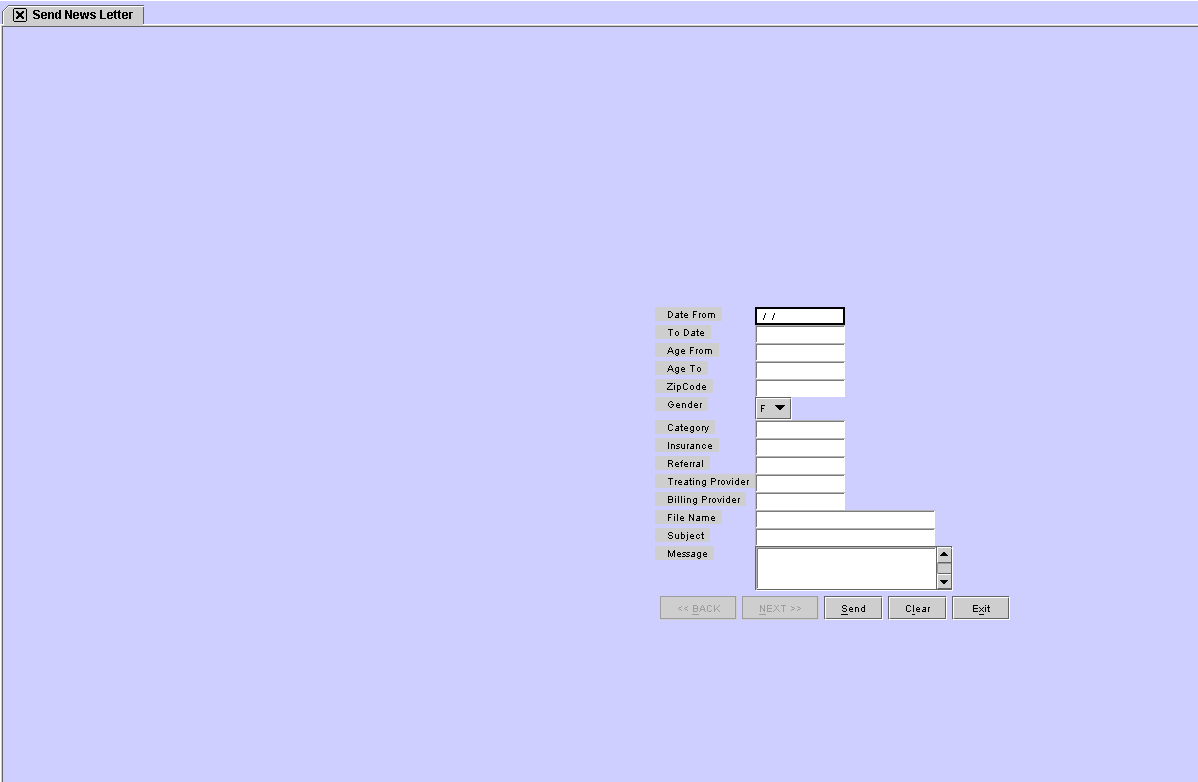
<Date From>
![]()
This field is required and will default to the current calendar date if left blank. You may accept, modify, or clear this field. This will select patients that have a date of service between the <From/To> date selected.
<Date To>
![]()
This field is required and will default to the current calendar date if left blank. You may accept, modify, or clear this field. This will select patients that have a date of service between the <From/To> date selected.
<Age From>
![]()
This field is Optional (leave blank if not applicable)
This is the youngest age, in whole years, if there is a need to filter the results by age determined by the patient’s age at this time.
The default is all ages (leave blank).
<Age To>
![]()
This field is Optional (leave blank if not applicable)
This is the maximum age, in whole years, if there is a need to filter the results by age determined by the patient’s age at this time.
The default is all ages (leave blank).
<Zip Code>
![]()
This field is Optional (leave blank if not applicable)
Enter a zip code if there is a need to filter the results by a patient’s zip code. The default is all zip codes.
<Gender>
![]()
This field is Optional (leave blank if not applicable)
Enter a gender if there is a need to filter the results by a patient’s gender. The default is all genders
.
<Category>
![]()
This field is Optional (leave blank if not applicable)
Enter a specific Category if there is a need to filter the results by Category. The default is all categories.
<Insurance>
![]()
This field is Optional (leave blank if not applicable)
Enter an insurance company if there is a need to filter the results by insurance company. The default is all insurances.
<Referral>
![]()
This field is Optional (leave blank if not applicable)
Enter a Referral Code if there is a need to filter the results by a referral. The default is all referring doctors.
<Treating Provider>
![]()
This field is Optional (leave blank if not applicable)
Enter a treating provider code if there is a need to filter the results by a treating provider. The default is all treating providers.
<Billing Provider>
![]()
This field is Optional (leave blank if not applicable)
Enter a billing provider code if there is a need to filter the results by a billing provider. The default is all billing providers.
<File Name>
![]()
This field is Optional (leave blank if not applicable)
Create any type of file for the system to find and attach to the email. Note that the file will only be attached to an email – the content of the file will NOT be displayed in the <Message> field.
To find the file, press [ENTER] in the <File Name> field. The Open box is then displayed to browse for and attach the file to this email.
Use the “Look in” drop down to change directories if necessary to browse for the file.
To select the file, highlight the file and select [OPEN] or double-click on the file to select it.
<Subject>
![]()
This field is Optional although it is recommended to include a subject line for the email.
Enter a title or brief description of the email.
<Message>

This field is Optional although it is recommended to include a brief message (leave blank if not applicable). Enter a message directly into this field.
NOTE: The content of the file previously attached in the <File Name> field is NOT displayed here.
Once finished entering the above information, select one of the following options:
![]()
Click the [Send] button to immediately begin emailing patients your News Letter.
Clicking the [Clear] button will clear all information and returns the cursor to the <Date From> field without saving.
Selecting [Exit] clears the screen and returns to the main Intellect screen without saving any information, or emailing the News Letter.
Version 9.03.25
Management --►Analysis
There are some reports which print only one page (for example: Analysis Report EE, FF, GG, and HH). These did not have a report Total when printing (There would only a total per page). This has been corrected and the report Total has been added.
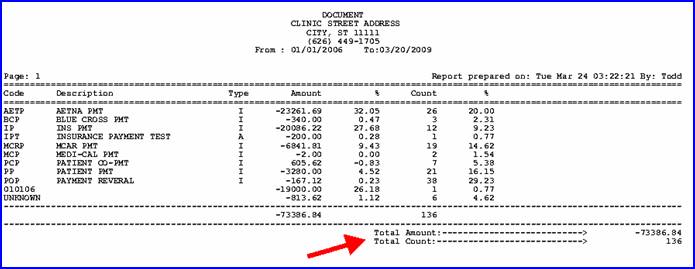
Version 9.12.13
FIX Utility--►Tools--►Reverse Entry – Report Failing
In some circumstances the report would fail to print even though the data was reversed. This was corrected and is in a patch; the version number remains 9.12.12.
Version 9.12.11
MODIFICATIONS Utility --►Diagnosis
In preparation for the ICD10 coding requirements the following changes have been made to the Diagnosis table and screen:
• The <ICD9 Code>field has been changed to <ICD9/ICD10 Coode> and the field size has been increased to 10 characters
• A new field has been added to the screen: <ICD9/ICD10> which will be used to indicate whether the code entered in <ICD9/ICD10 Code> is an ICD9 or ICD10 code.
NOTE: When your system is updated, all existing codes will be set to ICD9, assuming you will not yet have ICD10 codes entered in your database. If you have entered ICD10 codes – you must notify PCS prior to being updated.
NEW FIELD Utility--►Insurance --►TeleCom
A new field has been added to the TeleCom screen in preparation for a future change. The new field is NOT being used at this time.
When implemented this field will take the place of the Utility--►Insurance <Version> field, which is only used for electronic billing and only for Insurance records which also have a TeleCom record.
Version 9.12.10
BETA NEW FEATURE Internet Faxing
NEW FIELDS Utility --►Tools --►Configuration
Before using this feature, enroll with Fax.com. When enrollment is complete, Fax.com will provide you with login/user name and password information. This information is entered on the Utility --►Tools --►Configuration screen in the following new fields:
1. Fax Provider ![]()
![]()
1.1 To send faxes via the internet, select InterFax from the drop down list.

2. Fax Username ![]()
2.1 To send faxes via the internet, enter your vendor-assigned login/user name.
2.2 If you are not sending internet faxes, this field should be empty.
3. Fax Password ![]()
3.1 To send faxes via the internet, enter your vendor-assigned password.
3.2 If you are not sending internet faxes, this field should be empty.
Once the information has been entered in the above fields, faxes may be sent via internet. For additional information on sending faxes, refer to Sending Faxes in the online documentation.
After faxes have been sent, their status can be monitored on the Spooled Jobs list displayed at Misc--►Fax Spool, as shown below. Additional information on viewing fax status is also available in the Sending Faxes section of the online documentation.
NEW FIELD Utility --►Category - New Field <Follow Up Method>
A new <Follow Up Method> field has been added to the Utility--►Category screen to allow users to select the method for follow up letter printing.
![]()
![]()
The valid choices on the drop down list are:
Doctor: Print a separate letter for each provider treating the patient
Clinic: Print one letter per patient for all providers treating the patient.
NOTE: PCS recommends that if you use the Follow Up letter feature that you print a letter in each clinic to verify the Letterhead is set up.
MODIFICATION Utility --►Set Up--►Printer--►Report
Previously when adding or modifying records you needed to enter the Operator’s Password. Effective this update when adding or modifying records you will need to enter the User Number. This coincides with the changes made in the March release, version 9.12.03, which were made to help facilitate the management of operator’s passwords. The Report table is used to assign default printers for each operator based on their password.
Version 9.12.09
NEW FIELD Utility --►Set Up --►Parameter
A new <Automatic HL7 Export> field has been added to the Parameter screen, as shown below, making it possible to save Patient and Appointment information to an HL7 file on the server where client’s vendors can pick them up. HL7 file format are used as a standard in the industry.
![]()
The options for this field are as follows:
Blank: No HL7 file is generated.
Appointment: When an Appointment is added, modified, rescheduled, cancelled, or postponed, an HL7 file is generated.
Patient: When adding new patient demographics and/or insurance, an HL7 file is generated. Note: Worker is not available at this time.
Both: A HL7 file is generated when an Appointment is added, modified, rescheduled, cancelled, or postponed, and when adding new patient demographics and/or insurance.
Press [F2] or click directly on the field to display a list of options and their descriptions.
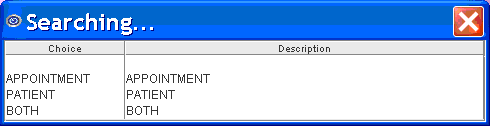
FIX Utility --►Procedure --►Inventory--►Vendor Items --►Print
In the past, when selecting Utility/Procedure/Inventory/Vendor Items/Print, the report printed in portrait and all fields of the report would not print. This report has now been setup as landscape, allowing all the report fields to display on the report.
NEW OPTION Utility --►Task Manager
To accommodate clients who would like to have the statement file created for the previous day’s cycle instead of the current cycle, the statement cycle parameter can now be set as TODAY –X where X is a number. If you are interested in having this change applied to your automated statements please contact our support department.
FIX Utility --►Message --►Reason Code
In the past, a new Reason Code could not be set up if that Reason Code number was already being used even though the Types were different. For example, if Reason Code 113 was already set up under Type CA, the system would not allow Reason Code 113 to be set up under Type CO. This has now been fixed.
Version 9.12.07
NEW FEATURE Utility --►Task Manager - CallSTAFF
CallSTAFF can now call either the Home Phone first and, if the Home Phone field is blank/null or if it has an invalid number of characters in the phone number, the system can then try the Cell Phone. This can be set up visa versa: Cell first, then Home. If the program attempts to call the first number and there is no answer: it does not call the second number. It only calls the second number if the first is blank or invalid.
Note: CallSTAFF will not call the second number if the first number was not answered or was busy.
NEW OPTION Utility --►Task Manager – parse as list
In the parameter screen the new option "parse as list" has been added which, if set, tells the report generator to enclose each element of a comma-separated list inside single quotes. As an example, when one,two,three, is entered, the report generator replaces it with 'one','two','three' inside the sql, eliminating the need to enter single quotes when running the report.
FIX Utility --►Procedure --►Inventory --►Vendor Items - Print
In the past when the Vendor Items were printed, the paper orientation needed to be set to Landscape. This has been corrected in this version.
FIX Utility --►Procedure --►Fee Schedule--► Print
When printing the fee schedule to Excel or disk, the job should convert to Local task but was not. It was running as a Server task, causing the file to saved to the server not the workstation. This has been corrected in this update.
Version 9.12.04
NEW FIELD: Utility—►Tools—►Configuration – <Time Zone>
A new <Time Zone> field has been added to the Modify CONFIG screen:
![]()
This field facilitates the correction of servers and/or workstations that may have their clocks set to the wrong time zone or those which are set to change Daylight Savings Time based on the old dates. You may need to use this field to change time zones if any of the following apply:
You use Intellect for check in/out and notice incorrect times are being entered
You are running CallSTAFF
The printed time on your reports is incorrect
You are using Windows 2008
You have a server which is 2 or more years old
Correct the time zone on each workstation and the server as follows:
1. Go to Utility>Tools>Configuration, select the correct time zone, and then press [Modify].
2. Double-click on the time shown in the bottom right corner of your screen, displaying the Date and Time Properties screen.
3. Un-select the auto-synch option. For example, on Windows XP Professional you would uncheck the box labeled: Automatically adjust clock for daylight saving changes.
4. Click on [OK].
Note: If you needed to have Prime Clinical Systems reset your time after the Daylight Savings Time change on either your server or workstation, please go through the above procedure to make sure the auto-synch feature is not selected on your server/workstation(s).
NEW OPTION Utility—►Insurance—►Tele Com – Capario
Real time eligibility now works with the vendor Capario. When setting up Capario for the Eligibility Feature on the Utility—►Insurance—►Tele Com screen, please note the following field information:
<Login>: Must be the same as the <Authorization> field
<Password>: Must be the same as the <Authorization> field
<Transmission Method>: Select CAPARIO
<FTP site>: Select https://b2b.capario.net/b2b/X12Transaction
<Authorization>: Must be filled with information provided by Capario
<ISA Password>: Must be filled with the password given by Capario
<ISA 5 Qualifier (05)>: Enter ZZ
<ISA 7 Qualifier (07)>: Enter 27
Version 9.12.03
NEW FEATURES Utility--►Set Up--►Security--►Login Users
There are two changes to the Login (password) set up in this update. The changes were made to help facilitate the management of operator’s passwords. Management may now modify an operator’s security, appointment group, etc without knowing the operator’s current password.
User Number: This is the unique number assigned to each operator. The number is used to track work done by each person and can be viewed in places such as the Ledgers and Appointment Schedule. To allow management to access an operators Login record without having the password, the <User No> field has been moved so it is now the first field on the screen. If modifying a record and you have the User No, enter it at the <User No> field and press [Enter]; if not, press the F2 key twice. A complete list of operators for the clinic will be display. Scroll down to the person whose record you wish to modify and press [Enter].
Temporary Password: This field allows you to reset an operator’s password. If set to ‘Y’ (yes), the next time the operator logs in the following message will pop up prompting them to enter a new password:
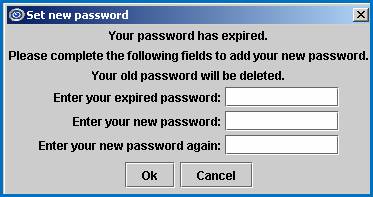
Using the Temporary Password feature will maintain the same security levels, operator number, and set up of the original password. After completing the fields and selecting [Ok], the following message will pop up confirming the new password has been set up successfully:
If the operator attempts to enter the same password, the following message will pop up. After selecting [Ok], the focus will return to the Set new password window.
In some circumstances the new password may not be accepted, in which case the following message will pop up After selecting [Ok], the focus will return to the Set new password window.

ATTENTION Prime Clinical Systems recommends that immediately after the update, management assure that access is provided to only those individuals who should have it by checking the following areas:
Settings for the Login Users menu
Security levels of all operators in each clinic
Settings for the Login User Menu
Verify the security setting for the Login User menu as follows:
1. Go to Utility--►Set Up--►Menus--►Programs. At the Command Name field enter Login Users/MIUS. Your screen should look similar to the following. Note the security level and security group assigned to the Login User menu in your system in fields <Level> and <Security Group>.
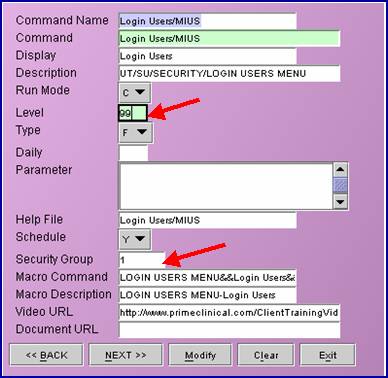
2. Go to Utility-►Set Up-►Security-►Login Users-►Modify. At the <User Number> field press [F2] and then, from the Search window, press [F2] again. This will list all of the users in this clinic. See example:

3. Highlight the first record and press [Enter] and then press [Enter] a second time. This will bring up the operator’s login record. Verify the Security Level for the applicable group. In our example it is Security Level Group 1.
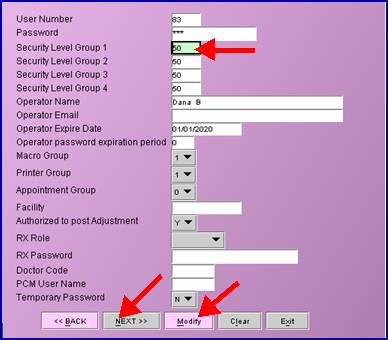
4. Verify the security levels of all operators in each clinic as described below.
Security Levels of All Operators
For this procedure, start where you ended above and refer to the sample screen given in step 3.
To verify each operator’s login record, click on the [Next] button to go to the next record in the list. If you modify the operator’s security level, you must click on the [Modify] button to save the change before clicking [Next].
NOTE: Do NOT change User Number 999 and 998.
If your office would like assistance in verifying or modifying the security levels on your system please contact our Training Department.
NOTE: With the changes to the Login User table, duplicate User (Operator) Numbers are not permitted. Therefore, if you have multiple Login User records with the same User Number, the update will reassign a new User Number to all but the first record it encounters with a duplicated User Number, including old users. Therefore, you may wish to review your Login user records and delete any which are no longer used, particularly if they have duplicated User (Operator) Numbers.
Version 9.12.02
FIX Utility--►Insurance --►Insurance --►Print
In the past an “Ambiguous Column undefined” error would occasionally display when trying to print. This problem has been resolved.
FIX Utility--►Procedure --►Surgery Items --►Print
In a previous version, an error message would display after clicking the [Print] button. This has been corrected.
Version 9.12.01
NEW FIELD Utility--►Diagnosis – <UDS Group>
To accommodate Uniform Data System (UDS) information, a <UDS Group> field has been added to the DIAGNOSIS screen, as shown below:
![]()
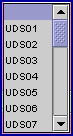
When updating your server to the current version: the UDS Group will be updated for you. If you add any new codes in the future you will need to select the correct UDS Group. This field MUST be completed if your office runs UDS reports. If your office does not use UDS reports, accept the “blank” default; otherwise, use the drop-down list to select the UDS Group that corresponds to this DX. Pressing [F2] in the <UDS Group> field will display the following list of UDS codes and their descriptions.
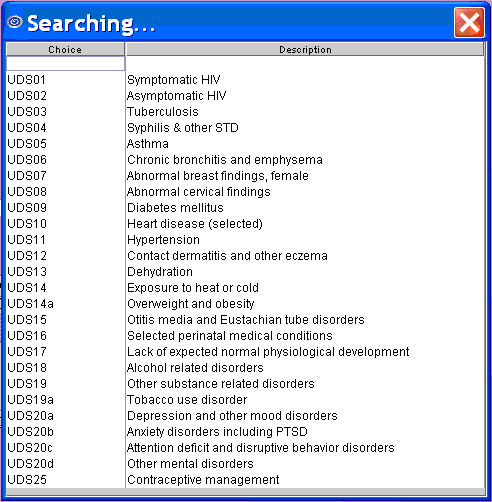
FIX Utility--►Procedure <Billing>
Even though they were not transmitted electronically and were for an Electronic Billing Carrier other than the carrier selected, claims whose <Billing> field equaled ‘Paper Claims Only’ were included on the Electronic Billing Report with the note “Not sent” displayed in the comment column. This has now been corrected.
NEW FIELD Utility--►Procedure--►Procedure - <UDS Group>
To accommodate Uniform Data System (UDS) information, a <UDS Group> field has been added to the PROCEDURE screen, as shown below:
![]()
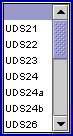
When updating your server to the current version: the UDS Group will be updated for you. If you add any new codes in the future you will need to select the correct UDS Group. This field MUST be completed if your office runs UDS reports. If your office does not use UDS reports, accept the “blank” default; otherwise, use the drop-down list to select the UDS Group that corresponds to this Procedure. Pressing [F2] in the <UDS Group> field will display the following list of UDS codes and their descriptions.
FIX Utility--►Provider
In prior versions there was a bug in the Provider Screen which prevented the user from saving changes when modifying the <Cost Ctr/Dr> field from C to D and the number of provider licenses purchased was equal to the number of provider records having ‘D’. This has been fixed.
NEW FEATURE Utility--►Tools--►iReport
The iReport option is available for clients to write custom reports. To access the iReport option, go to Utility --►Tools --►iReport. Since iReport is an off-the-shelf product made available for software developers’ use, Prime Clinical Systems does not provide training or a manual for iReport. Clients who choose to use this option must purchase a manual from a third-party software vendor.
NEW FIELD Utility--►Insurance--►Insurance
A new <Category> field has been added to the Insurance screen, as shown below.
![]()
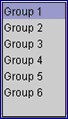
This field is for use with UDS reports and supports information given on UDS’ Table 4 Selected Patient Characteristics. Each of the options supports third party medical insurance sources, as defined below. The following chart is available by pressing [F2] in the <Category> field.
NOTE: Although initial use of this field is for UDS reports, in the future it will be used for other Intellect reports.
BETA Direct connection from Intellect to PCM
NEW FIELD Utility--►Set Up --►Clinic
A new field, as shown below, has been added to the Add CLINIC screen. This field has been added to facilitate a future interface between Intellect and PCM. If you are interested in finding out more about this feature, or would like to begin using it during the beta test phase contact Prime Clinical Systems Intellect support.
![]()
![]()
[No] indicates the client does not currently have PCM.
[Yes] indicates the client does have PCM.
NEW FIELD Utility--►Set Up --►Security --►Login Users
The Add SECURITY screen now has the new field shown below. This field has been added to facilitate a future interface between Intellect and PCM. If you are interested in finding out more about this feature, or would like to begin using it during the beta test phase contact Prime Clinical Systems Intellect support.
![]()
Version 9.10.21
Utility --►Referring --►Print:
When printing the Referring source list the program from Windows 2008 Intellect was having a ‘column ambiguity’ error. This has been fixed in the update.
Utility --►Category --►<Hold Who>:
The Category screen now has a <Hold Who> field. This field has a pull-down list with the choices of N and Y, with N being the default.
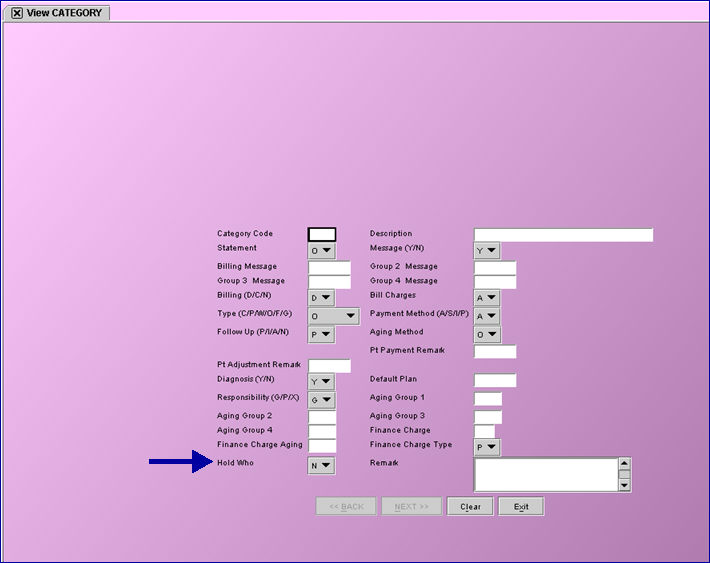
[N] Selecting N allows the payment responsibility to change during payment posting. For example, depending on a patient’s insurance, billing can vary between a primary insurance (P1), a secondary insurance (P2), or the patient as the guarantor (G).
[Y] Selecting Y keeps the payment responsibility the same while payments are being posted. For example, primary insurance (P1) will be the only insurance billed
Note: This option can be used for Worker Compensation patients so that partial payments will NOT change the balance to be the patient’s responsibility.
Note: This feature works only when posting payments through Payment/Open item.
Utility --►Set Up --►Printer --►Device
Option ‘T’ has been added to the device selections to allow information to be sent to an outside company via FTP/SFTP transmission.
By selecting this option, labels or reports can now be outsourced. When selecting ‘T’, make sure the appropriate printer or device is set up to receive the transmission. For additional information, contact PCS service.
Version 9.08.28
Utility --►Set Up--►Parameter
A new field on the View Parameter screen, <Waiting List Look Up Days>, now allows a user to specify how soon a patient should be displayed on the wait list. For example, if a patient appointment is booked 30 days in the future and you don’t want to see that patient on the waitlist until 15 days prior to his/her appointment, enter 15 in the <Waiting List Look Up Days> field. This is accessed using the Modify option. ![]()
Version 9.08.03
ATTENTION:
Utility--►Provider CallSTAFF Reminder:
The CallSTAFF program has an additional field added to the internal set up which must be initiated by PCS Support. Please notify the support agent before your update if your office is using CallSTAFF so the field may be updated. Failure to do so may result in errors within your system when trying to place reminder calls or when adding additional records.
Version 9.08.03
Utility--►Messages--►Body Part (Not used at this time):
This is a new screen which will contain an Industry List of Body Parts and assigned codes which will be used on some Worker Compensation forms. Do not add any records to this table yet. In a future update the list of body parts and codes will be inserted. If you add records before then, they will be over written by the list PCS will provide when ready to implement this table.
Version 9.08.03
Utility--►Maintenance--►Reverse Entry:
When reversing a payment or adjustment prior to this update, the <Who> column could not be changed back to the value it had been prior to the payment or adjustment being posted. This has been changed in the update. The program now has a new internal field to track what the <Who> column was prior to the payment. This value is used to set the correct <Who> value after running Reverse Entry.
Returning the <Who> value back to the correct setting will work only for charges posted after this update.
Version 9.03.25
ATTENTION: New Field:
Utility --►Procedure
A new field has been added Utility --►Procedure <NDC Unit Value >
![]()
Used to convert quantities from HCPCS to NDC.
This value is used to populate the Electronic 837 claim Loop 2410 CTP04
Type the actual decimal quantity administered in a single dose.
For example:
HCPCS code is per 10mg and the product comes as a dry powder injection 500mg
NDC units are “each vial”
Dose was 100 mg, for example
HCPCS quantity = 10 and the NDC quantity = 100/500 = 0.2
ATTENTION: New Field:
Utility --►Procedure
A new field has been added to the Utility --►Procedure screen called <Unit of Measure>.
The <Unit of Measure> is required when an NDC Code is present. A procedure must be created with Utility --►Procedure <Status> = “N”.
Select the Composite Unit of Measure Qualifier that applies to the billing in this field to populate the Electronic 837 claim Loop 2410 CTP05.
![]()
![]()
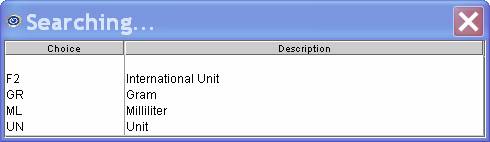
Utility --►Procedure
A new functionality has been added to the Utility --►Procedure screen field <Cost>.
The <Cost> is used when an NDC Code is present. A procedure must be created with Utility --►Procedure <Status> = “N”.
The value in this field is used to populate the Electronic 837 claim Loop 2410 CTP03.
Paper Claims
Intellect will be complete Box 24A CMS 1500 (HCFA) in the gray shaded area with the NDC number proceeded by the "N4" qualifier.
Or the UB-04 claim form, Intellect will be complete the Description field (Box 43) including the Unit of Measure and the Quantity.

Intellect will be complete Box 24D CMS 1500 (HCFA) in the gray shaded area with the quantity proceeded by the Unit of Measure qualifier
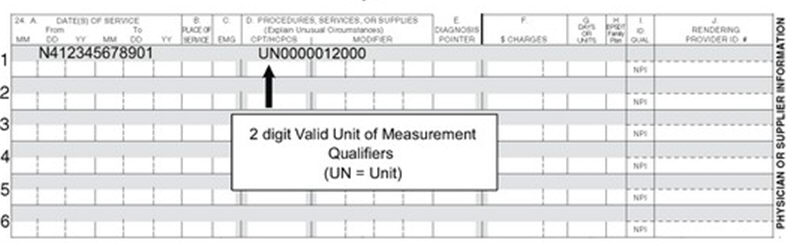
NOTE: the paper claims and electronic files allow for only one 11 character NDC number per charge. If billing for an injection where 1/2 comes from one vial and the second half comes from another vile: contact the insurance carrier to find out how the claim should be billed.
For more detail see the on-line help document under Charges --►Specialty Charges “NDC set Up”.
Utility --►Procedure
When Utility--►Procedure <Calendar Y/N> = “Y”, the Charge --►Charge Calendar pop up now has Check Boxes which allow the poster to select a week at a time
Utility --►Tools --►Configuration
Three new fields have been added to be used when the client's database server and the task server are different: Onstaff Server Address, Report Port, Task Manager Port.
These are the Values:
Onstaff Server Address localhost
Report Port 6234
Task Manager Port 6233
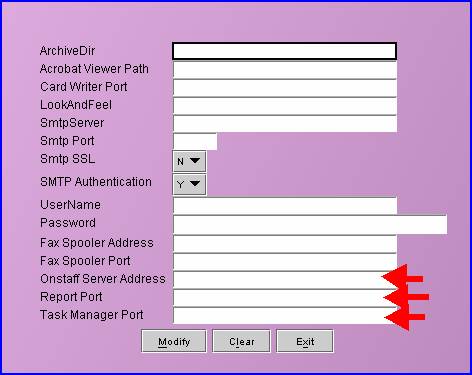
These fields should be modified ONLY if the Database Server and Intellect Server are separ`ate. Most systems are set up with the Database and Intellect Tasks running on the same server, and should be left with the default settings. Do not change them unless instructed to do so by Prime Clinical Systems.
Version 9.02.10
Utility --►Tools --►Configuration
A new field has been added to the Utility --►Tools --►Configuration screen. <SMTP Authentication> is used in Email setup where the mail server requires login and password authorization. If your office uses any Email feature in Intellect you should complete this field as soon as your system is updated if authentication is required by your mail server.
![]()
![]()
Utility --►Set Up --►Clinic
Two new Fields have been added to Utility --►Set Up --►Security to accommodate credit card processing.
![]()
![]()
These should be completed with information supplied by authorize.net upon registration for card processing.
See related On-line documentation located Schedule --►Appointment --► Receipt Credit --►Cards and Schedule --►Appointment --► Receipt.
Utility --► Procedure < CoPayment> :
Previous to this update the <Co-payment> field was not used. It is now used in conjunction with Schedule --► Appointment --► Receipt <Copay Amount> field and Payment --►Apply Receipt feature. When running Payment --►Apply Receipt: Intellect will post receipts entered in Schedule --► Appointment --► Receipt <Copay Amount> and apply them to charges where Utility --► Procedure <Co-Payment > =”Y”.
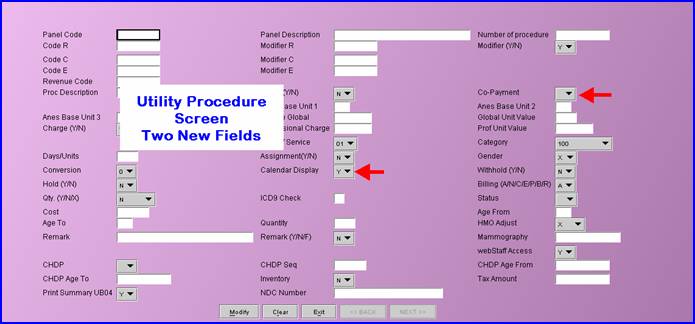
See the on-line documentation under Payment --► Apply Receipt for complete details.
Utility --► Procedure <Calendar Display>
A new option has been added to the Utility--► Procedure screen.
![]()
This drop down selection is used to activate a calendar pop up when posting this procedure in the Charges--►Charge screen.
Use this option for procedures which commonly have recurring charges such as Dialysis treatments, Allergy Injections, Physical Therapy, Hospital Visits, etc.
See the more complete description under the CHARGES section below and see the on-line documentation under Charges--►Charge and Utility--►Procedure --►Procedure <Calendar Display> for complete details. .
Utility --►Set Up --►Security and Log in to Intellect – forced password change feature added
Intellect now has the ability to force users to change their password based on a defined length of time. This feature was added for HIPPA compliancy.
To implement this new feature go to Utility --►Set Up --► Security --►Login User --► Add for new passwords, or Utility --►Set Up --► Security --►Login User --► Modify for existing passwords. Complete the <Operator password expiration period> field:
Operator password expiration period: Enter the number of days until the user will be forced to change their password. If completed: Intellect will prompt the operator to enter a new password, and to enter it a second time to confirm. For example: if completed as 30: each 30 days the system will prompt the user to enter a new password.
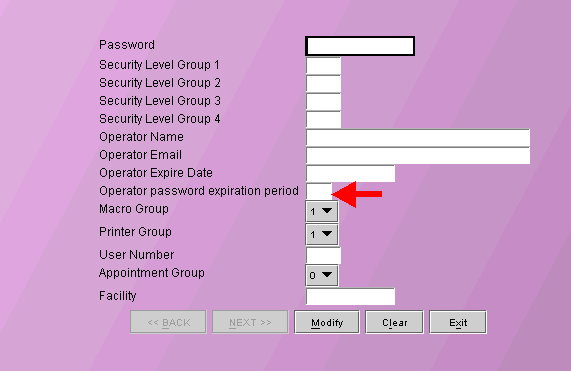
When logging into Intellect after the indicated number of days the Set new password window will be displayed.
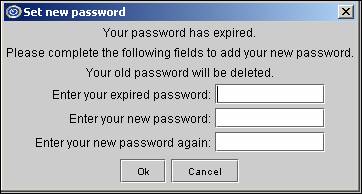
Complete the screen as follows:
Enter your expired password: this field must be completed. By entering your old password Intellect will copy your printer set up and User Interface to the new password.
Enter your new password: Enter your new password exactly as you will type it when logging in to Intellect. This field is case sensitive – so double check your Caps Lock before completing.
Enter your new password again: Enter your new password exactly as you did in the previous field.
Click [OK]
If the passwords entered are not exact matches, you will see the following message:
After selecting [OK] you will be returned to the Set new password screen. Correct your passwords.
Once correct the New Password Set screen will be displayed:
After selecting [OK] focus will return to the login screen. You may now log in using your new password.
If the program cannot accept your new password as entered the following Error screen will be displayed:
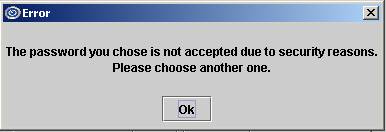
You must enter a different password. Selecting [OK] will return focus to the Set new password screen.
NOTE: If you do NOT complete the <Operator password expiration period> field: the user will not be forced to change their password.
Utility --►Procedure --►Procedure --► Increase Fee
The Utility --►Procedure --►Procedure --► Increase Fee menu option now allows the user to select from several rounding options:
After entering the <Percent to increase>:
Increase - Increases the fee without rounding
Round - Standard rounding where anything over $$.49 rounds up and all else rounds down(50 cents or more rounds up).
Round Up - Any amount over $$.00 rounds up (any amount of .01 or greater rounds up).
Round Down - Any amount under $$ .00 rounds down
Click on the radio button for the rounding method you wish to apply. Then click on the [Done] button to run the Increase Fee program.
Version 9.12.13
MODIFICATION Schedule--►Appointment--►Receipt
When two receipts were entered on the same day for the same patient, Apply Receipt could post only one of the receipts. However, the next time the Apply Receipt task was run, the second receipt would be posted. This has been changed in this version.
FIX Schedule --►Appointment --►Receipt
When two receipts for the same patient were being posting through Apply Receipt, the Check No of the first check would display in the Accounting and Open Item Ledgers under the <Message> column and would print on the Journal. This has been corrected in this version.
MODIFICATION Schedule--►Appointment--►Full Day - Eligibility Verification and Billing--►Tele Com--►Eligibility
Prior to this update, Response Code AAA67, used by the insurance when the patient was not found in their eligibility records, was not programmed in Intellect. Therefore, nothing would show in Intellect's Eligibility History. Effective this update, the 271 Response Code AAA67 has been added to the eligibility verification programming, allowing the code to be inserted into the patient's Intellect eligibility record and the description to be displayed in the patient eligibility history.
Version 9.12.10
Known Issue in This Version:
Schedule --►Appointment--►Print <Selection> = Registration
If completing the field <Appointment Type> to print for a single appointment type code, the task will fail. This error does not affect automated tasks which print for all appointment types or if manually printing for all appointment types. This has been fixed in the patch, and the version remains 9.12.10.
NEW Schedule Appointment Reminder
The email appointment reminder message has been enhanced to include both [Confirm] and [Cancel] buttons to allow patients to either confirm or cancel their appointments.
Note: In the example above, the bottom portion of the email reminder (where Instructions are shown) is available for a customized message by Appointment Type. A custom message for each Appointment Type (NOT patient) can be entered in the <Email Message> field on the Appointment Type screen. Go to Utility --►Set Up --►Appointment --►Appointment Type to enter your message.
If a patient clicks on the [Confirm] button, the following message displays
and the “N” column on the Appointment Schedule changes to green, as shown below, indicating the appointment was confirmed. Note: CallSTAFF also uses green for confirmed appointments.
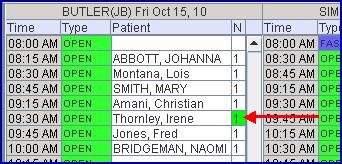
If a patient clicks on the [Cancel] button, the following message displays:
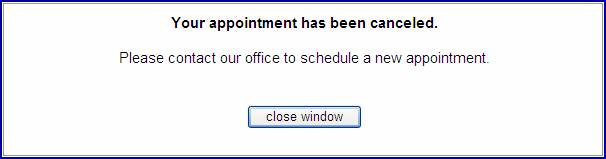
and the “N” column on the Appointment Schedule changes to red, as shown below, indicating the appointment was cancelled. Note: CallSTAFF also uses red for cancelled appointments.
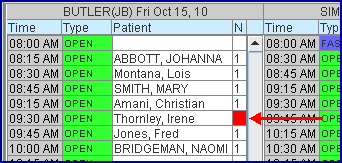
For additional information, please contact Prime Clinical.
MODIFICATION CAllSTAFF
CallSTAFF can now accommodate clients where dialing 1 before the area code is not needed. If this applies to your office please contact PCS support or training for assistance.
MODIFICATION CAllSTAFF – Multiple Reminder Calls for a Single Appointment: CallSTAFF can now place multiple calls on different dates for a single patient appointment. Calls can either be placed on separate dates or for different phones. Examples follow for how the additional calls may be used:
Example One: In addition to the reminder call a day or two before the appointment date, a call can also be placed two weeks prior to the appointment to remind the patient of any tasks to complete before the appointment, such as lab work or X-Rays, etc. There are program restrictions to having the extra call, such as:
Everyone with a scheduled appointment will receive two calls, not just those who need the extra reminder.
Example Two: the program can be set up to first call all patients whose cell phone number is on file, then call all patients whose land line/home phone is on file. This can be set up with either of these conditions:
Call ONLY the patients home phone who did not get a call placed to the cell phone. Or visa-versa.
Call EVERYONE on the home phone, even if they received a call on their cell phone. Or visa-versa.
If you are interested in having an additional call placed through CallSTAFF, contact PCS support or training for assistance.
FIX Schedule --►Appointment --►Print
In the previous release, the automated tasks for printing the Superbills, Registration Forms, and Appointment Lists were failing. This has been correct in the update.
NEW Schedule --►Appointment --►Print
The patient’s language has been added to the program files used to print the appointment lists. This means PCS can add a “Language” column to most of the appointment lists printed from Schedule --►Appointment --►Print. For example:
Patient Name Appointment Time Langage Appointment Type
Smith, Joe 01/01/2011 English Surgery
Smith, John 11/01/2010 Spanish Office Visit
If you would like the optional “Language” column added to any of the appointment lists you print, call PCS support for a quote.
MODIFICATION Schedule--►Appointment--►Receipt--►Delete
When Adding, Modifying or Deleting a Receipt, the program will verify that the operator’s password is still current and has not expired in Utility--►Set--►Up--►Security--►Login User <Operator Expire Date>. If it has expired, the program will display the message:
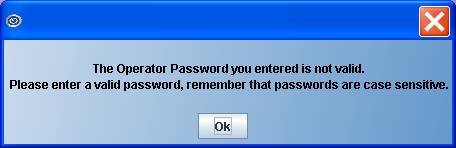
NEW FIELD Schedule --►Appointments --►Reports --►Appointment Statistical <Date Selection>
This field was added to further refine the report. In prior versions, the report selected the appointments within the date range entered based on the calendar date of the appointment. The new field provides the option to select whether the date range should be the calendar date of the appointment OR the calendar date the appointment was scheduled.
Select “Appointment Date” to get a report based on the calendar date of the appointment, or select “Appointment Date Made” to get a report based on the calendar date the appointment was scheduled.
FIX Schedule --►Appointment --►Full Day --►Right Click Menu --►Print - Label
In the past when trying to print labels, the system would pull a city and state that were not associated with the correct zip code. This has now been corrected.
NEW OPTION Schedule --►Appointment --►Full Day --►Right Click Menu --►Modify
A [Modify Patient] button was added to the Modify Appointment screen. This button acts the same as the [Modify Patient] button on the Add Appointment screen in that it opens the Modify Patient Screen or Worker Screen, depending on the patient's Utility--►Category <Type (C/P/W/O/F/G) >.
Version 9.12.09
FIX Schedule --►Appointment --►Search--►Notes Tab
When opening an existing appointment record by entering the patient account number, instead of searching for the patient and selecting them from the [F2] drop down list, the ‘Notes’ tab did not show previously entered notes, and new notes could not be saved.
MODIFICATIONS Schedule --►Appointment --►Eligibility
There were three changes made to the Eligibility feature in this update:
NEW COLUMN HEADING/PROPERTIES
The heading for the Amount column has been changed to Amt/% to accommodate improved data display. Now, if the line provided by the insurance has an amount which is a percentage, it is printed with the % symbol. For example, if In Patient services have a 30% coinsurance, the Amt/% column will print 30%. If the patient has a flat deductible, the column will display the flat amount; i.e., 250. Both of these situations are shown on the illustration below.

In some cases, a flat deductible is paid up to a certain point and then a percentage coinsurance covers the balance. In such a case both are displayed, separated by a forward slash, as indicated with the entries of 500/30% on the chart below.
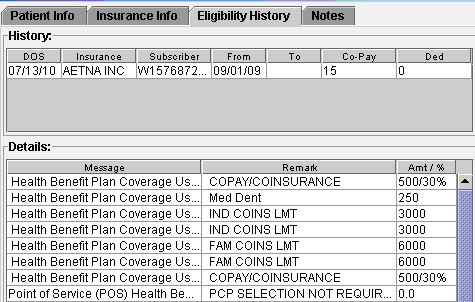
VERIFICATION PER CALENDAR DATE
Many insurances will verify eligibility for dates of service within 24 hours of the request. Some verify within 1 week, or 2 weeks, and some do not apply restrictions. Prior to this update, Intellect would submit the scheduled appointment date in the eligibility request file (270), which meant you could only request eligibility for current appointments. Effective this update the program will now send the Calendar Date instead of the scheduled appointment date. It is important to know that the eligibility response will be verifying the patient eligibility for the current calendar date and does not assure that the patient will be eligible for future appointments. This change applies to Real Time Eligibility (from the appointment schedule) and Batch requests for eligibility either sent via automation or manually sent through Billing--►TeleCom--►Eligibility.
EXPANDED DESCRIPTIONS
In the Eligibility information tab in Appointment Schedule, hover over descriptions with a mouse and the entire description provided by the insurance will display. In the example below, the mouse is hovering in the Message column over Health Benefit Plan coverage Us.. which then displays the verbiage in the gray pop-up field that states: Health Benefit Plan Coverage Use this code if only a single category of benefits can be supported. Deductible.
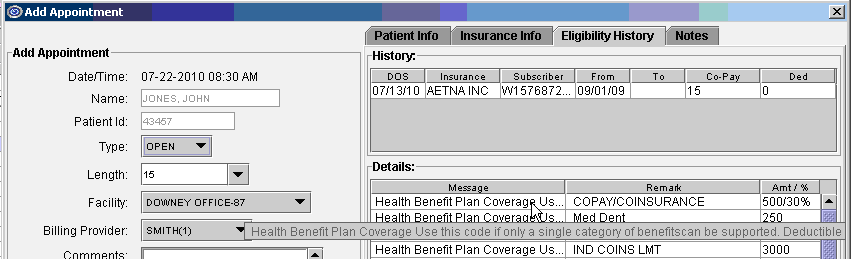
Version 9.12.07
FIX Schedule --►Recall --►Print - List
In a previous version when printing the List of Recalls, the program was inserting a record into the Ledger--►Message screen stating the Recall Letter was sent. A record should be inserted only when the Recall Letter (Form) is printed, not when the List is printed. This has now been corrected.
NEW FIELD Schedule --►Appointment --►Recall – <DOB>
Effective this update, you may now print the patient’s date of birth on your Recall Letter/Form. If you would like this field added to your letters, please contact Prime Clinical Systems.
FIX Schedule --►Appointment --►Reminder
Under some circumstances, the program had issues calling numbers with a local area code. This has been resolved in the update, provided the local area code is entered in the Parameter <Area Code> field.
CHANGE Schedule --►Appointment - <Eligibility>
Effective this update, changes were made to accommodate uploading multiple 271 Eligibility Response files.
NEW FEATURE Schedule --►Appointment - <Eligibility>
Effective this update, the program will now read and import rejection notices in the 271 Eligibility Response files; for example: "Patient not covered by insurance". The rejection notices are posted in the same Patient Eligibility file as insurance benefit notices.
NEW FEATURE Schedule --►Appointment - Print Option L - Label
Prior to this update the <Provider> condition was not applied to the Label print tasks. This has been added in the update.
MODIFICATION Schedule --►Appointment --►Print
The single-character code choices on the drop-down lists for the <Selection> and <Reprint Superbill> fields have been replaced with complete word choices, making the appointment print parameter selection easier. Please note that the values that have been previously set up in the task manager will still work.
Version 9.12.06
NEW FEATURE: Schedule —► Appointment —► Full Day—► Appointment Booking and Management – new tab: Notes
Intellect has a new Notes tab option on the Add, Modify, and Inquire Appointment dialog boxes, as shown below, which allows you to keep unlimited notes on a patient. The Notes are informational only, which means they can be accessed only through the Notes tab and, at this time, cannot be printed.
As shown above, the notes are operator and date/time stamped. You may scroll through the notes to read previous entries, which may be read only and not modified.
The notes are linked to the patient record, meaning if you share Patients between two clinics you will be able to read all notes entered in either clinic. If you do NOT share patients, you will be able to read only the notes added in the clinic in which you are logged.
Version 9.12.02
FIX Schedule--►Appointment --►Print – Selection S
In the past when a specific provider was requested, the report treated it as a wild card and all providers were printed in the report. As of this release, the report now prints for just the requested provider.
FIX Schedule --►Appointment --►Full Day – Search/Reschedule or Cancel
Effective in the 9.12.1 update, if you used the ‘right-click – Search option’ to find a patient’s appointment, and then selected to either Reschedule, Cancel, Postpone or Delete the appointment from the Appointment Search screen, the ‘Continued’ time slots were still displayed in the schedule. This has been corrected in the update.
Highlighting the appointment in the schedule, using right-click and selecting Reschedule, Cancel, Postpone or Delete from the drop-down menu did not have the same issue.
Version 9.12.01
FIX Schedule--►Appointment--►Print
The CallSTAFF report code B would sometimes fail dependent upon the date range entered. This bug has been fixed and the heading was also modified. See report sample below.
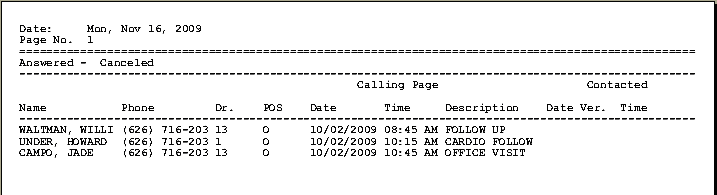
FIX Schedule--►Appointment--►Full Day--►Search – Month
When viewing the Month screen (see below), the total appointments for dates were not calculating correctly. The problem occurred when using the Appointment Schedule right-click Search option (see below) to do a Search for patient’s appointments and then an appointment on the Search list was rescheduled. The change was not reflected on the Month schedule. This has now been corrected.
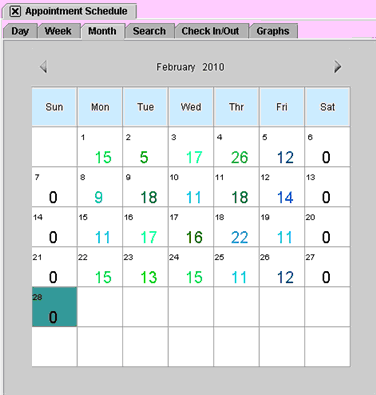
FIX Schedule--►Appointment--►Full Day--►rt click Search – Reschedule
When rescheduling an appointment from the right-click Search option: when pasting the appointment to the new time slot: the wrong appointment type and length were copied. This has been fixed.
NEW OPTION Schedule--►Appointment--►Receipt--►Print Report Receipt
A new <Date Selection> field has been added to the Print Report Receipt screen, as shown below:
The <Date Selection> field has a drop-down menu which allows the user to choose whether to use the date the receipt was entered or the date of service.
![]()
![]()
[E] Use the calendar date the receipt was entered.
[S] Use the actual date services were provided.
NEW OPTION Schedule--►Appointment--►Print
It is now possible to have a referring phone number and/or a fax number on the appointment report. If you would like this option, please contact Prime Clinical.
NEW OPTION Schedule--►Appointment--►Full Day -- CallSTAFF
CallSTAFF clients may now place multiple calls to patients with scheduled appointments. For example, a patient may now be called two weeks prior to his/her appointment and then again two days prior to his/her appointment. The second message may be different than the initial message. For more information contact PCS.
BETA NEW OPTION Schedule--►Appointment--►Full Day -- Eligibility
Intellect now offers an Eligibility option for real-time, immediate verification of patient insurance. Eligibility may be verified either from the Appointment Add screen at the time the appointment is scheduled, or by right-clicking on an already scheduled appointment and selecting either Inquire or Eligibility. All three screens have a button for [Eligibility] located at the bottom of the window.
Another available option is submitting a batch file for all patients with an appointment scheduled for a single day. This method of Eligibility Verification would usually be set up as an automated task, but could be manually run by the client if they wish to.
The eligibility information is kept indefinitely and may be viewed at any time.
Before using this feature, the system needs to be set up as follows:
1. Sign-up with Ingenix/ENS, Gateway, or P-Verify. When your enrollment is complete, provide PCS with your login and password for set up.
2. Enter your vendor-assigned login and password information into the Tele Com screen at Utility--►Insurance --►Tele Com --►Add. The only fields that need to be filled in on this screen are <Submission Script>, <Login>, <Password>, <Transmission Method>, and <FTP Site>. Depending on your system, a new Utility Insurance record may need to be added. Contact PCS if you need assistance.
3. NEW FIELD Enter the insurance code of the vendor into the <Default Eligibility> field on the Parameters screen located at Utility --►Set Up --►Parameter
4. Go to Utility--►Insurance --►Insurance --►Modify and complete the <Eligibility> field for the vendor’s record and all eligible insurance carriers based on the Payor lists provided by the vendor.
For additional information, please contact your trainer.
Version 9.10.21
Schedule --►Appointment --►Full Day --►Add Appointment
A new option of SMS has been added to the <Remind> field pull-down list, as shown below. This option is used when text message appointment reminders are being sent to patient’s cell phones. The Patient’s cell phone carrier also needs to be set up in the system. See Registration--►Regular--►Patient--►Add in this release note for additional information.
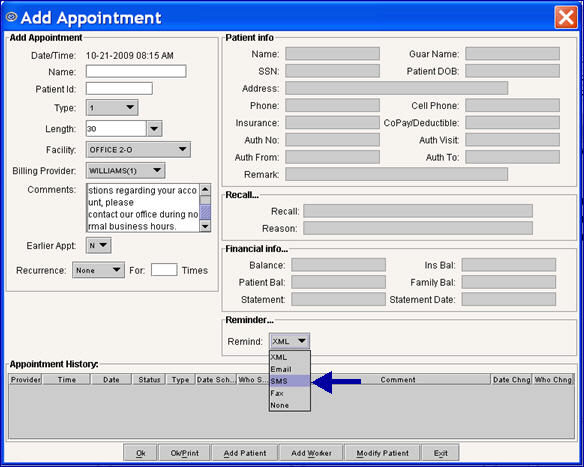
Schedule --►Appointment --►Print – error where appointment prints twice on report:
In the past when a patient had more than one insurance, the appointment would print twice on the report. This problem has now been fixed.
Schedule --►Appointment --►Print – Column Heading:
Another column option titled “Treating Provider” has been added for the Appointment Listing Report. Because of limited space, if you would like this field printed on the appointment schedule, you will need to have another field removed. Please contact PCS support or your trainer for additional information.
Schedule --►Appointment --►Waiting List:
In some circumstances the Waiting List was not displaying all patients who requested to be placed on the Waiting List. This error has been corrected in the update.
Version 9.08.28
Schedule --►Appointment--► Full Day
Previously, when printing a doctor’s appointment from the Full Day schedule screen, the “from date” and “to date” fields would not show on the report if it was set to be done on the server. This has been corrected.
Schedule --►Appointment--► Reports
In the past when the daily appointment list was printed, some of the patient entries were duplicated. This has been corrected.
Version 9.03.25
Schedule --►Appointment --►Full Day
Intellect has two new label formats which may be printed for a patient with a scheduled appointment. When the user right clicks on a scheduled appointment and selects Print--►Label the Page Set Up dialog box is displayed.
Select “Dymo” (if available) from the Printer option.
This feature may be used with only the Dymo Label printer; it will not work with a dot matrix or laser printer.
NOTE: every time a label is printed, it is required to select the margin settings (Landscape may be saved, but the Margin settings need to be selected each time).
Version 9.02.10
Schedule --►Appointment --► Receipt
The Schedule --►Appointment --► Receipt screen has been revised with renamed and new fields:
<Amount Received> field has been renamed and is now called: <Copay Amount>. The change was made as part of a new feature used to automatically post the co-payment through the new option: Payment --►Apply Receipt if the Utility --►Procedure <Co-Payment > = “Y”.
.
<Bal. Payment Amount>. This field should be completed when payments are intended for old patient balances. The change was made as part of a new feature used to automatically post payments entered through the new option: Payment --►Apply Receipt to the patient’s account for charges with a balance and the Who column =”G”.
See the on-line documentation under Payment --► Apply Receipt for complete details for the two fields above.
<Card No.> The field was added as part of a new feature to obtain Credit Card Authorization when patients are paying co-payments and balance on account using a credit card.
<Name On Card> The field was added as part of a new feature to obtain Credit Card Authorization when patients are paying co-payments and balance on account using a credit card.
<Expiration Date> The field was added as part of a new feature to obtain Credit Card Authorization when patients are paying co-payments and balance on account using a credit card.
See the on-line documentation under Schedule --►Appointment --► Receipt for complete details for the three fields above.
There are two new functions associated with the Receipt screen:
· Payment --►Apply Receipt:
Patient co-payments and/or balance on account payments collected at the time of an appointment and entered in the Receipt screen may be posted or reviewed through the new option Payment --►Apply Receipt.
See the on-line documentation under Payment --► Apply Receipt for complete details.
· Authorizing and Processing Credit Card Payments:
Intellect can now request credit card authorization through Schedule --►Appointment --► Receipt. The program will connect via Secure Connection (https) to the credit card authorization company. The Authorization number will be returned and recorded in the Receipt record, and payment will be credited to your account. Following are the system requirements for this feature:
1. Sign up with authorize.net, the company Prime Clinical System uses and has done testing with by calling 866-437-0476 or go to their website at: http://authorize.net/
2. When you receive your Login and Password: enter those in Utility--►Set Up --►Clinic --►Modify <Credit Card Authorization Login> and <Credit Card Authorization Password>.
3. Purchase a magnetic card reader. Although using a magnetic card reader is optional: Prime Clinical Systems recommends you purchase and use one.
If a card reader is used: Using the card reader will complete the <Card No>, <Name on Card> and <Expiration Date> fields.
If not: The <Card No>, <Name on Card> and <Expiration Date> must be entered to submit the request to authorize.net. If entered incorrectly the request will be rejected.
* If you wish to enter cards manually without the reader: type “CREDIT CARD” in the <Payment Method> field and Intellect will submit the request to authorize.net.
When using the new feature: Intellect will print a Credit Card Receipt. Receipts entered without using the new feature will continue to print the same Receipt as prior to the update.
See the on-line documentation under Schedule --►Appointment --►Receipt and Utility--►Set Up --►Clinic for complete details.
Schedule --►Appointment --► Full Day <Graphs> print option:
Previous to this update Graphs could only be viewed. Intellect now has the ability to print the Graphs. From the Schedule --►Appointment --► Full Day <Graphs> tab complete the screen as desired to display your graph. Located in the bottom, right corner of the screen is the Print button.
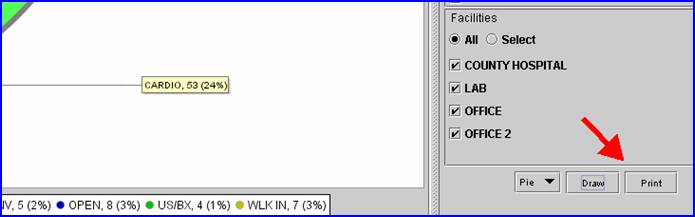
Click [Print] to display the Printer Dialog box. After selecting your printer and clicking [Print] in the dialog box, the Page Setup dialog box displays.
* Printing in Landscape and reducing the margins will print a larger image, making typed data easier to read. Graphs may be printed on a color printer.
The Page Setup box will pop up each time the graph is selected to print.
Changes to the Margins will be saved, but not to Orientation.
Schedule --►Appointment Export XML or HL7:
There was an error in the program which has been fixed in this release.
Version 9.10.21
Date--►Close Day - when closing the Month:
In the past the accounts receivable report would omit a month. This has now been fixed. Note: The fix is not retroactive. The month that was previously omitted is not restored.
Version 9.08.03
Main Menu--►Exit --►Exit:
A warning edit has been added for Prime Clinical Support employees. If you receive a similar warning to the one shown below, please open a reference and PCS support will resolve the issue.
Version 9.12.1
NEW OPTION Clinical
BETA NEW FEATURE E-Prescribing:
Electronic prescribing or ‘e-prescribing’ is a way of prescribing which is paperless. Physicians use their computer, with software which has been tested and certified, to electronically route the prescription to the patient’s choice of pharmacy. Pharmacists may electronically send renewal requests to the physician’s office for approval.
Electronic prescriptions are sent from your server through NewCrop, a third-party vendor. Clients interested in E-Prescribing through Intellect must first register with NewCrop. There are no monthly fees paid to Prime Clinical Systems, though NewCrop charges a monthly fee per each authorized person writing E-Prescriptions.
Other services available through NewCrop include Medical benefit checking, and Formulary Checking with the Rx Hub. When the patients’ prescription is received, the insurance is automatically assigned to it, and formulary checking begins to verify if the medication is covered. The Rx Hub also tracks and reports what other drugs the patient has been prescribed and, when needed, can list therapeutic alternatives. To learn more about NewCrop's services, visit their web site at www.newcroprx.com
Intellect Interface
NewCrop’s E-Prescribing can be accessed via Intellect either through the Appointment Schedule or from Intellect’s main menu by using the Clinical option.
1. Intellect Appointment Schedule
In the Appointment Schedule option, NewCrop’s E-Prescribing can either be accessed from new buttons located at the bottom of the Inquire Appointment screen or from the new options on the right-click menu.
1.1 Inquire Appointment Screen
NEW OPTIONS Schedule--►Appointment --►Full Day – Inquire
To access E-Prescribing, use the new [Compose RX], [Data Entry], and [RX Status] buttons at the bottom of the Inquire Appointment screen, as shown below.
![]()
[Compose RX] The Compose RX button allows a Doctor, or someone at the correct password level, to access E-Prescribing to generate a prescription for a patient.
[Data Entry] The Data Entry button allows access to NewCrop’s E-Prescribing to all four different types of users; i.e., Doctor, Nurse, Staff, and Mid-level.
[RX Status] The RX Status button allows a Doctor, or someone at the correct password level, to access E-Prescribing to check on the status of a prescription for a patient.
When one of the buttons described above is selected for a user who is set up on the system, a pop-up window will ask for that user’s password. This password is set up on the Add SECURITY screen. Successfully entering the user password takes the user to the NewCrop program. Once a user enters the NewCrop program from Intellect, an [OnStaff Intellect] button displays at the bottom of the screen to facilitate re-entry into Intellect from the NewCrop program.
1.2 Right-Click Menu
NEW OPTION Schedule--►Appointment --►Full Day – RX
When using the Appointment Schedule right-click menu, shown below, access E-Prescribing menu options by clicking on the new [RX] option.
After you click on one of the new sub-options of [Compose], [Data Entry], or [Status], a pop-up window will ask you for your password. This password is set up on the Add SECURITY screen. Successfully entering your password takes you to NewCrop’s E-Prescribing program.
Once a client enters the E-Prescribing program from Intellect, an [OnStaff Intellect] button displays at the bottom of the screen to facilitate re-entry into Intellect from the E-Prescribing program.
2. Intellect Main Menu
Additionally, an [RX] button and Clinical menu option have been added to Intellect’s main menu to facilitate ordering prescriptions and checking on the status of prescriptions already ordered.

2.1 NEW FEATURE [RX] Button
The RX button can be a solid white, green, or flashing red and white.
White: Indicates the server is connected and there are no pending pharmacy calls (refills) or faxes.
Flashing Red and White: Flashing can occur when the server can not be reached. Hovering a mouse over the flashing [RX] button will display a statement stating the reason the button is flashing.
Green: Indicates there are pending pharmacy calls (refills), or faxes. The system checks the status every 5 minutes, but you can also re-login to update.
Someone at the correct password level, such as a doctor, can click on this button and be taken directly to Intellect’s Clinical--►Check RX Status option. This option is described below.
2.2 NEW OPTION Clinical
The new Clinical menu option has three sub options: Compose RX, Check RX Status, and RX Data Entry, as described below.
2.2.1 NEW OPTION Clinical --► Compose RX
The Compose RX option allows a Doctor, or someone at the correct password level, to access E-Prescribing to generate a prescription for a patient.
2.2.2 NEW OPTION Clinical --► Check RX Status
The Check RX Status option allows a Doctor, or someone at the correct password level, to access E-Prescribing to check on the status of a prescription for a patient.
2.2.3 NEW OPTION Clinical --► RX Data Entry
The RX Data Entry option allows access to NewCrop’s E-Prescribing to all four different types of users; i.e., Doctor, Nurse, Staff, and Mid-level.
3. Intellect Set Up
NEW FIELDS In order to use the E-Prescribing option, the following new fields in Intellect also need to be set up according to your trainer and/or online documentation.
3.1 Utility--►Set Up--►Clinic
Set up the <RX Server (Production or Preproduction)> field on the Add CLINIC screen.
3.2 Utility--►Set Up--►Security
Set up the <RX Role>, <RX Password>, and <Doctor Code> fields on the Add SECURITY screen.
3.3 Utility--►Set Up--►System
Set up the <RX> field on the Add SYSTEM screen.
3.4 Utility--►Provider--►Provider
Set up the <RX> field on the Add DOCTOR screen.
Contact your trainer or consult the online documentation for additional information.
Version 9.12.05
Using F2 Search Window
NEW FEATURE: Drop-Down List Definitions
In the past when there was a drop-down option for a field, you could click on the field and then press [F2] to display a box containing a list of choices and their descriptions. Now, in addition to the [F2] key, the choices and descriptions can also be displayed by placing the pointer directly on the field and then either right- or left-clicking the mouse, or pressing the right arrow key on the keyboard. These new options are available throughout Intellect with the exception of custom-design forms such as Charge, Payment, and Ledger. However, the new options are available for custom-modified drop-down lists.
Version 9.12.01
Miscellaneous Items
The following three modifications are applicable only for clients who import charges from Patient Chart Manager to OnSTAFF Intellect.
NEW FEATURE: When the PCM Individual Users--►Program Set Up--►Misc <Charge Posting Hold/Send Ins> is set to the default value Y and charges were imported into Intellect, the charges were not linked to the patient’s primary insurance. As a result, the charge would need to be modified before billing the insurance. For example, the correct primary insurance (P1 or P2, etc), the pay plan, approved amount from the fee schedule, etc. needed to be entered.
With this update, when Individual Users--►Program Set Up--►Misc <Charge Posting Hold/Send Ins> = Y, the import program will assume the insurance is the P1 Primary Insurance and use that insurance to find the correct pay plan and approved amount, and the insurance code will be inserted into the treatment history record. This change will reduce the amount of work and changes needed after importing charges.
NEW FEATURE: When the PCM charges were imported into Intellect, the charges were not linked to the Utility--►Procedure <Modifier>. The modifier would either need to be entered in PCM before the charges were imported, or in Intellect after the charge was imported.
With this update, as the charges are being imported, the program will look to see if a modifier was entered in PCM. If it was, no change will be made.
If a modifier was not entered in PCM, the program will pick up the patient’s primary insurance and check the Utility --►Insurance <Code (R,C,E,U)> field to determine which Utility --►Procedure <Modifier> to add to the charge.
NEW FEATURE: Imported Charges report. When charges are imported from PCM to Intellect, the program will automatically print a report defining charges which were inserted into the treatment history table and those which could not be imported.
For each imported file, a report is automatically sent to your designated printer. Please advise Prime Clinical which printer to set up to print the report.
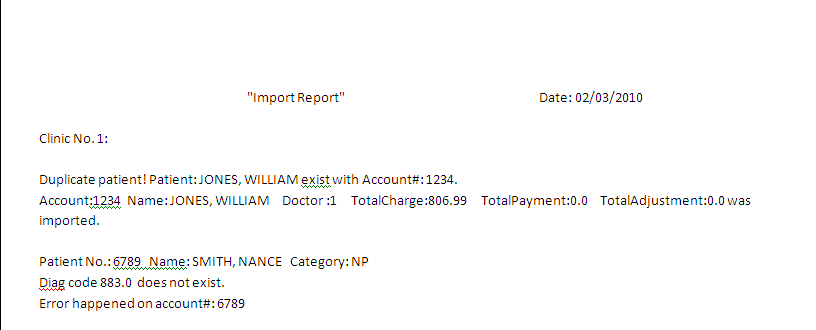
A file for this report is also kept in the report folder. To find the location of your report folder, go to Utility --►Set Up--►Parameter--►View and complete the <Clinic No.> field. Once the screen has populated, the <Path File> field will display the directory of the report folder.
Version 9.02.10
Login In
New Splash screen:
Intellect users will see a new look when launching their application.