Intellect™
CLINICAL MENU OPTIONS

Compose Rx
Videos available for this option are: Compose RX and Renewing Prescriptions. Depending on the system set up, the media player may need to be activated. Speakers need to be attached to the workstation to hear the instructions.
Note: To view the videos, log-in through the www.primeclinical.com website. Current support is required.
The Compose RX option allows a Doctor, or someone at the correct password level, to access e-Prescribing through NewCrop to generate a prescription for a patient. These steps are needed to compose a prescription:
2. Search for a Prescription (NewCrop's Compose Rx Tab)
3. Review Prescription Information (NewCrop's Review Rx Screen)
4. Send a Prescription (NewCrop's Transmit Rx Screen)
Note: When you are done using NewCrop, make sure all the NewCrop (eRX) screens are closed after closing Intellect.
For more information, see:
Appendix A - Prescribing from the Doctor's Favorite List
Appendix B - Other 'Review RX' Screen Options
Appendix C - Searching for Pharmacies
There are three methods for accessing NewCrop and accessing/setting up the Compose RX option through Intellect. Click a method below for specific instructions.
• 1.1 Clinical --► Compose RX menu option
• 1.2 Appointment right-click menu
• 1.3 Inquire Appointment screen.
After successfully using one of the above methods to access NewCrop and display the Compose Rx Tab, go to Step 2. Search for a Prescription.
1.1 The Clinical --► Compose RX menu option method:
Click on the Compose RX option to display this screen:

1.1.1 Patient 
Enter the account number of the patient for whom the prescription is being ordered.
1.1.2 Doctor 
Enter the Utility --►Provider --►Provider <Provider Code> for a doctor who is the prescriber, or midlevel with supervision, or a midlevel without supervision (like a doctor). For a list of Doctor codes, press [F2]. To select, double-click on the correct code, OR use the ↑ (up) and ↓ (down) arrows to highlight the correct code, and then press the [Enter] key to select.
Note: If your clinic is set up for multiple <Provider Code>s, only one <Provider Code> may be entered here. One <Provider Code> should be set to Y on the Provider screen and the other <Provider Code>s should be set to N.
Additionally, if a single provider has more than one <Provider Code>, they have two licensing choices:
• Purchase one E-Rx license for one <Provider Code> and send all prescriptions under that <Provider Code>. This is the option PCS recommends.
• Purchase an E-Rx license for each <Provider Code>.
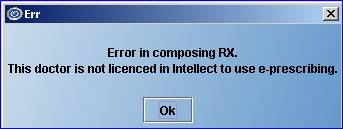
If the provider entered is not licensed or the <Rx> field is not set to ‘Y’ in Utility --►Provider --►Provider for that provider, this error message displays:
1.1.3 Facility 
Enter the <Facility Code> for the clinic where the patient is being treated, as set up in the <Facility Code> field on the Utility --►Facility screen. For a list of <Facility Code>s, press [F2]. To select, double-click on the correct code, OR use the ↑ (up) and ↓ (down) arrows to highlight the correct code, and then press the [Enter] key to select.
1.1.4 There are three buttons at the bottom of the screen.
After entering the Patient, Doctor and Facility information, click on [Compose]; click on [Clear] to remove the information from the Patient, Doctor and Facility fields; or, click on [Exit] to return to Intellect’s main menu.

After entering the Patient, Doctor, and Facility information, click on:
[Compose] to access the e-Prescribing screen. After clicking on [Compose], this screen displays:
• If the user is the correct user level and has the correct password, the system goes to NewCrop's Compose RX tab. For more information on using the Compose RX tab, go to Step 2. Search for a Prescription.
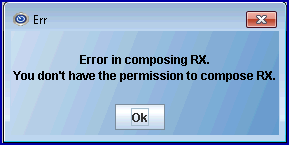
• If the user does not have access to this feature, this error message displays:

[Clear] to remove the information from the Patient, Doctor, and Facility fields.
[Exit] to return to Intellect’s main menu.
1.2 The Appointment right-click menu method:
With the pointer in a patient field, use the Appointment Schedule right-click menu, shown below, to access e-Prescribing menu options by clicking on the [RX] option.

Note: Access to the right-click menu options is affected by the password of the user logging-in to the PC. The login user’s password must link to the Rx Password. For example, in order for a Doctor to use the Compose] option on a particular PC, the Doctor needs to be logged-in to that PC with his/her password.
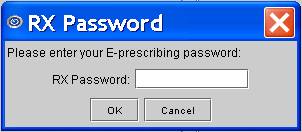
After you click [Compose], a pop-up window asks for your password. This is the password that was set up on the Add SECURITY screen. Enter the password and click on [OK].
Successfully entering your password takes you to NewCrop’s e-Prescribing program. Once you enter the e-Prescribing program from Intellect, an [OnStaff Intellect] button displays at the bottom of the screen to facilitate re-entry into Intellect from the e-Prescribing program.
• If the user is the correct user level and has the correct password, the system goes to NewCrop's Compose RX tab. For more information on using the Compose RX tab, go to Step 2. Search for a Prescription.
• If the user does not have access to this feature, this error message displays:
1.3 The Inquire Appointment screen method:
To access e-Prescribing, click on the [Compose RX] button at the bottom of the Inquire Appointment screen, as shown below.
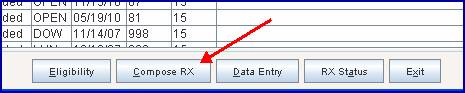
The [Compose RX] button allows a Doctor, or someone at the correct password level, to access e-Prescribing to generate a prescription for a patient.
When the [Compose RX] button is selected for a user who is set up on the system, a pop-up window asks for that user’s password. This is the password that was set up on the Add SECURITY screen.
Successfully entering the user password takes the user to the NewCrop program. Once a user enters the NewCrop program from Intellect, an [OnStaff Intellect] button displays at the bottom of the screen to facilitate re-entry into Intellect from the NewCrop program.
• If the user is the correct user level and has the correct password, the system goes to NewCrop's Compose RX tab. For more information on using the Compose RX tab, go to Step 2. Search for a Prescription.
• If the user does not have access to this feature, this error message displays:

2. Search for a Prescription (NewCrop's Compose RX Tab)
Successfully using one of the three methods to access NewCrop displays the Compose Rx Tab:
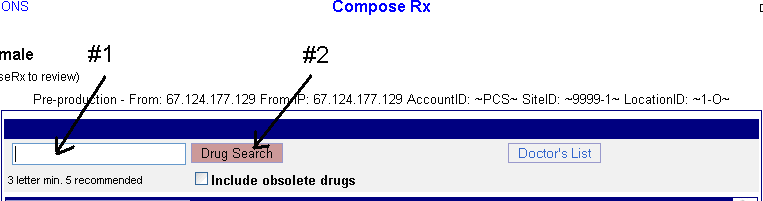
2.1 Enter a minimum of three letters of the drug you wish to prescribe in the search field.
2.2 Select 'Drug Search' (See Appendix A on prescribing from the Doctor's favorite list). A list of medications display:
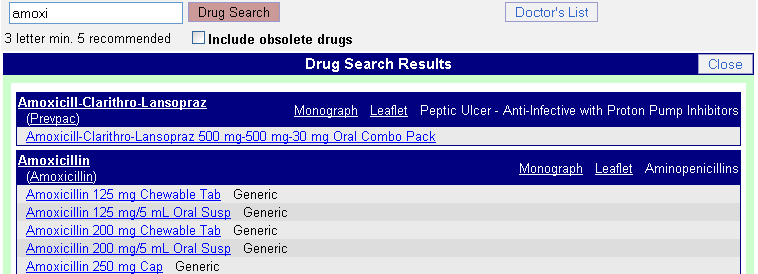
2.3 Select the blue link for the medication you wish to prescribe. The Sig Edit screen opens. Refer to the screen shot below and associated description of each item:
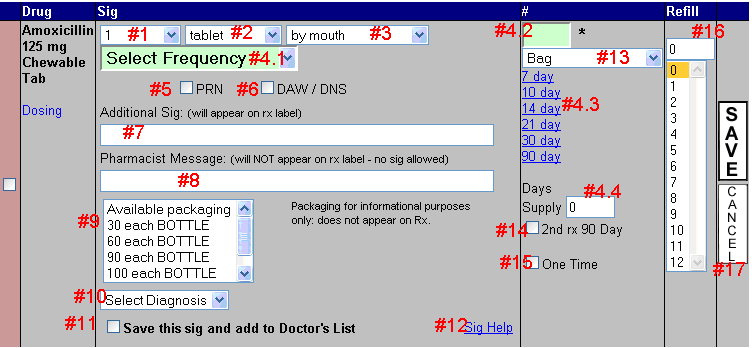
2.3 #1 Dose (select drop-down arrow to change).
2.3 #2 Form (select drop-down arrow to change).
2.3 #3 Route (select drop-down arrow to change).
2.3 #4
2.3 #4.1 Frequency, such as b.i.d., t.i.d., etc (select the drop-down arrow to change).
2.3 #4.2 Number to be dispensed. After selecting the frequency in 4.1, the number to be dispensed is automatically calculated based upon a 30-day prescription.
2.3 #4.3 Other prescription lengths. When selecting one of these, the number to be dispensed in #4.2 automatically recalculates.
2.3 #4.4 Manual prescription length. When entering a custom days supply, you have to manually change the number to be dispensed in #4.2 also.
2.3 #5 To denote on Rx that patient should take as needed.
2.3 #6 To signify that Rx should be dispensed as written (no substitutes).
2.3 #7 Any additional Sig (this appears on Rx label).
2.3 #8 Pharmacist message (i.e., no child proof caps).
2.3 #9 Used to specify packaging instructions.
2.3 #10 Disregard as 'Diagnosis not supported at this time.
2.3 #11 Saves prescription to Doctor’s favorite list
2.3 #12 Opens window with explanation of Sig items
2.3 #13 Additional Rx specifications
2.3 #14 Generates a 3 month prescription in addition to the original prescription you are writing.
2.3 #15 Denotes on the prescription that this is to be a one time prescription.
2.3 #16 Refills
2.3 #17 Save to continue or Cancel to cancel
2.4 Once done with the Sig and other edits, select [Save] to continue. This brings you back to the 'Compose RX' screen.

To continue, select 'Take Complete RX to Review Page' (also notice other options in the screen shot).
3. Review Prescription Information (NewCrop's Review RX Screen)
3.1 Once 'Take Complete RX to Review Page' is selected from the Compose Rx screen, the Review Rx screen opens. Please review the screen shot below, noting the field and option descriptions that follow:
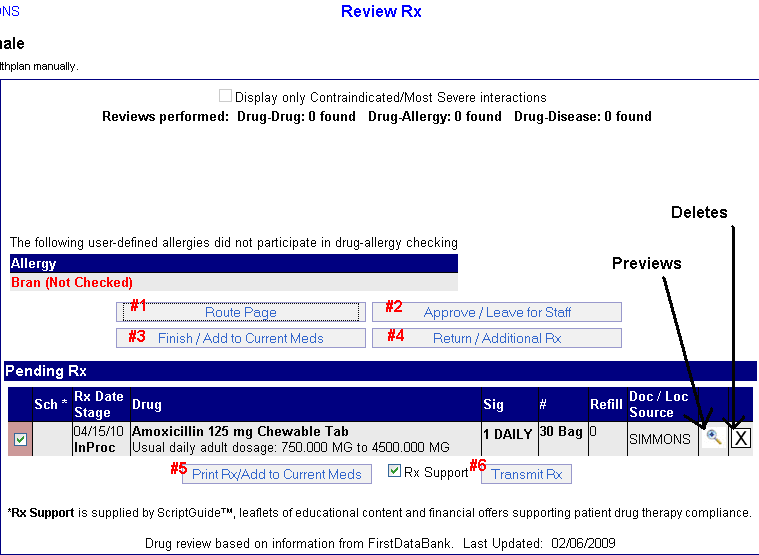
For the purpose of this document, method #6 is discussed. For details on #1-5, please see Appendix B.
#1 Takes you to the 'Route page' where you may select the number and language of leaflets to print, etc.
#2 Approves prescription and leaves for Staff to transmit.
#3 Finishes and adds prescription to Current Meds list without printing or electronically transmitting.
#4 Returns you to the 'Compose Rx' screen where the current prescription will be in the 'Pending Rx' list. You may edit the Sig or add another prescription.
#5 Opens screen to print a copy of the prescription for the prescriber to sign by hand and give to the patient to take the pharmacy for filling.
#6 Takes you to the transmission screen where you may select the pharmacy.
3.2 Select 'Transmit Rx' (#6).
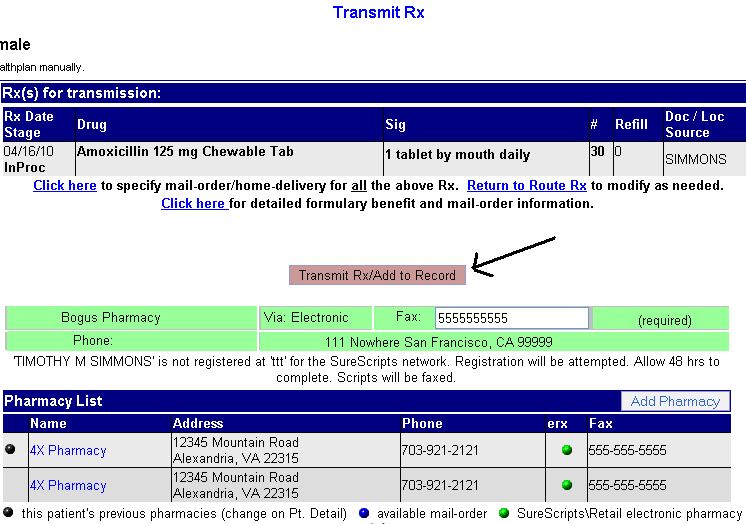
4. Send a Prescription (NewCrop's Transmit Screen)
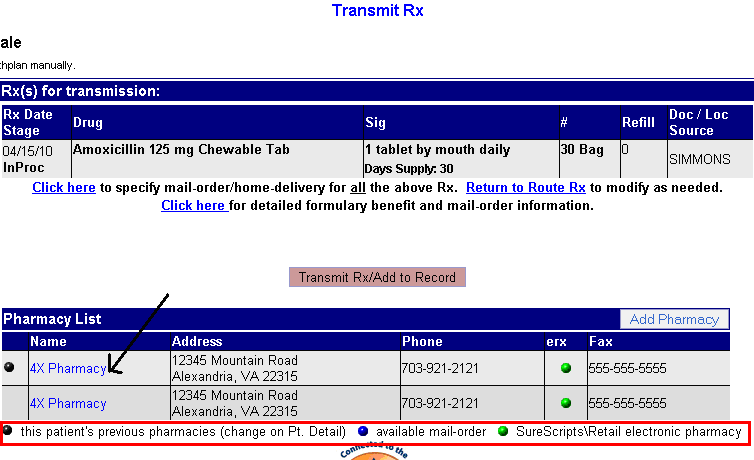
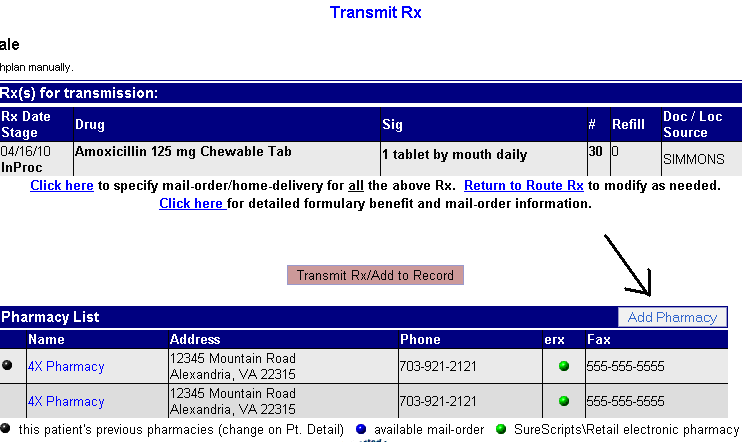
4.1 After selecting 'Transmit Rx' from the Review Rx screen, the Transmit Rx screen opens. Any pharmacies previously used for that patient display below, as well as any pharmacies added to the common pharmacy list. Also on the screen shot, notice the description below the pharmacy list that denotes the meaning of each colored dot. If the pharmacy you want is not listed, see Appendix C on searching for pharmacies.
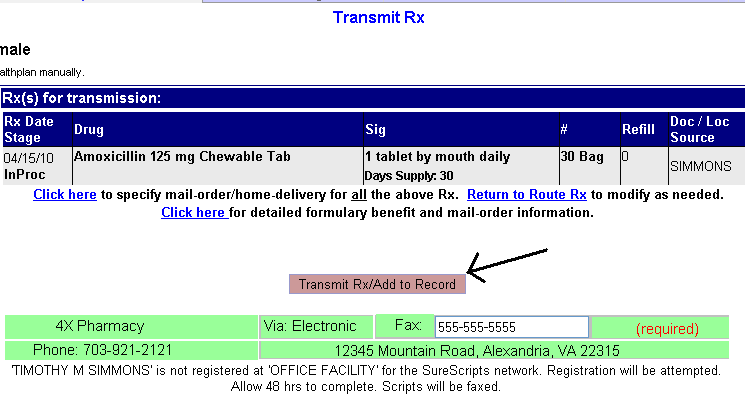
4.2 After selecting the pharmacy name, it moves above the list of pharmacies as in the screen shot below. If it is indeed able to accept electronic prescriptions, it appears bright green. If, for some reason, you cannot transmit electronically, it appears gray and the prescription is transmitted by fax. Select [Transmit Rx/Add to Record].
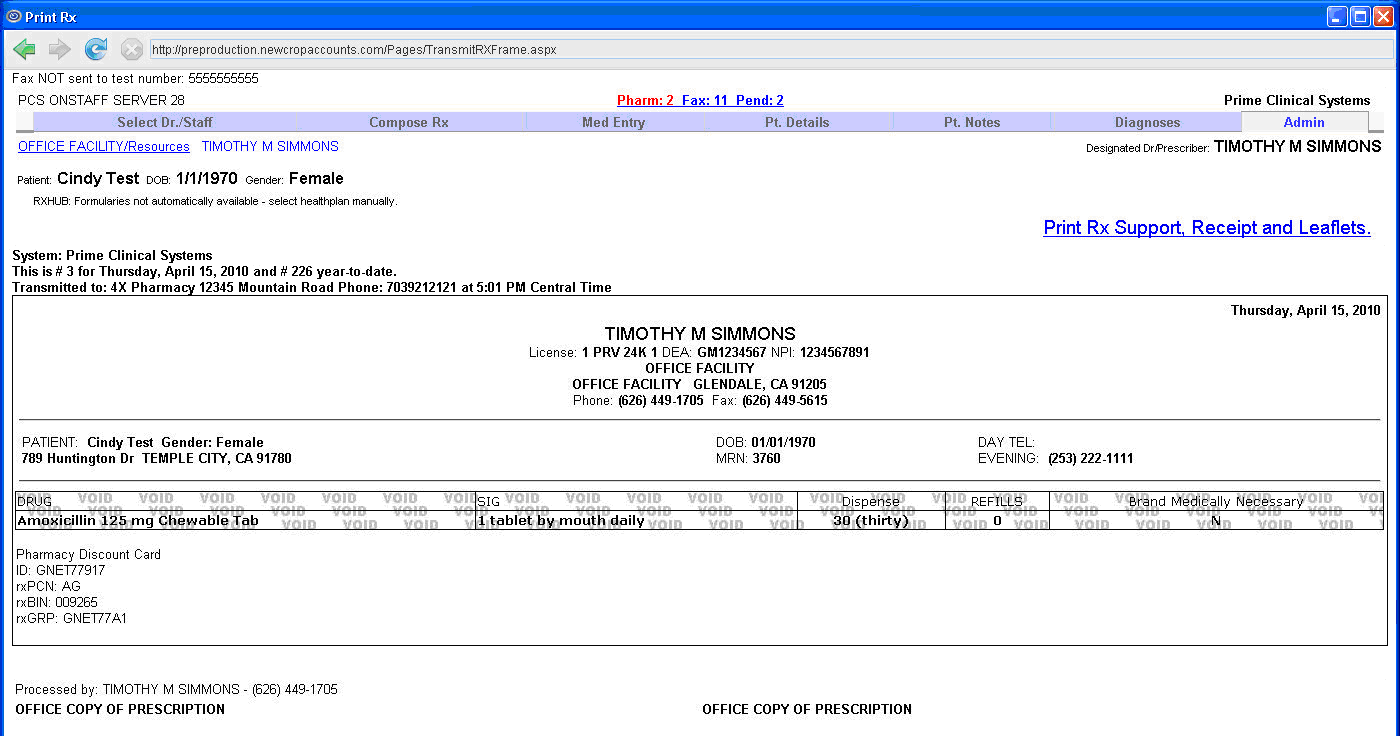
4.3 A preview of the prescription then appears on the screen. You may return to the 'Compose Rx' screen (tab on the top) where you will see the medication you just prescribed in the Current Meds list. If you are done with this patient, you may exit the browser with the red 'X' in the upper right corner.
Appendix A - Prescribing from the Doctor's Favorite List
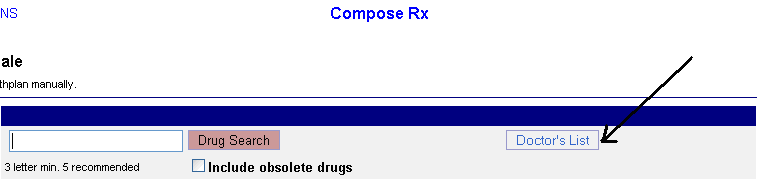
1. After entering the 'Compose Rx' screen, select 'Doctor's List'.
The favorite prescription list appears:
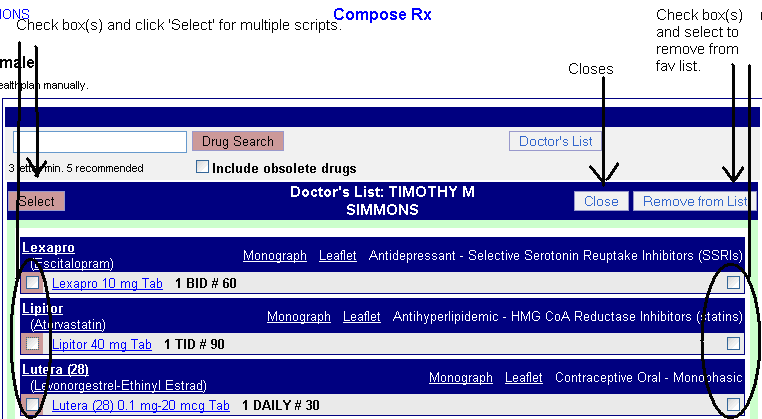
2. Select the blue link of the medication name you want to prescribe. Please also refer to the other options on the screen shot.
3. After selecting the medication name, the 'Compose Rx' screen returns. Go to step 2.4 in section 2 - Search for a Prescription to continue with the prescription.
Appendix B - Other 'Review RX' Screen Options

Click links for information for each numbered field above:
#5 Print Rx/Add to Current Meds
Review Rx field #1 Route Page: Opens the 'Route RX' page. See the following descriptions:
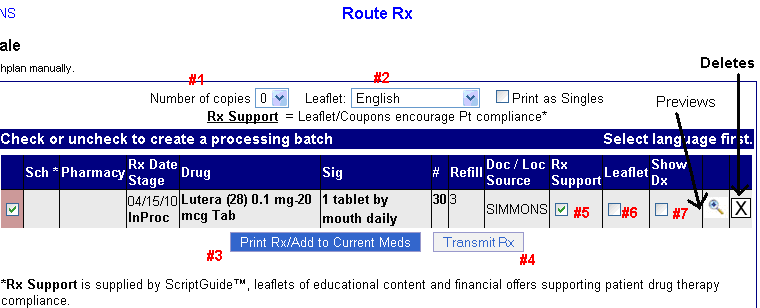
#1 Number of copies of leaflets.
#2 Language of leaflets.
#3 Opens screen to print a copy of the prescription for the prescriber to sign by hand and give to the patient to take to the pharmacy for filling.
#4 Takes you to the transmission screen where you may finalize transmission. Please refer to section 4 - Send a Prescription to continue from this point.
#5 Denotes that RX Support is to be included.
#6 Denotes that Leaflets are to be included.
#7 Disregard as not supported at this time.
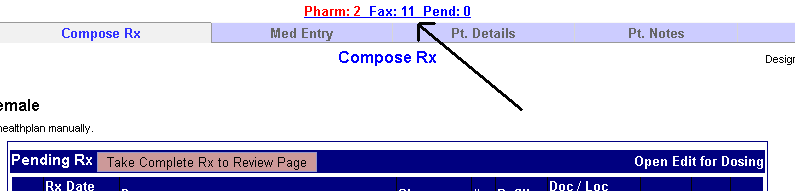
Review Rx field #2 Approve/Leave for Staff (see initial screen shot in this Appendix): Approves prescription and leaves it in the list for staff to transmit. If a Nurse or Mid-Level were starting the prescription, instead of this option, it would say 'Leave for Doctor Review'. Selecting to leave for Doctor or Staff creates a list in the Status page. There are two ways to access this list:
1. When already in the e-Prescribe browser, select the 'Pharm: __ Fax: __ Pend: __' link at the top of the screen:
2. From OnStaff (Intellect)
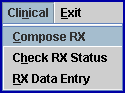
a. Either click on the 'RX' button below the toolbar (#1), OR select the [Clinical] menu option on the toolbar and then select [Check RX Status] (#2).
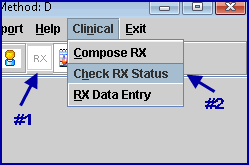
Either option displays the 'Status Rx' screen:
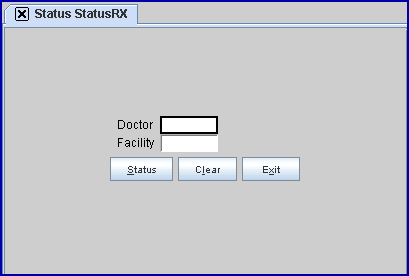
b. Enter the Doctor and Facility codes and select [Status]. The 'RX Password' window opens.
c. Enter your password and select [OK]. The 'Status' page opens, listing prescriptions at the bottom that are for Staff or Doctors to address:
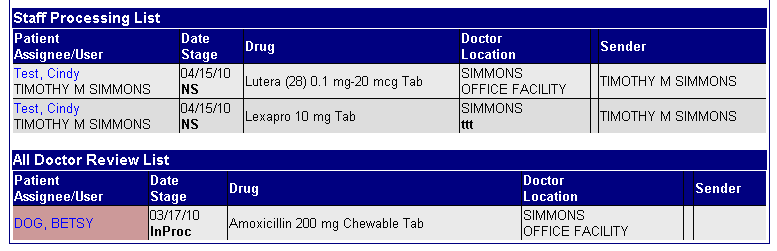
• Staff Processing List
Selecting the Patient name opens the 'Route RX' screen. Refer to the beginning of this Appendix for more information on the 'Route RX' screen.
• Doctors Review List
Selecting the Patient name opens the 'Compose RX' screen. The Doctor may then edit the Sig or finish processing the prescription. Go to step 2.4 in section 2 - Search for a Prescription to continue with the prescription.
Review Rx field #3 Finish/Add to Current Meds (see initial screen shot in this Appendix): Finishes are adds prescription to Current Meds list without printing or electronically transmitting.
Review Rx field #4 Return/Additional Rx (see initial screen shot in this Appendix): Returns you to the 'Compose RX' screen where the current prescription are in the 'Pending RX' list. You may edit the Sig or add another prescription.
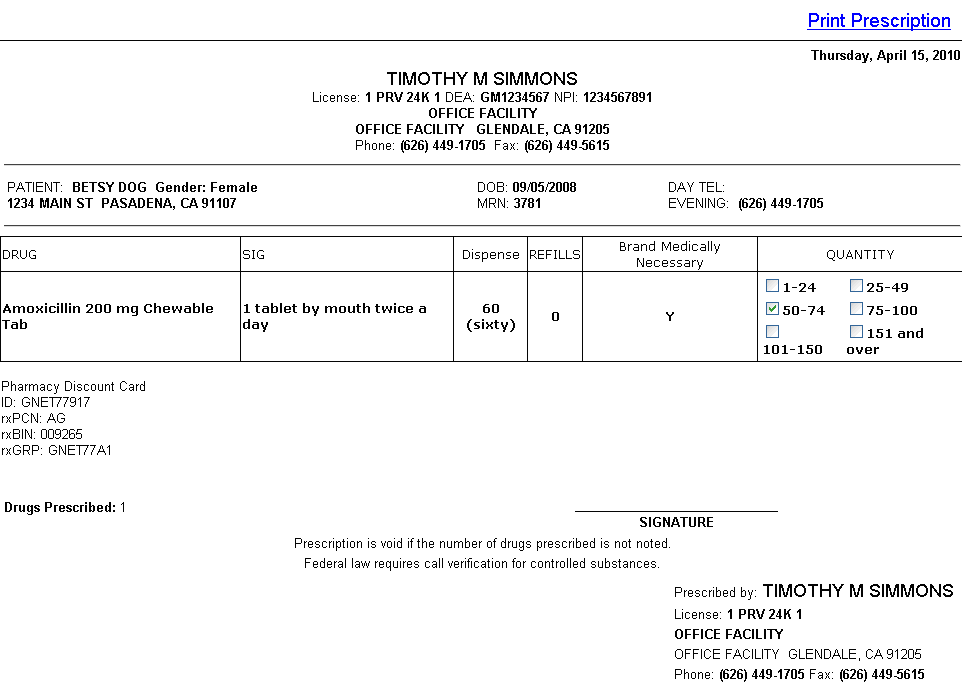
Review Rx field #5 Print Rx/Add to Current Meds (see initial screen shot in this Appendix): Opens a preview of the prescription that should be printed, signed by the prescriber, and given to the patient to take to a pharmacy to be filled:
Review Rx field #6 Transmit Rx (see initial screen shot in this Appendix): Takes you to the 'Transmit Rx' screen. For additional information on this screen, see section 4. Send a Prescription (NewCrop's Transmit Rx Screen).
Appendix C - Searching for Pharmacies
1. In the 'Transmit RX' screen, select 'Add Pharmacy':
The Pharmacy Search screen then opens:
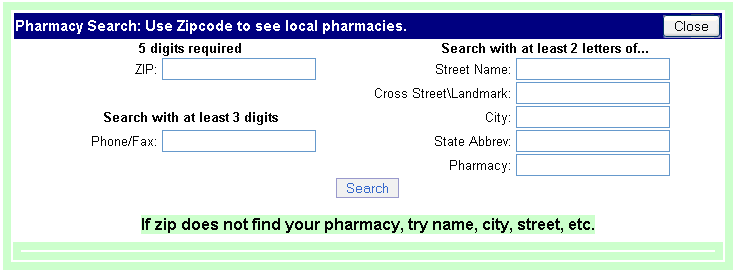
2. Enter your search criteria and select [Search]. A list displays at the bottom with Pharmacy information:
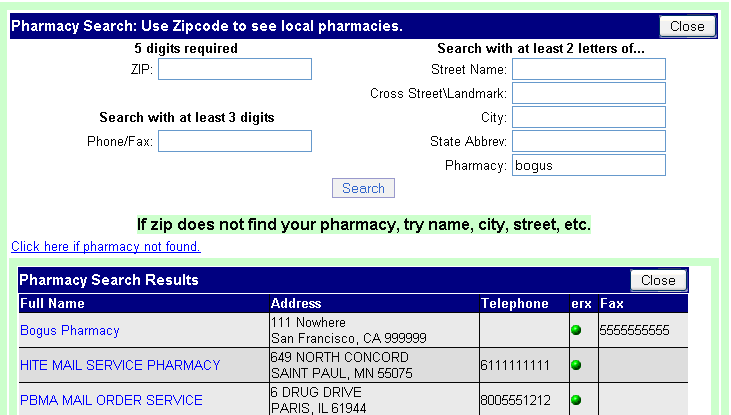
3. Select the blue link of the pharmacy name you wish to add. The pharmacy you selected appears above the pharmacy list and the prescription is ready to transmit. Refer to step 4.2 in section 4. Send a Prescription (NewCrop's Transmit Rx Screen).