
Intellect™
MANAGEMENT MENU OPTIONS

Letters
Newsletters/Reports
Prior to version 13.04.10, this option was only used to email office newsletters to patients. This option now allows voice messages to be sent to patients for additional types of notifications.
Note: A voice message and newsletter may not be selected/sent at the same time.
Voice messages may be sent to applicable patients for various reasons.
For example, a voice message may be sent:
• to all patients whose birthday is in April, reminding them to schedule their annual exam.
• to all patients with the same diagnosis, letting them know about new treatments or options for their diagnosis.
• to all patients at the clinic, notifying them that the office is moving to a new location.
Complete these steps in Intellect to send a voice message.
• Send the Voice Message or Newsletter
NOTE: Non-commercial email carriers have a cap on the number of emails that may be sent per day. If a clinics current email carrier does not support the number of emails needed to be sent on a daily basis, the clinic needs to contract with a commercial email vendor.
Office newsletters may be emailed to patients who have a completed email address on file in Intellect. Newsletters can be created using software such as Microsoft Word or Excel, or scanning a newsletter and attaching the .PDF file, etc. Create a newsletter, and then complete these steps in Intellect:
Update:
Effective version 19.08.06, newsletters may be customized and sent to patients via this option to include one or more URLs. This capability is only available as a customized option.
For example, links can be a webserver image link, or a URL to direct the patient to click on the clinics' social media page. In the latter case, the social media page is pulled from the Newsletter.htm in Utility --►Tools --►Formatted Text that is customized to include the provided URLS.
Intellect requirements for this option are:
• A clinic must have an https:// email and a current SSL certificate loaded on Intellect's server
• Utility --►Tools --►Formatted Text must have Newsletter.htm. Contact Prime Clinical Support for more information on the Newsletter.htm file.
Using this option:
On Intellect's Send News Letter screen, the drop-down list for the <Voice Message> field now includes an 'HTML' option. When 'HTML' is selected, Intellect reads from the ‘Newsletter.htm’ file and includes the URL(s) within this programming.
When providing the links and/or URLs to Prime to include in a customized Newsletter.htm, keep the following in mind:
• Links can be webserver image links such as:
<img alt="" height="200" src="http:///@URL@/:/@PORT@//webstaff/images/Header.jpg" width="940"
• The URL may be one that directs the patient to click on the clients Social Media page which pulls from the Newsletter.htm in Utility --►Tools --►Formatted Text. For example:
| <a href="https://www.facebook.com/LDILASER/">Facebook</a>
| <a href="https://www.instagram.com/laserdermatologyinstitute/">Instagram</a></strong></p>
Set up is required on these three screens:
A. Utility --► Set Up --►Security --►Login Users:
1. <Operator Email> 
1.1 The field must be completed for the operator who submits the email request.
1.2 The <Operator's Email> must be the same 'registered' DSL <Username> email address located in Utility --►Tools --►Configuration.
B. Utility --►Tools --►Configuration:
1. <SmtpServer> 
1.1 Type the address for the mail server's out going email.
2. <Smtp Port> 
2.1 If the email server accepts port 25, leave it unchanged. Otherwise, type in the required port number.
3. <Smtp SSL/TLS> 
3.1 The default is 'N' (No SSL or TLS required). If the email server requires SSL/TLS, use the drop-down to select 'Y' (Yes).
4. <SMTP Authentication> 
4.1 This option is used in email setup where the mail server requires login and password authorization.
4.2 Accept the default 'Y' to use authentication OR use the drop-down list to make an alternate selection.
5. <User Name> 
5.1 Type the user name for the email server account.
6. <Password> 
6.1 Type the password for the email server account, if required.
C. Registration --►Regular --►Patient or Registration --►Worker --►Worker:
1. <Email Address> 
or <Email> 
1.1 Type the patient's email address or the email address where newsletters may be sent for this patient.
NOTE: This email address may be used for several types of communication in Intellect; e.g., newsletters, patient statements, follow-up letters, appointment reminders, and reviewing/updating patient demographic and/or insurance information.
Management --► Letters --►News Letter Report - Print
This option generates a list of patients with an email on file and/or without an email on file. Completing the following fields allows the list to be filtered by date of service and various optional criteria. NOTE: If the patient’s account has charges for more than one date of service or multiple charge lines for the same date of service that meet the selected criteria, then each unique account is listed one time only on the report.
NOTE: The patient's email address is entered in Registration --►Patient --► <Email Address> or Registration --►Worker --►Worker <Email> field in the demographic screen.
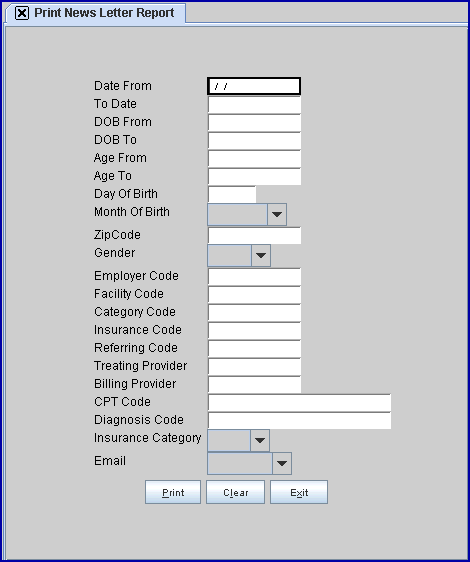
To print either list, go to Management --►Letters --►News Letter Report and complete the screen as follows.
Note: All fields used to filter the selection results may also use the word NOT to exclude information. For example, in the <Insurance> field, to include all insurances EXCEPT for MCAR, 'NOT MCAR' could be entered in the <Insurance> field.
1. Date From 
1.1 This field is required and defaults to the current calendar date if left blank.
1.2 Accept, modify, or clear this field.
1.3 Patients are selected that have a date of service between the <From/To> date selected.
2. To Date 
2.1 This field is required and defaults to the current calendar date if left blank.
2.2 Accept, modify, or clear this field.
2.3 Patients are selected that have a date of service between the <From/To> date selected.
3. DOB From 
3.1 Effective version 14.11.14 - New field.
3.2 This field allows emails to be filtered for patients within a specific age range. Enter the beginning date of birth in MM/DD/YYYY format.
4. DOB To 
4.1 Effective version 14.11.14 - New field.
4.2 This field works with the <DOB From> field in selecting a range of birthdates. Enter the ending date of birth in MM/DD/YYYY format.
5. Age From 
5.1 This field is optional (leave blank if not applicable).
5.2 This is the youngest age, in whole years, if there is a need to filter the results by age determined by the patient's age at this time.
5.3 Leave blank for the default of all ages.
6. Age To 
6.1 This field is optional (leave blank if not applicable).
6.2 This is the maximum age, in whole years, if there is a need to filter the results by age determined by the patient's age at this time.
6.3 Leave blank for the default of all ages.
7. Day of Birth 
7.1 Effective Version 13.04.10.
7.2 This field allows more flexibility in selecting and filtering patient email address.
7.2.1 The default for this field is blank, meaning no dates are selected.
7.2.2 Enter the number for the date. For example, to select patients born on the first day of the month, enter 1.
8. Month of Birth 
8.1 Effective version 13.03.01
8.2 This field allows more flexibility in selecting and filtering patient email address.
8.2.1 The default for this field is blank, meaning all 12 months of the year are selected.
8.2.2 To limit patient email addresses, use the drop-down list to select a specific month.
9. Zip Code 
9.1 This field is optional (leave blank if not applicable).
9.2 Enter a zip code if there is a need to filter the results by a patient's zip code.
9.3 The default is all zip codes.
9.4 Effective 9.12.31 several zip codes may be entered in this field.
9.4.1 Zip codes should be separated by commas and no spaces.
9.4.2 Only patients with the entered zip codes receive the email.
10. Gender 
10.1 This field is optional (leave blank if not applicable).
10.2 Enter a gender if there is a need to filter the results by a patient's gender.
10.3 The default is all genders.
11. Employer Code 
11.1 Effective version 14.12.30 - New field.
11.2 Leave blank for the default of all employers/companies.
11.3 To request a specific employer/company for an email address list or to send a voice message or newsletter, type the Utility --►Business <Company Code>.
11.4 This field accepts multiple values:
• separated by commas with no spaces:

• an asterisk * to return all employers/companies starting with the portion of the <Company Code> entered prior to the *. For example, M* prints all employers/companies whose <Company Code> begins with M.

11.5 Via this field, Intellect can also pull data based on the employer attached to the Charges. For the employer to attach to any charges, this information must be set up in Intellect:
Patient --►Registration <Employer Name>
Patient --►Worker --►Worker Insurance <Employer>
.
12. Facility Code 
12.1 Effective version 13.04.10 - New field.
12.2 This field is optional (leave blank if not applicable).
12.3 Enter a facility code (or multiple facility codes separated by a comma and no spaces) to filter the results based on the facility associated with the patient’s charge(s).
12.4 Leave blank for the default of all facility codes.
13. Category Code 
13.1 This field is optional (leave blank if not applicable).
13.2 Enter a specific Category if there is a need to filter the results by Category.
13.3 Leave blank for the default of all categories.
14. Insurance Code 
14.1 This field is optional (leave blank if not applicable).
14.2 Enter an insurance company code if there is a need to filter the results by insurance company.
14.3 Leave blank for the default of all insurances.
15. Referring Code 
15.1 This field is optional (leave blank if not applicable).
15.2 Enter a <Referral Code> if there is a need to filter the results by a referral.
15.3 Leave blank for the default of all referring doctors.
16. Treating Provider 
16.1 This field is optional (leave blank if not applicable).
16.2 Enter a treating provider code if there is a need to filter the results by a treating provider.
16.3 Leave blank for the default of all treating providers.
17. Billing Provider 
17.1 This field is optional (leave blank if not applicable).
17.2 Enter a billing provider code if there is a need to filter the results by a billing provider.
17.3 Leave blank for the default of all billing providers.
18. CPT Code 
18.1 Effective Version 9.12.28 - New Field.
18.2 This field is optional (leave blank if not applicable).
18.3 One or more CPT codes may be entered in this field, limiting the newsletter recipients to just the patients with the entered CPT code(s).
18.3.1 Multiple CPT codes must be separated by a comma and no spaces.
18.3.2 For example, to send a mailing to both new and established patients between the ages of 12-17, enter the two panel codes separated by a comma and no spaces; i.e., 99384,99394.
19. Diagnosis Code 
19.1 Effective version 9.12.28 - New Field.
19.2 This field is optional (leave blank if not applicable).
19.3 One or more Diagnosis codes may be entered in this field, limiting the newsletter recipients to just the patients with the entered Diagnosis code(s).
19.3.1 Multiple Diagnosis codes must be separated by a comma and no spaces.
19.3.2 For example, if a clinic has new treatment information for vascular headache patients, they could limit who receives their mailing by entering the vascular headache diagnosis code in this field.
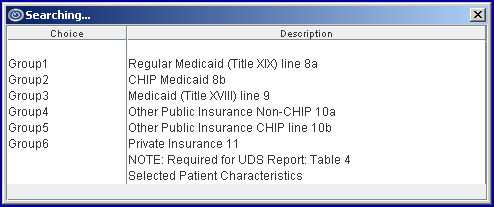
20. Insurance Category 
20.1 Effective version 9.12.28 - New Field.
20.2 This field is optional (leave blank if not applicable).
20.3 Newsletters and reports may also be limited by insurance group. Use the drop-down list to select the appropriate insurance group as defined below:

21. Email 
21.1 There are three options for email:
• Blank - Accept the default of Blank which displays both patients that have an email address and patients that do not have an email address.
• Have - Select this option to print a listing of patients which have the Registration --►Patient --► <Email Address> or Registration --►Worker --►Worker <Email> field in the demographic screen completed.
• Do Not Have - Select this option to allow reports to be printed for patients that do not have an email address in the system.
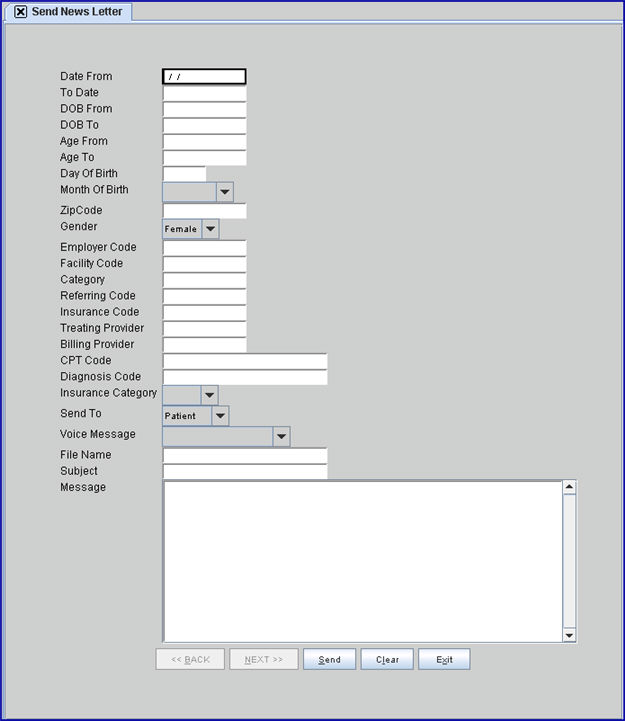
Send the Voice Message or Newsletter
Management --►Letters--►News Letter
Note 1: A voice message and newsletter may NOT be selected/sent at the same time.
Note 2: If the patient’s account has charges for more than one date of service or multiple charge lines for the same date of service that meet the selected criteria, the voice message or newsletter is sent once for each unique account.
Send the Voice Message
Voice messages may be sent two ways. See <Voice Message> for details. Complete the fields indicated below on the Send News Letter screen to filter the patients who are to be sent the Voice Message.
Newsletters may be emailed to patients who have an email address in the system. Email addresses can be entered at Registration --►Regular --►Patient --► <Email Address> or Registration --►Worker --►Worker <Email>. Once an email has been entered, complete the following fields to filter the patients who are to be sent the newsletter.
Note: All fields used to filter the selection results may also use the word NOT to exclude information. For example, in the <Insurance> field, to include all insurances EXCEPT for MCAR, 'NOT MCAR' could be entered in the <Insurance> field.
1. Date From
1.1 This field is required and defaults to the current calendar date if left blank.
1.2 Accept, modify, or clear this field.
1.3 Patients are selected that have a date of service between the <From/To> date selected.
2. To Date
2.1 This field is required and defaults to the current calendar date if left blank.
2.2 Accept, modify, or clear this field.
2.3 Patients are selected that have a date of service between the <From/To> date selected.
3. DOB From
3.1 Effective version 14.11.14 - New field.
3.2 This field may be used to select a specific age range of patients to receive the newsletter.
3.3 Enter the beginning date of the desired age range.
3.4 If this field is used, the <DOB To> field must also be filled in.
4. DOB To
4.1 Effective version 14.11.14 - New field.
4.2 This field is used in conjunction with the <DOB From> field to select a specific age range of patients to receive the newsletter.
4.3 Enter the ending date of the desired age range.
5. Age From
5.1 This field is optional. Leave blank if not applicable.
5.2 This is the youngest age, in whole years, if there is a need to filter the results by age determined by the patient's age at this time.
5.3 Leave blank for the default of all ages.
6. Age To
6.1 This field is optional. Leave blank if not applicable.
6.2 This is the maximum age, in whole years, if there is a need to filter the results by age determined by the patient’s age at this time.
6.3 Leave blank for the default of all ages.
7. Day of Birth
7.1 Effective Version 13.04.10 - New Field.
7.2 This field allows more flexibility in selecting and filtering patient email addresses.
7.3 Enter the number for the date. For example, to select patients born on the first day of the month, enter 1.
8. Month of Birth
8.1 Effective Version 13.03.01 - New Field.
8.2 This field allows more flexibility in selecting and filtering patient email addresses.
8.2.1 The default for this field is blank, meaning all 12 months of the year are selected.
8.2.2 To limit patient email addresses, use the drop-down list to select a specific month.
9. Zip Code
9.1 This field is optional. Leave blank if not applicable.
9.2 Enter a zip code if there is a need to filter the results by a patient's zip code.
9.3 The default is all zip codes.
9.4 Effective 9.12.31, several zip codes may be entered in this field.
9.4.1 Zip codes should be separated by commas.
9.4.2 Only patients with the entered zip codes receive the email.
10. Gender
10.1 This field is optional. Leave blank if not applicable.
10.2 Enter a gender if there is a need to filter the results by a patient's gender.
10.3 Leave blank for the default of all genders.
11. Employer Code
11.1 Effective version 14.12.30 - New field.
11.2 Leave blank for the default of all employers/companies.
11.3 To request a specific employer/company for an email address list or to send a voice message or newsletter, type the Utility --►Business <Company Code>.
11.4 This field accepts multiple values:
• separated by commas with no spaces:
• an asterisk * to return all employers/companies starting with the portion of the <Company Code> entered prior to the *. For example, M* prints all employers/companies whose <Company Code> begins with M.
11.5 Via this field, Intellect can also pull data based on the employer attached to the Charges. For the employer to attach to any charges, this information must be set up in Intellect:
Patient --►Registration <Employer Name>
Patient --►Worker --►Worker Insurance <Employer>
.
12. Facility Code
12.1 Effective version 13.04.10 - New field.
12.2 This field is optional (leave blank if not applicable).
12.3 Enter a facility code (or multiple facility codes separated by a comma and no spaces) to filter the results based on the facility associated with the patient’s charge(s).
12.4 Leave blank for the default of all facility codes.
13. Category Code
13.1 This field is optional. Leave blank if not applicable.
13.2 Enter a specific Category code if there is a need to filter the results by Category.
13.3 Leave blank for the default of all categories.
14. Insurance Code
14.1 This field is optional. Leave blank if not applicable.
14.2 Enter an <Insurance Co. Code> there is a need to filter the results by insurance company.
14.3 Leave blank for the default of all insurances.
15. <Referring Code>
15.1 This field is optional. Leave blank if not applicable.
15.2 Enter a <Referral Code> if there is a need to filter the results by a referral.
15.3 Leave blank for the default of all referring doctors.
16. Treating Provider
16.1 This field is optional. Leave blank if not applicable.
16.2 Enter a treating provider code if there is a need to filter the results by a treating provider.
16.3 Leave blank for the default of all treating providers.
17. Billing Provider
17.1 This field is optional. Leave blank if not applicable.
17.2 Enter a billing provider code if there is a need to filter the results by a billing provider.
17.3 Leave blank for the default is all billing providers.
18. CPT Code
18.1 Effective Version 9.12.28 - New Field.
18.2 This field is optional. Leave blank if not applicable.
18.3 One or more CPT codes may be entered in this field, limiting the newsletter recipients to just the patients with the entered CPT code(s).
18.3.1 Multiple CPT codes must be separated by a comma and no spaces.
18.3.2 For example, to send a mailing to both new and established patients between the ages of 12-17, enter the two panel codes separated by a comma and no spaces; i.e., 99384,99394.
19. Diagnosis Code
19.1 Effective Version 9.12.28 - New Field.
19.2 This field is optional. Leave blank if not applicable.
19.3 One or more Diagnosis codes may be entered in this field, limiting the newsletter recipients to just the patients with the entered Diagnosis code(s).
19.3.1 Multiple Diagnosis codes must be separated by a comma and no spaces.
19.3.2 For example, if a clinic has new treatment information for vascular headache patients, they could limit who receives their mailing by entering the vascular headache diagnosis code in this field.
20. Insurance Category
20.1 Effective Version 9.12.28 - New Field.
20.2 This field is optional. Leave blank if not applicable.
20.3 Newsletters and reports may also be limited by insurance group. Use the drop-down list to select the appropriate insurance group as defined below:
21. Send To 
21.1 Effective Version 14.11.14 - New Field
21.2 This field may be used to specify to whom the newsletter should be sent.
21.3 Use the drop-down list to select the appropriate party to receive the newsletter; i.e., patient, guarantor, or guardian.
22.1 Effective version 13.04.10, this field was added to the screen.
This field must be used when sending Voice Messages. It may be used when sending newsletters. See details for each option below.
22.2 Voice Messages
Voice Messages may be sent either as a text file read by Twilio, or as a recorded file in MP3 format. Voice Messages are sent based on selected criteria; if the criteria are not met, the message is not sent.
22.2.1 Select 'TEXT' to have Twilio read the message typed in the <Message> field. Messages may be in any language that Twilio supports. As of 06/2013, English, Spanish, French, and German are supported. To send a message in a language Twilio does not support, the message needs to be recorded in MP3 file format. This message may also be sent via automation. To have the message automated, please contact Prime Clinical Support.
- OR -
22.2.2 Select a pre-recorded MP3-format file from the drop-down list.
MP3 file names do not appear on the drop-down list for clinics where MP3 files have not been set up. See Voice Message Set Up, MP3 File Set Up, for details.
22.3 Newsletters
22.3.1 Select the default 'blank' to send a standard newsletter.
22.3.2 Select 'HTML' (effective version 19.08.06) to send a customized newsletter that allows links/URLs within the newsletter. When 'HTML' is selected, Intellect reads from the ‘Newsletter.htm’ file and includes the URL(s) in the newsletter. See Email Office Newsletters above for details.
23. File Name 
23.1 This optional field is used only for newsletters. Leave blank if not applicable.
23.2 Create any type of file for the system to find and attach to the email. For example, the newsletter could be in a Word file or .pdf file.
Note: The file is only attached to an email - the content of the file is NOT displayed in the <Message> field.
23.3 To find the file, click in the <File Name> field. The Open box displays to browse for and attach the file to this email.
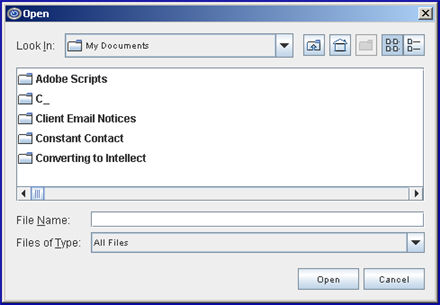
23.3.1 Use the <Look in> drop-down to change directories if necessary to browse for the file.
23.3.2 To select the file, highlight the file and select [OPEN] OR double-click on the file to select it.
24. Subject 
24.1 This field is used when sending email. Although optional, it is recommended as it is the Subject Line for the email.
24.2 Enter a title or brief description of the email. For example:

For Newsletters:
Note: The content of the file previously attached in the <File Name> field is NOT displayed here.
25.1 This field is optional, although it is recommended to include a brief message. This message appears as the body of the email.
25.2 Type the message directly into this field. For example:
For Text to Voice Messages (Effective Version 13.04.10):
25.3 For this option to work with voice messages, clinics must have a Twilio account, and Twilio must be set up in Intellect. To open a Twilio account, go to www.twilio.com. See Voice Message Set Up for additional information.
Note: Text-to-voice messages are sent based on selected criteria; if the criteria are not met, the message is not sent.
25.4 When the ‘Text’ option is selected for the <Voice Message> field, the message typed in this field is read by Twilio when the call is made.
Note: Messages may be in any language that Twilio supports. As of 06/2013, English, Spanish, French, and German are supported. To send a message in a language Twilio does not support, the message needs to be recorded in MP3 file format.
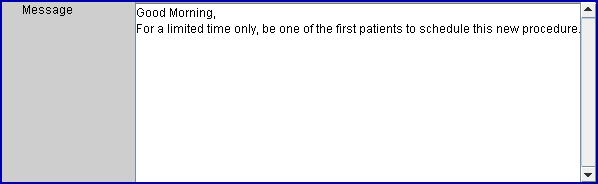
25.5 Enter the message Twilio should read. So that the message does not begin the instant the call is initiated, create a pause by entering 5 or 6 commas preceding the message. For example: ,,,,,Good Morning. This is Doctor Smith's office letting you know there are new treatment options for diabetes. Please call our office for details.
25.6 Effective Version 13.06.24. The message may include database fields like PA_FIRST_NAME, or PA_BALANCE, which Intellect replaces with the appropriate value to personalize the message for each patient when it is read by Twilio.
25.6.1 Available database fields are accessed by right-clicking in the <Text to Voice> field. Simply double-click on the appropriate option to select it.
For example, begin typing the message and right-click to insert a database field for personalized information. When the sample message below is read by Twilio, the data base fields in the message are replaced by the patient’s first name, and the name of the guarantor for the account. Note: It is recommended that the message be typed in lowercase.
Hello %{PA_FIRST_NAME}. Our records indicate %{GU_NAME} is the guarantor on your account.
25.7 Text-to-voice messages may also be sent via automation. To have a voice message automated, please contact Prime Clinical Support.
26. When the information is completely entered, select one of these options:

• Click the [Send] button to immediately begin emailing the newsletter to patients, or to send a voice message.
• Click the [Clear] button to clear all information and return the cursor to the <Date From> field without saving.
• Click [Exit] to clear the screen and return to the main Intellect screen without saving any information, emailing a newsletter, or sending a voice message.
