
Intellect™
REGISTRATION MENU OPTIONS

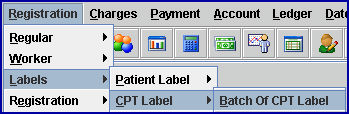
Labels
CPT Label BOP
This option pulls patients with the same CPT and prints a mailing label. Labels may be requested for a single patient or a batch of patients by account number.
1. To print an individual or small batch of patient labels in Intellect, go to Registration --►Label --► Patient Labels--►Batch Of CPT Label
The printer dialog box displays:
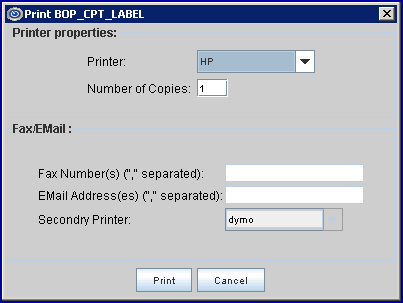
1.1 Printer Properties:
1.1.1 Printer: The default printer for the logged-in clinic and password is selected. To select a different printer, either click on the arrow, OR press the → (right arrow) on the keyboard to view the list of printer codes. In our example, the defaulted Printer is HP. This is just an example of a printer name and may or may not be set up on the system.
To select the printer type, click on the code, OR use the ↑ (up) and ↓ (down) arrows to highlight the correct code, and then press the [Enter] key to select.
Note: The Dymo Label Printer may be used with this option.
1.1.2 Number of Copies: Labels always print 1 copy. To have the system set to always print more than one copy of labels, contact support.
1.2 Fax/Email: These options are not available when printing labels.
1.3 Select the [Cancel] button to clear the screen and return the focus to the main Intellect screen without saving or printing.
1.4 Select [Print] to open this parameter screen:
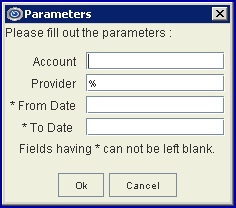
2. Account ![]()
2.1 Type the Patient <Patient Account No.> to print.
2.2 To print labels for more than one account, enter multiple account numbers separated by a comma but no space.
3. Provider 
3.1 To filter by provider, type the Utility --► Provider --► Provider <Provider Code> of the provider(s) you want to include. Multiple provider numbers should be separated by commas but no space.
3.2 This field may be left blank to include all providers.
4. From Date 
4.1 This field works in conjunction with the <To Date> field to create a range of dates of service.
4.2 Type the beginning date to print.
4.3 This field may not be left blank/empty.
5. To Date 
5.1 This field works in conjunction with the <From Date> field to create a range of dates of service.
5.2 Type the ending date to print.
5.3 This field may not be left blank/empty.
6. When you have finished entering the information, select one of these options:
![]()
6.1 Select [Ok] to complete the printing.
6.2 Select [Cancel] to clear the screen and return the focus to the main Intellect screen.