Intellect™
REGISTRATION MENU OPTIONS

Labels
ICD10 Label GOP
This option allows the printing of mailing and chart labels for patients. Labels may be requested for patients with a specific Category, Insurance Company, Gender, and Month of Birth, ICD9 or any combination thereof. The primary purpose of using this option is to request labels for patients who have had a specific diagnosis for a set date range.
NOTE: All label printing in Intellect returns only those patients that have the fields complete in their registration. For example, if a specific insurance is requested, patients that do not have any insurance do not print.
Contact support to have these parameters removed from the label-printing screen.
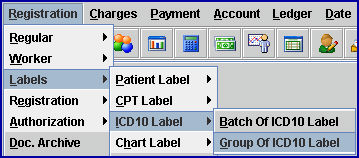
1. To print a group of labels based on ICD codes in Intellect, go to Registration --►Labels --► ICD10 Label --►Group Of ICD10 Label:

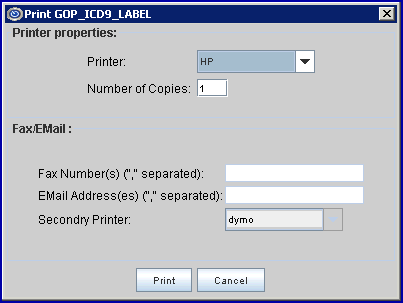
The printer dialog box displays:

1.1 Printer Properties:
1.1.1 Printer: The default printer for the logged-in clinic and password is selected. To select a different printer, either click on the arrow, OR press the → (right arrow) on the keyboard to view the list of printer codes. In our example, the defaulted Printer is HP. This is just an example of a printer name and may or may not be set up on the system..
To select the printer type, click on the code, OR use the ↑ (up) and ↓ (down) arrows to highlight the correct code, and then press the [Enter] key to select.
Note: The Dymo Label Printer may be used with this option.
1.1.2 Number of Copies: Labels always print 1 copy. To have the system set to always print more than one copy of labels, contact support.
1.2 Fax/Email: These options are not available when printing labels.
1.3 Select the [Cancel] button to clear the screen and return the focus to the main Intellect screen without saving or printing.
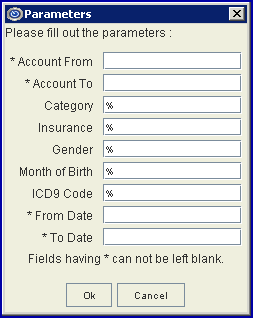
1.4 Select the [Print] to open this parameter screen:

2. Account From ![]()
2.1 Type the first Registration --► Patient <Patient Account No.> to print.
2.2 This field works in conjunction with the <Account To> field to create a range of patient accounts.
3. Account To ![]()
3.1 Type the last Registration --► Patient <Patient Account No.> to print.
3.2 This field works in conjunction with the <Account From> field to create a range of patient accounts.
4. Category ![]()
4.1 Type a Utility --► Category <Category Code> to request Intellect to select only those patients with this category OR leave blank to include all categories.
5. Insurance ![]()
5.1 Type an Utility --► Insurance --► Insurance <Insurance Code> to request Intellect to select only those patients with this insurance as one of their insurance carriers OR leave blank to include all carriers.
6. Gender ![]()
6.1 Type 'F' (female), 'M' (male), or 'U' (unspecified) to request Intellect to select only those patients of this gender OR leave blank to select all genders. This field is case sensitive, use a capitol letter.
7. Month of Birth ![]()
7.1 Type a month to request Intellect to select only those patient's with this month of birth OR leave blank to include all months. Enter the month in numeric format.
8. ICD9 Code ![]()
8.1 Type a Utility --►Diagnosis --► Diagnosis <Diagnosis Code> to select only those patients whose ledger contains that code for the <From and To Dates> below.
9. From Date ![]()
9.1 Type the beginning date of service from which to print labels.
9.2 This field works in conjunction with the <To Date> field to create a range of dates.
10. To Date ![]()
10.1 Type the ending date of service to which to print labels.
10.2 This field works in conjunction with the <From Date> field to create a range of dates.
11. When the information is completely entered, select one of these options:
![]()
11.1 Select [Ok] to complete the printing.
11.2 Select [Cancel] to clear the screen and return the focus to the main Intellect screen.