
Intellect™
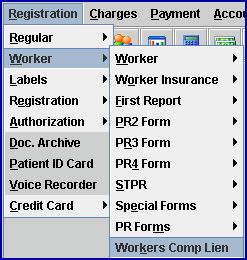
REGISTRATION MENU OPTIONS

Worker
Workers Comp Lien
This menu option is used to facilitate: 1) credit card storage and encryption in Intellect, and 2) filing Worker’s Compensation Liens.
Encrypt and Store Credit Card Information in Intellect
Before using Registration --►Worker --►Workers Comp Lien to file liens through QuickEAMS, the credit card information for the clinic must be entered under the [Show Settings] button (see step 3.1). The clinic's credit card information is stored and encrypted for use when filing liens.
File Worker’s Compensation Liens
Effective version 14.02.04, several features may be managed. For example:
• Liens may be field to the State, with the ability to attach statements
• Information may be tracked
• The DOR (Declaration of Readiness) may be filed
Before this option may be used to process liens, make sure set up is completed for:
• Hardware
• An account with a supported vendor - this is required
Note: At this time, QuickEAMS is the only vendor supported by PCS.
Set up should be completed by the clinic's IT person. If the clinic does not have an IT person, please contact Prime Clinical’s hardware department to complete the set up of these fields.
1. Open port 8080 (or whatever port was entered in the <Webserver Port> field on the Utility --►Tools --►Configuration screen) in the client’s firewall and forward it to the Intellect server.
1.1 To check to see if the firewall setting is correct and the port is forwarded correctly, open up a web browser (for example, Internet Explorer), type http://[your external IP address]:8080 and hit [Enter].
• Getting a blank page means that it is working.
• Getting an error page means there is something wrong with the firewall setting.
2. Run InstallOnstaffWebServerService.bat under the home/staff/app directory. It adds a new service called Onstaff Web Server (like the Onstaff server) to the Windows services.
2.1 To check to see if the "onstaff web service" is up and running, open up a web browser (for example, Internet Explorer), type http://localhost:8080 and hit [Enter].
• Getting a blank page means that it is working.
• Getting an error page means that the web server is not working.
3. Start the 'OnStaff Web Server' service. See Restart OnStaff Web Server Service for more information.
Note: QuickEAMS must be set up before the Intellect software can be set up.
1. Contact QuickEAMS, either by email or phone, to set up an account and get an account ID.
Steve Pineda
(213) 359-5309
2. In Intellect, go to Registration --►Worker --►Workers Comp Lien.
2.1 At the bottom of the first screen, click the [Setup] button to generate the public key. The button label changes from [Setup] to [Show Settings].
Note: This button may already display as [Show Settings] if credit cards are being used in the clinic.
2.2 Click the ![]() button. The Settings screen displays with the clinic's public key shown in the <Public Key> field:
button. The Settings screen displays with the clinic's public key shown in the <Public Key> field:
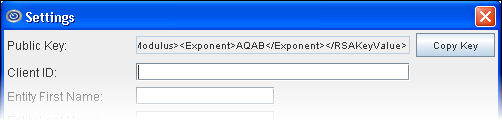
2.3 Click the ![]() button to copy the public key to the clipboard.
button to copy the public key to the clipboard.
2.4 Go to http://quickeams.com/pages/primeclinical.htm. When the Prime Medical page opens, skip to the section labeled Settings in QuickEAMS and follow the directions.
1. In Utility --►Set Up --►Clinic, populate these fields:
<Clinic No>
<Name>
<Physical Address>
<Physical Zip>
<Physical City>
<Physical State>
<Phone>
<Fax Number>
2. In Utility --►Tools --►Configuration, populate these fields:
<External IP>
<Webserver Port>
3. In Registration --► Worker --► Workers Comp Lien, click the ![]() button at the bottom of the first screen to display the Settings screen. Populate the fields as indicated below.
button at the bottom of the first screen to display the Settings screen. Populate the fields as indicated below.
Note: If the clinic has not yet been set up, the button displays as [Setup] instead of [Show Settings]. If [Setup] displays, complete section Set Up QuickEAMS above.
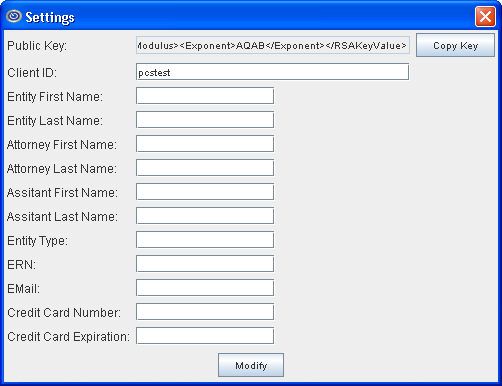
3.1 Public Key: This field is auto-filled with information from the supported vendor.
3.2 Client ID: This field is auto-filled with information from the supported vendor.
3.3 Entity First Name: For your clinic, type in the first name of your clinic OR clinic manager/contact person.
3.4 Entity Last Name: For your clinic, type in the last name of your clinic OR clinic manager/contact person.
3.5 Attorney First Name: Type in the first name of the clinic’s attorney.
3.6 Attorney Last Name: Type in the last name of the clinic’s attorney.
3.7 Assistant First Name: Type in the first name of the clinic’s manager/contact person. This may be the same as entered in <Entity First Name>.
3.8 Assistant Last Name: Type in the last name of the clinic’s manager/contact person. This may be the same as entered in <Entity Last Name>.
3.9 ERN: Type in the State-assigned ERN (EAMS reference number). This is a uniquely assigned number for entities registered in EAMS. If the trading partner does not have or know its' ERN, DWC assigns one and informs the trading partner of the same by email to the primary administrator. Claims administrators and representative offices should locate their ERNs using the UAN (uniform assigned name) online lookup tool.
3.10 Email: Enter the clinic’s email address.
3.11 Credit Card Number: Enter the number on the clinic's credit card. After the number has been entered and saved, it only displays the last four digits of the card number. If any modifications are made to any of the Name fields on this screen, the credit card number needs to be re-entered.
Note: In order to actually file a lien, credit card information MUST be entered.
3.12 Credit Card Expiration: Enter the expiration information in MM/YY format for the clinic's credit card entered above.
Note: In order to actually file a lien, credit card information MUST be entered.
When all of the changes/additions are complete:
• Click ![]()
• Click the ![]() button to send the settings information to the supported vendor. Once the supported vendor confirms it is registered properly, a pop-up window displays "Entity is successfully registered", and this Workers Comp Lien option may be used.
button to send the settings information to the supported vendor. Once the supported vendor confirms it is registered properly, a pop-up window displays "Entity is successfully registered", and this Workers Comp Lien option may be used.
• To verify that everything is set up properly, enter a patient account number in the <Patient Account> field on the Lien Tab screen.
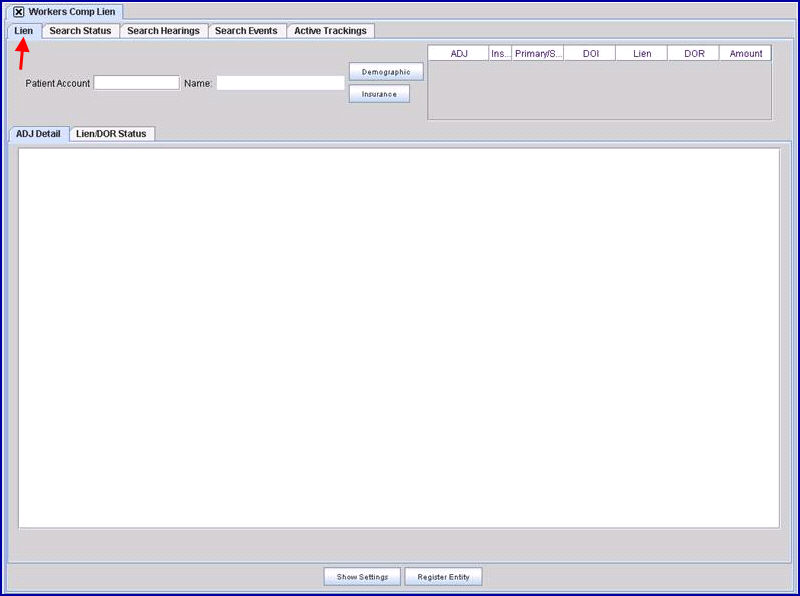
To process liens using the Workers Comp Lien option in Intellect, go to Registration --► Worker --► Workers Comp Lien:
This displays the Lien screen, which is the first of four tab-option screens. The screen for each tab is discussed in this documentation.
Note: The right-click menu is available on the Lien tab screen and is discussed at the end of that section.
1.1 Press the [F2] key to display a patient search screen.
- OR -
Enter a patient account number and press [Enter].
1.2 For the patient account number, Intellect searches within Intellect’s database for insurances with ADJ numbers (the claim number assigned to the case) in the first <ADJ Number> field.
1.3 Intellect then searches through the supported vendors’ database by patient’s last name, first name, date of birth, and zip code.
Note: If it does not match Intellect’s database, it does not pull data and does not display on the ADJ table.
1.4 Intellect then displays the ADJ numbers from both Intellect and the supported vendor on the ADJ table (see 5. below).
1.5 Effective version 14.07.01, once [Enter] is pressed, this status message displays at the bottom of the screen until the ADJ table is filled with all ADJs associated with the patient account number entered in the <Patient Account> field:

The search takes place in two phases:
• It searches for any ADJs assigned to the patient in Intellect’s database and lists them, if any.
• It also searches the states’ database and adds any new ADJs it receives.
Users might see the table populated in two steps because of the two-phase search. The search is complete when the status message at the bottom of the screens disappears.
If the state search returns no results, Intellect displays the message: “ADJ search from the search database did not return any records!”. Note that this message does not necessarily mean the ADJ is empty as there might be records coming from Intellect’s database.
Important: It is highly recommended to wait for one task to finish before another task is requested, if it is in the same tab.
2. Name ![]()
2.1 This field is filled-in with the patient name associated with the account number entered in the <Patient Account> field.
2.2 It is a read-only field.
3. [Demographic] ![]()
3.1 Click [Demographic] to display the patient’s demographics on Intellect’s View WORKER screen. See Registration --►Worker --►Worker --►View for more information.
4. [Insurance] ![]()
4.1 Click [Insurance] to display Intellect’s View WORKER INSURANCE screen for the patient. See Registration --►Worker --►Worker Insurance for more information.
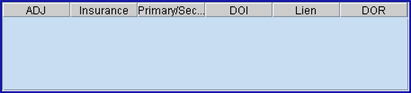
5.1 ADJ: This column displays all ADJ numbers found in steps 1.2 and 1.3 above
5.2 Insurance: Initially, if an insurance is shown (i.e., P1, S1, etc.), the ADJ number was found in Intellect’s database.
5.3 Primary/Secondary: Displays the name of the insurance shown in the Insurance column.
5.4 DOI: Displays the date of injury associated with the ADJ number shown in the ADJ column.
5.5 Lien: Effective version 14.07.01. If a Lien request has ever been sent for the selected ADJ, regardless of it being successful or not, the request date displays in the Lien column.
5.6 DOR: Effective version 14.07.01. If a DOR request has ever been sent for the selected ADJ, regardless of it being successful or not, the request date displays in the DOR column.
5.7 Amount: Effective version 14.07.01. Displays the amount of the Lien/DOR.
6. ADJ Detail tab ![]()
After selecting this tab, right-click on an ADJ number on the ADJ table, and select ADJ Detail to fill this field. Information comes from the State, and includes the Case number, Case location, DOI, Assigned judge, Injured worker first name, Injured worker last name, Next Hearing date/time, Hearing type, Hearing location, Hearing judge, Drive case, Body Part 1, Participant name, Role, and Address.
7. Lien/DOR Status tab ![]()
Select the Lien/DOR Status tab to display information from the State for the case.

7.1 Timestamp: Indicates the date and time the function took place.
7.2 Function: Indicates the operation performed by the system. For example, ‘QESubmitien’ indicates the lien/DOR has been submitted for processing.
7.3 Return: An ‘OK’ in this field indicates the request was received; it does not mean that the lien was successfully submitted.
7.4 Step: Indicates the steps being taken as the lien/DOR is processed.
7.5 Message: Describes the steps being taken.
7.6 Amount: Displays the amount shown in the <Amount> field on the New Lien screen, which is pulled from the original fee schedule assigned to the pay plan/insurance. Users may change the amount.
7.7 EServe: Information is displayed if the EServe option was selected on the New Lien or New DOR screens.
7.8 Request: Displays the type of request, as selected from the drop down list of the <DOR Type> field on the New DOR screen.
7.9 Issues: Displays the issues as selected on the New DOR screen.
7.10 OtherIssue: Displays the issue(s) entered in the <Other Issue Text> field on the New DOR screen.
7.11 Doctor: Displays the name of the doctor, as entered in the <Dr. Name> field on the New DOR screen.
7.12 ReportDate: Displays the date of the report, as entered in the <Report Date> field on the New DOR screen.
7.13 Efforts: Displays the steps already taken, as entered in the <Efforts> field on the New DOR screen.
7.14 ConfirmationID: Displays the confirmation ID, as entered in the <Confirmation ID> field on the New DOR screen.
7.15 Operator: Displays the operator number of the operator who performed the function. This may also be automatically generated if the function is done by the super user.
The right-click menu is displayed by clicking on an ADJ number and then right-clicking the mouse.
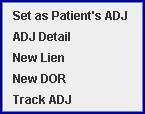
1.1 This option is used to link the ADJ found in the supported vendors’ information to the Intellect patient account.
1.2 If only the ADJ column is filled on the ADJ table (i.e., the Insurance, Primary/Secondry, and DOI columns are empty), the ADJ was found in the supported vendor’s database.
1.3 ADJ numbers need to be verified that they belong to the selected patient.
1.3.1 Click on an ADJ.
1.3.2 Right-click to display the menu.
1.3.3 Click on ADJ Detail. Information shown in the ADJ Detail field may be used to verify the patient as being the same.
1.4 If the ADJ number belongs to the patient, the ADJ needs to be assigned to the patient’s date of injury.
1.4.1 Click on the verified ADJ.
1.4.2 Right-click to display the menu.
1.4.3 Click on Set as Patient’s ADJ.
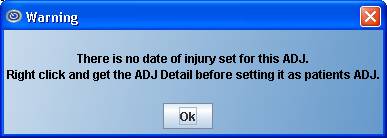
Note1: The ADJ is only assigned to the patient if there is a date of injury in the insurance.
Note2: If the DOI column is empty for the ADJ number, Intellect displays:
2. ADJ Detail
Click this option to fill the field under the ADJ Detail tab with the Case number, Case location, DOI, Assigned judge, Injured worker first name, Injured worker last name, Next Hearing date/time, Hearing type, Hearing location, Hearing judge, Drive case, Body Part 1, Participant name, Role, and Address.
Effective version 14.07.01, when this option is selected, this notice displays at the bottom of the screen until the field under the ADJ Detail tab is filled:

Important: It is highly recommended to wait for one task to finish before another task is requested, if it is in the same tab.
Click this option to generate a New Lien pop-up window:
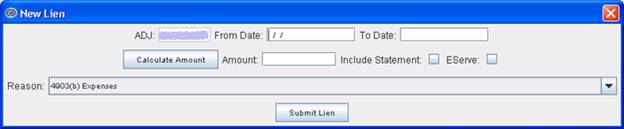
Note: The only required fields are the <Amount> and <Reason>.
3.1 ADJ ![]()
3.1 1 This field displays the selected ADJ number. Note: Numbers are redacted in this documentation for patient privacy.
3.2 From Date/To Date ![]() /
/ ![]()
3.2.1 These fields are used to limit the lien by dates of service. Enter the beginning and ending dates of service.
3.2.2 The fields may be left blank if the dates of service do not need to be limited.
3.3 [Calculate Amount] ![]()
3.3.1 Calculates the lien amount based on the <From Date> and <To Date> fields (see above) for the overall net balance and populates the amount based on the <From Date>/<To Date>.
3.4.1 This field is required.
3.4.2 This field displays either the amount calculated via the [Calculate Amount] button, or a manually entered amount. This amount displays in the Amount column on the Lien/DOR Status tab screen.
3.5 Include Statement ![]()
3.5.1 When this box is checked, a PDF statement report is generated and attached to the lien. Note: If a dollar amount is entered in the <Amount> field (see above), this box should not be checked.
3.6 EServe ![]()
3.6.1 This option is only available if the clinic is registered with a supported vendor. If this box is checked, notification documents are sent to the appropriate parties.
3.7 Reason
![]()
3.7.1 This field is required.
3.7.2 Click on ![]() to display the drop-down menu choices. Use the scroll bar on the side to view the available choices, and then click on the appropriate reason.
to display the drop-down menu choices. Use the scroll bar on the side to view the available choices, and then click on the appropriate reason.
3.8.1 Click to submit the new lien. The process can take 24 - 48 hours.
3.8.2 Once [Submit Lien] is clicked, the system automatically begins tracking the progress of the lien. Progress may be viewed on the Lien/DOR Status tab screen.
Effective version 14.07.01, when the [Submit Lien] button is pressed, the button stays 'depressed' (i.e., changes color  ) until the server returns the result to Intellect. Once Intellect has received the results, the button 'pops up' (returns to the original color) and displays this message indicating the Lien was submitted:
Click on [OK] to close the pop up window.
Click this option to generate a New DOR (Declaration of Readiness) pop-up window:
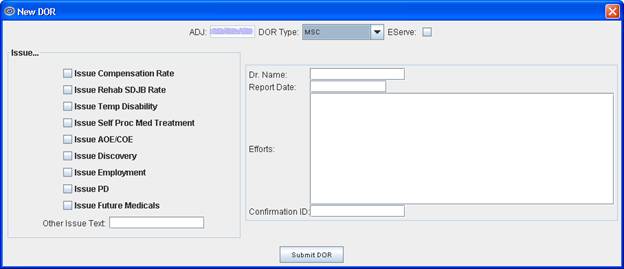
4.1 ADJ ![]()
4.1.1 This field displays the selected ADJ number. Note: Numbers are redacted in this documentation to comply with patient privacy.
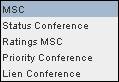
4.2.1 Click on ![]() to display the drop-down menu choices, and then click on the appropriate DOR type:
to display the drop-down menu choices, and then click on the appropriate DOR type:
4.3 EServe ![]()
4.3.1 This option is only available if the clinic is registered with a supported vendor. If this box is checked, notification documents are sent to the appropriate parties.
4.4 Issue 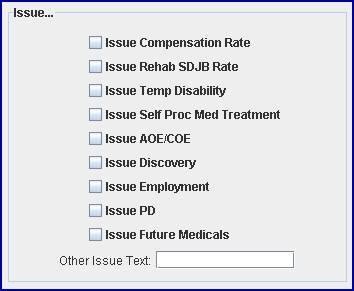
4.4.1 Click on the boxes that describe the issue. At least one issue must be given, either click on the box, OR briefly describe the problem in the ![]() box. More than one box may be selected.
box. More than one box may be selected.
4.5.1 Type the name of the doctor.
4.5.2 This field may be left blank.
4.6.1 Enter a report date.
4.6.2 This field may be left blank.
4.7.1 Enter efforts taken.
4.7.2 This field may be left blank.
4.8.1 Enter the confirmation ID.
4.8.2 This field may be left blank.
4.9.1 Click to submit the new DOR. Once [Submit DOR] is clicked, the system automatically begins tracking the progress of the DOR. Progress may be viewed on the Lien/DOR Status tab screen.
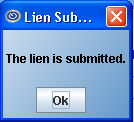
Effective version 14.07.01, when the [Submit DOR] button is pressed, the button stays 'depressed' (i.e., changes color  ) until the server returns the result to Intellect. Once Intellect has received the results, the button 'pops up' (returns to the original color) and displays a message indicating the DOR was submitted.
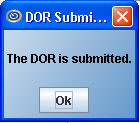
Click on [OK] to close the pop up window.
5.1 Highlight an ADJ, and then click this option manually to request the supported vendor to start tracking the selected ADJ.
5.2 Note: After filing a lien, this option must be selected for the associated ADJ so that it can be searched for later.
5.3 Effective version 14.07.01, when this option is selected, this notice displays at the bottom of the screen until tracking has been initiated for the selected ADJ:

Important: It is highly recommended to wait for one task to finish before another task is requested, if it is in the same tab.

1. Effective version 14.07.01, the Search Status tab was added to the Workers Comp Lien screen. This tab allows the query of a batch of submitted liens and DORs to check the status of each ADJ.
2. Unlike the Lien tab, which starts with the patient account number, here a date range is entered to list all the liens and DORs which were submitted within that date range. The batch of data that displays is based on the beginning and ending dates entered in the <From> and <To> fields:

3. The columns and column headings function as described below.

• Click on the column headings to toggle the information from most current to least current, and vice versa.
• Hover the mouse over the divider between columns to display arrows to click and drag the divider to increase/decrease the column size. Note: This is only true for some of the columns.
3.1 Name: Displays the patient name.
3.2 ADJ: Displays the adjudication number, as found in the supported vendor's database.
3.3 Acct: Displays the patient account number, as set up in Intellect.
3.4 Amount: Displays the amount, if any, associated with the lien/DOR.
3.5 Timestamp: Displays the date and time the function took place. The information is arranged in date/time order.
3.6 FN: Indicates the function that took place; i.e., lien or DOR.
3.7 Insurance: Displays the name of the insurance carrier.
3.8 DOI: Indicates the date of injury.
3.9 Packet Reference: Displays the reference number of the case packet.
When the data displays and a row is selected, the right-hand side text area populates with the details of the selected ADJ, the notifications received from QuickEAMS, and any step the ADJ has gone through.


1. This option allows all the clinic’s future hearing information to display for the ADJ/patient that is related to the case from the State. The database is updated every Saturday or Sunday night via the supported vendor.
Note: Only the ADJs that have been activated using the previous step (i.e., selecting ‘Track ADJ’) are searched.
2. The amount of data that displays is based on the range of dates entered in the <Date From> and <Date To> fields:

Effective version 14.07.01, after filling the <Date From> and <Date To> fields and pressing [Enter], the following message displays until the task is completed. It is highly recommended to wait for one task to finish before another task is requested, if it is in the same tab.

3. The columns and column headings function as described below.
• Click on the column headings to toggle the information from most current to least current, and vice versa.
• Click on a particular column entry to display the complete information. For example, if ‘12/18/2013 …’ displays in the On column, clicking on ‘12/18/2013 …’ displays ‘12/18/2013 1:30:00’.
• Hover the mouse over the divider between columns to display arrows to click and drag the divider to increase/decrease the column size.
3.1 Columns 1-11 display information from the supported vendor. Information is only shown on this screen if the supported vendor is tracking the ADJ.
3.2 Columns 12-15 display information from Intellect:

3.2.1 On: Displays the date and time of the hearing.
3.2.2 Board: Displays the assigned board. Examples include SBR, MDR, ANA OXN, LBO, etc.
3.2.3 Type: Displays ADJ.
3.2.4 Description: Displays the type of hearing. For example, LIEN CONFERENCE, TRIAL, MSC, STATUS CONFERENCE, etc.
3.2.5 Judge: Displays the name of the judge presiding at the hearing.
3.2.6 ADJ#: Displays the ADJ number associated with the hearing.
3.2.7 Status: Indicates the status of the hearing. For example, SCHEDULED, which indicates the hearing was added to the calendar; REMOVED, which indicates cases set for hearing may be removed from the active calendar; CONTINUANCE, which indicates hearing after reconsideration granted; TRIAL, which indicates hearing trial.
3.2.8 ID: Generated by the supported vendor.
3.2.9 Reference: Generated by the supported vendor.
3.2.10 Case Man …: Generated by the supported vendor.
3.2.11 Hearing Rep.: Generated by the supported vendor.
3.2.12 Patient Account: Displays the account number of the patient.
3.2.13 Patient Name: Displays the patient name.
3.2.14 Insurance Name: Displays the patient insurance name related to the ADJ.
3.2.15 DOI: Displays the patient’s date of injury.
4. Effective version 14.07.01, an  button was added to the bottom of the screen for the Search Hearings tab. Click this button to generate an Excel file, and display a pop-up window for naming the file and selecting where it should be saved. The column headings on the saved Excel file match those on the Search Hearings screen.

1. This option allows all the clinic’s past event information to display for the ADJ/patient that is related to the case from the State.
Note: If the ADJ numbers have NOT been assigned to the patient’s date of injury using the right-click option Set as Patient’s ADJ, the ADJ does NOT display on this Search Events screen.
2. The amount of data that displays is based on the range of dates entered in the <Date From> and <Date To> fields:

Effective version 14.07.01, after filling the <Date From> and <Date To> fields and pressing [Enter], the following message displays until the task is completed. It is highly recommended to wait for one task to finish before another task is requested, if it is in the same tab.

3. The columns and column headings function as described below.
• Click on the column headings to toggle the information from most current to least current, and vice versa.
• Click on a particular column entry to display the complete information. For example, if ‘12/18/2013 …’ displays in the On column, clicking on ‘12/18/2013 …’ displays ‘12/18/2013 1:30:00’.
• Hover the mouse over the divider between columns to display arrows to click and drag the divider to increase/decrease the column size.
3.1 Columns 1- 8 display information related to other portions of the case.
3.2 Columns 9-12 display information from Intellect.

3.2.1 On: Displays the date and time of the hearing.
3.2.2 Type: Indicates the type of event that took place. For example, ORDER APPROVING C& R, C & R FILED, EDEX, OTOC, ORDER SUSPEND ACTION ON SETTLEMENT, DOR FILED, etc.
3.2.3 Description: Displays a description of the event. For example, CLOSING ORDER: C & R (GRANTED), COMPROMISE AND RELEASE FILED, HEARING COMPLETED, HEARING DISPOSITION: OTOC, etc.
3.2.4 ADJ#: Displays the ADJ number associated with the event.
3.2.5 ID: Displays the supported vendor’s document ID number of the document filed.
3.2.6 Reference: Generated by the supported vendor.
3.2.7 Case Manager: Generated by the supported vendor.
3.2.8 Hearing Rep.: Generated by the supported vendor.
3.2.9 Patient Account: Displays the account number as entered in the <Patient Account> field on the Lien tab screen.
3.2.10 Patient Name: Displays the patient name as displayed in the <Name> field on the Lien tab screen.
3.2.11 Insurance Name: Displays the patient insurance name related to the ADJ.
3.2.12 DOI: Displays the patient’s date of injury.
4. Effective version 14.07.01, an button was added to the bottom of the screen for the Search Events tab. Click this button to generate an Excel file, and display a pop-up window for naming the file and selecting where it should be saved. The column headings on the saved Excel file match those on the Search Events screen.
This option allows the viewing of ADJ’s being tracked, and the stopping of the tracking of a selected ADJ. Tracking needs to be stopped when a case is finished

1. Click ![]() to update screen information.
to update screen information.
2. Timestamp: Displays the date and time tracking was initiated.
2.1 ADJ tracking automatically begins and displays when either the [Submit Lien] or [Submit DOR] buttons are clicked to begin tracking mode.
2.2 See right-click menu option ‘Track ADJ’ for information on manually initiating tracking.
3. ADJ#: Displays the ADJ number.
4. Operator: Displays the Intellect operator number. This may also be the super operator, as generated by the system.
• Click on an ADJ to highlight it
• Right-click to display ![]()
• Click on the [Stop Tracking ADJ] pop-up.
• Effective version 14.07.01, this message displays after requesting that tracking should be stopped for an ADJ:

Important: It is highly recommended to wait for one task to finish before another task is requested, if it is in the same tab.