Intellect™
SCHEDULE MENU OPTIONS

Appointment
Full Day
Tab Options
Appointment List Tab
Appointment List Tab
Videos Available: Click Appointment List Tab and/or Confirm Appointments to access the links. Depending on the system set up, the media player may need to be activated. Speakers need to be attached to the workstation to hear the instructions.
Note: To view the videos, log-in through the www.primeclinical.com website. Current support is required.
Effective version 9.12.20, the Appointment List tab was added to the Appointment Schedule:

Click the Appointment List tab to display booked appointments:
Left portion of screen:
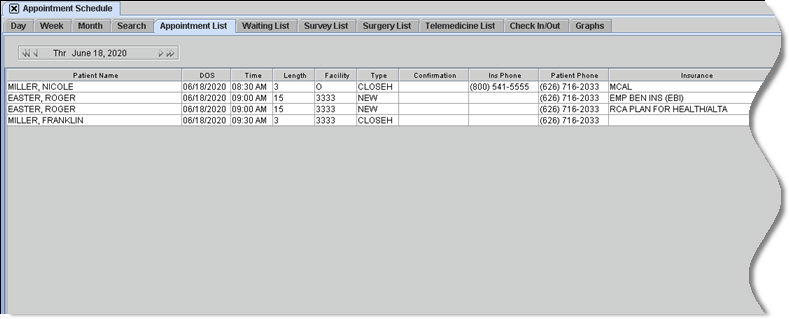
Right portion of screen:
NOTE: The display may vary from the one above based on the version of software being used, the monitor, and/or workstation. See Column Information.
As shown above, the display is divided into three sections:
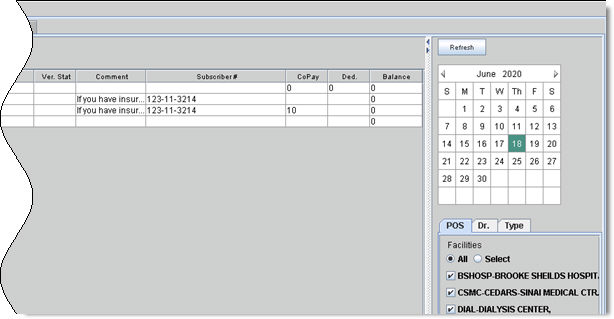
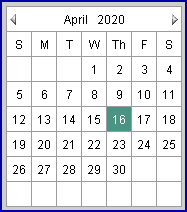
• Calendar
1. Context Menu
Access a context menu by right clicking within any column (in software versions prior to 9.12.32, this option is only available in the Patient Name column):
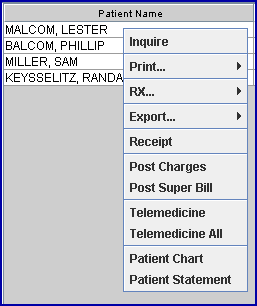
1.1 The Inquire (Effective version 9.12.32), Print, RX, Export, Receipt, Telemedicine (Effective version 20.04.20) and Patient Chart (Effective version 18.05.24 for PCM users only) features work the same as they do on the right-click menu on the Day tab.
For more information on these options, see Schedule --►Appointment --►Full Day --►Tab Options --►Schedule Overview & Right-Click Menu.
1.2 Post Charges - Effective version 9.12.35.
Click on the Post Charges option to go to the <Diagnosis Code> field on the Charges --►Charge screen, skipping the prior fields in the Public Info section. On the Appointment List tab, once a charge has been posted for a client using this option, a colored background displays in the Patient Name field.
For more information on posting charges, see Charges --►Charge.
1.3 Post Superbill - Effective version 15.08.06.
Right-click on a row of patient information on the Appointment List, and then click on Post Superbill to display the Superbill Post screen, which allows superbills to be posted electronically. See Post Superbill option for detailed information.
1.4 Telemedicine All – Effective version 20.04.20
Click on the Telemedicine All option to send invitations via text message and/or email for ALL appointments. See Schedule --►Appointment --►Full Day --►Special Features --► Telemedicine for additional information.
1.5 Patient Statement - Effective version 21.01.06
To print a Patient Statement, look in the 'Balance' column for the patient's balance and right-click on it to display the context menu. Click on the Patient Statement option to display a print screen where the appropriate printer may be selected and then click [Print].
Note: Effective version 17.06.09, click on a column heading and drag it to a new location in the displayed column order. Closing the schedule and then reopening it returns the screen to the default order.
2.1 Patient Name: Displays the name of the patient for whom the appointment was scheduled.
2.2 DOS: Displays the date on which the appointment is scheduled.
2.3 Time: The scheduled time of the appointment.
2.4 Length: Effective version 9.12.32. Shows the length of the appointment in minutes.
2.5 Facility: Displays the facility where the appointment will take place.
2.6 Type: Indicates the type of appointment; i.e., new patient, surgery, etc.
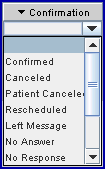
2.7 Confirmation: Displays the status of the appointment confirmation. To update the status, click in the Confirmation column on the row to update, then select the appropriate code from the drop-down list. NOTE: The color-coding for this column only is based on the confirmation status, see Schedule --► Appointment --►Full Day --►Appointment Booking and Management --►Modify Appointment Dialog Box for a complete list of colors associated with the <Confirmation> options.
2.8 Ins Phone: Displays the phone number of the insurance company pulled from the <Phone> field on the PATIENT INSURANCE screen.
2.9 Patient Phone: Displays the patients' phone number pulled from the <Home Phone No.> field on the patient's registration screen.
2.10 Insurance: Displays the name of the insurance being used for the scheduled appointment, as pulled from the <Insurance Company Name> field on the PATIENT INSURANCE screen.
2.11 Ver. Stat:
Effective version 9.12.32 - New Column. Displays the status of patient eligibility.
• When the Ver. Stat field is blank, the batch or real-time eligibility has not run
• When the Ver. Stat field has a date with a gray background, it indicates a 270 eligibility request has been sent out but no response has been received.
• When the Ver. Stat field has a date with a green background, it indicates the 271 eligibility response has been received.
2.12 Subscriber #: Populated from the <Subscriber No> field on the PATIENT INSURANCE screen.
2.13 CoPay: Populated from the <Co Payment> field on the PATIENT INSURANCE screen.
2.14 Ded: Populated from the <Deductible Met> field on the PATIENT INSURANCE screen.
2.15 Balance: Effective version 20.03.09 - New column. Displays the balance the patient owes.
Effective version 21.01.06, a patient statement can be printed when the ‘Balance’ option is added to the header using the Patient Statement option on the context menu. See Patient Statement above for details.
3. Color Coding
When certain actions are performed for an appointment, the line changes colors based on the most recent action.
3.1 Effective version 20.04.20, pink indicates the Telemedicine invitation was sent.
3.2 Effective version 20.04.23, yellow indicates the patient joined the Telemedicine video session for at least 60 seconds.
3.3 Blue indicates the charges were posted using the Post Super Bill option, the [Post Charge] button on the Telemedicine window (effective version 20.04.20), or Charges --►Charge where <SB#> is populated.
The Calendar displayed on the right (see below) works the same as it does under the Day tab.
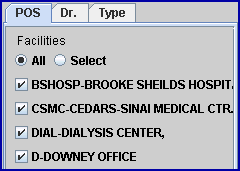
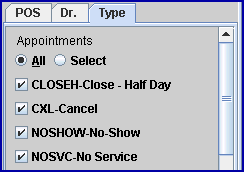
The POS, Dr., and Type tabs in this option work similarly to the Day tab, but have one difference. Under the Day view, when only specific Facilities or Types are selected to display, the program displays the slots depending upon the Utility --►Set Up --►Appointment --►Template. Whereas, in the App List tab, the slots displayed depend on the scheduled appointment. For example, if the slot defaults to OPEN, but, when scheduled, is changed to the reason for the appointment such as OV (Office Visit) or CONS (Consultation), selecting the Type = OV displays the appointment scheduled.