
Intellect™
TROUBLESHOOTING

Statement Printing Troubleshooting
The following list gives the most common reasons why a patient statement does not print. Review the list to verify whether or not a statement should have printed for a patient. If all these items were checked and it is still unclear why the statement did not print, call PCS Software Support for assistance.
1. Check the patient's <Who> column in either Charges --► Modify, Ledger --►Open Item --►Display, or Ledger --►Accounting --►Display.
In order to produce a statement, the <Who> column should be set to a 'G.'
NOTE: Once the statement is printed, if the Primary or Secondary Insurance has not made a payment, be sure to change the <Who> column back to the applicable payer who owes for the current charge. This allows the user to continue to electronically bill the claim or drop the claim to paper.
2. Check the Patient Screen Registration --►Regular --►Patient
2.1 <Guarantor> field:
This field is used to link patients in the same family together to print one statement for the entire family.
Is the <Patient Account No> for the statement to be printed the same as the <Guarantor>?
• If YES, continue looking through the list to find why the statement did not print.
• If NO, the statement must be printed by requesting from the <Guarantor>'s account number:
2.2 <Patient Stmt Override> 
![]()
Used to override the patient's Utility --►Category <Statement> print setting.
C - does not override and uses the Utility --► Category <Statement> setting for the patient's <Category Code>.
N - do not print even if the Utility --► Category <Statement> for the patient's <Category Code> indicates a statement should be printed.
3. Check Category Screen Utility --► Category
3.1 <Statement> 
This field determines whether or not a statement is printed for patients assigned this category and, if so, which charges should be included.
If this field is set to:
N – No patient statements should print for patients with this Category Code.
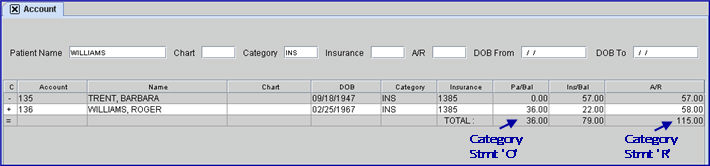
O – Indicates an ‘Open Item’ statement, meaning only charges with a balance and the <Who> column set to G are included on the statement.
R – Indicates a ‘Regular’ statement. All charges with a balance print on the statement, including those where the <Who> column is set to P1, P2, P3, S1, S2, S3, T1, G etc.
4. Check the Ledger Screen Ledger --►Accounting or Ledger --►Open Item
Go to the Ledger --► Accounting or Ledger --► Open Item screen to verify the balance for the account:

• If Utility --► Category <Statement> = O (only patient balances where the <Who> column is G are included on the statement), verify that the <Patient> balance is greater than the minimum assigned to this clinic in the Utility --►Set Up --►Parameter screen.
• If Utility --► Category <Statement> = R (all balances are included on the statement), verify that the <Balance> is greater than the minimum assigned to this clinic in the Utility --►Set Up --►Parameter screen.
• If the patient is part of a Family Account, verify the family balance by going to the Account option from the main menu.
5. Check the Parameter screen Utility --► Set Up --►Parameter
5.1 <Minimum Statement> 
Verify that the <Minimum Statement> entered here is less than the balance. If an office is printing ‘Family Statements,’ then the family balance must be greater than this amount.
5.2 <Stop Statement Age> 
This field can set the length of time charges are to be included in the balance on a patient’s statement. Type the appropriate value for the <Stop Statement Age> field; i.e., 1- 16 as indicated below:
1 - over 30 days
2 - over 60 days
3 - over 90 days
4 - over 120 days
Etc.
Once a charge is over the selected <Stop Statement Age>, it does not appear on a patient statement again even if the patient continues to receive statements for more recent charges.
5.3 <Include Zero Charges> 
This field has the options of Y, N, and P. In each of the option descriptions below, the example used is for a patient with three charges - one with a debit/positive balance, one with a credit/negative balance, and one with a zero balance.
Y - includes all charges on statements regardless of balance. This means all charges are included on the statement
N - includes only charges with an open positive balance. This means only the debit/positive and credit/negative balances print.
P- includes only POSITIVE balances on the statement. This means only the debit/positive balance print.
The detailed information which prints on the statement is determined by several things. The following shows how the Utility --► Category <Aging Method> and the Billing --►Statement <Date> affect the statement:
• Example A: If the selection for the Utility --► Category <Aging Method> field is based on Date of Service, then the Date of Service of the charge must be equal to or greater than the ‘Date’ entered on the Statement screen (or be equal to or greater than the number of days to print detail)
• Example B: If the Utility --► Category <Aging Method> is based on Entry Date, then the Entry/Posting Date of the charge must be equal to or greater than the ‘Date’ entered on the Statement screen (or be equal to or greater than the number of days to print detail)
• Example C: If the Utility --► Category <Aging Method> is based on Last Payment Date, then the Last Payment Date for the charge must be equal to or greater than the ‘Date’ entered on the Statement screen (or be equal to or greater than the number of days to print detail)
6. Check the Procedure screen Utility --►Procedure screen
6.1 <Parties to Bill> 
Note: This field was formerly <Billing (A/N/C/E/P/B/R)>.
This field determines whether or not a procedure is included on the patient statement.
• If 'N' (NO billing for this item) is selected, it does not print on patient statements.
• If set to anything else, the charge prints on the statement if all other criteria are met.