
OnSTAFF 2000
/Schedule/Appointment/APPOINTMENT
This option assists in setting up an appointment by allowing the scheduler to search by template types, provider, day(s) of the week, date and AM or Pm prior to accessing the Full Day schedule. These options help narrow down the amount of information displayed, thus speeding up the booking process. When the Appointment option is selected, On-Staff will display the following:

Patient: Press [Enter] to leave this field blank. The patient field is not used at this time, the patient name will be entered after locating the time slot.
Type: Press [Ctrl] [D] to deselect all previously selected types then use one of the methods below:
Enter the /Utility/Set Up/Appointment template <Appointment Type> and press [Enter]. The cursor will remain in the Type field. To select additional template types, repeat this process. On-Staff will display the Batch Entry for Appointment Type screen. Continue to enter in this way until you have selected all desired template types. Press [Enter] to move the cursor to the batch entry C (command) column. If an error in selection was made, from the command column use the arrow keys to highlight the type you do NOT want and press D to delete. If the selection(s) is(are) accurate, press [Enter] and On-Staff will display ONLY the selected template types in the scheduling screen.
To select all types for scheduling enter an * (asterisk) then press [Enter]. On-Staff will display the Batch Entry for Appointment Type screen. Press [Enter] to move the cursor to the batch entry C (command) column. Press [Enter] to
search using all types listed OR from the command column, use the arrow keys to highlight type(s) you do NOT want to search by and press D to delete those types.
The scheduler may not remember an appointment type. In this case, enter part of the /Utility/Set Up/Appointment/Appointment Type <Description>, press the [F2] search key and On-Staff will display the screen Selection Screen for Appointment Type. Press Q (quit) if you do not want to search using any of these types or use the arrow keys to highlight the template type you want to search by and press [Enter]. The template type will be added to the Batch Entry for Appointment Type screen (displayed after the second type is selected) and the cursor will return to the Type field. To select additional types in this fashion, repeat this process. The cursor will remain in the Type field while the selections are entered in the Batch Entry for Appointment Type screen. Continue to enter in this way until you have selected all the desired types. Press [Enter] to move the cursor to the batch entry C (command) column. If an error in selection was made, from the command column use the arrow keys to highlight the type you do NOT want and press D to delete. If the selection(s) is(are) accurate, press [Enter] and On-Staff will display ONLY the selected template types in the scheduling screen.
Dr.: Press [Ctrl] [D] to deselect all previously selected items then use one of the methods below:
To select one provider, enter their /Utility/Provider <Provider Code> and press [Enter]. The cursor will remain at the Dr. field. To select additional providers, repeat this process. On-Staff will display the Batch Entry for Provider Code screen. Continue to enter in this way until you have selected all desired providers. Press [Enter] to move the cursor to the batch entry C (command) column. If an error in selection was made, from the command column use the arrow keys to highlight the provider you do NOT want and press D to delete. If the selection(s) is(are) accurate, press [Enter] and On-Staff will display ONLY the selected providers in the scheduling screen.
To select all providers for scheduling enter an * (asterisk) then press [Enter]. On-Staff will display the Batch Entry for Provider Code screen. Press [Enter] to move the cursor to the batch entry C (command) column. . If an error in selection was made, from the command column use the arrow keys to highlight the provider you do NOT want and press D to delete. If the selection(s) is(are) accurate, press [Enter] and On-Staff will display ONLY the selected providers in the scheduling screen
Enter part of the /Utility/Provider <Provider Code> description, press the [F2] search key and On-Staff will display the Selection Screen for Provider Code screen. Press Q (quit) if you do not want to search using any of these providers or use the arrow keys to highlight the provider you do want to search by and press [Enter]. The cursor will return to the Dr. field. To select additional providers repeat this process. On-Staff will display the Batch Entry for Provider Code screen. Continue to enter in this way until you have selected all the desired providers then press [Enter] to move the cursor to the batch entry C (command) column. Press [Enter] to search using the providers listed or use the arrow keys to highlight types you do NOT want to search by and press D to delete. If the selection(s) is(are) accurate, press [Enter] and On-Staff will display ONLY the selected providers in the scheduling screen.
DOW: Press [Ctrl] [D] to deselect each day of the week. When upon entry they are already deselected, enter A to select all days of the week OR use the arrow keys to move the cursor to the day of the week that the patient is available for an appointment and press the [Space Bar] to select that day (pressing the [Space Bar] will deselect AND select a day). Continue in this manner until all appropriate days have been selected. Press [Enter] and On-Staff will display ONLY the selected days of the week in the scheduling screen.
Date: Enter the first date the patient is available for an appointment and press [Enter]. On-Staff will start the scheduling screen at this date.
Remember, on date fields you may:
Press T to enter today’s date
[Space Bar] to clear the field, enter a day of the month, for example 04, and press [Enter] to have On-Staff enter the current month, the entered day and the current year
With a date displayed on a date field, pressing;
M will move that date a month forward, m a month backward
D a day forward, d a day backward
Y a year forward, y a year backward
W a week forward, w a week backward.
Am/Pm: Use the [Space Bar] to select (or deselect) either AM, PM or both to designate whether the patient is available only in the morning, afternoon or all day. Press [Enter] and On-Staff will display ONLY the selected AM or PM times in the scheduling screen.
When the system is unable to display the selected criteria, On-Staff will display the following message:
Could Not Find Any Appointments of Type indicated in the Days Specified.
Pressing any key will return to the Appointment Menu.
When the system is able to display the selected criteria, On-Staff will move the cursor to the first day, first time slot of the Schedule Appointment screen C (command) column. This option now displays in the requested template type(s), doctor(s), day(s) of the week, starting at the specified date for AM or PM (or both) time slots within each doctor(s) /Schedule’s assigned /Template(s).
The following / More Options choices perform differently when requested from /Schedule /Appointment/Appointment:
Type: Selecting / Type will display the Batch Entry for Appointment Type screen containing the type(s) originally requested upon completing the /Schedule/Appointment/Appointment screen with the cursor in the Type field.
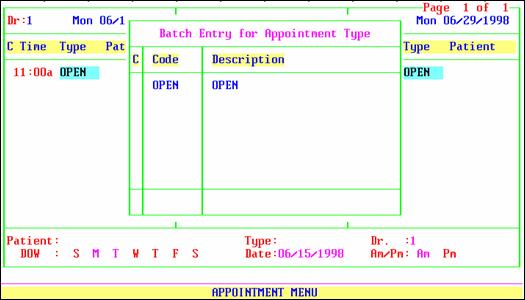
The scheduler may enter another /Set Up/Appointment/Appointment Type <Appointment Type> in the Type field, press [Enter] and that type will be added to the Batch Entry for Appointment Type screen. Continue entering types OR if finished, press [Enter] to move cursor to the C (command) column of the Batch Entry for Appointment Type screen. The scheduler may delete (D) or add (A) from the command column of this screen. If the selection(s) is(are) accurate, press [Enter] and On-Staff will display ONLY the newly selected template types in the scheduling screen.
Dr.: Selecting / Provider will display the Batch Entry for Doctor screen containing the doctor(s) originally requested upon completing the /Schedule/Appointment /Appointment screen with the cursor in the Dr.: field.
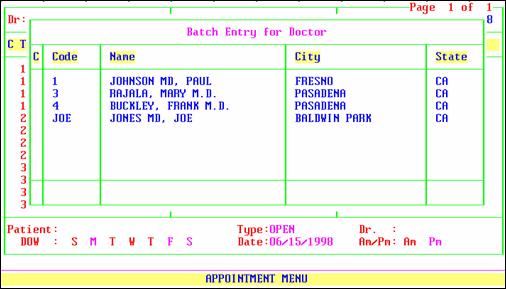
The scheduler may enter another /Utility/Provider <Provider Code> in the Dr. field, press [Enter] and that doctor will be added to the Batch Entry for Doctor screen. Continue entering provider codes OR if finished, press [Enter] to move cursor to the C (command) column of the Batch Entry for Doctor screen. The scheduler may delete (D) or add (A) from the command column of this screen. If the selection(s) is(are) accurate, press [Enter] and On-Staff will display ONLY the newly selected doctors schedule in the scheduling screen.
DOW: Selecting / DOW will return the cursor to the /Schedule/Appointment /Appointment screen DOW field which will be displaying the originally designated day(s) of the week. The scheduler may add to and/or remove previously selected day(s). Once the selection(s) is(are) accurate, press [Enter] and On-Staff will display ONLY the newly selected day(s) of the week in the scheduling screen.
Date: Selecting / Date will return the cursor to the /Schedule/Appointment /Appointment screen Date field which will be displaying the originally requested date. Upon changing this date and pressing [Enter], On-Staff will begin the scheduling screen at that date.
Am/Pm: Selecting / Am/Pm will return the cursor to the /Schedule/Appointment /Appointment screen Am/Pm field which will be displaying the original designation. Upon changing this and pressing [Enter], On-Staff will display ONLY the newly selected AM and/or PM designation in the scheduling screen.