OnSTAFF 2000
UTILITY/SET UP/
APPOINTMENT MENU
The first step in using the appointment scheduling program is setting up your files. We suggest this area be maintained by the System Administrator. Whenever set up of appointment types is necessary, add additional templates, create, delete or make changes to schedules, or add blocks to existing schedules, you will be working from this area of the program. The following is a brief explanation of tasks which may be performed from each menu option:

Menu Options:
Appointment Type Allows creation, deletion or modification of Appointment Types.
Template Allows creation, deletion or modification of pre-defined Templates.
Schedule Allows creation, deletion or modification of rotating or non-rotating Schedules for the provider.
Block Allows Blocking of patient scheduling for a specified period of time when the provider will be unavailable.
Exit Returns to the Set Up Menu.
NOTE: Once you have scheduled patients based on the information in these files, please call your vendor before making any modifications or it may result in the masking of scheduled patients and/or loss of appointment history.
*Clinic 99, the practice clinic, is an excellent place to set up and test a provider's schedule.
Utility/Set Up/Appointment/BLOCK
In this option, the user may block all or part of a provider's schedule as needed. Provided are two sets of From and To Times to allow, for example, blocking of a staff meeting from 9:00 A.M. to 9:30 A.M. in addition to a doctors meeting from 4:00 p.m. to 5:00 p.m. on the same day. See FIGURE 2

Menu Options:
Add Add Blocking for a provider.
Modify Modify an existing provider Blocking.
Delete Delete an existing provider Blocking.
View View an existing provider Blocking.
Print Print a listing of Blocking.
Exit Returns to the Appointment Set Up Menu.
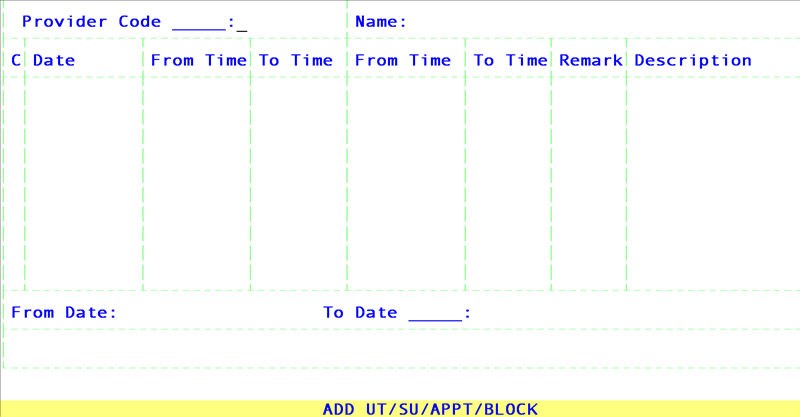
To add blocks in the schedule, select the Add option. On-Staff will display the following fields:
Provider Code: Enter the user defined code of the provider.
Name: Automatically displayed.
From Date: Enter the first date involved in this block (for example; the first day of the doctor's vacation).
To Date: Enter the last date involved in this block (for example; the last day of the doctor's vacation).
From Time: Enter the beginning time involved in this block (for example; the first appointment time slot on the schedule of the first day of the doctors vacation OR the start time for the scheduled staff meeting).
To Time: Enter the ending time involved in this block (for example; the last appointment on the schedule on the last day of the doctor's vacation OR the ending time for the scheduled staff meeting).
From Time: If more than one block is involved on a given day, enter the beginning time (for example; 9:00 A.M. in the first From Time slot for a staff meeting, 4:00 p.m. in this field for a doctors meeting). If only one block is involved, press [Enter].
To Time: If more than one block is involved on a given day, enter the ending time (for example; 9:30 A.M. in the first To Time slot for a staff meeting, 5:00 p.m. in this field for a doctors meeting). If only one block is involved, press [Enter].
NOTE: If adding a Block for the first time for this privider, after each set of block times are added the cursor will stop in the remark field although it is not marked on the screen.

If adding a Block to the screen where one or more Blocks exist, then the cursor will stop in the Remark Column.

Remark: Enter the user defined code that has been entered at /Utility/Messages /Remark that indicates why patients are not to be scheduled in this time period. For example, Remark Code - MTG, Description - Meeting, Type - B (blocking).
After pressing [Enter] at the Remark field, the cursor will return to the From Date: field allowing you to review the accuracy of the initial entries. When you are satisfied, press [] and On-Staff will display the selected Date, From and To Time(s) (or the default time of 12:00 am to 12:00 PM - all day), Remark Code (the reason for blocking the schedule), and will move the cursor to the CMD column. At this point, you may either exit from this blocking by pressing Q, or you may edit this information further.
To see what editing options are available, while the cursor is in the CMD column, press the [F2] search key to display the following choices:
A The cursor will move to the Date column, allowing you to enter the date you wish to block. Next, the cursor will move to the From Time column, allowing you to enter the starting time of the blocking (for example, if the doctor was unable to see patients for only part of the day due to surgery). Next, the cursor will move to the To Time column, allowing you to enter the ending time of the block. You will prompted for the From Time and To Time once again in case more than one time frame is to be blocked for that day. If the first From and To Time covers the needed blocking, press [Enter] through the second From and To Time fields. Lastly, the cursor will move to the Remark field, allowing you to enter the reason code for the blocking. After pressing [Enter], the cursor will move to the Date field for the next line, allowing you to add another blocked date if desired. If you have finished, press [] and the cursor will return to the CMD column.
M If the M option is selected adjacent to the desired line, the cursor will move to the Date column, allowing you to modify the blocked date if desired. Next, the cursor will move through the From Time and To Time columns, allowing you to modify the starting and/or ending times as desired. Next, the cursor will move to the Remark column, allowing you to modify the reason for the blocking of the day. After pressing [Enter], the cursor will return to the CMD column.
D If you select the D option adjacent to the desired line item, On-Staff will prompt you with the question "Would You Like To Delete (Y/N)".
Y - On-Staff will delete the line from the template.
N - DO NOT delete that line.
NOTE: On-Staff will only accept Y or N, pressing any other key, including [Enter], will cause the terminal you are using to beep once.
Pressing Q (quit) from the CMD column will return the cursor to the Provider Code field, allowing you to add blocking for another provider. If you have finished, press [] to return to the Block Menu.