
OnSTAFF 2000
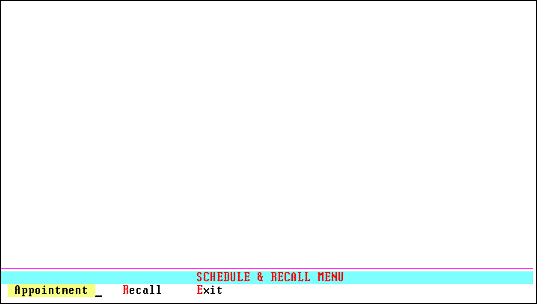
SCHEDULE MENU
This option is designed to manage appointment related actions. The prerequisites for performing these actions are: creating a Provider, creating an Appointment Type, creating an Appointment Template, and adding the Provider to and the Template to the schedule through Utility --► Set Up --► Appointment --► Schedule < Provider> and < Template> fields .
Once all these tasks are completed the scheduler is ready to add and modify patient appointments.
Menu Options:
Appointment Allows scheduling of patient appointments, printing of appointment lists, super bills, registrations forms and tracking of printed super bills.
Recall Allows scheduling and printing of patient recall letters.
Exit Returns you to the Main Menu.
NOTE: The working hours of individual doctors were set up using the /Utility/Set Up/Appointment Menu covered in Session I.
/Schedule/APPOINTMENT
This option is designed to manage appointment related actions, whether it be scheduling related activities, printing registration forms or super bills (i.e., charge tickets, fee slips, etc.) or tracking printed super bills. When the Appointment option is selected, On-Staff will display the following:
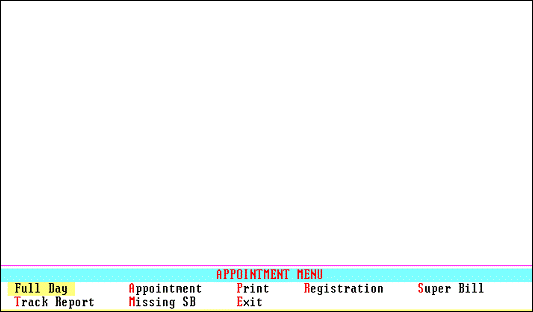
Menu Options:
Full Day Allows the scheduling of appointments showing the Full Day schedule.
Appointment Allows scheduling of appointments, searching by type, provider, day of the week, date and AM or PM prior to accessing the Full Day schedule.
Print Allows the printing of the schedule (scheduled times slots only or all time slots), labels, registration forms, super bills and sign-in sheets for a selected date range, provider and time sequence.
Registration Allows the printing of blank registration forms for the patient to complete or completed forms for the patient to confirm the accuracy of the information on a return visit.
Super Bill Allows the printing of super bills for a single patient on demand or for the day's scheduled appointments.
Track Report Creates a list of super bills that have been posted; including the super bill number, patient's name, account number and entry date of charges for a specified period and a specific clinic.
Missing SB Creates a list of super bills that have been printed but not posted; includes the super bill number, patient's name and account number.
Exit Returns to the Appointment Menu.
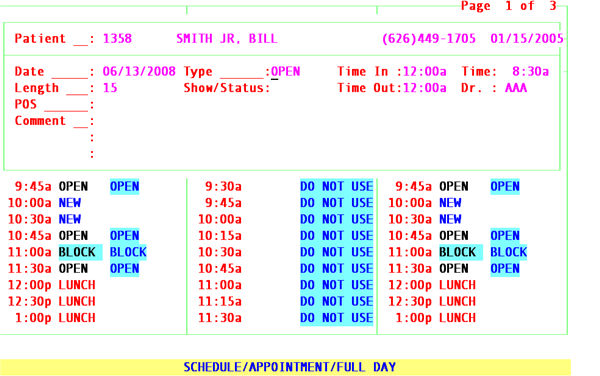
/Schedule/Appointment/FULL DAY
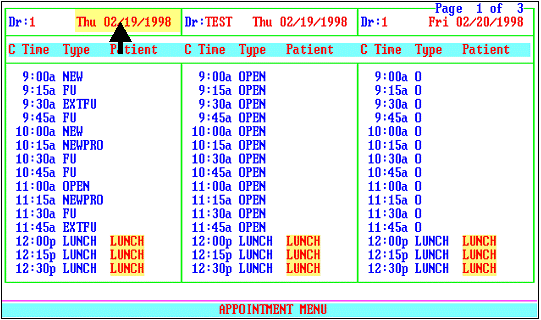
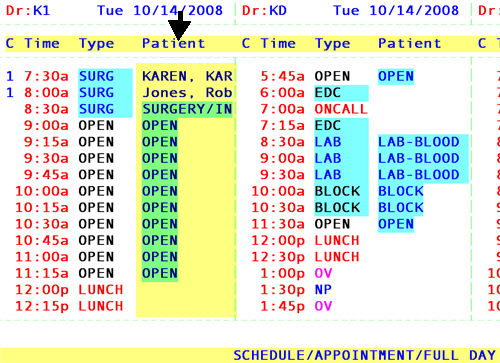
This options displays the appointment template for all doctors, all days of the week within each doctors /Schedule, AM and PM time slots within the /Schedule’s assigned /Template(s) and displays the current calendar date. When the Full Day option is selected, On-Staff will display your cursor in the C (command) column of the /Full Day schedule (see following example):
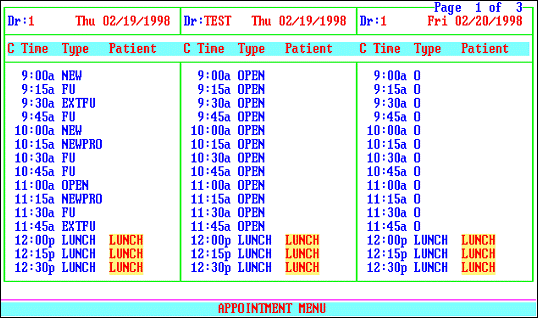
Page 1 of 3: Located in the upper right hand corner of the screen, this example alerts the scheduler that the schedule continues past 12:30pm for two additional pages.
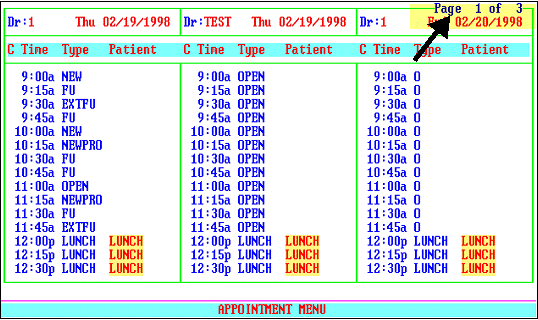
Dr: Displays the all available doctor's assigned /Utility/Provider <Provider Code>. To see additional providers press the (right arrow) ![]() on your keyboard to scroll over.
on your keyboard to scroll over.
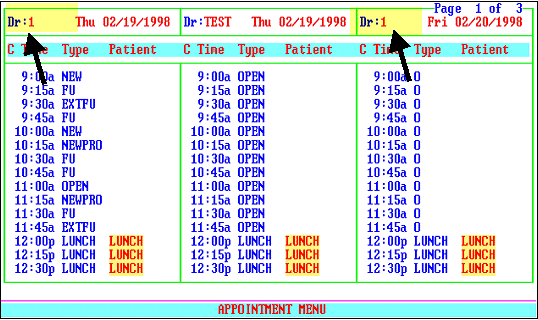
Displayed following Dr is the day of the week followed by the calendar date.
C: Upon selecting Full Day the cursor will be in the C (command) column.
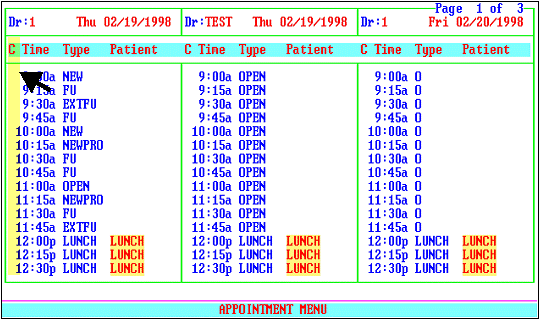
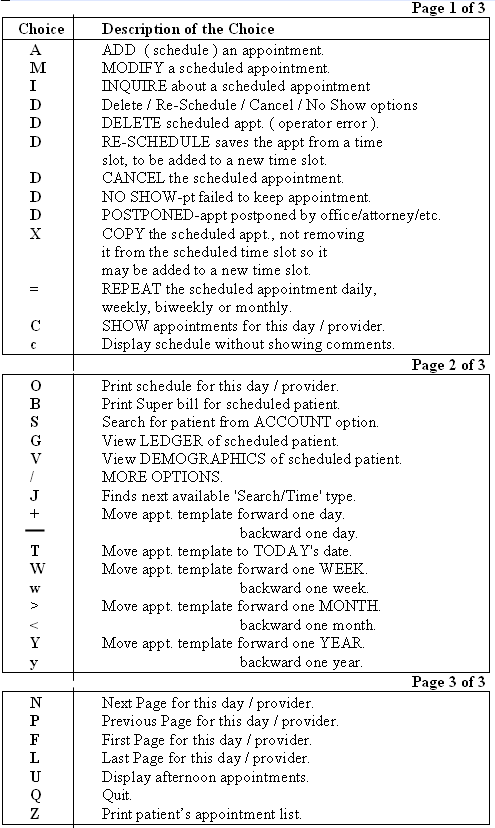
Pressing the [F2] search key will display the following valid choices. See Explanation of the Appointment Command Column Options for instructions regarding each option.
NOTE: Page 1 of 3, located in the top right hand corner of the Choice/Description of Choice screen, alerts the scheduler that there are 3 pages of command options. You may view the other pages by pressing: N - Next page, P - Previous page, F - First page and L - Last page. You may also use the [Page Up] and [Page Down] keys.
Time: Displays available appointment times.
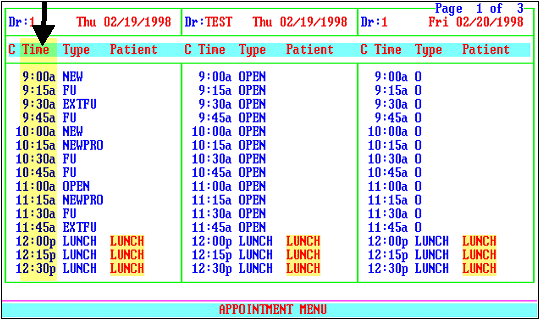
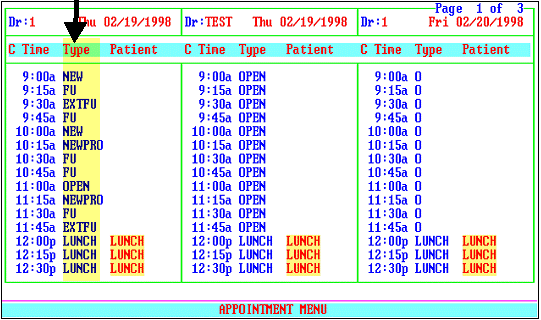
Type: Displays the preset template appointment types.
Patient: Displays the name of the first scheduled patient or >Continued if an appointment requires more than one time slot.
Appointment Scheduling for a New Patient
In order to schedule an appointment, the patient must be registered (i.e. have an account number) in On-Staff. The following are instructions for booking an appointment for a New Patient:
C: With focus in the C (command) column, move the cursor by using the [“], [‘], [”], [’], [Page Up] and [Page Down] keys to select the appropriate provider, date, and time slot
.
To Schedule by a specific date
Once selected, press A to Add the appointment to the schedule. (More will be discussed on page movements latter on).
Patient: Enter the patient's full name (last name, first name, being careful to use correct spelling) and press [Enter]. Because this is a NEW PATIENT, On-Staff will not find their name, thus the following will display on your screen:
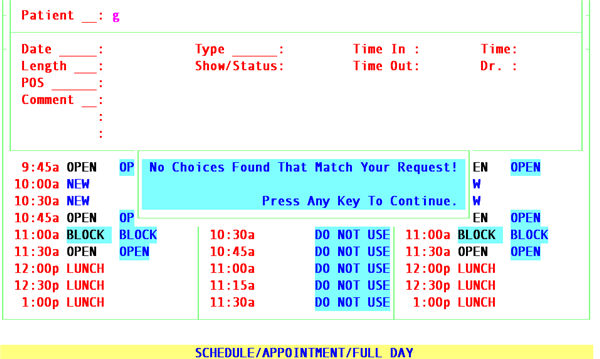
Pressing any key to continue will return to the Selection Screen for Patient. It is recommended that you search for the patient again by entering information in the search grid, this double checking will help prevent duplicating accounts.
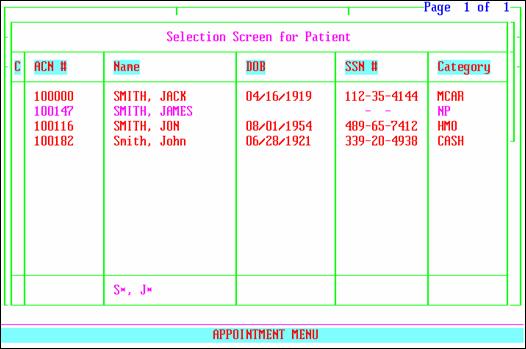
Use a Wild Card search to verify that the patient does not exist in On-Staff. Using the example of JOHN T. SMITH, you could enter any one of the following examples:
SMITH, JOHN T. *, * T.
S*, JOHN T. *MIT*
*MITH, JOHN T. SMITH
*, JOHN SMITH, * T.
*, *OHN SMITH, JOHN T*
The * (asterisk) is used in place of any string of characters not known. Remember, On-Staff is case sensitive, it is important to know whether your data is in upper or lower case lettering. On-Staff may be locked into upper case by entering U in the Upper/Lower (U/L/F) field of the /Parameter screen (covered in Session I).
Assuming your patient is NOT found after the second search, from any cursor position in the Selection Screen for Patient, press the [End] key. You will return to the following screen with the prompt Would You Like to Add the Patient (Y/N)?:
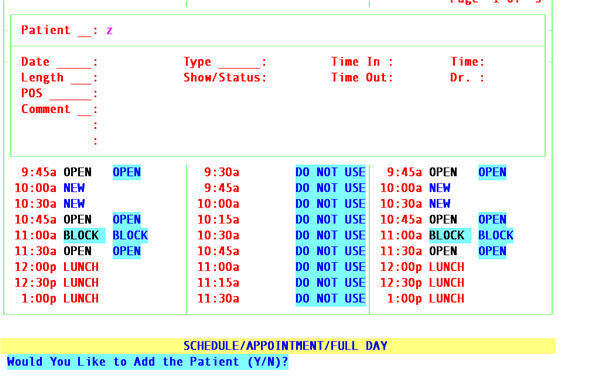
N Will NOT add the patient, returning you to the full day Appointment Menu.
Y WILL add the patient, displaying the following /New Patient demographic screen allowing you to enter patient information.

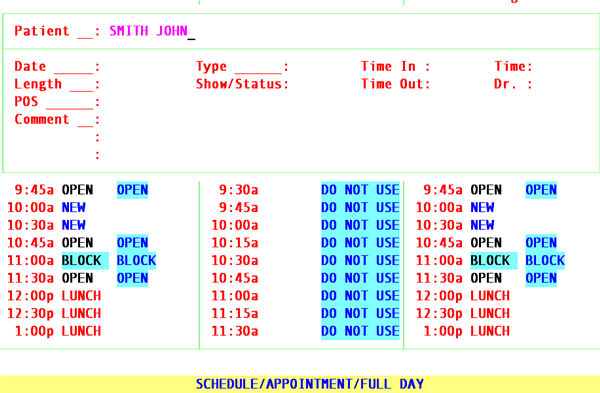
After completing what your office deems necessary to obtain from a new patient, be sure to press [Enter] to save the information BEFORE pressing [End] to return to the full day Appointment Menu. Noted in the above example is the recommended minimum information to obtain from the patient.
Appointment Scheduling for Existing Patients
C: From the C (command) column, move the cursor by using the [“], [‘], [”], [’], [Page Up] and [Page Down] keys to select the appropriate provider, day of week, and time. Once selected, press A to Add the appointment to the schedule. (More will be discussed on page movements later on).
Patient: Enter the patient's full name (last name, first name, being careful to use correct spelling) and press [Enter].
From the Selection Screen for Patient C (command) column:
If this is the correct patient, press [Enter]. On-Staff will display the screen on the following page.
If this is NOT the correct patient, press [/] to move the cursor from the C (command) column to the bottom row in order to search the name again using the * (asterisk) and/or another spelling.
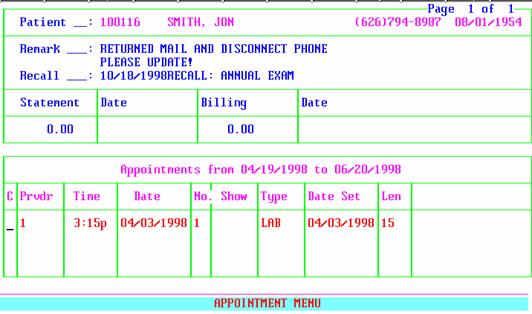
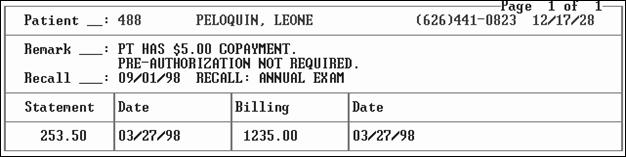
NOTE: On-Staff may be set up to display the patient's financial history, appointment history, both (as in the above example) or neither.
Train your staff the review the Remark, Recall and Show fields. The Remark field is used as a communication tool to obtain information from the patient at the time of scheduling the appointment. In the above example, mail has been returned and their phone has been disconnected. While talking with the patient, the scheduler could update this information by using their Macro Key designated to go to /Modify New Patient (press [Ctrl] F to display Macro Key destinations). The Recall field is displaying the next scheduled recall for the patient. If appropriate, that type of appointment could be scheduled now. For instance, using the above example, enough time could be allotted to schedule their annual exam. If in the Show column several NoShow entries appear, the scheduler would be alerted to not offer the most desirable appointment times for the day, leaving those for patients who do show. Following is an explanation of each field of the above screen.
Financial Information
Page 1 of 1: This would alert the scheduler of additional pages of appointment history when Page 1 of 2, etc. is displayed.
Patient: The patient's account number, name, home telephone number and date of birth.
Remark: If a Remark was entered in /New Patient <Remark>, it would be displayed here. The patient's remark field is a good place to record information that should be shared with the appointment scheduler. For example; Needs Prior Auth., Patient Discharged From Practice As Of 01/15/98, Pass Call to Collection Department-Seriously Past Due, Mail Returned, Phone Disconnected, Need New Signed Claim Form, etc.
Recall: If the patient has a scheduled recall, On-Staff will display the date the recall letter is scheduled to be printed along with a brief description of the letter.
Statement: The balance due from the patient on the last statement.
Date: The date of the last statement.
Billing: The balance due from the insurance on the last billing.
Date: The date of the last billing.
Appointment History
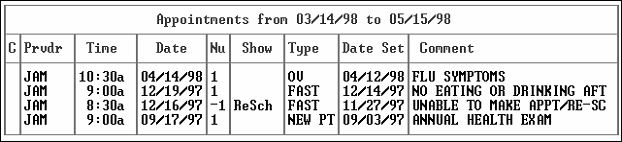
C: Command column. From this command column the scheduler may perform various functions. Pressing the [F2] search key will display the following valid choices:
A Add Appointment
M Modify
D Reschedule/Cancel/Delete/No Show
I Inquire
N Next Page
L Last Page
F First Page
P Previous Page
Prvdr: The /Utility/Provider <Provider Code> of the doctor the patient is/was scheduled to see.
Time: The time of the appointment.
Date: The date of the appointment.
Nu: If there had been more than one appointment scheduled for this time slot the Nu column shows whether this was the first, second, etc., appointment that was scheduled (1, 2, etc.).
Show: If the appointment had been deleted, re-scheduled, canceled or marked as a no show (D from the full day C (command) column), or the scheduler entered a user defined internal code (not maintained in On-Staff), On-Staff will display the Show/Status here.
Type: The appointment type.
Date Set: The calendar date when the appointment was scheduled.
Len: The length of the appointment.
(no heading) This field displays a portion of the first comment line of the appointment.
Completing the Appointment Process
Date: The date of the appointment is displayed automatically but is not accessible. If the date is wrong, press [End] to return to the full day Appointment Menu and select another date.
Type: On-Staff will display the appointment type that was assigned the template for that time slot. Press [Enter] to assign this type to the appointment OR enter another type. If you do not know your defined appointment types, clear this field by pressing the [Space Bar], press the [F2] search key to display the Selection Screen for Appointment Type, move the cursor to select the appropriate type for the appointment being scheduled and press [Enter].
Time In: The Time In field is displayed, but is not accessible when adding a new appointment. From Modify you may enter a Time In to track what time the patient arrived.
Time: Displays the time of the appointment this patient is being scheduled (or has been scheduled) for. This field is informational only.
Length: The default length of the appointment type will be displayed in this field. If the default time is increased, more time slots will be allocated. Decreasing the time does not have any effect in the system.
Example: If the default time is thirty minutes and the scheduler changes the time to ninety minutes, the appointment will take three slots as opposed to the one slot that would normally be taken. The first slot containing the patient’s name, the remaining slots marked with >Continued.
Show
/Status: When adding a new appointment, this field is normally left blank. When an appointment has been re-scheduled, canceled, deleted or marked as a no show (D from the full day C (command) column), On-Staff will record that information here. You may also enter a user defined internal code (not maintained in On-Staff). If desired, an appointment list may be run using the Show/Status entry, allowing you to obtain all no shows or canceled appointments for a specified date range.
Time Out: The Time Out field is displayed, but is not accessible, when adding a new appointment. From Modify you may enter a Time Out to track what time the patient checked out.
NOTE: Reports on Time In and Time Out entries may only be ran using Query, a separate software purchase from On-Staff.
Dr.: Displays the /Utility/Provider <Display Code> of the doctor this patient is being scheduled (or has been scheduled) for. This field is informational only.
Comment: On-Staff allows three lines of comment which will print on various appointment listings.
After pressing [Enter] in the last field, On-Staff will schedule the appointment and return to the full day Appointment Menu.
NOTE: The number of appointments scheduled will appear next to the time slot in the C (command) column. If ten or more appointments have been scheduled in one time slot an * (asterisk) will appear in the C (command) column.
Explanation of the Appointment Command Column Options
A: Used to Add (schedule) a patient's appointment.
M: Used to Modify the appointment Type, Time In, Length, Show/Status, Time Out and Comment lines. After you modify any information, remember to press [Enter] to save the new information.
NOTE: If more than one appointment was scheduled, On-Staff will display all of the patients who have been scheduled for the time slot. Use your arrow keys to select the patient, press M and the appointment information will be displayed.
I: Used to Inquire (view) an appointment. When this option is selected, On-Staff will display the Patient name, Date, Type, Time In, Length, Show/Status, Time Out and Comment lines.
NOTE: If more than one appointment was scheduled, On-Staff will display all of the patients who have been scheduled for the time slot. Use your arrow keys to select the patient, press I and the appointment information will be displayed.
D: Used to Delete, Re-Schedule and Cancel an appointment, or flag as a No Show. When D is selected, On-Staff will display the following:

NOTE: When only one appointment was scheduled in the time slot, On-Staff will display a summary of the appointment and the menu choices described above. When more than one appointment was scheduled, On-Staff will display all of the patients who have been scheduled for the time slot. Use your arrow keys to select the patient, press [D] and On-Staff will display a summary of the selected appointment and the menu choices described above.
Re-Schedule: On-Staff will display the following message:
Appointment Saved Press Any Key to Continue ->
Press any key to continue and On-Staff will delete the appointment from the day's schedule, copy the patient's appointment information into the system's memory and return to the full day Appointment Menu. Move the cursor to the desired date and time to re-schedule and press A (add). On-Staff will display the patient's name, press [Enter] and the appointment will be added to the new time slot. The original appointment will be saved in the patient's appointment history and marked with ReSch in the Show column.
Cancel: On-Staff will delete the appointment from the day's schedule. The appointment will be saved in the patient's appointment history and marked with CAN in the Show column.
Delete: On-Staff will delete the appointment from the day's schedule. This option is used when an appointment has been booked in error by the scheduler. The appointment will be saved in the patient's appointment history and marked with Delete in the Show column.
NoShow: On-Staff will modify the appointment, inserting NoShow in the Show/Status field. The appointment will be saved in the patient's appointment history and marked with NoShow in the Show column.
Exit: Exit will return to the full day Appointment Menu.
X: Used to copy an appointment. When this option is selected, On-Staff will display the following message:
Appointment Saved Press Any Key to Continue ->
Press any key to continue and On-Staff will copy the patient's appointment into the system's memory and return to the full day Appointment Menu. Move the cursor to the desired date and time to schedule and press A (add). On-Staff will display the patient's name, press [Enter] and the appointment will be added to the new time slot. The original appointment will not be change.
NOTE: If the new appointment should not be the same type as the original appointment, you will need to modify the Type entry.
O: Used to print a list of all appointments for the doctor in that day. On-Staff will print the number (whether they were the first, second, etc. appointment scheduled), the provider’s code, date, time, day of week, type of appointment, the patient’s category code, account number, name, referring doctor’s name, the patient’s home and work phone numbers and any appointment comments entered. When this option is selected On Staff will display the following message:
Enter your print out destination or Return for default ? HP
To accept the default printer (in the above example; HP) press [Enter]. To display your printer options press [Space Bar] once to clear the field, then press [Enter]. At this point, highlight the desired printer and press [Enter]. The system should beep once to signify that the process is going to the printer. If the system beeps twice the print job has failed.
B: Used to print a super bill for the current patient. When this command is selected, On-Staff will display the following message:
Enter your print out destination or Return for default ? HP
To accept the default printer (in the above example; HP) press [Enter]. To see your printer options press [Space Bar] once to clear the field, then press [Enter]. The printer destinations for your system will be displayed. At this point, highlight the desired printer and press [Enter]. The system should beep once to signify that the process is going to the printer. If the system beeps twice the print job has failed.
S: Used to search for a patient. When this command is selected, On-Staff will display the /Main Menu/Account option. Press the [F2] search key to display the following valid choices which may be performed from the C (command) column of the Account screen:
A Add a New Patient
M Modify Patient Demographic Information
V View Patient Demographic Information
D Display Patient Open Item Ledger
G/J Display Patient Accounting Ledger
I Display Patient/Family Balance Broken
I Down by Patient and Insurance
N Next Page
P Previous Page
F First Page
L Last Page
E/Q Exit
G: Used to view the patient's accounting ledger.
V: Used to view the patient's demographic information. When this option is selected, On-Staff will display the first page of the patient's demographic screen.
: When the forward slash key is selected (/, More Options), On Staff will display a sub-menu to further assist the scheduler in booking appointments. See IV-1-23 All About / MORE OPTIONS.
J: Used after / (More Options) Search/Time, J will jump to the next available time slot.
+: The + (plus) option will move the template forward one day. Press the [Shift] key to type the plus symbol.
-: The - (minus) option will move the template backward one day.
T: The T (upper or lower case) option will move the template to Today's date.
W: The W (capital W) option will move the template forward one week.
w: The w (lower case w) option will move the template backward one week.*
>: The > (greater than) option will move the template forward one month. Press the [Shift] and [.] keys to type the greater than symbol.
<: The < (less than) option will move the template backward one month. Press the [Shift] and [,] keys to type the less than symbol.
Y: The Y (capital Y) option will move the template forward one year.
y: The y (lower case y) option will move the template backward one year.*
N: The N (upper or lower case) option will move the template to the Next page for this day / provider.
P: The P (upper or lower case) option will move the template to the Previous page for this day / provider.
F: The F (upper or lower case) option will move the template to the First page for this day / provider.
L: The L (upper or lower case) option will move the template to the Last page for this day / provider.
U: The U (capital U) option is used to display the first afternoon time slot for that doctor on that day. To display the morning appointments press U again.
Q: The Q (upper or lower case) option will Quit (exit) the full day appointment menu.
Z: Used to print a list of scheduled appointments for the current patient. When this command is selected, On-Staff will display the following message:
Enter your print out destination or Return for default ? HP
To accept the default printer (in the above example; HP) press [Enter]. To see your printer options press [Space Bar] once to clear the field, then press [Enter]. The printer destinations for your system will be displayed. At this point, highlight the desired printer and press [Enter]. The system should beep once to signify that the process is going to the printer. If the system beeps twice the print job has failed.
* When locked into upper case (/Utility/Set Up/Parameter <Upper/Lower (U/L/F)> = U), On-Staff will recognize lower case letters by using the [Shift] key.
All About ‘/’ More Options
More Options provides additional assistance in booking an appointment. These options help narrow down information displayed in the full day Appointment Menu, thus speeding up the booking process. When the forward slash key (/, More Options) is pressed from the C (command) column of the full day Appointment Menu, On-Staff will display the following:

Search: Assists the scheduler in searching. When the Search option is selected, On-Staff will display the following:
APPOINTMENT SEARCH OPTION
Patient Time Exit
Patient: This option allows the scheduler to search for the patient and view their appointment history. When the Patient option is selected, On-Staff will display the following:
APPOINTMENT SEARCH OPTION
Patient__: __
For instance, when a patient calls to ask when their next appointment is, the scheduler would select /, Search, Patient, enter the patient’s name, press [Enter] and view the patient’s appointment history. From the appointment history screen, the scheduler may cancel or reschedule their appointment or modify it to add a remark, etc.
Time: This option assists the scheduler in searching for specified appointment time slots. When the Type option is selected, On-Staff will display the following:
APPOINTMENT SEARCH OPTION
Type: __ Provider: Length: 1 Booking: 1 Am/Pm:
Type: Enter the appointment type assigned to a time slot that you want to search by. If left blank, the system will search for all types. Pressing the [F2] search key will display the Selection Screen for Appointment Type, listing all types your practice has chosen to set up.
Provider: Enter the provider number you want to search by. If left blank, the system will search for all providers. Pressing the [F2] search key will display the Selection
Screen for Provider, listing all providers your practice has set up.
Length: Enter the number of consecutive time slots needed for this appointment (1, 2, etc.).
Booking: Leaving this field at it’s default value of 1 will search for the next available unscheduled time slot. If your office does not double book, leave this field at 1. If your office does double book, entering 2, 3¸ etc. will search for the next available scheduled (up to the second, third, etc. patient scheduled) or unscheduled time slot, whichever comes first.
Am/Pm: Search for only morning or afternoon time slots. If left blank the system will search for all time slots.
After completing these prompts, the cursor will return to the Type field.
If the values you entered are correct press [“] to exit the loop and return to the Appointment Menu. On-Staff will locate the next open appointment time slot that meets your criteria.
If you need to change any information entered, press [Enter] until you are at the field you need to change. Press [Space Bar] to clear the field and enter the new value. Press [Enter] until you are at the Type field and press [“] to exit the loop.
NOTE: When an entry is NOT made in either the appointment Type or Provider fields, the search will simply locate the next available time slot.
Print: Allows the scheduler to print the schedule for the doctor in the column where the cursor rested prior to pressing / (slash). When Print is selected, On-Staff will display the following:
Enter your print out destination or Return for default ? HP
To accept the default printer (in the above example; HP) press [Enter]. To see your printer options press [Space Bar] once to clear the field, then press [Enter]. The printer destinations for your system will be displayed. At this point, highlight the desired printer and press [Enter]. The system should beep once to signify that the process is going to the printer. If the system beeps twice the print job has failed.
New Patient: Refer to the section Appointment Scheduling for a New Patient, regarding Patient for instructions. When this option is selected On-Staff will display the following:
APPOINTMENT MENU
Patient__: __
Type: Allows the scheduler to select specific types to display in the full day Appointment Menu, thus speeding up the booking process. When the Type option is selected, On-Staff will display the following Batch Entry for Appointment Type screen:
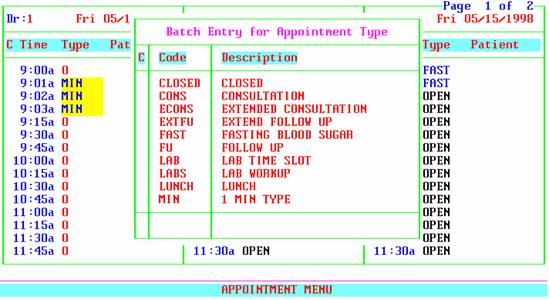
Press [Ctrl] [D] to deselect all appointment types. Enter the specific appointment type(s) you would like to schedule for and press [Enter]. When you have completed your selection(s), press [Enter] to move the cursor to the C (command) column. Press [Enter] again to quit the batch entry screen. On-Staff will now reflect only that/those selection(s) in all three columns of the full day
Appointment Menu. Using the above example, the scheduler could search for FAST and receive the following:

NOTE: Type only works if that appointment type is assigned to time slots in the template. Otherwise On-Staff will display the following message:
Could Not Find Any Appointments Of Type Indicated of Days Specified
Provider: Allows the scheduler to select which provider(s) schedule is displayed in the full day Appointment Menu. As with the Type option, when the Provider option is selected, On-Staff will display a screen entitled Batch Entry for Doctor. Press [Ctrl] [D] to deselect providers. Enter the provider code of the specific provider(s) you would like to schedule for and press [Enter]. You may enter the provider's name (last name first) and press the [F2] search key when unsure of the provider code. When only one provider matches your selection criteria, that provider will be added to the Batch Entry for Doctor screen. When more than one provider matches your selection criteria, On-Staff will display the Selection Screen for Provider, highlight the appropriate provider and press [Enter].
When you have completed your selection(s) press [Enter] to move the cursor to the C (command) column. Press [Enter] again to quit the batch entry screen. On-Staff will now reflect only that/those selection(s) in all three columns of the full day Appointment Menu.
DOW: Allows the scheduler to select which day(s) of the week to display in the full day Appointment Menu. When the DOW option is selected, On-Staff will display the following:
APPOINTMENT MENU
DOW: __Sun Mon Tue Wed Thu Fri
Press [Ctrl] [D] to deselect each day of the week. Use the arrow keys and [Space Bar] to select and highlight the days of the week that the patient is available for an appointment. Press [Enter] and On-Staff will now reflect only that/those selection(s) in the full day Appointment Menu.
Date: Allows the scheduler to quickly move to a specific date. Use the [”] key to select the Date option. When selected, On-Staff will display the following:
APPOINTMENT MENU
Date: 06/04/98
Enter the first date the patient is available for an appointment. On-Staff will move the full day Appointment Menu to this date.
Am/Pm: Allows the scheduler to select only AM or PM appointments to be displayed in the full day Appointment Menu. When AM/PM is selected, On-Staff will display the following:
APPOINTMENT MENU
Am/Pm: ___Am Pm
Press [Ctrl] [D] to deselect both AM and PM and/or use the [Space Bar] to select or deselect the desired AM or PM choice to designate whether the patient is available only in the morning or afternoon. Press [Enter] and On-Staff will now reflect only those time slots in all three columns of the full day Appointment Menu.
Utility: Allows the scheduler access to the /Utility/Set Up/Appointment Menu where appointment types, templates, schedules and blocking are set up. When the Utility option is selected, On-Staff will display the following:
APPOINTMENT SETUP MENU
Appointment Type Template Schedule Block Exit
Choosing the Exit option will return you to the full day Appointment Menu.
View
Month: This option will display a monthly calendar for the doctor whose command column the cursor rested in prior to pressing / (slash). When the View Month option is selected, On-Staff will display the following:
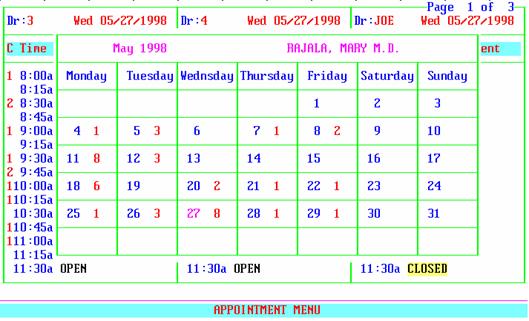
Adjacent to the day of the month is a number reflecting how many appointments are scheduled for that day. The scheduler may use the arrow keys to highlight a given day and press [Enter] to go directly to that day in the full day Appointment Menu. To scroll between months press the [Page Up] or [Page Down] keys. Press [End] to return to your original place in the full day Appointment Menu.
NOTE: If the doctor's schedule is not set up for the day you selected, On-Staff will take the scheduler to the next available date.
Super bill: Allows the scheduler to print a Super Bill for the last patient scheduled. When the Super bill option is selected, On-Staff will display the following message:
Enter your print out destination or Return for default ? HP
To accept the default printer, press [Enter]. To see your printer options press [Space Bar] once to clear the field, then press [Enter]. At this point, highlight the desired printer and press [Enter]. The system should beep once to signify that the process is going to the printer. If the system beeps twice the print job has failed.
Exit: Returns to the full day Appointment Menu.