
OnSTAFF 2000
Menu/PAYMENT
This option is used to post all payments and adjustments (other than those which were posted using the Jump/Payment option in the Charge screen) regardless of the payment’s source, using various methods to calculate and apply these credits. After selecting the Payment option from Main Menu, On-Staff will display the following:

Menu Options:
Open Item Used to apply or reverse payments and adjustments from all Payors, line item by line item or by jumping or tagging specific line items.
Auto Payment When software requirements have been met, used to perform auto payment/adjustment posting for Medicare, Medi-Cal and/or Capitated (Pre-Paid) Contracts.
Balance Forward
Guarantor The Guarantor option is used to post payments to family accounts (accounts linked together
Load MCAL
ANSI Auto Pay Use the new payment menu option ANSI AutoPay to post the ERA file. Auto Payment will be used for all other auto payment features.
Exit Returns to the Main Menu.
AUTO PAYMENT POSTING FOR MEDICARE and MEDI-MEDI
NOTE: NHIC Medicare must be contacted prior to proceeding.
Must I Use a Specific Format (Auto Payment screen <Carrier Type>) in Order to Perform Auto Posting?
NHIC Medicare’s Carrier Type is 4. Medicare’s Carrier Type is O (capital o not zero!). Both are submitted in the National Standard Format, Version 2.0 as required by both carriers.
How Does this Work?
Your ERA file will be placed in what is referred to as a mailbox and may be picked up through the Main Menu/Payment/Auto Payment feature. Usually in starting out, electronic deposit of your check (EFT-Electronic Funds Transfer) is waived until a later date thus the hard copy EOMB and check will continue to be mailed to you.
When you are ready, notify Medicare that you would like them to start EFT and they will deposit your check electronically into your bank account within 24 hours of mailbox pickup. Once this is done, you will no longer receive the hard copy EOMB or check. You will receive the ERA file printout after each pickup which is used as an EOMB for secondary billing.
How Often Do I Execute the Auto Payment Feature?
The ERA file is to be picked up weekly, (we recommend Monday after 2:00 p.m.) for Medicare. .
What Am I Picking Up?
The printed ERA file contains the same information as an EOMB received through the mail. The check number(s), denial codes, crossover notification, etc. are included in the printout and may be copied and used in secondary billing.
A 'File Name' is also included in the printout. This is composed of the date of transmission followed by a dot and your submitter number. Example: 112996.00123.
The ERA file may contain an Error Report, the contents of which is explained at 1, D.
What Procedures Do I Follow to Get Started?
Stop posting any checks received from Medicare. You will pick up ONLY the file(s) in your mailbox by going to Main Menu/Payment/Auto Payment and completing the screen as noted at 1.
Why Do I Want to Pick Up Only?
You may have been billing Medicare from a previous computer system, thus payments received at this time might apply to those charges. If you were to pick up and post an ERA file that contained such payments, the system would not apply any payments or adjustments for these charges. They would appear in the error report since these charges do not exist in On-Staff.
You may have been billing Medicare from On-Staff. In this situation you will need to make sure (by holding all Medicare checks for a while) that what you pick up in your mailbox does NOT contain a check that was previously received and posted to your system. As these ERA files are picked up and they may contain a check that has already been posted and one or more that may not have been (the check numbers are noted on the printout). You have two options.
1) You may manually post the checks that have not been posted.
2) You may have the system automatically post these checks (See 2).
Will I ALWAYS Pick Up Only?
You will continue to pick up only the ERA file until such time as the checks on the printout and in your possession do NOT relate to charges posted to your previous computer system or do not relate to charges previously posted to On-Staff. When this point is reached, you may then have the system automatically post the payments and adjustments for all check numbers noted on the ERA file printout (See 3).
From this point forward we recommend that you continue to pick up only to verify receipt of all checks contained in the ERA file printout. Only after EFT has been implemented should you pick up AND post the entire ERA file (See 5).
What Happens if an ERA File Printout is Lost or Destroyed?
You may reprint a previously picked up ERA file at any time. This is accomplished from the Payment/Auto Payment feature (See 4).
What Happens When I Execute the Auto Payment Feature?
When the transmission to request the ERA file is in progress, a file is created in the $DBPATH/Occ directory named 'submitter#. nsf '. If there is a failure in the transmission itself, this file will not be created, no printout will occur, no posting is done, and a message will appear on the screen stating that the transmission failed. You may reset the modem and try again. If the transmission is successful, the 'submitter#.nsf' file will be created and immediately copied to a file named 'date.submitter#', i.e., 071896.00003008 (the date is the calendar date, not the On-Staff clinic entry date) and the ERA file will be printed.
1: /Payment/Auto Payment screen entries to
PICK UP & PRINT FILE ONLY-DO NOT post payments and adjustments.
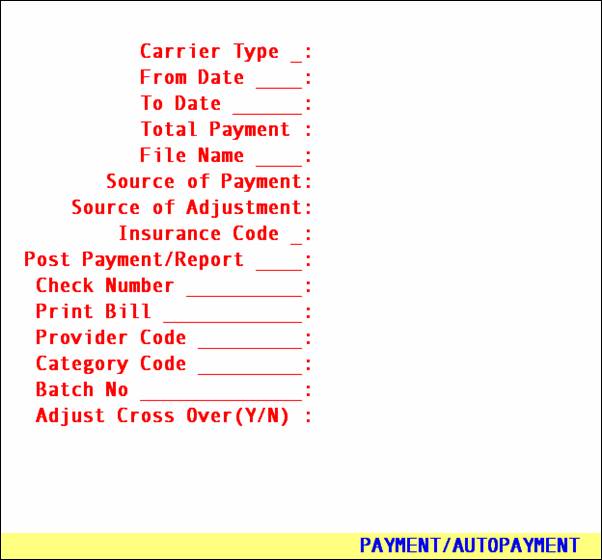
Carrier Type: Enter the carrier type
I Proxy Med
4 Medicare. See [F2]
S Medi-Cal
From Date: Program automatically bypasses this field for this option
To Date: Program automatically bypasses this field for this option
Total Payment: Program automatically bypasses this field for this option
File Name: Bypass by pressing [Enter]
Source of Payment: Bypass by pressing [Enter]
Source of Adjustment: Bypass by pressing [Enter]
Insurance Code: Enter the Utility/Insurance Insurance Co. Code
Post Payment/Report: Bypass by pressing [Enter], not used when picking up ERA file.
Check Number: Bypass by pressing [Enter], not used when picking up ERA file.
*Print Bill: Bypass by pressing [Enter], not used when picking up ERA file.
Provider Code: Used only for pre-paid contract posting (Carrier Type P).
Category Code: Bypass by pressing [Enter], not used when picking up ERA file.
**Batch No.: Bypass by pressing [Enter], not used when picking up ERA file.
Adjust Cross Over (Y/N): Bypass by pressing [Enter], not used when picking up ERA file.
The system will next prompt:
Enter your print out destination or Return for default?
After responding to the above prompt the following will occur:
A: The ERA file will be picked up from Medicare.
B: The program will examine the data, checking the patient account number,
subscriber number, procedure codes and modifiers, charge amounts and dates of service.
C: The report will be printed, however, NO payments or adjustments will be
applied.
D: An error report will print if there were patient accounts that could not be
verified either due to a non-existent account number, incorrect subscriber number (the patient's Medicare Subscriber number should not be entered on the New Patient/Insurance screen with dashes or spaces between the numbers as this will cause the system to place the account on the Error Report. Correct entry format: 123456789A), procedure code not posted to patient's account, charge amount(s) or date(s) of service not being found on account.
NOTE: The printout will contain a 'File Name'. This 'File Name' consists of the date you picked up the report followed by a dot '.' and your submitter number. Example: 112996.000033009. This 'File Name' is what will be used to have the system automatically post all or random check payments and adjustments from the picked up ERA file, if you choose to do so, and to reprint an ERA file.
2: /Payment/Auto Payment screen entries to
POST PAYMENTS AND ADJUSTMENTS FOR RANDOM CHECK NUMBERS contained on the ERA file printout:
|
Carrier Type:
From Date:
To Date:
Total Payment:
File Name:
Source of Payment:
Source of Adjustment:
Insurance Code:
Post Payment/Report:
Check Number:
*Print Bill:
Provider Code:
Category Code:
**Batch No.:
Adjust Cross Over (Y/N):
|
I Proxy Med 4 NHIC Medicare. See [F2] Program automatically bypasses this field for this option
Program automatically bypasses this field for this option
Program automatically bypasses this field for this option
Enter the ‘File Name’ noted on the ERA file printout (i.e., 112996.000003008) By pass by pressing [Enter]
Bypass by pressing [Enter]
Enter the Utility/Insurance Insurance Co. Codes for Medicare and Medi-Medi (usually MCAR and MM), then press [Enter] N (when posting random check numbers, post payments and adjustments ONLY for the next field’s specified ‘Check Number’ AND print the ERA file). Enter the check number exactly as found on the printout.
Y - print secondary claims for all N - do not print secondary claims X - print secondary claims only for non crossed over claims per ERA file printout. Used only for pre-paid contract posting (Carrier Type P).
Used only for pre-paid contract posting (Carrier Type P).
You may assign a batch number or press [Enter] to bypass.
Y - Adjust the amount noted in the ‘CO-INS’ column of the EOMB for all patients whose primary insurance is Medi-Medi. N - Do not adjust the ‘CO-INS’.
|
* If you have only one printer and are using HCFA Form B you must say N to printing secondary claims.
If you have a laser printer with two trays and are using HCFA Form B and want to use Y or X, Utility/Set Up/Printer Report and Printer screens must be set up properly to print the ERA file and Claims forms from the appropriate trays.
** By assigning a batch number, this activity may:
1: Be printed through /Management /Journal by operator code and/or by batch number.
2: Be reversed through /Utility/Maintenance/Reverse Entry (Contact Prime Clinical Systems, Inc. first!).
The system will next prompt:
Enter your print out destination or Return for default?
After responding to the above prompt the following will occur:
A: The payments and adjustments of the noted check number will be posted.
B: The ERA file will be printed.
3: /Payment/Auto Payment screen entries to
POST PAYMENTS AND ADJUSTMENTS FOR ALL CHECK NUMBERS contained on the ERA file printout, once you are certain you have all the noted checks in hand.
Carrier Type: Enter the carrier type
I Proxy Med
4 Medicare. See [F2]
S Medi-Cal
From Date: Program automatically bypasses this field for this option
To Date: Program automatically bypasses this field for this option
Total Payment: Program automatically bypasses this field for this option
File Name: Enter the ‘File Name’ noted on the ERA file printout (i.e., 112996.000003008)
Source of Payment: Bypass by pressing [Enter]
Source of Adjustment: Bypass by pressing [Enter]
Insurance Code: Enter the Utility/Insurance Insurance Co. Code
Post Payment/Report: N - Post all payments and adjustments AND print the ERA file. or 1- pick up or print or Re-print
Check Number: Bypass by pressing [Enter]
*Print Bill: N - accept this default, Print Bill is used for Carrier Type O and 4 only.
Provider Code: Used only for pre-paid contract posting (Carrier Type P).
Category Code: Used only for pre-paid contract posting (Carrier Type P).
**Batch No.: You may assign a batch number or press [Enter] to bypass.
Adjust Cross Over (Y/N): N - accept this default, Adjust Cross Over (Y/N) is used for Carrier Type O and 4 only
* If you have only one printer and are using HCFA Form B you must say N to printing secondary claims.
If you have a laser printer with two trays and are using HCFA Form B and want to use Y or X, Utility/Set Up/Printer Report and Printer screens must be set up properly to print the ERA file and Claims forms from the appropriate trays.
** By assigning a batch number, this activity may:
1: Be printed through /Management /Journal by operator code and/or by batch number.
2: Be reversed through /Utility/Maintenance/Reverse Entry (Contact Prime Clinical Systems, Inc. first!).
The system will next prompt:
Enter your print out destination or Return for default?
After responding to the above prompt the following will occur:
A: The payments and adjustments for the full complete ERA file will be
posted.
B: The ERA file will be printed.
4: /Payment/Auto Payment screen entries to
REPRINT AN ERA FILE ONLY-DO NOT post payments and adjustments.
Carrier Type: Enter the carrier type
I Proxy Med
4 Medicare. See [F2]
S Medi-Cal
From Date: Program automatically bypasses this field for this option
To Date: Program automatically bypasses this field for this option
Total Payment: Program automatically bypasses this field for this option
File Name: Enter the ‘File Name’ noted on the ERA file printout (i.e., 112996.000003008)
Source of Payment: Bypass by pressing [Enter]
Source of Adjustment: Bypass by pressing [Enter]
Insurance Code: Enter the Utility/Insurance Insurance Co. Codes for Medicare and Medi-Medi (usually MCAR and MM), then press [Enter]
Post Payment/Report: 1 (reprint ONLY-NO posting of payments or adjustments)
Check Number: Bypass by pressing [Enter]
*Print Bill: N - do not print secondary claims
Provider Code: Used only for pre-paid contract posting (Carrier Type P).
Category Code: Used only for pre-paid contract posting (Carrier Type P).
**Batch No.: You may assign a batch number or press [Enter] to bypass.
Adjust Cross Over (Y/N): Bypass by pressing [Enter], not used when reprinting an ERA file.
The system will next prompt:
Enter your print out destination or Return for defaults?
After responding to the above prompt the following will occur:
A: The ERA file will be reprinted.
5: /Payment/Auto Payment screen entries to
PICK UP, POST & PRINT ERA FILE: the full complete ERA file will be picked up, payments and adjustments posted and ERA file printed. Generally used when clients have signed up for EFT (Electronic Funds Transfer).
Carrier Type: Enter the carrier type
I Proxy Med
4 Medicare. See [F2]
S Medi-Care
From Date: Program automatically bypasses this field for this option
To Date: Program automatically bypasses this field for this option
Total Payment: Program automatically bypasses this field for this option
File Name: Bypass by pressing [Enter]
Source of Payment: Bypass by pressing [Enter]
Source of Adjustment: Bypass by pressing [Enter]
Insurance Code: Enter the Utility/Insurance Insurance Co. Codes for Medicare and Medi-Medi (usually MCAR and MM), then press [Enter]
Post Payment/Report: N (post all payments and adjustments AND print the ERA file…the next field ‘Check Number must be left blank).
Check Number: Bypass by pressing [Enter]
*Print Bill: Y - print secondary claims for all
N - do not print secondary claims
X - print secondary claims only for non crossed over claims per ERA file printout.
Provider Code: Used only for pre-paid contract posting (Carrier Type P).
Category Code: Used only for pre-paid contract posting (Carrier Type P).
**Batch No.: You may assign a batch number or press [Enter] to bypass.
Adjust Cross Over
(Y/N): Y - Adjust the amount noted in the ‘CO-INS’ column of the EOMB for all patients whose primary insurance is Medi-Medi.
N - Do not adjust the ‘CO-INS’.
* If you have only one printer and are using HCFA Form B you must say N to printing secondary claims.
If you have a laser printer with two trays and are using HCFA Form B and want to use Y or X, Utility/Set Up/Printer Report and Printer screens must be set up properly to print the ERA file and Claims forms from the appropriate trays.
** By assigning a batch number, this activity may:
1: Be printed through /Management /Journal by operator code and/or by batch number.
2: Be reversed through /Utility/Maintenance/Reverse Entry (Contact Prime Clinical Systems, Inc. first!).
The system will next prompt:
Enter your print out destination or Return for default?
After responding to the above prompt the following will occur:
A: The ERA file will be picked up from Medicare.
B: The program will examine the data, checking the patient account number,
subscriber number, procedure codes and modifiers, charge amounts and
dates of service.
C: The payments and adjustments will be posted. Any other functions
requested will be performed (print secondary claims, write off Medi-Medi, etc.) The ERA file will be printed.
D: An error report will print if there were patient accounts that could not be
verified either due to a non-existent account number, incorrect subscriber number (the patient’s Medicare Subscriber number should not be entered on the New Patient/Insurance screen with dashes or spaces between the numbers as this will cause the system to place the account on the error report, correct entry format: 123456789A), procedure code not posted to patient’s account, charge amount(s) or date(s) of service not being found on account.
NOTE: The printout will contain a ‘File Name’. This ‘File Name’ consists of the date you picked up the report followed by a dot ‘.’ and your submitter number. Example: 112996.0000033009. This ‘File Name’ is what will be used to have the system automatically post all or random check payments and adjustment from the picked up ERA file, if you choose to do so, and to reprint an ERA file.
AUTO PAYMENT POSTING FOR MEDI-CAL
NOTE: EDS Medi-Cal must be contacted prior to proceeding.
How Does this Work?
Your ERA file will be placed in what is referred to as a mailbox to be picked up utilizing the Main Menu/Payment/Auto Payment feature.
How Often Should I Execute the Auto Payment Feature?
The ERA file is to be picked up weekly, (we recommend Tuesday after 2:00 p.m.).
What Am I Picking Up?
The printed ERA file contains the same information as an EDS Warrant (EOB) received through the mail. The printout may contain three parts, the EXPLANATION OF MEDI-CAL BENEFITS, SUMMARY and ERROR REPORT.
See 'ABOUT THE REPORT GENERATED BY ON-STAFF.'
What Procedures Do I Follow to Get Started?
All software setup has been previously determined and completed during Session II. Simply go to the Auto Payment screen and follow the instructions for picking up your file(s) (See 1a-4a).
What Happens if an ERA File Printout is Lost or Destroyed?
You may reprint a previously picked up ERA file at any time. This is accomplished from the Payment/Auto Payment feature (See 4a).
What Happens When I Execute the Auto Payment Feature?
When the transmission to request the ERA file is in progress, a file is created in the $DBPATH/Occ directory named 'submitter#.nsf'. If there is a failure in the transmission itself, this file will not be created, no printout will occur, no posting is done, and a message will appear on the screen stating that the transmission failed. You may reset the modem and try again. If the transmission is successful, the 'submitter#.nsf' file will be created and immediately copied to a file named 'date.submitter#', i.e., 071896.00003008 (the date is the calendar date, not the On-Staff clinic entry date) and the ERA file will be printed.
1a: \Payment\Auto Payment screen entries to
PICK UP ERA FILE & PRINT ONLY: DO NOT post payments and adjustments.
|
Carrier Type:
From Date:
To Date:
Total Payment:
File Name:
Source of Payment:
Source of Adjustment:
Insurance Code:
Post Payment/Report:
Check Number:
Print Bill:
Provider Code:
Category Code:
Batch No.:
Adjust Cross Over (Y/N):
|
X (EDS Medi-Cal)
Program automatically bypasses this field for this option
Program automatically bypasses this field for this option
Program automatically bypasses this field for this option
By pass by pressing [Enter]
Bypass by pressing [Enter]
Bypass by pressing [Enter]
Enter the Utility/Insurance Insurance Co. Codes for EDS Medi-Cal (usually MCAL), then press [Enter] 1 - Pick up ERA file and print ONLY.
Bypass by pressing [Enter]
N - accept this default, Print Bill is used for Carrier Type O and 4 only. Used only for pre-paid contract posting (Carrier Type P).
Used only for pre-paid contract posting (Carrier Type P).
You may assign a batch number or press [Enter] to bypass.
N - accept this default, Adjust Cross Over (Y/N) is used for Carrier Type O and 4 only.
|
The system will next prompt:
Enter your print out destination or Return for defaults?
After responding to the above prompt the following will occur:
A: The ERA file will be picked up from Medi-Cal.
B: The program will examine the data, checking the patient account number, subscriber number, procedure codes and modifiers, charge amounts and dates of service.
C: The ERA file will be printed, however NO payments or adjustments will be applied.
2a: \Payment\Auto Payment screen entries to
PICK UP ERA FILE AND POST:
|
Carrier Type:
From Date:
To Date:
Total Payment:
File Name:
Source of Payment:
Source of Adjustment:
Insurance Code:
Post Payment/Report:
Check Number:
Print Bill:
Provider Code:
Category Code:
*Batch No.:
Adjust Cross Over (Y/N):
|
X (EDS Medi-Cal)
Program automatically bypasses this field for this option
Program automatically bypasses this field for this option
Program automatically bypasses this field for this option
By pass by pressing [Enter]
Bypass by pressing [Enter]
Bypass by pressing [Enter]
Enter the Utility/Insurance Insurance Co. Codes for EDS Medi-Cal (usually MCAL), then press [Enter] N - Post all payments and adjustments AND print the ERA file.
Bypass by pressing [Enter]
N - accept this default, Print Bill is used for Carrier Type O and 4 only. Used only for pre-paid contract posting (Carrier Type P).
Used only for pre-paid contract posting (Carrier Type P).
You may assign a batch number or press [Enter] to bypass.
N - accept this default, Adjust Cross Over (Y/N) is used for Carrier Type O and 4 only.
|
* By assigning a batch number, this activity may:
1: Be printed through /Management /Journal by operator code and/or by batch number.
2: Be reversed through /Utility/Maintenance/Reverse Entry (Contact Prime Clinical Systems, Inc. first!).
The system will next prompt:
Enter your print out destination or Return for defaults?
After responding to the above prompt the following will occur:
A: The ERA file will be picked up from Medi-Cal.
B: The program will examine the data, checking the patient account number, subscriber number, procedure codes and modifiers, charge amounts and dates of service.
C: The ERA file will be printed, however NO payments or adjustments will be applied.
3a: \Payment\Auto Payment screen entries to
POST A PREVIOUSLY PICKED UP ERA FILE:
|
Carrier Type:
From Date:
To Date:
Total Payment:
File Name:
Source of Payment:
Source of Adjustment:
Insurance Code:
Post Payment/Report:
Check Number:
Print Bill:
Provider Code:
Category Code:
*Batch No.:
Adjust Cross Over (Y/N):
|
X (EDS Medi-Cal)
Program automatically bypasses this field for this option
Program automatically bypasses this field for this option
Program automatically bypasses this field for this option
Enter the ‘File Name’ noted on the printout (i.e., 112996.42n).
Bypass by pressing [Enter]
Bypass by pressing [Enter]
Enter the Utility/Insurance Insurance Co. Codes for EDS Medi-Cal (usually MCAL), then press [Enter] N - Post all payments and adjustments AND print the ERA file.
Bypass by pressing [Enter]
N - accept this default, Print Bill is used for Carrier Type O and 4 only. Used only for pre-paid contract posting (Carrier Type P).
Used only for pre-paid contract posting (Carrier Type P).
You may assign a batch number or press [Enter] to bypass.
N - accept this default, Adjust Cross Over (Y/N) is used for Carrier Type O and 4 only.
|
* By assigning a batch number, this activity may:
1: Be printed through /Management /Journal by operator code and/or by batch number.
2: Be reversed through /Utility/Maintenance/Reverse Entry (Contact Prime Clinical Systems, Inc. first!).
The system will next prompt:
Enter your print out destination or Return for defaults?
After responding to the above prompt the following will occur:
A: The payments and adjustments for the ERA file selected will be posted.
B: The ERA file will be printed.
4a: \Payment\Auto Payment screen entries to
REPRINT A PREVIOUSLY PICKED UP AND/OR POSTED ERA FILE ONLY- DO NOT post payments or adjustments.
|
Carrier Type:
From Date:
To Date:
Total Payment:
File Name:
Source of Payment:
Source of Adjustment:
Insurance Code:
Post Payment/Report:
Check Number:
Print Bill:
Provider Code:
Category Code:
Batch No.:
Adjust Cross Over (Y/N):
|
X (EDS Medi-Cal)
Program automatically bypasses this field for this option
Program automatically bypasses this field for this option
Program automatically bypasses this field for this option
By pass by pressing [Enter]
Bypass by pressing [Enter]
Bypass by pressing [Enter]
Enter the Utility/Insurance Insurance Co. Codes for EDS Medi-Cal (usually MCAL), then press [Enter] 1 - Reprint ONLY - NO posting of payments or adjustments.
Bypass by pressing [Enter]
N - accept this default, Print Bill is used for Carrier Type O and 4 only. Used only for pre-paid contract posting (Carrier Type P).
Used only for pre-paid contract posting (Carrier Type P).
You may assign a batch number or press [Enter] to bypass.
N - accept this default, Adjust Cross Over (Y/N) is used for Carrier Type O and 4 only.
|
The system will next prompt:
Enter your print out destination or Return for defaults?
After responding to the above prompt the following will occur:
A: The ERA file will be reprinted.
ABOUT THE REPORT GENERATED BY ON-STAFF
Each report consists of up to three sections:
1) EXPLANATION OF MEDI-CAL BENEFITS
This contains the same information as the hard copy EDS Medi-Cal Warrant. The following will discuss the information entered in the noted areas of the EXPLANATION OF MEDI-CAL BENEFITS. See Release Note 222 for additional detail. Message a code used to notify the provider of any unusual conditions: i.e., 0401-payment adjusted to maximum allowable. Please refer to the appropriate Medi-Cal Provider Manual for a complete list of these codes and their definitions.
Status a code to indicate the current status of a claim
3 denied
4 returned to provider via RTD
5 error suspend
6 review suspend
8 paid
Check/CON will list, per charge, the Warrant 'Claim Number'
File Name example: /u/staff/bin/Occ/091196.42n
The file name, 091196.42n is in the format DDMMYY.login. 'DDMMYY (091196) is the calendar date On-Staff picked up the ERA file. '42n' is your three digit login (\Insurance\Tele Com {Login entry). the 'File Name', e.g., 091196.42n, is what is used in the \Auto Payment screen {File Name) field when requesting to post or reprint a previously picked up file (See 3 and 4).
2) SUMMARY
This section summarizes the adjustments, approved, denials and suspends for each provider.
3) ERROR REPORT
After the ERA file is picked up from Medi-Cal, On-Staff will examine the data checking the patient account number, subscriber number, procedure code(s) and modifier(s), charge amount(s) and date(s) of service.
The error report will print if there were patient accounts that could not be verified either due to a non-existent account number, incorrect subscriber number (the patient's Medi-Cal Subscriber number should not be entered on the \New Patient\ insurance (2nd) screen with dashes or spaces between the numbers as this will cause the system to place the account on the error report, e.g., a correct entry format: 1234565789), procedure code not posted to patient's account, charge amount(s) and/or date(s) of service not found for the account.
Items listed on the error report have not been posted. The user will need to investigate these and manually post the payment(s).
NOTE: PAYMENTS FROM MEDI-CAL for MEDI-MEDI PATIENTS
Payments from Medi-Cal received for Medi-Medi patients (patient's \Utility\Insurance {Insurance Type} 1) when the balance has already been written off (i.e., previously posted Medicare payment and adjustment made using \Auto Payment {Carrier Type} 2 and {Adjust Cross Over (Y/N)} Y) are handled as follows:
If the charge balance is zero, On-Staff will post the Medi-Cal payment along with a negative adjustment to keep the balance zero.
If the charge balance is NOT zero, On-Staff will post the Medi-Cal payment. If this leaves a remaining balance, On-Staff will make the appropriate adjustment amount to make the balance zero.
AUTO PAYMENT POSTING: FOR PRE-PAID CONTRACTS
This feature allows payments to be distributed and the remaining balances written off leaving a zero account receivable for each charge captured. ONLY those charges whose Utility/Procedure field <HMO Adjust> is set to N will be captured for the Auto Payment feature. When the check is received, go to the Main Menu/Payment/Auto Payment screen and complete the screen as follows:
|
Carrier Type:
From Date:
To Date:
Total Payment:
File Name:
Source of Payment:
Source of Adjustment:
Insurance Code:
Post Payment/Report:
Check Number:
Print Bill:
Provider Code:
Category Code:
Batch No.:
Adjust Cross Over (Y/N):
|
P - (Pre-Paid accounts)
Enter the beginning date of service, i.e., 12/01/97
Enter the ending date of service, i.e., 12/31/97
Enter the check amount, i.e., 4000.00
Automatically bypassed
Bypass by pressing [Enter]
Bypass by pressing [Enter]
Enter the Utility/Insurance Insurance Co. Code for the issuing carrier, then press [Enter]. SEE NOTE 1. N - Post all payments and adjustments AND print the ERA file 1 - Print report ONLY - no posting of payments or adjustments Enter the check number
N - accept this default, Print Bill is used for Carrier Type O and 4 only. By entering a provider code the system will ONLY distribute the payment among the charges that were posted to the indicated provider code OR press [Enter] to bypass thus posting to all providers. By entering a pre-paid category code the system will distribute the payment among the charges that were posted to the indicated category, using the entered insurance code solely for the source of payment and source of adjustment codes.
You may assign a batch number or press [Enter] to bypass. SEE NOTE 2. N - accept this default, Adjust Cross Over (Y/N) is used for Carrier Type O and 4 only.
|
NOTE 1:
By entering an ‘Insurance Code’ (and/or ‘Provider Code’) AND ‘Category Code’, the payment will be distributed among the charges posted to those patients that have the indicated ‘Category Code’ and/or ‘Provider Code’, NOT verifying if the patient has this insurance, just using the /Utility/Insurance <Payment Source> and <Adj.> codes of this insurance for the Source of Payment and Source of Adjustment *.
* The system requires the entry of an ‘Insurance Code’ at all times. The user may choose to enter the source of payment and adjustment codes by:
1: Entering the appropriate payment and adjustment codes in ‘Source of Payment’ and ‘Source of Adjustment’. These field entries will override the /Utility/Insurance <Payment Source> and <adj.> codes of the entered ‘Insurance Code’.
2: Bypass ‘Source of Payment’ and ‘Source of Adjustment’ and use the /Utility/Insurance <Payment Source> and <Adj.> codes of the entered ‘Insurance Code’.
NOTE 2:
By assigning a batch number, this activity may:
1: Be printed through /Management /Journal by operator code and/or by batch number.
2: Be reversed through /Utility/Maintenance/Reverse Entry (Contact Prime Clinical Systems, Inc. first!).
The system will next prompt:
Enter your print out destination or Return for defaults?
After responding to the above prompt the system will do the following:
· Gather all patients with charges that fall within the entered criteria.
· Calculate the proportionate distribution of the payment amount entered and the resulting adjustment amount to zero the charge (i.e. the balance on the charge will be zero).
· Post the calculated payment and adjustment amounts and enter PAID in each Ledger's {Code) column for these charges.
· Print a report that contains the account number, name, category, date of service, procedure code and charge, payment and adjustment totals.
To verify that all the charges have been posted to for the dates specified, run Management/Aging/Report Aging using the same insurance company code (or category code) as in the Auto Payment screen. Any balances contained in this report must be investigated to determine why they exist. The following reasons may apply:
The {HMO Adjust) field for this charge is set to X for fee for service and co-payment charges. Inclusion on the aging report is correct.
The {HMO Adjust } field for this charge is set to N for charges that should be paid off by the Auto Payment feature. Inclusion on the aging report is incorrect.
If it is not, you will need to correct your procedure screen and manually write off this charge for all entries on the aging report. All setup requirements must be in place at the time of posting the charge. In view of this, because you have changed the value of the {HMO Adjust} field and charges may have already been posted, you will need to continue manually writing off this charge until the point when charges were entered with the procedure {HMO Adjust} field set to it's new value.
If it is set correctly, contact Prime Clinical Systems Software Support Department.
What if the total payment amount is greater than the total charges?
The payment and adjustment will still be applied proportionately, however, the adjustment amount may be either positive or negative in order for the balance to remain zero.
When/Why Would You Use {Write Off Denied Charges} 1?
For your first posting, you may want to print the report FIRST, BEFORE actually posting the moneys. This will enable you to check a few accounts to verify that your set up is correct and the Auto Payment feature is indeed capturing the appropriate charges and NOT any fee for service and co-payment charges. This will also enable you to preview what accounts and charges the payment/adjustment will be distributed to. Entering a 1 in this field will ONLY print the report based on the entered criteria and will NOT post any money.
When/Why Would You Use {Write Off Denied Charges} N?
When you are certain your set up is correct and you want to post the payment and write off the remaining balance.