
OnSTAFF 2000
CHARGES
This option allows the user to post and modify charges, post monthly finance charges, add, modify, view and delete Encounters and UB-Encounters. When the Charges option is selected from the Main Menu, On-Staff will display the following:
CHARGE MENU
Charge Encounter Modify UB-Encounter Finance Charge Exit
Menu Options:
Charge This option is used to post charges incurred by patients.
Encounter This option is used to Add, Modify, View or Delete the patient's HCFA 1500 claim detail information. Refer to Session III, Chapter 2 for information regarding Encounter.
Modify This option is used to modify previously posted charges.
UB-Encounter This option is used to Add, Modify, View or Delete the patient's UB claim detail information. Refer to Session III, Chapter 2 for information regarding UB-Encounter.
Finance Charge This option is used to post monthly finance charges.
Exit Returns you to the Main Menu.
Main Menu/Charges/CHARGE
This option is used to post all charges incurred by the patient. After selecting the Charge option from the Charge Menu, On-Staff will display the following screen:
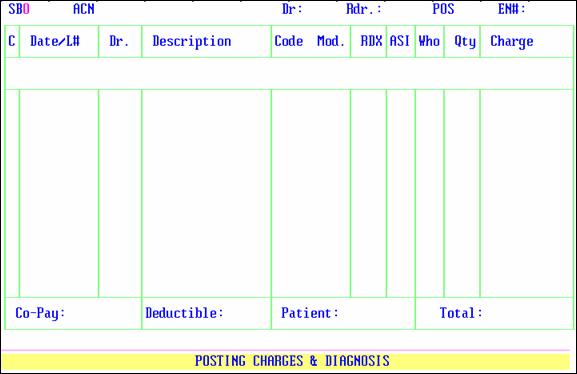
SB: Enter the SuperBill number printed by On-Staff (if this option is being used). The patient's account number and name will be displayed for you. When a SuperBill is not utilized, press [Enter] to bypass this field.
Note: During Charge Posting Session, when the user enters in a Super Bill number which has already been used, the program will send a message prompt ‘WARNING You have already Posted Charges For This Super Bill Number Press Any Key To Continue’.This FUNCTION IS only A WARNING AND WILL STILL ALLOW THE USER TO POST CHARGES TO THE SUPER BILL NUMBER ENTERED and the warning will also prompt when the Super Bill number was entered in the Charge screen but no charges were posted.
ACN: When a SuperBill is used, the patient’s account number will be displayed for you. When a SuperBill is not utilized, enter the patient's account number (the patient's name will be displayed). When the account number is unknown, use the [F2] search key. After pressing [Enter] the patient’s account number, partial name and category code will display.
Dr: When a SuperBill is used, the /Utility/Provider <Provider Code> will be displayed for you. When a SuperBill is not used a default value will be displayed if the Default Provider field entry of the /Utility/Set Up/Parameter screen was set up during Session I training. If a default value does not display, enter the treating physicians /Utility/Provider <Provider Code>. If this code is unknown, use the [F2] search key. When a SuperBill is used and the patient saw a different physician, press the [Spacebar] to remove the defaulted provider code and enter the code of the treating physician.
Rdr.: The /New Patient <Referral> field entry will default here (the /Utility/Referring <Referring Code> that designates their referring source). When NOT applicable press the [Space Bar] to remove, then either leave blank or enter appropriate code. When applicable press [Enter]. When a code is unknown you may use the [F2] search key. See the HCFA 1500 REVIEW for more information regarding Box 17 and 17a.
POS: A default value will be displayed if the Default Facility field entry of the /Utility/Set Up/Parameter screen was set up during Session I training. If the defaulted place of service code is applicable to this charge session press [Enter], otherwise enter the /Utility/Facility <Facility Code> that designates where the service(s) was/were rendered. When this code is unknown, use the [F2] search key.
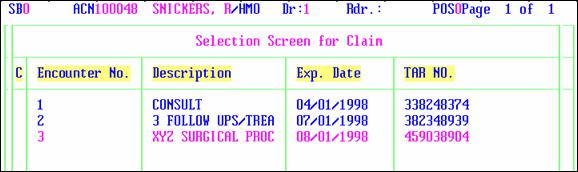
EN#: If you enter 0 (zero), On-Staff will ignore the encounter and assume that you are not using any encounter number and related encounter information for the current charges (i.e., HMO authorization numbers, hospital admit and discharge dates, accident/injury information, etc. to be printed on the HCFA). If you bypass the EN# field by pressing [Enter], On-Staff will pick up the last encounter number (as long as it is not zero), copy the encounter screen information and attach it to the current charge record. If you enter an encounter number, On-Staff will check to see if the encounter exists. It will then copy the encounter screen information and attach this to the current charge record. If the encounter does not exist, it will display a prompt that the record does not exist and will allow you to enter a valid encounter number. When the encounter number is unknown, clear the field by pressing the [Spacebar] then press the [F2] search key to display the Selection Screen for Claim. When [F2] is pressed again, ALL encounters entered for that patient will be displayed (see following example). To select an encounter, move the cursor to highlight the desired one and press [Enter]. To exit this screen without making a selection, from the C (command) column press Q or [End].
Once an encounter has been assigned and [Enter] has been pressed, the EN# field will display the remaining authorized number of visits for that encounter (/Encounter <Authorized No. of Visit>). If at this time 0000 is displayed in the EN# field, On-Staff is alerting you that this encounter has NO remaining authorized visits.
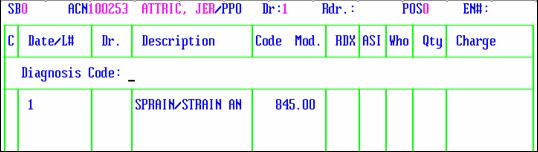
Upon initial entry, the third row of the charge posting screen had no information displayed. After pressing [Enter] on the EN# field, the third row will now be displaying the cursor on the field Diagnosis Code.
Diagnosis: Enter the /Utility/Diagnosis <Diagnosis Code> designated for the diagnosis to be posted. After pressing [Enter], the system assigned line number (Date/L#), the diagnosis description (Description) and diagnosis code (Code Mod.), will be displayed in the posting screen:
Continue entering the appropriate diagnoses for this patient. When a code is unknown, use the [F2] search key. When the code entered is not recognized, On-Staff will respond with the statement Diagnosis: Record does not exist. Press Any Key to Continue. At this point, pressing any key will return the cursor back to the Diagnosis Code field.
NOTE:
1) You may post up to 8 diagnosis codes as desired. However, only the first four will print on the insurance form per posting session even though all 8 diagnosis codes will transmit electronically.
2) Diagnoses will automatically default into the charge screen from the patient’s previous charge session when the patient’s category screen’s On-Going Diagnosis = Y.
After all diagnosis codes have been entered, press [Enter] once more and the third row will now be displaying the cursor on the field Panel Code.
Per version 8.2 release 01/22/2012
In versions of OnStaff prior to 01/22/2012, the program was sending any variation of a modifier. Effective version 01/22/2012, the program now omits if the modifier is not 2 digits.
Error Example: 99303:TC1
New Changes: 99303: TC
In the example above, the charge was posted with an additional number, however when the claims are transmitted, the value of ‘1’ will be omitted.
Panel Code: Enter the /Utility/Procedure <Panel Code> that designates the procedure(s) to be posted for the patient. When the code is not recognized, On-Staff will prompt with the question, Panel Does Not Exist. Would You like to Add it (Y/N). When answering Y, On-Staff will switch screens allowing you to add that panel code (/Utility/Procedure/Add). After completing the addition of the code, On-Staff will return to the Charge screen. When answering N, On-Staff will return to the Panel Code field, allowing you to enter an existing code. When the panel code is unknown, use the [F2] search key.
NOTE: More than one charge may be posted when entering one panel code when more than one procedure exists within that panel.
From: When a SuperBill number was entered, the SuperBill’s date will be used as the default date of service. This default date may be overwritten. When the SuperBill field was bypassed, the current clinic date will be displayed as a default. If this is correct, press [Enter] and the cursor will move under the RDX heading, bypassing the To date field. When this date is incorrect, enter the beginning date of service that applies, press [Enter] and the cursor will move to the To date field.
NOTE: When entering a date of service greater than the clinic/system date, On-Staff will prompt:
DOS Greater than Calendar/System Date, Is This Correct(Y/N)?
N Will return the cursor to the From date field.
Y Will accept the date, moving the cursor to the To date field.
In order for the date of billing to be correct (HCFA 1500 Box 31), On-Staff will flag the entry date of this charge as being the same as the service date and will not allow this charge to be billed until that date.
To: This field is normally used when posting consecutive hospital visits or a global charge such as used when billing OBGYN delivery charges. When posting consecutive hospital visits, enter the ending date of service that applies, On-Staff will then post the charge for each date From the beginning date of service To the ending date of service. To do this type of non-global billing, the /Utility/Procedure <Global (Y/N)> field entry must be N, for this charge. When posting global charges such as used in OBGYN billing, enter the delivery date that applies, On-Staff will then post ONE charge noting on the HCFA the From and To date range of that charge. To do this type of global billing, the /Utility /Procedure <Global (Y/N)> field entry must be Y, for this charge.
Procedure <Global> = “Y” and <QTY> Examples Effecting <To>
NOTES:
1. When the beginning and ending date of service are the same, for example when posting an office visit or hospital consult, there is no need to enter a To date, simply press [Enter].
2. When you are posting charges for a patient assigned a company category type (/Utility/Category <Type (C/P/W/O/F/G)> = C), the system will prompt you to enter the name of the employee after the date of service has been entered. The employee name will be displayed on the printed company bill and in the companies ledger.
3. If you are posting for an anesthesiologist (/Utility/Provider <Specialty> = 005), refer to the section Anesthesiology Posting included in Session III.
RDX: Enter the number in order of appearance (NOT the displayed Date/L# line number) of the diagnosis that is related to the procedure displayed on the screen. 1 for primary diagnosis (or first listed), 2 for secondary diagnosis (or second listed), etc. When applicable, 1234 may be used to relate diagnosis 1 through 4 to a charge OR 13 to relate diagnosis 1 and 3 to a charge, etc. After pressing [Enter] the panels CPT code will be displayed under the Code heading.
After pressing [Enter] based on each individual procedure’s set up, the cursor may or may not move under the following second row headings:
Mod.: The cursor will bypass this field when N was entered at the (Y/N) field to the left of Modifier R in the /Utility/Procedure file, otherwise, enter consecutively, up to three modifiers (for example LT, 51, 80 would be entered consecutively as LT5180). If common modifiers applicable to your practice were entered at /Utility/Procedure/Modifier, when a modifier is unknown, pressing the [F2] search key will search that area.
ASI: The cursor will bypass this field when N was entered at the Assignment Y/N field in the /Utility/Procedure file, otherwise, the displayed default is coming from the patient’s primary insurance screen’s Assignment field. When applicable, change this value to indicate whether assignment should be accepted for this procedure or not.
Who: When N was entered at the Hold(Y/N) field in the /Utility/Procedure file, the cursor will bypass this field. When Y was entered at the Hold(Y/N) field in the /Utility/Procedure file, the cursor will stop on the Who field. To hold billing for this procedure until a later date, enter Y. To perform normal billing for this procedure, press [Enter].
About Charges/Who and Insurance Look-Up
Qty: The cursor will bypass this field when N was entered at the Qty. Y/N/X field in the /Utility/Procedure file, otherwise, the displayed default is coming from the procedure screen’s Days & Units field. You may override this default by entering the desired quantity for this procedure.
NOTE:
1: When the procedure screen’s Qty. Y/N/X = Y or X the cursor will stop in the Qty. field allowing you to accept the default or replace it with the appropriate quantity. When X is entered on the procedure file and the quantity is changed, the charge amount will then be automatically multiplied by the quantity, thus increasing the charge amount. When Y is entered on the procedure file and the quantity is changed, the charge amount is not affected.
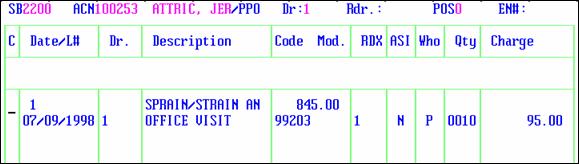
2: Please take note: Once the charge is posted, the quantity will be displayed under the Qty. heading in the following format, 1 would be 0010, 14 would be 0140, 20 would be 0200, etc.
Charge: The cursor will bypass this field when N was entered at the (Y/N) field, second column to the right of Charge Global, in the /Utility/Procedure file, otherwise, the displayed default is coming from the procedure screen’s Charge Global field. You may override this default by entering the desired fee for this procedure. At this point, when a panel code contains more than one procedure, the cursor will return to the RDX field. If this occurs, enter the information as applicable for each procedure of the panel until the cursor returns to the Panel Code field. When the cursor has returned to the Panel Code field, enter the next charge to be posted
OR press [Enter] and the cursor will move to the C (command) column from which you may edit the posted items.
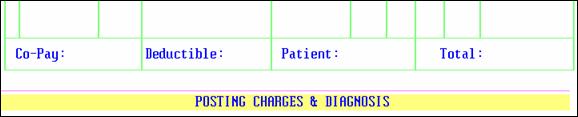
Co-Pay: This value is defaulting from the patient’s /New Patient primary insurance screen’s Co Payment field.
Deductible: This value is defaulting from the patient’s /New Patient primary insurance screen’s Deductible Met field.
Patient: When software requirements for fee schedules are met, this amount will display the patient’s portion due after primary insurance payment, thus allowing you to collect their portion at the time of the visit.
Total: The total of charges just posted.
At this point, you may edit the posted items, post a patient payment or courtesy adjustment, print a receipt or claim, etc. by using the following commands. Pressing the [F2] search key from the C (command) column will display the following valid choices:
A Add Charge/ Dx/Remark/Medication
D Delete Item
I Inquire about the Procedure
M Modify the Charge
J Bill/Remark/Payment
Q Exit this patient’s Charges
C Commit the Adjustment/Withhold Amount
Z Ignore the Withhold and Adjustment
B Print HCFA form
T Print Medication
|
A |
Pressing A from any position in the C (command) column will display the following prompt: Charge Diagnosis Remark Medication Exit |
Charge Selecting Charge will move the cursor to the Panel Code field, allowing you to post an additional procedure.
Diagnosis Selecting Diagnosis will move the cursor to the Diagnosis Code field, allowing you post an additional diagnosis.
Remark After first positioning your cursor adjacent to the charge item to which a remark applies, then pressing A, selecting Remark will move the cursor to the Remark field, allowing you to enter the desired remark. After pressing [Enter], this remark will be displayed immediately beneath the posted procedure and will also appear in the Accounting Ledger of the patient and may print on the claim form or transmit electronically, dependent on the patient’s /Utility/Insurance <Comment On Bill> field entry discussed during Session II.
For those practices who enter the same remarks over and over again, set up a /Utility/Messages/Message file containing each of those remarks. Then, when the cursor is on the charge screen’s Remark field, enter the first few values of the remark you are looking to add, press [F2], and On-Staff will search /Utility/Messages/Message and display all related entries. Highlight the appropriate choice, press [Enter] and your remark has been added to the charge.
Medication Selecting Medication will move the cursor to:
Code Enter the /Utility/Procedure/Medication <Medication Code> of the medication you wish to post and press [Enter].
DOS Enter the date of this prescription or refill and press [Enter]. This will print on the prescription at Date.
Dos Displays the /Utility/Procedure/Medication <Usual Dosage>. Press [Enter] to accept this default or change appropriately. This will print on the prescription at Dosage.
Qty Enter the quantity of pills that are to be dispensed. This will print on the prescription at Quantity.
Ref Displays the /Utility/Procedure/Medication <Refill Allowed>. Press [Enter] to accept this default or change appropriately. This will print on the prescription at Refill.
Rm This does NOT display the /Utility/Procedure/Medication <Comment>. Enter any additional remark as appropriate.
After pressing [Enter] the medication will post and the cursor will return to the Code field ready to enter the next medication OR press [Enter] again to return to the C (Command) column.
NOTE: Medications may only be deleted at the time of posting the charge. Medications will NOT display through /Charges/Modify, only through /Ledger/Medication.
|
D |
Placing the cursor adjacent to a procedure, diagnosis or medication and pressing D will delete that item. |
|
I |
Placing the cursor adjacent to a procedure and pressing I will display the /Utility/Procedure file set up for that procedure. |
|
M |
Placing the cursor adjacent to a procedure, remark or medication and pressing M will allow you to modify the line item: |
Pressing M adjacent to a procedure, allows you to modify the date of service (Date/L# - though NOT recommended…delete the charge and re-enter it with the correct date), the performing doctor (Dr.), the modifier (Mod.), the related diagnosis (RDX), the assignment (ASI), the responsible party (Who), the quantity (Qty.), and the charge for the procedure (Charge). Pressing [Enter] from the charge field will return the cursor to the date field, allowing you to review the modified information for accuracy. When accurate, press [“] from the date field to return the cursor to the C (command) column.
Pressing M adjacent to a remark provides you with the ability to modify the message. Pressing [Enter] will return the cursor to the C (command) column.
Pressing M adjacent to a medication allows you to modify the date of service (DOS), dosage (Dos), quantity (Qty), refill (Ref) or remark ( Rm). Pressing [Enter] from the remark field will return the cursor to the C (command) column.
|
J |
Pressing J from any position in the C (command) column will display the following prompt: Billing Receipt Payment Exit |
Billing Prints a HCFA 1500 claim form(s) based on the /Utility/Set Up/Parameter <Billing (A/P/S)> field entry. When selecting Billing, On-Staff will display Enter your print out destination or Return for default? Press [Enter] to accept the displayed default or enter another printer destination for the claim form.
Receipt Prints a receipt for the charges and payments just entered. When selecting Receipt, On-Staff will display Enter your print out destination or Return for default? Press [Enter] to accept the displayed default or enter another printer destination for the receipt.
Payment Allows you to post patient payments or adjustments made at the time of service (i.e., co-payments or courtesy adjustments). When Payment is selected, On-Staff will switch screen’s to the open item payment screen. Refer to the Payment section included in Session III for posting instructions.
NOTE:
1: When posting several dates of service during the same charge posting session, only the last entered charge will be displayed in the open item payment screen. Thus, if for each date of service the patient made a payment, post the charge, select J then Payment, post the payment, return to the charge posting screen, post the next charge, select J then Payment, etc.
2: When posting payments and adjustments using this option, the cursor does NOT stop on the S_Pay and S_Adj fields of the open item payment screen, thus, On-Staff looks to the patient’s assigned category screen and uses the codes entered on the Payment Remark (DEF) and Adjustment Remark (DEF) fields to describe the payment and/or adjustment. If these do not sufficiently describe the source of payment or adjustment, do not post using J. Exit the charge screen and post the payment and/or adjustment through Main Menu/Payment/Open Item.
|
Q |
Pressing Q from any position in the C (command) column will exit the posting screen. |
After pressing Q or [End], On-Staff will return to the SB field allowing you to enter charges for another patient. To exit and return to the Charge Menu, press [“] or [End].
|
C |
Pressing C from any position in the C (command) column will commit the capitated adjustment or withhold amount. |
When the patient has been assigned a pre-paid category type (/Utility/Category <Type (C/P/W/O/F/G)>) and for the charge posted the HMO Adj field entry is Y in the procedure file, you must press C to commit the adjustment. See Z, regarding ignoring (not committing) this adjustment.
When the patient has been assigned a pay plan and has a procedure posted where both are set up for withhold amounts, you must press C to commit the adjustment. See Z, regarding ignoring (not committing) this adjustment.
|
Z |
Pressing Z from any position in the C (command) column will ignore the Withhold or Capitated (Pre-Paid) adjustment. |
When the patient has been assigned a pre-paid category type (/Utility/Category <Type (C/P/W/O/F/G)>) and for the charge posted the HMO Adj field entry is Y in the procedure file, pressing Z will ignore (not commit) this adjustment.
When the patient has been assigned a pay plan and has a procedure posted where both are set up for withhold amounts, pressing Z will ignore (not commit) this adjustment.
|
B |
Pressing B from any position in the C (command) column will print the HCFA 1500 form for the entered charges. |
A HCFA 1500 claim form will print only when the patient’s category Default Form and their insurance Form Type are the same. The /Utility/Set Up/Parameter <Billing (A/P/S)> will determine which patient insurance will be printed.
|
T |
Placing the cursor adjacent to a medication and pressing T will print a prescription for that medication and patient. |
![]()