
OnSTAFF 2000
UTILITY/SET UP/
CLINIC
The Set Up Menu is an area which is addressed during initial set up of your clinic(s). This area will not be accessed on a daily basis. The Set Up Menu security level should be such that only Administrative Personnel have access. There are three principle areas for each clinic’s set up, the Clinic, System and Parameter screens addressed in this chapter.

Menu Options:
Clinic Initial set up of clinic information.
Security Login User and Macro set up. Login User is step one in adding new users including their security level and macro group.
Printer Printer and Report set up. Report is step two for adding new users and defining their default printer destinations.
System Clinic sharing set up.
Appointment Appointment set up.
Menus Menu and Program set up. Program allows the set up of automation and security levels per menu and/or command column option.
Help Contains the initial set up of search screens entitled Selection Screen for... and allows modification of each screen where applicable. Allows formatting of fields (i.e., (###) ###-#### for phone number fields).
Field Choices Contains the initial set up of search screens entitled Choice/Description of the Choice and allows modification of each screen where applicable.
Maintenance Contains the Purge, Update and Reverse Entry options.
Parameter Determines system configuration including default category, facility and billing, etc.
Exit Returns you to the Utility Menu.
/Utility/Set Up/CLINIC
The Clinic option controls several On-Staff functions. Following are a few examples. If your billing method is by Clinic (/Utility/Set Up/Parameter <Billing> = C) it sets the name, address and IRS ID# of the practice used in billing. When transmitting claims for electronic billing, it sets the system in TEST or PRODUCTION mode. The projected dates for year and month end close as well as the current entry date are set here prior to going live. You will need to use the Modify option to enter information.

Menu Options:
Add Set up a new Clinic name, address, phone, etc.
Modify Change existing Clinic information.
View View existing Clinic information.
Exit Returns you to the Set Up Menu.
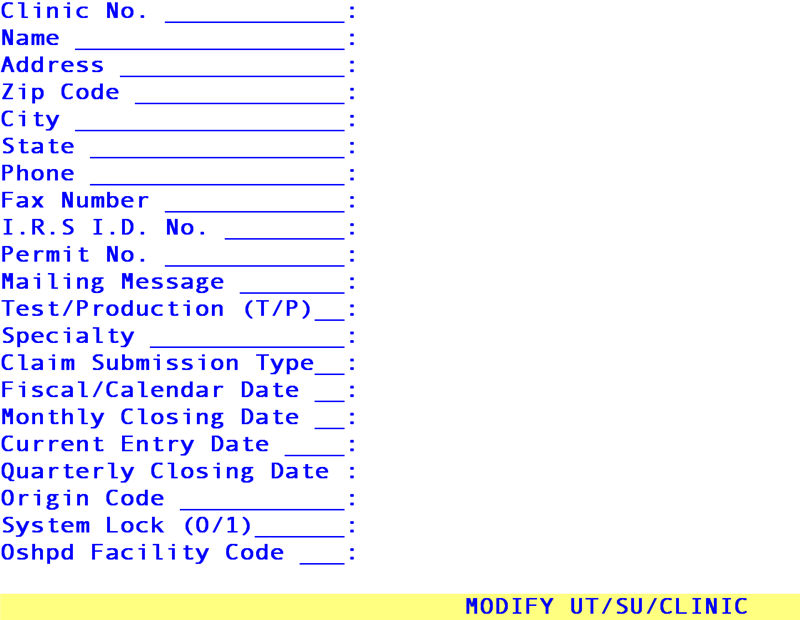
To set up your initial clinic, select the Modify option and press [Enter]. On-Staff will display the following fields:
Clinic No.: Enter the clinic number you wish to define.
Name: Enter the name of the practice which will print in Box 33 of the HCFA 1500 claim form when the Billing Method is set to C (/Utility/Set Up/Parameter <Billing> = C)*.
Address: Enter the address of the practice.
Zip Code: On-Staff has a built-in Zip Code memory file. After the initial entry of a zip code, the corresponding city and state will be stored so that the next time that particular zip code is entered On-Staff will automatically provide the city and state on the screen.
NOTE: To delete or modify a city or state, with the cursor on any zip code field clear the field then press [F2]. The cursor will be in the command column of the Selection Screen for City and State. From this command column you may Add, Modify, View or Delete.
City: Displayed automatically if already stored in the Zip Code memory file. If this field is blank, enter the city.
State: Displayed automatically if already stored in the Zip Code memory file. If this field is blank, enter the state.
Phone: Enter the phone number of the clinic.
Fax Number: Enter the fax number of the clinic if applicable (this is an optional field).
IRS I.D. No: Enter this number for either the clinic or doctor. The IRS I.D. No. will print in Box 25 of the HCFA 1500 claim form when the Billing Method is set to C (/Utility/Set Up/Parameter <Billing> = C)*. Leave this field blank when there is no IRS number for the practice.
Permit No: Number assigned by the Post Office for bulk mailing.
Mailing
Message: Enter Bulk Mail, First Class or whatever the postage rate is. For use with Statement 2 and 6 ONLY.
Test/Production
(T/P): This field is used for any National Standard Format Electronic Billing, and is initially set to T. After the carrier (Medicare, IMS, etc.) has approved the test submission of your electronic claims, this field should be changed to P.
NOTE: If you are submitting claims to more than one carrier and one is in Test Mode and one is in Production Mode, you will need to change the value of this field prior to submitting claims until all of the carriers are in the Production Mode.
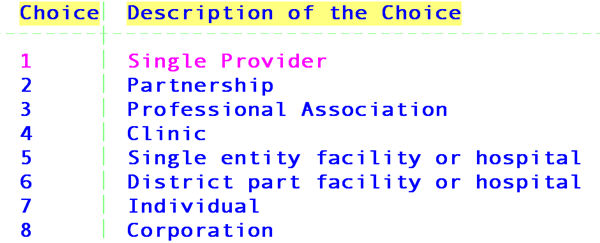
Specialty: For use with National Standard Format billing. The following list will be displayed when the [F2] search key is used on this field. Enter the appropriate Professional Organization Code for your practice. Do not leave this field blank.
Claim Submission
Type: This code will print in Box 4 of the UB04 form unless the charges are linked to a UB Encounter and <Bill Type> is completed, in which case On-Staff will print the <Bill Type> on the UB04 form or 837 Institutional Loop 2300 CLM05
Fiscal/
Calendar Date: Enter the projected date for the next time the accounts will be closed for the year. This date will then be automatically updated when changing the date through Main Menu/Date. Do not change this field’s entry once set unless requested to do so by a Software Support Representative.
Example: 12/31/2007 is entered on this field as the projected date for the next time accounts will be closed for the year When changing the date through Main Menu/Date from 12/31/2007 to 01/01/2007 the response to the On-Staff prompt; Close for the Year? is Y (yes) 20008 is thus closed. On-Staff automatically updated this field to 12/31/2008 (the following year) as the next projected date for year end close.
Monthly
Closing Date: Enter the projected date for the next time the accounts will be closed for the month. This date will then be automatically updated when changing the date through Main Menu/Date. Do not change this field’s entry once set unless requested to do so by a Software Support Representative.
Example: 12/31/95 is entered on this field as the projected date for the next time accounts will be closed for the month. When changing the date through Main Menu/Date from 12/31/95 to 01/01/96 the response to the On-Staff prompt; Close for the Month? is Y (yes). December, 1995 is thus closed. On-Staff has automatically updated this field to 01/31/96 (the following month) as the next projected date for month end close.
Current Entry Date: Enter the date that your office will be on-line (the date you will begin posting). This date will then be automatically updated when changing the date through Main Menu/Date. Do not change this field’s entry once set unless requested to do so by a Software Support Representative.
Example: 12/01/95 is entered on this field as the projected date you will begin posting. All data entry work has been entered and balanced, the minimum daily requirements have been completed. The date is changed from 12/01/95 to 12/02/95 through Main Menu/Date. December 01, 1995 is thus closed. On-Staff has automatically updated this field to 12/02/95 as the next projected date for data entry.
NOTE: When changing the date from Main Menu/Date, On-Staff will automatically prompt for closure of the quarter when changing the date to or past March 31, June 30, September 30 and December 31. On-Staff will continue to prompt for closure of the quarter until the 5th of the following month even when the quarter was closed.
Example: In changing the date from March 30, 1995 to April 1, 1995 the response to the On-Staff prompt; Close for the Quarter? was Y (yes). The following day when changing the date from April 1, 1995 to April 2, 1995 On-Staff will prompt again (and will continue to prompt until April 5, 1995) Do you want to close the accounts for the Quarter? (Y/N). You must answer N (no) until after April 5, 1995 at which time On-Staff will no longer prompt for quarter closure.
Quarterly
Closing Date: Enter the projected date for the next time the accounts will be closed for the quarter. This date will then be automatically updated when changing the date through Main Menu/Date. Do not change this field’s entry, once set, unless requested to do so by a Software Support Representative.
Origin Code: If you are sending electronic claims to GTE, enter the Origin Code that has been assigned to your practice.
If you are sending IMS Blue Cross electronic claims, and your practice has more than one location billing with the same Federal Tax ID number and each location is entered into your system as a separate clinic (i.e., you login to Clinic 1 for the Covina office and login to Clinic 2 for the Rosemead office) submission requirements will be met when this field is set to 001 for Clinic 1, 002 for Clinic 2, etc.
System Lock
(0/1): This field should originally be set to 0 (zero). When changing the date from Main Menu/Date, anyone on the system will receive the following:
Warning Warning Warning Warning Warning
* * * * * * * * * * * * * * * * * * * * * * * * *
The system date is about to change please logout and log back in
* * * * * * * * * * * * * * * * * * * * * * * * *
Warning Warning Warning Warning Warning
During the date changing process On-Staff automatically sets this field to 1 which will prevent users from posting. Once the date change has been completed and each user has logged out and back in, On-Staff automatically sets this field back to 0 to allow posting again.
Oshpd Facility Code Used for MIRCal OSHPD accounts. Type Your account number if applicable.
After the last field has been entered, the cursor will return to the Name field allowing the user to review the changes made. If the changes are satisfactory press [“] and On-Staff will return to the field Clinic No. allowing modification of an additional clinic if desired. Pressing [“] will return the cursor to the Clinic Menu.