
Billing/Menu
This menu allows you to bill the financially responsible party by sending either an insurance form (paper or electronic) or a detailed statement.

Menu Options:
Insurance Allows billing of Insurance claim forms to the applicable insurance company.
Statement This option allows the printing of detailed statements, which are sent to patients.
Tele Com This option is used for electronic claims submission.
Follow-Up Used to generate follow-up letters to patients or insurance carriers.
Worker Used to bill charges and submit other Workers Compensation related information.
Pre-Billing Allows you to, prior to billing, for ALL charges entered, edit the information contained in the report.
Exit Returns you to the Main Menu.
Billing/Menu/Follow Up Letters
MAIN MENU/BILLING/FOLLOW UP ITEMIZED

This option allows the generation of extensive follow up letters for patients or the insurance companies. Letters can be generated by Group of Patients or Batch of Patients. This menu contains 4 options.
Insurance Allows follow up letter generation to the insurance companies for a variety of dates and reasons.
Patient Allows follow up letter generation to the patient for a variety of dates and reasons.
Customize Allows follow up letter generation for specific user-defined letters. This can be done for either patients or insurance companies for a variety of date ranges or reasons.
Exit Allows return to the Billing menu.
Group of Patients
Batch of Patients
Exit
This option allows the generation of follow up letters to the insurance company. After selecting the Insurance option, the screen will display two options (Group of Patients or Batch of Patients). The only difference between these options is the method of entering account number information. Select Group of Patients.
On-Staff will display the following fields:
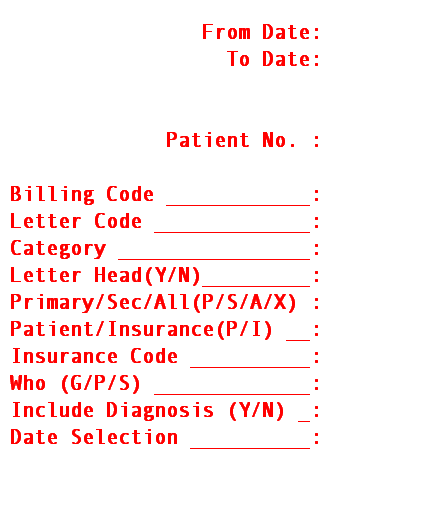
From Date: Enter the beginning entry date range for the generation of the letters.
To Date: Enter the ending entry date range for the generation of the letters.
NOTE: If the System was set to bill by Service dates instead of entry dates (see Utility/Set Up/System: Entry/Service Date field entry) , enter the service date range in the previous two fields.
If you selected Group of Patients, you will see:
Patient's Account Number:
From: Enter the first account number of the sequence.
To: Enter the last account number of the sequence.
If you selected Batch of Patients, you will see:
Patient No.: Enter all of the account numbers you wish to print this form for one at a time, pressing [ENTER] after each entry. When you have completed your selection, press [ENTER] one more time to proceed to the next field.
Billing Code : Enter the user defined code from the Billing Status Code column previously discussed in the Payment option. All procedures that have the selected code will be included in the letter generation.
Letter Code: Enter the code for the Letter from the Utility/Messages/Remark file. If you do not know the code, you may press the F2 key or enter a question mark to search for the code, or See the end section of this document for sample letters.
Category: Enter the user defined code for the category of the patient only if you want to limit your request to patients in that particular category; otherwise press [ENTER].
Letter Head (Y/N): This feature has not yet been implemented.
Primary/Sec/All
(P/S/A/X): Enter the indicator of sequence regarding the patient's insurance company. The choices are:
P Primary insurance company
S Secondary insurance company
A All insurance companies
X Expired insurance companies
Patient /
Insurance (P/I): Indicate whether this letter should be sent to the patient or the insurance company.
Insurance Code: Enter the user defined code of the insurance company from the Utility/ Insurance file only if you want to limit the printing of letters to one specific insurance company.
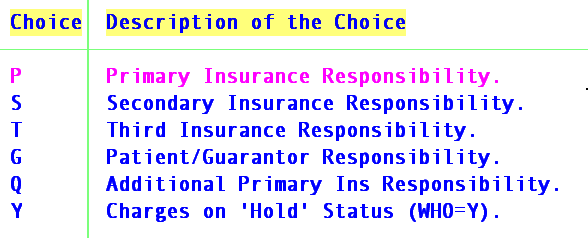
Who (G/P/S): Used this to determine which insurance type (Who) to include.
Press the [F2] search key to display the following valid choices:
Include Diagnosis: Enter "Y" yes include diagnosis or "N" no do not include diagnosis.
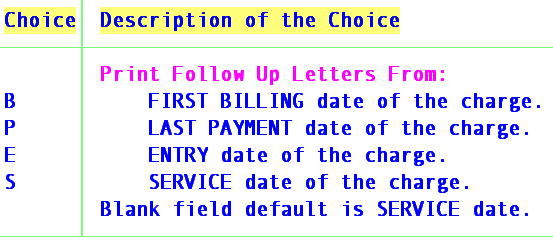
Date Selection: Accept the default “S” Service Date or
Press the [F2] search key to display the following valid choices:
After pressing [ENTER] at the last field, you will be prompted to enter the printer destination or hit Return for the default. To accept the default printer, press [ENTER]. To see your printer options, press [SPACE BAR] once to clear the field, then press [ENTER]. The printer destinations for your system will be displayed. At this point, highlight the desired printer and press [ENTER]. The system should beep once to signify that the process is going to the printer. If the system beeps twice, it means that:
1) there are no letters to be printed within the range of accounts selected.
2) the range of account numbers or the dates specified are invalid.
Group of Patients
Batch of Patients
Exit

