
OnSTAFF 2000
Ledger Flags
DATE FIELD COMMANDS
CONTROL KEYS: R, P, F, E, W, D, X and C
Date Field Commands: Throughout On-Staff 2000, when the cursor is on a date field, pressing the [T] key will automatically enter today’s calendar date. When a date field is displaying a date, pressing the following keys will modify the displayed date as follows:
[+] increase by one day [-] decrease by one day
[W] increase by one week [w] decrease by one week
[M] increase by one month [m] decrease by one month
[Y] increase by one year [y] decrease by one year
Control Keys R, P, F, E, W, D, X and C: By holding down the [Ctrl] key and pressing [R], [P], [F], [E], [W], [D], [X] or [C] ANYWHERE in the system, the user may access the following:
[Ctrl] [R] will ‘Redraw’ the screen in the event the screen display becomes garbled.
[Ctrl] [P] will allow the user to print whatever is showing on their screen. This option will not print screen contents when you are out in the shell (i.e., in the operating system).
[Ctrl] [F] will allow the user to check the function key mappings and the Macro Group assignment for the user currently logged in.
[Ctrl] [E] will display the EXTERNAL OPTIONS MENU allowing quick access to load fonts and forms, reset the modem, cancel printouts, kill processes and more.
[Ctrl] [W] will allow the user to access the word processor that may have been purchased in addition to the On-Staff 2000 software. This area may be programmed by Prime Clinical Systems, Inc. to pass patient’s information including name, address and/or patient’s ledger information to a word processing file.
[Ctrl] [D] will allow the user to return to On-Staff 2000 whenever the user has exited the On-Staff 2000 program to go to the shell (i.e., the operating system).
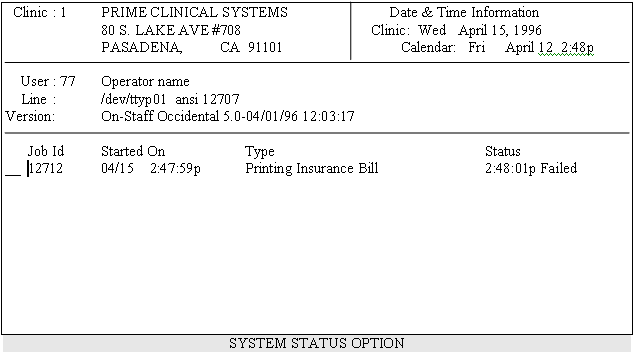
[Ctrl] [X] will access the SYSTEM STATUS OPTION screen. This screen displays the clinic number, name and address of the clinic currently accessed, the current clinic (posting) date, the system (actual calendar) date, the unique user number followed by the operator name logged into this clinic, the terminal device number followed by the terminal emulation and the process i.d. number for that terminal and the word ‘On-Staff’ followed by the Medicare territory, the On-Staff 2000 version number, date and time. The remainder of the SYSTEM STATUS OPTION screen reflects the status of all jobs/processes requested by this user during this log in session, whether completed, failed or running.
Pressing [D] next to a ‘Running’ job/process entry will prompt the user with ‘Would You Like To Delete (Y/N)’. Typing Y (yes) will cancel the job/process and place ‘Canceled’ in the Status field for that job/process.
Pressing [I] next to a job/process entry will display the screen and criteria entered by the user when requesting the particular job/process, for example, the billing screen and information entered in an attempt to generate an insurance claim form. This will allow the user to verify that the information was typed correctly:
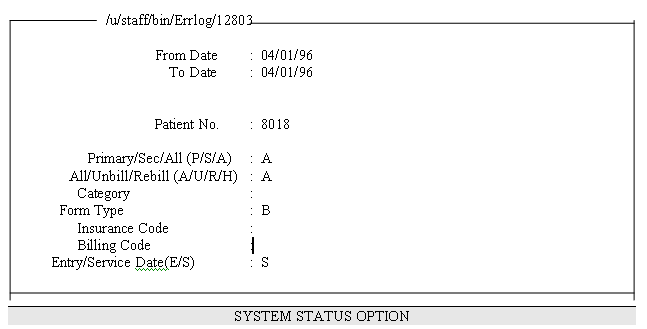
If the information was typed correctly yet, the job/process failed, a detailed error message indicating why may be viewed by pressing [¯], [Page Down] or [G] (to go to the end of the file):
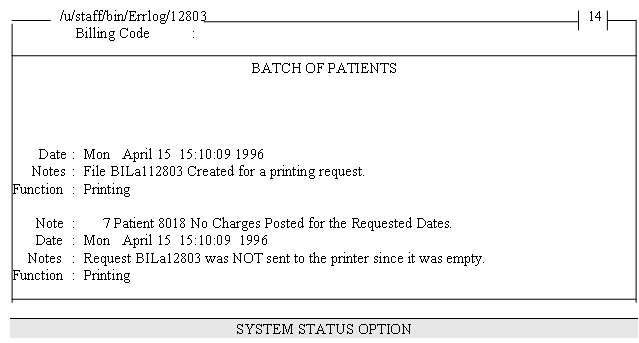
Upon reviewing this error message, the user may determine the reason for the failure. For example, the above reads ‘Note: 7 Patient 8018 No Charges Posted for the Requested Dates’. The job/process failed here since no charges exist within the given date range. At this point, pressing [Q] twice will exit the SYSTEM STATUS OPTION screen. The user may now view the patient’s ledger to locate the appropriate date(s) in order to print the claim.
EXISTING FEATURES: Be Creative! ! !
Use Them In Various Ways to Benefit YOU !
Ledger Flags in Conjunction with the Ledger\Collection
There are four ‘flags’ that are automatically entered into a patient’s ledger remark ‘Flag’ column depending on the function performed. These are I, G, L, and E. When the F2 search key is pressed while the cursor is in the ‘Flag’ column, these and all other flags will be displayed. You may use any alpha character or any one digit number as a unique flag. Additional flags that you may want to create may be added by going to \Utility\Set Up\Field Choices\Modify, entering co_fl in the <Field Name> field and pressing ‘A’ to add the flag.

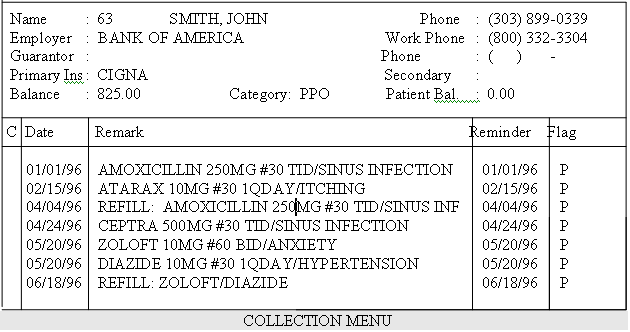
Use ‘P’ as a Flag for Refills: A busy Cardiology office wanted to have quick access to all prescribed medications and refills. So they devised a way to use the ledger remark ‘Reminder’ and ‘Flag’ area for this purpose. When a medication is prescribed, this is entered into the patient’s ledger remarks, e.g., Medrol Dose Pak, Amoxicillin 250mg tid #30, etc.. By pressing ‘T’ in the Reminder column, the system will enter the calendar date. By pressing ‘P’ in the Flag column (this office chose to use a Flag of ‘P’ for prescribed medications and refills), the system will enter ‘P’ in this column.
What happens when a refill is called in? Go to Ledger\Collection. To see all prescriptions for this patient for the past six months, enter a date that is six months prior to today’s date in ‘From Date’ (entering 01/01/01 will display RX’s from the beginning of this patient’s ledger). In ‘To Date’ press ‘T’ for today’s calendar date. Enter ‘P’ in ‘Collection Flag’ and enter the patient’s account number (or name) in ‘Account No.’. Ledger\Collection will display in chronological order all prescriptions for this patient within the selected from and to date range! No more searching for and/or through a patient’s chart. All the necessary information is displayed in Ledger\Collection. With the New Feature ‘J’ entered in the ‘C’ (or command) column, these RX remarks may be printed for the doctor’s review!
Track Expected Deliveries: A busy OBGYN practice wanted to know how to quickly obtain ‘how many’ and ‘who’ are projected to deliver and/or had delivered within a given date range. Part of the routine for entering a new expecting patient is to add a ledger remark for this patient: Expected delivery date 06/04/95. They would then type this date in the ‘Reminder’ column and enter ‘P’ (this office chose to define flag ‘P’ as projected date of delivery) in the ‘Flag’ column. When the patient actually delivered, the delivery date would be entered as a remark in the patient’s ledger (Remark: C-Section delivery on 03-01-96. Reminder: 03/01/96. Flag: D (defined as delivered)).
How do I see how many and who delivered in April? Go to Ledger\Collection. From Date: 04/01/96. To Date: 04/30/96. Collection Flag: D. Account: Bypass and the system will search and display all accounts that meet the entered criteria.
How do I see who is projected to deliver in May? Go to Ledger\Collection. From Date: 05/01/96. To Date: 05/31/96. Collection Flag: P. Account: Bypass.
By using your imagination and being creative, this method may be modified to detail high risk pregnancies, etc.
Modify the Referring F2 Search Screen for Making Referrals to Labs or Specialists: How can this assist my staff and patients? When a patient needs to see a specialist or lab that accepts their particular insurance, a screen print of a specialist or lab located near the patient’s home or work may be quickly obtained by going to any referring field (e.g. New Patient\ <Referral>, Charges\<Rdr.>, or Utility\Referring\<Referring Code>), pressing F2, entering the selection criteria and pressing F2 again (for example, ‘LAB’ in the Specialty column, ‘*Cigna*’ in the Ins/Company column and the patient’s home zip code in Zip column).
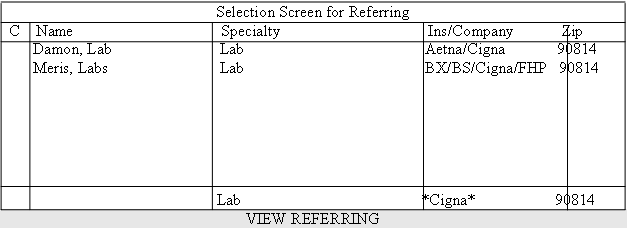
This is accomplished by changing the use of the <Company Name> field in \Utility\Referring to contain the name of insurances that the provider/lab are contracted with and adding these lab names here. Next, modify the fields displayed on the Selection Screen for Referring (accesssed by pressing the F2 search key from any ‘Referring’ field) in \Utility\Set Up\Help to display Name, Specialty, Ins/Company and Zip (Call Prime Clinical Systems, Inc. for assistance in making this modification).
Use the New Patient <Chart Number> Field to Help in Posting Workers’ Comp Payments: When a payment is received, the patient name is searched in the Payment\Open Item screen in the <ACN> field. The Selection Screen for Patient contains four separate accounts for the same patient! How may I quickly determine which account contains the date of service this payment is for? Ordinarily, each date of injury for a patient necessitates having a separate account. If the date of injury is entered in the New Patient <Chart Number> field for all workers’ comp cases and this field is added to be displayed on the Selection Screen for Patient, the user can quickly select the account to post the payment to!
Use \Utility\Business to Quickly and Correctly Assign Medicare, Medi-Medi or Medi-Cal Insurance Coverage to a New Patient: \Utility\Business is set up to simply add the appropriate insurance when entering a new patient who had either Medicare, Medi-Medi or Medi-Cal coverage.
How does this work? First, \Utility\Business is set up. The only fields completed on this screen are: ‘Company Code’ (adding M, for example, to denote Medicare, MM Medi-Medi and MC Medi-Cal) and ‘Insurance Code’ (\Utility\Insurance\ <Insurance Co. Code> for the appropriate carrier). Remember, this is an example only, you may choose to use additional fields, different codes, etc.
When the patient demographic screen is being completed, with the cursor on the <Employer> field, by entering the appropriate ‘Company Code’ from \Utility\Business, the correct insurance will be automatically added at that point. All that remains to be done is complete the remainder of the demographic screen and modify the subscriber number on the patient’s insurance screen. Save key strokes and eliminate the need to search for the carrier’s insurance company code!
IMPLEMENT UPCOMING NEW FEATURES:
They Have Been Added to Make YOUR Job EASIER!
About Ledger\Collection
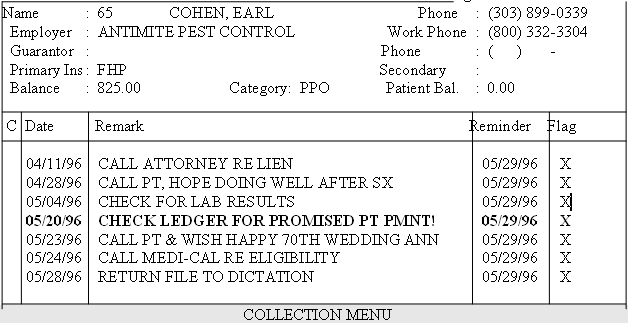
Using the above example, when a user logs into On-Staff 2000 on the calendar date of 05/29/96 this COLLECTION MENU screen is displayed before the Main Menu. The above sample contains all patient accounts with ‘Reminder’ date of 05/29/96 which this user has entered remarks for with the reminder ‘Flag’ X. The cursor will be positioned in the ‘C’ (or command column) next to the first remark. The top of the screen will display the account this remark is for. Pressing the down arrow key will move the cursor to each subsequent remark ON THE CURRENT PAGE. As the cursor is moved to each subsequent remark, the information displayed at the top of the screen will change only when the current remark is from an account that is different from the account of the previous remark, i.e., the account information displayed at the top of the screen will always correspond to the remark the cursor is positioned at. The user may enter an additional remark by pressing ‘A’ (for Add) with the cursor positioned next to the appropriate comment. The addition will be added to the appropriate patient’s ledger. These COLLECTION MENU remarks may also be printed by pressing ‘J’ from the ‘C’ (or command column).
Ledger Flag ‘X’: If you would like pre-set ledger reminders, specific to each user, displayed in a COLLECTION MENU screen when logging into On-Staff 2000, after you have loaded the upcoming update, go to \Utility\Set Up\Parameters. Press [Enter] until the cursor is on the new field called <Reminders (Y/N)>. Type ‘Y’ and press [Enter].
Example: On May 20, 1996 a user determines he/she wants to be reminded to check a patient’s ledger on 05/29/96 for a promised patient payment (see above example ‘Date’ 05/20/96, ‘Reminder’ 05/29/96). To accomplish this the user should go to the patient’s ledger. In the remark section add the comment ‘CHECK LEDGER FOR PROMISED PT PMNT!’ by pressing [A] from the ‘C’ (or command column). Under the ‘Reminder’ heading enter the date you want to be reminded of this message (05/29/96). Under the ‘Flag’ heading enter the flag ‘X’. On the calendar date of 05/29/96, when that user logs into On-Staff 2000, this reminder (along with any others entered by this user using a ‘Reminder’ date of 05/29/96 and ‘Flag’ of X) will be displayed in a COLLECTION MENU screen. From the ‘C’ (or command column) of this screen, the user may print their reminders for the day by pressing [J] OR add a remark to the patient’s ledger by pressing [A].
New \Utility\Category <Type (C/P/W/O/F/G> Field Option ‘A’: This option was designed to be utilized for collection and bankruptcy accounts. When a patient’s category has been changed to one which has been set up to use option ‘A’ on the <Type (C/P/W/O/F/G)> field (for example to a collection category code) the following screen will be displayed when the patient’s account number is entered anywhere throughout On-Staff 2000:
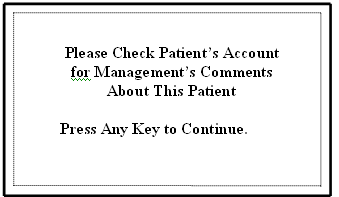
The ‘Comments’ the above display is referring to are the remarks entered by a user on the patient’s Main Menu\New Patient <Remark> field lines. By displaying the above screen BEFORE an appointment is booked, a statement is printed, charges are entered, payments are posted, changing or viewing the demographic information or viewing a ledger, the user will better know how to handle the account!