
OnSTAFF 2000
Menu/PAYMENT
This option is used to post all payments and adjustments (other than those which were posted using the Jump/Payment option in the Charge screen) regardless of the payment’s source, using various methods to calculate and apply these credits. After selecting the Payment option from Main Menu, On-Staff will display the following:

Menu Options:
Open Item Used to apply or reverse payments and adjustments from all Payors, line item by line item or by jumping or tagging specific line items.
Auto Payment When software requirements have been met, used to perform auto payment/adjustment posting for Medicare, Medi-Cal and/or Capitated (Pre-Paid) Contracts.
Balance Forward
Guarantor The Guarantor option is used to post payments to family accounts (accounts linked together
Load MCAL
ANSI Auto Pay Use the new payment menu option ANSI AutoPay to post the ERA file. Auto Payment will be used for all other auto payment features.
Exit Returns to the Main Menu.
Main Menu/Payment/OPEN ITEM
When the Open Item option from the Payment Menu is selected, On-Staff will display the following:
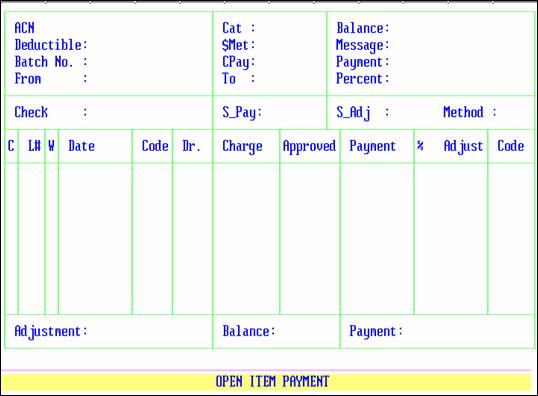
ACN: When not already displayed, enter the account number of the patient you are posting a payment for. If the account number is unknown, you may search by entering all or part of the name (last name, first name) and/or incorporating the Wild Card (*) then press [Enter].
Cat: The patient’s assigned /New Patient <Category> code is displayed automatically.
Balance: The patient’s total account balance is displayed automatically.
Deductible: Not used at this time.
$Met: The dollar amount contained on the patient’s /New Patient/Primary Insurance Screen’s <Deductible Met> field is displayed automatically once the cursor reaches the C (Command) column.
Message: The /Ledger/Analysis <Message> field entry is displayed automatically. The cursor will not stop in this field until after the payment/adjustment has been committed. At that time you may accept this default or enter a /Utility/Messages/Message <Message Code> for the statement message you’d like printed on this patient’s statement. The next time a payment is posted to this account, that statement message code will be displayed, allowing the user to accept or change the code or enter NONE. When the /Utility/Messages/Message <Message Code> is unknown use the [F2] search key.
Batch No.: 0 is displayed automatically. After entering the patient’s account number, the cursor will stop in this field allowing the user to assign a batch number to this payment. Journals may be requested by batch numbers thus listing ONLY payments and adjustments for the requested date(s), provider, operator, etc.
CPay: Once the cursor reaches the C (Command) column, this field automatically displays the patient’s /New Patient/Primary Insurance Screen’s <Co Payment> field amount.
Payment: 0.00 is displayed automatically. Entering the total payment amount you will be posting to this account, will alert you with a prompt (after posting and committing the payment) when the payment amount posted (noted in the Payment box, bottom right corner of screen) does not match the amount entered in this field. You may choose to not use this feature by pressing [Enter].
Percent: Enter the percentage of payment from the EOB. The default value is 80%.
Check: Enter the Bank number from the check (this field is optional unless the Check Slip Report is utilized by your office).
NOTE: If your office uses the Check Slip Report for balancing the days' payments, you must enter something in the Check Number field. Failure to do so will result in report imbalances!!
At this point, the system will display a box with all of the insurance company or companies that the patient has entered in the New Patient insurance screen, as well as a co-payment option. Use the arrow keys to select the correct source of payment. The source of Payment and Source of Adjustment fields will be displayed by On-Staff.
S_Pay: Source of Payment code. This field is displayed automatically from the source of payment code entered in the Utility/Insurance file. You may enter the desired code or press [ENTER] to accept the default value.
S_Adj: Source of Adjustment code. This field is displayed automatically from the source of adjustment code entered in the Utility/Insurance file. You may enter the desired code or press [ENTER] to accept the default value.
Method: Select the payment method for this account. The valid choices are:
A Automatic calculation (the system will make the required
write off for you)
S Automatic write off for State Insurance
I Insurance Payment (No Calculation)
P Patient Discount
NOTE: The From: and To: service dates entered on the screen will appear in the ledger as the date range for the payment. It is advisable to enter a range of dates as close to date of service as possible, so the payment can be tracked more easily.
After entering the appropriate information in these fields, the cursor will return to the From: date field, allowing you to review the data for accuracy. If you need to change any information, press [ENTER] to move the cursor to the desired field, make the necessary changes, then press [ENTER] until the cursor goes back to the From: date field. At this point, press [CTRL-U] and On-Staff will display the charges in the patient ledger that apply to the service date range entered. The cursor is positioned to the left of the first date of service on that screen under the letter 'C'. To the right of the cursor, the charges are displayed under the following headings:
C: Marks the position of the cursor. Also the point of entry for the Command Line options, which are explained later in the document.
L# Line number of the displayed charges (all charges are displayed in Date of Service order).
Who: This field identifies who is currently responsible for the balance of this charge. The default value of this field depends on the entry made in the Responsibility fields in the Utility/Category file. If the patient has two insurance policies, the value of the field will change to 'S' for secondary insurance as a default value. If the patient has single coverage only, the field will default to 'G' for patient/guarantor. You may also override the value of the field. The valid choices are:
I Primary Insurance
S Secondary insurance
G Patient/Guarantor
Date: Date of Service for the charge.
Code: CPT code of the item (a code other than the CPT may appear on the EOB from the patient's insurance company).
Dr.: The internal code for the performing physician from the Utility/Provider file (displayed automatically).
Charge: Amount charged for the procedure.
Approved: Amount normally approved by the patient's insurance company for the treating Doctor (if this feature was implemented, it is maintained in the Utility/Procedure/Fee Schedule file). If you have selected the 'A' method of posting, you may override the field if the amount is either incorrect or zero.
Payment: Enter the amount of payment from the EOB.
%: Enter the percentage of payment if different than the amount entered at the top of the screen.
Adjust: Enter the amount of the adjustment from the EOB. This field is calculated by the system when using the 'A' or 'S' method of posting.
Code: The Billing Status Code. As a default, the system will insert a code to represent the last activity on this charge. For example: if the primary insurance paid this claim on the entry date of 06/01/93, the system inserts the message "P06/01". When this charge has been paid in full, you can enter the code "PIF", or any other user defined code (not maintained in On-Staff) to tell you the most recent thing to occur to this item.
To post a payment, move the cursor adjacent to the desired line. If the Approved amounts are set up in your Procedure code library, press 'A'. On-Staff will automatically post the correct payment, adjustment, and will mark the Code column with a code similar to "P06/01" to indicate the charge was paid by the primary carrier on the system date of 06/01/93. If the Approved amounts are not set up, press 'M'. The cursor will move to the Who column and will change the entry to the next applicable code (from 'I' to 'S' if the patient has more than one insurance policy or to 'G' if the patient has only single coverage) as a default, telling you who is the next party responsible for this charge. If the code is changed to 'G', and the patient is set to receive an open item statement, the charge will appear on the next statement sent to the patient.
If you selected the 'A' method of posting payments, the cursor will next move to the Approved column. If the entry in the approved amount column is either blank or incorrect, enter the amount approved by the insurance company and press [ENTER], and the cursor will move to the Payment column. Enter the amount paid by the insurance company and press [ENTER]. The cursor will bypass the Adjustment column, as On-Staff will calculate the adjustment for you. The cursor will move to the Code column and will display a code similar to 'P06/01' to indicate the charge was paid by the primary carrier on the system date of 06/01/93. You may override this field if desired, to enter your own code (any entry in this field will be a code devised by the office manager, and is not maintained in On-Staff). After the entry has been made in the Code column, press [ENTER]. The system will calculate the appropriate amount for the adjustment, and will return the cursor to the 'C' column, allowing entry on the next item.
If you have finished posting payments, press 'C' to commit the payment. This operation will update the account balance and commit the payment to the patient's ledger. If you have made mistakes on this account and wish to start over, press 'Q', and On-Staff will prompt you with the following:
"You Have Not Committed the Payment. Would You Like to Commit(Y/N)"
If you answer 'N', the system will clear the screen, and move the cursor to the Message field. At this point, press [ENTER] until the cursor returns to the ACN field. You may now post the payments for the patient again.
NOTE: If you answer 'N' to the question of committing the payment, the patient's account will not be updated!
After you have committed the payment, the cursor will move to the $Met field, allowing you to enter the portion of the deductible satisfied with this EOB, if applicable. If the insurance company applied a portion of the claim to the patient's deductible, type in the amount, and press [ENTER]. The system will move the cursor to the Message field, allowing you to send a message to the patient on his/her next statement (providing that the Category assigned to the patient is set to receive a statement.
This message will appear in addition to the automatic statement message set up in the Utility/ Category file.
At this point, press [ENTER], and On-Staff will return to the ACN field, allowing payment entry for the next patient. If all payment activity has been completed, press [CTRL-U] once more, and the system will return to the Payment Menu.
Here is a listing of the commands available when posting payments and the cursor is in the 'C' column (this list may be displayed by entering a question mark or by pressing the F2 key):
A Automatic payment based on the approved amount.
M Post manual payment or adjustment.
I Show payment history on this procedure.
J Distribution of the payment to a range of procedures.
T Identify procedures for payment.
C Commit the payment.
U Uncommit the payment.
B Bill the charges that marked under Who as 'S'.
Further detail about the Command Line Options follow:
A If your procedure codes are set up with approved amounts for all insurance companies and doctors, then an amount in the approved column will appear. Simply press 'A' and the system will post the appropriate payment and adjustment for you, and mark the Code column with a code similar to "P06/01" to indicate that the item was paid by the primary carrier on the system date of 06/01/93. This option will work only if these codes are set up.
M Used to post payments and adjustments to a charge on the patient's account. When this option is selected, you can enter the approved amount from the Explanation of Benefits, the dollar amount of the payment, the dollar amount of the adjustment (if the I or P methods were selected) and the Billing Status code.
D Used if no payments are being made by the insurance company, this option will move the cursor to the Code column to allow you to enter the desired code, and will change the Who column to 'G'. This action will release the item to be billed to the patient if their Statement Type is set to 'O' for open item statements.
I Used to display the payment history of the item. This option will display the entry date of the payment, the source of payment code of from the previous payment session, the Check No., the payment, and the adjustment. To return to the payment screen, press 'Q'.
J Used to select multiple charges to apply one payment and/or adjustment amount. After selecting this option, you will be prompted to complete the following fields:
L#: Enter the first line number of the item you wish to include in the payment.
To: Enter the last line number of the item you wish to include in the payment.
Pay: Enter the amount of the payment you wish to distribute.
Adj: Enter the amount of the adjustment you wish to distribute (if applicable)
NOTE: If you are using the 'A' or 'S' methods of posting payments, you should not use this option.
Method: Select the method for distributing the payment. The valid choices are:
A Calculate the payment according to the approved amount of the charges.
P Proportional payment. This will distribute the payment evenly amongst the items.
% Payment on a percentage basis. Selecting this option will apply the payment as the percentage of the charge (i.e., if the line items totaled 150.00 and the payment was 120.00, the system would pay each line item at 80%.
%: If you selected the percentage or approved method, enter the percentage of payment; otherwise, leave this field blank.
Code: On-Staff will display the appropriate default code. To accept this entry, press [ENTER]. You may, if desired, override the entry on this field with a user defined code.
Who: On-Staff will display the next appropriate Who column entry. To accept this value, press [ENTER]. You may override this field if desired.
After completing the last field, On-Staff will apply the payment to the chosen procedures.
T used to select multiple charges to apply one payment and/or adjustment amount. To designate a procedure for this operation, move the cursor adjacent to the procedure, and press 'T'. After you have chosen all desired items, press 'X' and you will be prompted to complete the following fields:
Pay: Enter the amount of the payment you wish to distribute.
Adj: Enter the amount of the adjustment you wish to distribute (if applicable)
NOTE: If you are using the 'A' or 'S' methods of posting payments, you should not use this option.
Method: Select the method for distributing the payment. The valid choices are:
A Calculate the payment according to the approved amount of the charges.
P Proportional payment. This will distribute the payment evenly amongst the items.
% Payment on a percentage basis. Selecting this option will apply the payment as the percentage of the charge (i.e., if the line items totaled 150.00 and the payment was 120.00, the system would pay each line item at 80%.
%: If you selected the percentage or approved method, enter the percentage of payment; otherwise, leave this field blank.
Code: On-Staff will display the appropriate default code. To accept this entry, press [ENTER]. You may, if desired, override the entry on this field with a user defined code.
Who: On-Staff will display the next appropriate Who column entry. To accept this value, press [ENTER]. You may override this field if desired.
After completing the last field, On-Staff will apply the payment to the chosen procedures.
C Used to commit the payment to the patient's ledger after completion of posting. This operation must be performed, or the payment will not be recorded.
U Allows you to uncommit the payment. This function can be used if you committed the payment in error, and wish to have the chance to re-post this information.
B Allows the user to print a claim form for the secondary insurance including all the items on the screen marked with an 'S' in the Who column. This will make secondary billing very easy, as it will print the needed claim form, and the user will simply attach the EOB to the claim form, making it ready for submission. When this option is selected, you will be prompted to enter the printer destination or hit Return for the default. To accept the default printer, press [ENTER]. To see your printer options, press [SPACE BAR] once to clear the field, then press [ENTER]. The printer destinations for your system will be displayed. At this point, highlight the desired printer and press [ENTER]. If a laser printer is chosen, a HCFA-1500 form will be generated (or the data will print on a pre-printed claim form if you chose to print claim form type 'B'. If you are using a dot matrix printer, the claim data will be sent to pre-printed HCFA-1500 form.