
OnSTAFF 2000
UTILITY/SET UP/
PARAMETER MENU
The Set Up Menu is an area which is addressed during initial set up of your clinic(s). This area will not be accessed on a daily basis. The Set Up Menu security level should be such that only Administrative Personnel have access. There are three principle areas for each clinic’s set up, the Clinic, System and Parameter screens addressed in this chapter.

Menu Options:
Clinic Initial set up of clinic information.
Security Login User and Macro set up. Login User is step one in adding new users including their security level and macro group.
Printer Printer and Report set up. Report is step two for adding new users and defining their default printer destinations.
System Clinic sharing set up.
Appointment Appointment set up.
Menus Menu and Program set up. Program allows the set up of automation and security levels per menu and/or command column option.
Help Contains the initial set up of search screens entitled Selection Screen for... and allows modification of each screen where applicable. Allows formatting of fields (i.e., (###) ###-#### for phone number fields).
Field Choices Contains the initial set up of search screens entitled Choice/Description of the Choice and allows modification of each screen where applicable.
Maintenance Contains the Purge, Update and Reverse Entry options.
Parameter Determines system configuration including default category, facility and billing, etc.
Exit Returns you to the Utility Menu.
/Utility/Set Up/PARAMETER
The Parameter option determines system configuration including default category, facility and billing, etc. You will need to use the Modify option in order to address the Parameter screen.

Menu Options:
Add Add System Parameters for a new clinic.
Modify Modify System Parameters for an existing clinic.
View View System Parameters for an existing clinic.
Exit Returns you to the Set Up Menu.
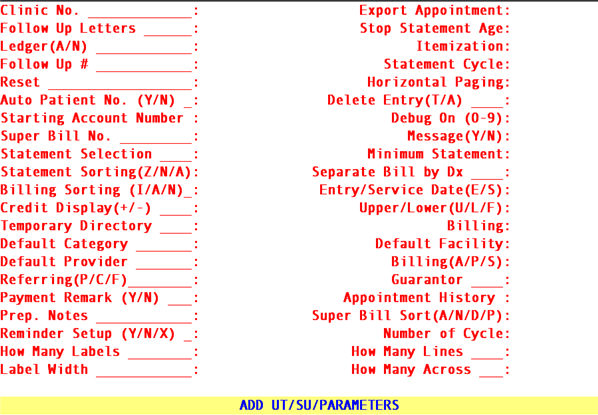
To set up your initial system parameter screen, select the Modify option and press [Enter]. On-Staff will display the following fields:
Clinic No.: Enter the number of the clinic you wish to define.
Export
Appointment: For future update.
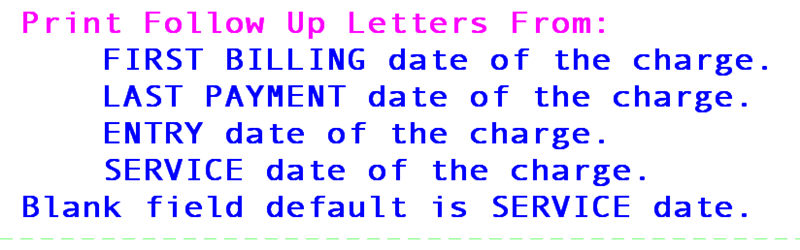
Follow Up Letters: This option allows you to determine which date to use in processing follow up letters. For example, unpaid since last billing date, payment date, entry date of the charge or service date of the charge. Pressing the [F2] search key will display the following choices:
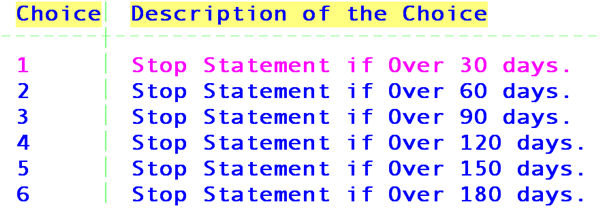
Stop Statement
Age With this option you can set the length of time charges are to be included in the balance on a patient’s statement.
Type the appropriate value.
Values for the Stop Statement Age field are from 1 – 99. Pressing the [F2] search key will display the following choices:
Ledger (Y/N): This option allows the system to sort the printout of ledgers. For example, ledgers would be printed prior to purging accounts and filed in the patient’s chart. If your charts are filed alphabetically, you might want to enter N on this field. Pressing the [F2] search key will display the following choices:
A - Account number of patient.
N - Name of patient.
Itemization: This field allows you to sort charges on the HCFA claim form. Pressing the [F2] search key will display the following choices:
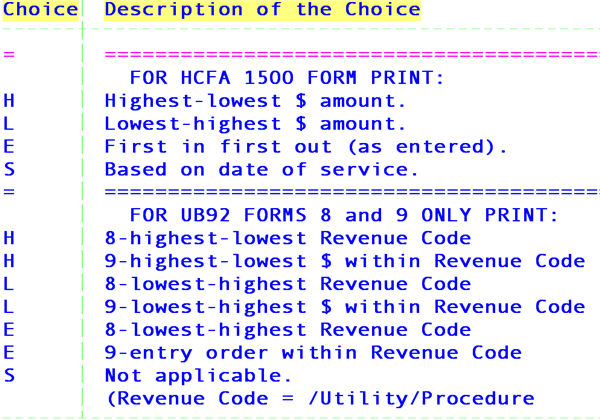
NOTE: Keep in mind this will effect your claims when billing or rebilling several dates of service at a time and works in conjunction with the field Separate Bill by Dx. After Session III, practice different variables in Clinic 99 in order to understand how these fields effect your claims.
Follow Up#: This field allows you to set the number of blank lines at the beginning of the follow up letters before information is printed.
Statement Cycle: This field allows cycle printing of statements. It is recommended to assign a 28 day cycle and have this automated so that statements are printed on a daily basis. Pressing the [F2] search key will display the following choices:
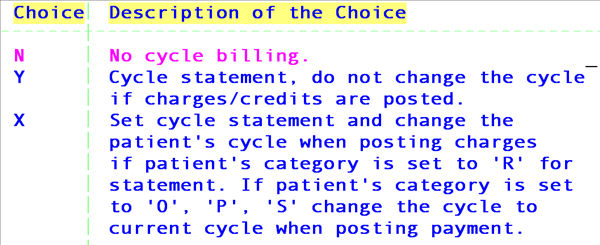
Reset: It is recommended to set this field to Y. Pressing the [F2] search key will display the following choices:
Y - If electronic billing fails, remove the comments from the patient’s ledger and reset the billing date and code to the original value.
N - If electronic billing fails, do not remove the comments from the patient’s ledger and do not reset the billing date and code to the original value.
Paging: Used to determine how many columns the Appointment Scheduling program will move on a horizontal axis. Based on your hardware, your vendor has determined the setting for this field, therefore, leave this field at its default setting.
(Y/N): New patient account numbers can be automatically assigned sequentially by On-Staff for each new patient registered. Pressing the [F2] search key will display the following choices:
Y - New patient account numbers will be automatically assigned
sequentially.
N - New patient account numbers will NOT be automatically
assigned.
Entry(T/A): This field establishes which charges can be deleted after their initial entry. Pressing the [F2] search key will display the following choices:
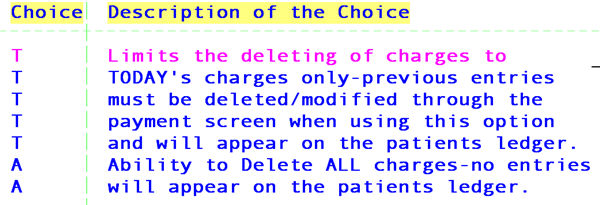
NOTE: On-Staff will not allow the deletion of a charge which has a payment or adjustment applied to it.
Number: If you entered Y in the field Auto Patient (Y/N), enter the beginning account number for new patients registered (this is a numeric field only). As new patients are registered, this number will increase.
Debug on
(0-9): Your vendor has already determined the setting for this field, therefore, leave this field at its default setting. This field determines the level of information provided to the user if a printout fails. 0 is lowest, 9 highest.
Bill No.: When using Superbills, enter the beginning number to be printed on the Superbill. As Superbills are printed, this number will increase.
Message(Y/N): Enter Y if a comment is to be automatically placed in the patient's Ledger Remark area when claim forms, statements, recall or follow up letters are generated.
Selection: Enter the type of statement your office will be using. Pressing the [F2] search key will display the following choices:
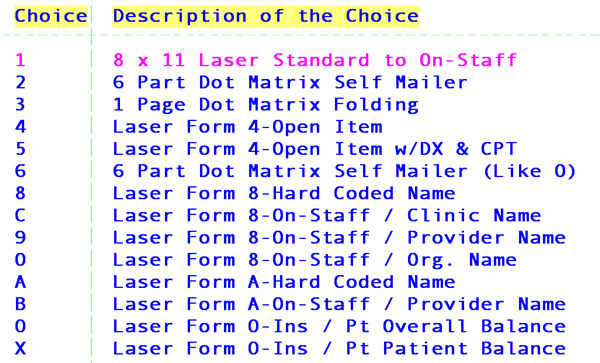
NOTE: Refer to Lets Get Started with On-Staff to see printed samples of each statement type and worksheet. Statement types 2 and 3 require a dot matrix printer and may be purchased from your vendor. Statement type 2 requires a dot matrix printer capable of handling six part pages. Statement types 4 , 7 and 8 require a laser printer and are custom designed by your vendor.
Statement: Indicate the minimum family balance to qualify for a statement to be generated.
Statement Sorting
(Z/N/A): Used to determine how the statements will be sorted. Pressing the [F2] search key will display the following choices:
Z - By zip code (recommended for bulk rate mailing)
N - By name
A - By account number
Separate Bill By
Dx(Y/N): With this option claims can be separated. Pressing the [F2] search key will display the following choices:
Y - Print separate bill for each entry.
Z - Print separate bill based on each place of service.
N - Print bill by combining all the charges into one bill regardless of the place of service or entry.
NOTE: Z and N are to be used only under specific circumstances. Claim information regarding diagnosis and place of service will always be ONLY that which was posted in reference to the first printed charge(s). Thus, remaining charges relation to diagnosis and BOX 32 information may be incorrect.
Billing Sorting
(I/A/N): Claim forms and the Pre Billing Report can be sorted. Pressing the [F2] search key will display the following choices:
I - By Insurance
A - By Account Number
N - By Name
Date(E/S): This field determines the default for which date(s) are used when submitting electronic claims or when printing paper claims. Pressing the [F2] search key will display the following choices:
E - Entry Date (date entered into the computer). This option will generate billings for all dates of service entered on the same entry date.
S - Service Date (treatment date). This option will generate billings for the entered date of service only.
Display(+/-): Enter the negative sign (-) to display a negative symbol on each payment and adjustment in the system. This is a cosmetic feature only and is not to be confused with credit due a patient.
(U/L/F): Entry in this field establishes case. Pressing the [F2] search key will display the following choices:
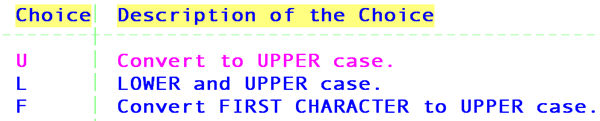
NOTE: Keep in mind, if you set this to U now, log off and log on at a later time to set up /Security/Login Users, enter an alpha password, that password is being entered in UPPER CASE, thus the user must enter their password in UPPER CASE upon logging on to On-Staff.
Directory: Your vendor has already determined the setting for this field, therefore, leave this field at its default setting. This is the directory used as a place holder for temporary files.
Category: This field is used for the Category Code that will be automatically assigned when adding a new patient to On-Staff. If left blank, On-Staff will force the user to enter an existing /Utility/Category <Category Code> or prompt if you would like to add a new one.
Facility: This field is used for the Facility Code that will be automatically defaulted when posting charges. You may enter the /Utility/Facility <Facility Code> for the place of service where the majority of charges are encountered or leave this field blank in which case On-Staff will force the user to enter an existing Facility Code.
Provider: This field is used for the Provider Code that will be automatically defaulted when posting charges. You may enter the /Utility/Provider <Provider Code> or in the case of several providers, leave this field blank, in which case On-Staff will not allow the user to continue entering charges without entering a valid Provider Code.
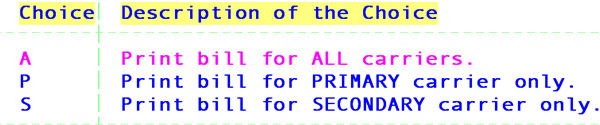
(A/P/S): This field determines the insurance carrier(s) billed when printing claims (not electronic claims submission) from the charge screen (not from the billing screen). Pressing the [F2] search key will display the following choices:
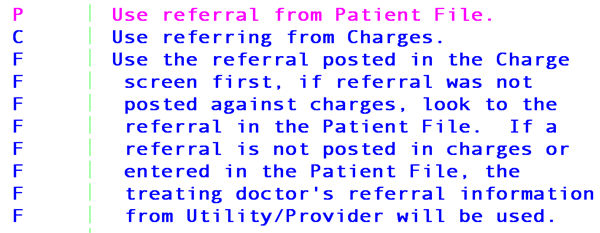
(P/C/F): This field determines where in On-Staff the referring doctor's information will be extracted for billing and referral reports. Pressing the [F2] search key will display the following
Guarantor This option allows On-Staff to automatically add or modify a dependent's information based on the guarantor's. Pressing the [F2] search key will display the following choices:
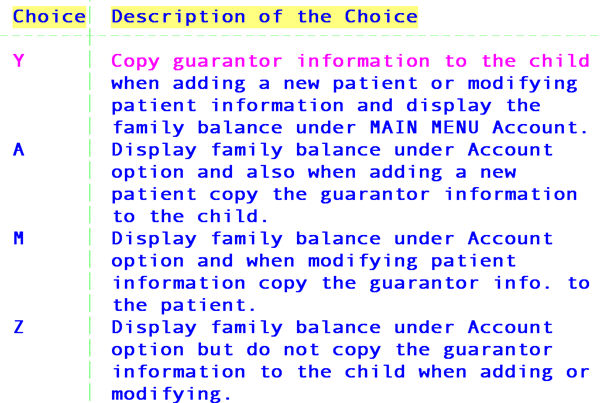
NOTE: Dependent and guarantor /New Patient <Category> SHOULD ALWAYS MATCH (i.e., be the same).
(Y/N): This field is used to determine whether a source of payment list is displayed when the payment screen is accessed. Pressing the [F2] search key will display the following choices:
Y - Show all payment sources when posting payments (this option will place a source of payment/adjustment code in by default).
N - Do not show payment sources when posting payments (the source of payment/adjustment codes must be typed in).
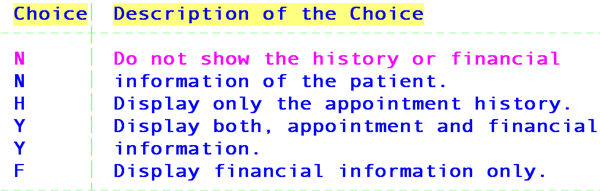
History: Allows you to choose what will be displayed at the time of booking an appointment. Press the [F2] search key to display the following valid choices:
Prep. Notes: For appointment types that require specific instructions, this option will allow the display of those instructions in the comment area of the patient’s appointment screen at the time the appointment is made. Pressing the [F2] search key will display the following choices:
Y - When making an appointment for a patient the system will copy notes into the comment area of the patient’s appointment screen when the appointment type selected is defined under /Utility/Messages/Message. Prior to using this option, prep notes must be added under /Utility/Messages/Message. The field <Message Code> in /Utility/Messages/Message must match the field <Appointment Type> in /Utility/Set Up/Appointment /Appointment Type for the appointment being made.
N - Prep. Notes are not set up at /Utility/Messages/Message.
Super Bill
Sort (A/N/D/P): The entry in this field selects the sorting of printed superbills when printing from either Main Menu/Schedule/Appointment/Print or Main Menu/Schedule/Appointment/Super Bill. If this field is left blank, the sorting default will be account number. Pressing the [F2] search key will display the following choices:
'0
'; A - Account number.
N - Patient name.
D - Date of service.
P - Provider.
Reminder
Setup (Y/N/X): This option allows a user to immediately view upon logging into On-Staff reminders they have entered in patients’ ledgers. Pressing the [F2] search key will display the following choices:
Y - Display all the ledger remarks that meet the following criteria prior to displaying the Main Menu when logging into On-Staff:
1: The Flag is set to X.
2: The Reminder date is the same as the calendar date at login.
3: Reminders were entered by the current operator logging on.
N - Do not display the ledger remarks when logging into On-Staff (you may still access these remarks by going into /Ledger/Collection).
Number of Cycle: In conjunction with the Parameter field <Statement Cycle> Y or X (see page I-2-15), this option sets the frequency with which statements are to be printed. Sample field entries are:
NOTE: The assumption is a 28 day month.
2 Two statement cycles per month
Cycle 1- from the 1st to the 15th of the month
Cycle 2- from the 16th to the 28th
3 Three statement cycles per month
Cycle 1- from the 1st to the 10th of the month
Cycle 2- from the 11th to the 20th of the month
Cycle 3- from the 21st to the 28th
4 Four statement cycles per month
Cycle 1- from the 1st to the 7th of the month
Cycle 2- from the 8th to the 14th of the month
Cycle 3- from the 15th to the 21st of the month
Cycle 4- from the 22nd to the 28th
5 Five statement cycles per month
Cycle 1- from the 1st to the 6th of the month
Cycle 2- from the 7th to the 12th of the month
Cycle 3- from the 13th to the 18th of the month
Cycle 4- from the 19th to the 24th of the month
Cycle 5- from the 25th to the 28th
28 Statements printed on a daily basis. The first cycle of each month will contain patient’s registered into On-Staff on the 29th, 30th and 31st , this will be your largest in volume.
The following fields set the defaults for like fields in the /New Patient/Labels screen.
How Many Labels: This field sets the default for /New Patient/Labels <How Many Per Patient>. Enter the number of labels that are to print for each patient.
How Many Lines: This field sets the default for /New Patient/Labels <How Many Lines Per Label>. Enter the total number of lines per label (i.e., NOT the number of lines that will print BUT the TOTAL number of lines the label is capable of printing. Refer to the box the labels came in)./ Set Up / Parameter
Label Width: This field sets the default for /New Patient/Labels <Width of Each Label>. Enter the width of each label in characters (i.e., NOT in inches but the total number of printable characters from left to right per label. Refer to the box the labels came in). Normally this is 40 to 42 characters for a 2-column page of labels or 26 to 28 for a 3-column page of labels.
How Many Across: This field sets the default for /New Patient/Labels <How Many Across>. Enter the number of columns per page from left to right.
After the last field has been entered, the cursor will return to the Ledger (A/N) field, allowing the user to review the changes made. Once the changes are satisfactory press [“] and On-Staff will return to the Clinic No. field, allowing modification of an additional clinic if desired. Pressing [“] again will return the cursor the Parameter Menu.