
OnSTAFF 2000
Main Menu/Schedule/Appointment
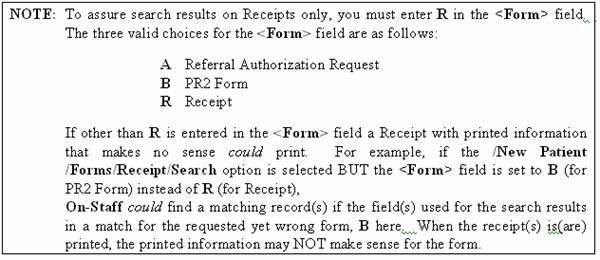
RECEIPT
The Receipt and the Report option provide the ability to record money received and print a receipt and/or print a report showing the money received. Money entered here will NOT affect the financial status of the patient, doctor or clinic. The Receipt Menu is accessed from the /New Patient/Forms Menu as well as the /Schedule/Appointment Menu. The Report option is accessed from the Receipt Menu.
![]()
Receipt Allows the user to log the patient's account number, patient name, payment for date(s) of service, amount received, payment method, and collected by information. Money entered through this option will not affect the financial status of the patient, doctor or practice. Once the information is entered, the Search option allows the user to print a receipt.
Report When Report is selected, On-Staff will prompt for Clinic No., From and To Date range, Completed By or * for All, Payment Method or * for All, and Printer ID. This information will print under the report headings (Receipt) Date, Account #, Patient Name, Amount Recd, Payment Method, and Total amount received for the requested criteria.
Adding a Receipt
When the Receipt option is selected from the /New Patient/Forms or /Schedule/Appointment Menu, On-Staff will display the following:
![]()
Menu Options:
Add Add a new receipt.
Search Search for an existing receipt. Once found, Modify, Delete or Print.
Report Print a receipt report.
Exit Return to the /New Patient/Forms or /Schedule/Appointment Menu.
When the Add option is selected, On-Staff will display the following screen:

Form: Enter R always.
Date: Enter the date of the payment as MM/DD/YY (e.g., 09/08/00).
Acct#: Enter the patient's account number.
Patient Name: Automatically displayed.
Payment for
Date(s) of Service: Enter the date(s) of service the patient is making the payment for. (This is a "free" field. Some examples of entries are: 07/13-16/00, July 3 through 16, 07/03/00 - 07/16/00.)
Amount
Received: Enter the amount received (e.g., 5.00).
Payment
Method: Enter the payment method (e.g., CASH, CC (credit card),VISA, etc.). (The Report can be requested for a specific payment method or for all payment methods.)
Collected By: (Optional but strongly suggested.) Enter the initials (e.g., JAM) of the person who collected the payment. (The Report can be requested for a specific collector or for all collectors. If you want to obtain a separate report for the morning patients and the afternoon patients, you may consider entering 1 (or am) after the collector's initials to denote the morning patients or 2 (or pm) to denote the afternoon patients (e.g., JAM 1, JAM1, JAMam, JAM2, JAMpm, etc.). Doing so will allow more flexibility in obtaining reports more selectively.)
After pressing [Enter] On-Staff will return to the <Form> field. To exit the screen, press the [End] or [é] (up arrow) key.
Searching for, Viewing, Modifying, Deleting, and Printing a Receipt
The /Receipt/Search option allows you to search using any combination of fields from the search screen. Once found, the user may view, modify, delete or print a receipt for a specific patient or all patients displayed.
When the Search option is selected, On-Staff will display the RECEIPT screen.
To search, complete the field(s) with the desired information, press [Enter], then press [End] to start the search. When a match cannot be found, On-Staff will display the following prompt:
Could not find a matching record. Press any key to continue.
When only one match is found, On-Staff will display the following:
![]()
File1:
record 1 of 1 On-Staff has found one match and is displaying that record.
Modify: Allows you to modify the information on the displayed record.
Delete: This option will delete the displayed record. When the delete option is selected, On-Staff will display the following prompt:
Would You Like To Proceed? (y/n)
Y After pressing [Enter] On-Staff will delete the currently displayed record and return to the menu.
N After pressing [Enter] On-Staff will return to the menu.
Print: When the Print option is selected, On-Staff will display the following prompt:
Enter your print out destination or Return for default? HP
Exit: Returns to the Receipt Menu.
When more than one match is found, On-Staff will display the following:

File1:
record 1 of 14 On-Staff has found fourteen matches and is displaying the first record of fourteen.
Next: Will display the next record.
Previous: Will display the previous record.
First: Will display the first record.
Last: Will display the last record.
Modify: Allows you to modify information on the displayed record.
Delete: Allows you to delete the displayed record. When the delete option is selected, On-Staff will display the following prompt:
Would You Like To Proceed? (y/n)
Y After pressing [Enter] On-Staff will delete the currently displayed record and will display the next record.
N After pressing [Enter] On-Staff will continue displaying the currently displayed record and return to the menu.
NOTE: There is no tracking of deleted receipts.
Print One: Will print the Receipt form for the displayed record/patient. When the Print One option is selected, On-Staff will display the following prompt:
Enter your print out destination or Return for default? HP
Print Set: Will print a separate PR2 Form for each record/patient displayed in this set (fourteen (14) in this example). When Print Set is selected, On-Staff will display the following prompt:
Enter your print out destination or Return for default? HP
Exit: Returns to the Receipt Menu.