
OnSTAFF 2000
UTILITY/SET UP/
PRINTER MENU

Menu Options:
Devices This area will be maintained by your vendor.
Capability This area will be maintained by your vendor.
Report Setup This option contains the definition of On-Staff report formats.
Report Step two for adding new users and their default Report printer destinations.
Exit Returns you to the Printer Menu.
Set Up/Printer/REPORT SETUP
This option allows you to define the paper tray, print size, portrait or landscape, form feed, length, width, code for customized forms, priority status, and number of copies for each report throughout On-Staff.

Menu Options:
Add (please contact your vendor for assistance)
Modify (please contact your vendor for assistance)
Delete (please contact your vendor for assistance)
View Allows you to view the Report Setup for a specified Printer Class.
Copy (please contact your vendor for assistance)
Exit Returns you to the Printer Menu.
When the Add, Modify, Delete or View option is selected, On-Staff will display the following fields:
Printer
Class HP for laser printers, printer for dot matrix printers.
C Command column. Press the [F2] search key to display the following valid choices:
|
Choice A M D |
Description of the Choice Add Report Setup Modify Report Setup Delete Report Setup |
REP# Report number. This value should not be changed since it is a unique number assigned to each report throughout On-Staff .
DESCRIPTION This field should not be changed since it is a unique name assigned to each report throughout On-Staff.
TRAY This option is available for laser printers equipped with two separate paper trays. Placing T1 in this field will pull the paper from the top tray, T2 will pull the paper from the bottom tray for this particular report.
CON. This field defines whether or not this report is to print in condensed format (small print) or regular. The value entered in this field is the code defining the condensed print command from /Utility/Set-up/Printer/Capability. Please call your vendor for assistance.
LS. This field defines whether or not this report is to print in Portrait (regular) or Landscape format. The value entered in this field is the code defining the landscape printer command from /Utility/Set Up/Printer/Capability.
FF. This field contains the code defining the printer form feed command. This value is also defined under /Utility/Set Up/ Printer/Capability.
LENGTH This field defines the line length for this particular report.
WIDTH This field defines the report width (in characters) for this particular report.
CODE This is used to define the form code for customized laser forms.
PRI This field allows prioritization of this particular report. 1 (one) is the highest level of priority, 20 (twenty) the lowest. A 0 (zero) value in this field will default to 20.
COPY This field defines the number of copies to be printed whenever this particular report is requested for printing. A 0 (zero) value in this field will default to 1.
To exit this option, with the cursor at any point in the C (command) column, press Q and On-Staff will return to the Printer Class field allowing modification of an additional Printer Class if desired. Press [“] and On-Staff will return to the Report Setup Menu.
NOTE: Some reports and forms will force the printer to feed a blank page after the report/form has completed printing. To eliminate the blank page, go to /Utility/Set Up/Printer/Report Setup and choose Modify. Type in the Printer Class (HP for laser printers, printer for dot matrix printers). With the cursor next to the report or form you wish to change, from the C (command) column type M (to modify) and press [Enter] until the cursor is resting in the FF column. Type FE in this column. Press [Enter] until the cursor returns to the C (command) column. Press Q to quit. This will eliminate a form feed the next time the report or form is printed.
/SET UP/PRINTER/REPORT SETUP/Copy
Maintained by your vendor.
Set Up/Printer/REPORT

Report is the second step in adding users to On-Staff (/Set Up/Security/Login Users is the first step, log on with the users password to verify access is the third). This option allows the set up of default printers tied to the user’s password and is the second step when adding a user to On-Staff. The default printer will follow the user to each terminal on On-Staff, using the logic that a user on On-Staff will sign in to other terminals (using their password) as the need arises.

Menu Options:
Add Add a printer Report set up.
Modify Modify an existing printer Report set up.
View View an existing printer Report set up.
Exit Returns you to the Printer Menu.
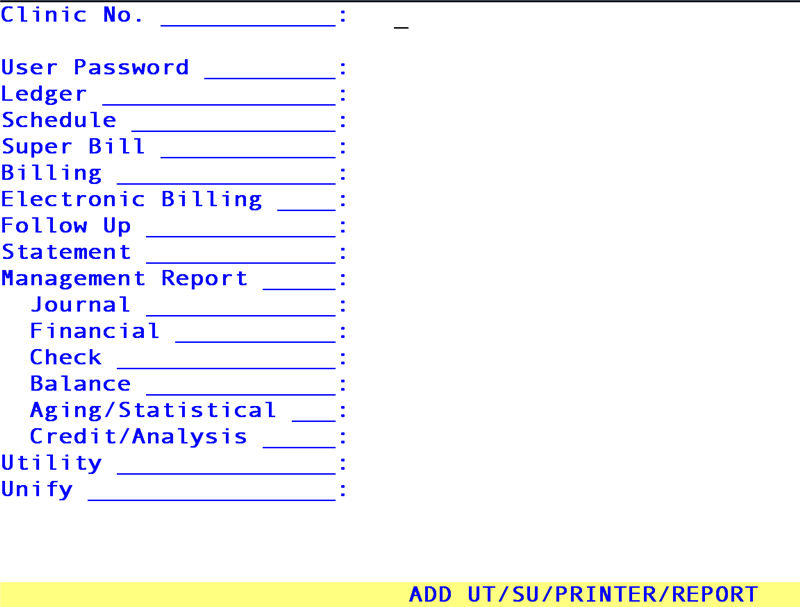
To set up default printers, select the Add option. On-Staff will display the following fields:
Clinic No: Enter the clinic number.
User Password: Enter the password of the user.
For the remaining fields, enter the user-defined code for the printer destination desired for each listed report (HP, printer, IBM, etc.).
After the last field has been entered, the cursor will return to the User Password field, allowing the user to review the information entered. If accurate press [“] and the cursor will return to the Clinic No. field, allowing additional set up if desired. Pressing [“] again will return to the Report Menu.