
OnSTAFF 2000
Schedule/Appointment/SUPER BILL
Super Bill allows the scheduler to print super bills (i.e., charge tickets, fee slips, etc.) in advance for patients with a scheduled appointment for the requested date or range or dates OR on demand as the patient arrives for their appointment, specifying the date, patient and doctor. When the Super Bill option is selected On-Staff will display the following:
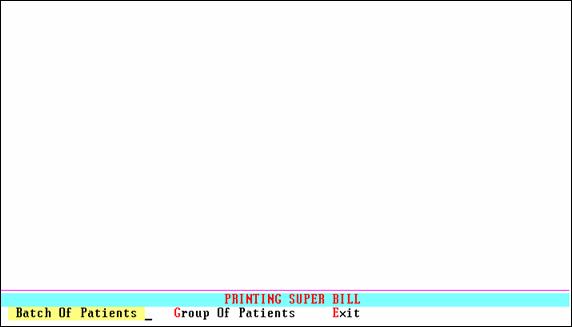
Menu Options:
Batch of Patients: This option will print a Super Bill on demand for the requested date, for one account number or specific account numbers not in sequence, for the requested provider and if desired, an additional form.
Group of Patients: This option will print Super Bills for patients scheduled for the date(s) requested.
Exit: Returns to the Appointment Menu.
Appointment/Super Bill/BATCH OF PATIENTS
Batch of Patients allows the scheduler to request on demand Super Bills for a specific date of service, one or more patients whose account numbers are individually entered, for the requested provider and any additional form such as a registration or special form. When the Batch of Patients option is selected On-Staff will display the following:
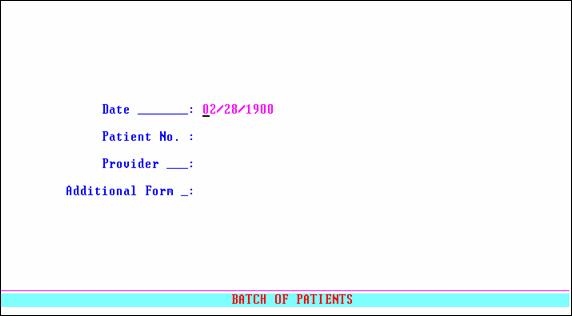
Date: Enter the date (appointment date) you want to print on the super bill. When posting charges this date will default as your date of service.
Patient No: Enter the patient’s account number OR if you do not know the account number you may search from this field by entering the patient’s full name (last name, first name) or search using the Wild Card search method (see Session I Getting Around On-Staff regarding Search Methods). After selecting the accounts for which you want super bills printed for, pressing [Enter] will move the cursor to the next field.
Provider: Enter the /Utility/Provider <Provider Code> of the physician this patient will be seeing. When posting charges this code will default as your provider of service. Pressing [Enter] will return the cursor to the Patient No. field to request printing an additional SuperBill for the same date but another patient and the same or different provider. When the selection process is complete, press [“] at the Patient No. field to continue with the next step in printing.
Additional Form: Enter a form code and On-Staff will print the selected form in addition to the super bill for each patient entered. Multiple choices may not be entered. Pressing the [F2] search key will display the following valid choices, although you may have programmed additional forms (such as authorization forms) to print from here.
AL Attorney Lien.
DE Data Entry Sheet.
DR Declaration of Readiness.
EP Employee’s Permanent Disability Questionnaire.
NQ Notice of QME Unavailability.
QN QME Appointment Notification Form.
QT QME Time Frame Extension Request.
QA Qualified or Agreed Medical Examiner’s Findings Summary.
RS Request for Summary Determination.
RW Return to Work Certificate.
W1 Worker’s Comp. Visit Encounter Form.
WIEF Visit Encounter Form.
After entering a form code OR leaving the field blank if no additional for is needed, press [Enter] and On-Staff will display the following message:
Enter your print out destination or Return for default? HP
To accept the default printer (in the above example: HP) press [Enter]. To see your printer options press [Space Bar] once to clear the field, then press [Enter]. The printer destinations for your system will be displayed. At this point, highlight the desired printer and press [Enter]. The system should beep once to signify that the process is going to the printer.
If the system beeps twice the print job has failed. To determine the reason the print job failed access the SYSTEM STATUS OPTION by holding down the [Ctrl] key and typing X. For more information on this topic, please see Session I training documents regarding Control X.
NOTE: Verify that fonts and forms are loaded before you print Super bills.
After selecting your printer and pressing [Enter] On-Staff will return to the Appointment Menu.
Appointment/Super Bill/GROUP OF PATIENTS
Group of Patients allows the scheduler to request the printing of Super Bills (i.e., charge tickets, fee slips, etc.) for all patients who have scheduled appointments on the date(s) specified. When the Group of Patients option is selected On-Staff will display the following:
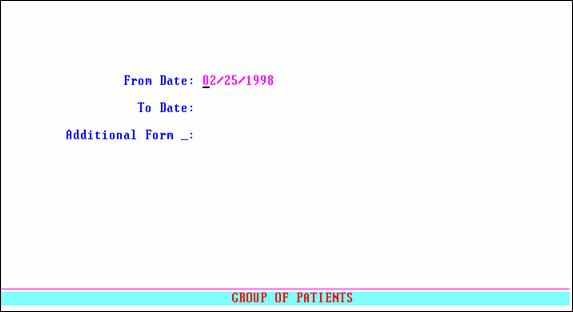
From Date: Allows the scheduler to order super bills for all patients with scheduled appointments From the entered date.
To Date: Allows the scheduler to order super bills for all patients with scheduled appointments To the entered date.
Additional Form: Enter a form code and On-Staff will print the selected form in addition to the super bill for all patients with scheduled appointments From and To the dates entered. Multiple choices may not be entered. Pressing the [F2] search key will display the following valid choices, although you may have programmed additional forms (such as authorization forms) to print from here.
AL Attorney Lien.
DE Data Entry Sheet.
DR Declaration of Readiness.
EP Employee’s Permanent Disability Questionnaire.
NQ Notice of QME Unavailability.
QN QME Appointment Notification Form.
QT QME Time Frame Extension Request.
Appointment/Super Bill/GROUP OF PATIENTS continued
QA Qualified or Agreed Medical Examiner’s Findings Summary.
RS Request for Summary Determination.
RW Return to Work Certificate.
W1 Worker’s Comp. Visit Encounter Form.
WIEF Visit Encounter Form.
After entering a form code OR leaving the field blank if no additional for is needed, press [Enter] and On-Staff will display the following message:
Enter your print out destination or Return for default? HP
To accept the default printer (in the above example: HP) press [Enter]. To see your printer options press [Space Bar] once to clear the field, then press [Enter]. The printer destinations for your system will be displayed. At this point, highlight the desired printer and press [Enter]. The system should beep once to signify that the process is going to the printer.
If the system beeps twice the print job has failed. To determine the reason the print job failed access the SYSTEM STATUS OPTION by holding down the [Ctrl] key and typing X. For more information on this topic, please see Session I training documents regarding Control X.
NOTE: Verify that fonts and forms are loaded before you print Super bills.
After selecting your printer and pressing [Enter] On-Staff will return to the Appointment Menu.