
Intellect™
ACCOUNT MENU OPTIONS

Account
This menu option is used to search for and view family accounts. Although the <Patient Name> field is used most of the time, the screen provides an area to enter other search parameters (<Chart>, <Category>, <Insurance>, <A/R>, and <DOB> range) that may be used alone or in any combination to return a multi-line display showing linked accounts (family or common guarantor). All linked accounts are grouped together with an indicator marking the guarantor (-), dependant accounts (+), and the grouping total (=). Non-linked account types display, but only have individual lines. See sample below.
The screen offers the option to use buttons or Command Column keystrokes to access several registration and ledger screens.
1. To display the Account screen in Intellect, go to Account --► Account:

The ACCOUNT screen displays:

2.1 Enter the Patient Name, OR type up to 6 characters of the last name and press the [F2] key.
2.2 To select the code from the list, either highlight the record and press the [Enter] key, OR double-click on the record.
2.3 Press [Enter] all the way through the search portion to return the results in the multi-line display, add more parameters, OR leave blank to search with a different entry(s).
2.4 The focus always begins with this field. To bypass this field and leave it blank, use a mouse or the system generates this prompt when pressing [Enter] or [Tab]:
Select [Ok] to return the focus to the <Patient Name> field.
3. Chart 
3.1 To search by chart number, OR to include it in the search with other parameters, type the desired number.
4.1 To search by patient category, OR to include it in the search with other parameters, type the desired Utility --► Category <Category Code>.
4.2 Enter the <Category Code>, OR type up to 6 characters of the name and press the [F2] key. To select the code from the list, either highlight the record and press the [Enter] key, OR double-click on the record. OR, after clearing the field, press the [F2] key twice to view the entire list of codes. For more information on Searching screens in this documentation, see Intellect Characteristics and Features: Searching.
5. Insurance 
5.1 To search by insurance company, OR to include it in the search with other parameters, type the desired Utility --► Insurance --►Insurance <Insurance Co. Code>.
5.2 Enter the <Insurance Co Code>, OR type up to 6 characters of the name and press the [F2] key. To select the code from the list, either highlight the record and press the [Enter] key, OR double-click on the record. Or, after clearing the field, press the [F2] key twice to view the entire list of codes. For more information on Searching screens in this documentation, see Intellect Characteristics and Features: Searching.
6. A/R 
6.1 To search by patient balance, OR to include in the search with other parameters, type the balance amount.
7.1 To search by a beginning DOB, OR to include it in the search with other parameters, type the earliest date of birth.
7.2 Include with <DOB To> to create a range of birth dates.
8. DOB To 
8.1 To search an ending DOB, OR to include it in the search with other parameters, type a date of birth to serve as the latest date.
8.2 Include with <DOB From> to create a range of birth dates.
Press [Enter] to display the multi-line table:
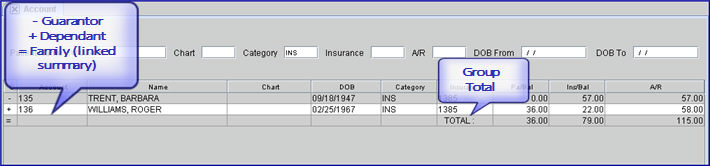
All linked accounts are grouped together with an indicator marking the guarantor (-), dependant accounts (+), and the grouping total (=).
Column Definitions
9. C ![]()
9.1 Initially, the focus is in the 'C' column in the top left of the multi-line table.
9.2 This column and the buttons at the bottom of the screen are for navigation.
9.2.1 Press [F2] with the focus anywhere in the multi-line table to display Key's Help. Type any of the following keystrokes into the C column to open the indicated screen, clear the table, and return the focus to the <Patient Name> field, OR send the focus to the buttons:
9.2.2 Right-click with the focus anywhere in the multi-line table to display these menu options:
These options perform the same functions as their matching action buttons in the Choices section at the bottom of the screen; i.e., [Add Patient], [Modify Patient], [View Patient], [Open Ledger], and [Accounting Ledger].
10. Account ![]()
10.1 Displays the <Patient Account No.> as shown in Registration --►Regular --►Patient or Registration --►Worker --►Worker.
11. Name ![]()
11.1 Displays the patient's name as Last, First.
12. Chart ![]()
12.1 Displays the patient's chart number.
13. DOB ![]()
13.1 Displays the patient's date of birth.
14. Category ![]()
14.1 Displays the Utility --► Category <Category Code> as currently entered in the patient's <Category> field.
15. Insurance ![]()
15.1 Displays the Utility --► Insurance --►Insurance <Insurance Co Code> as currently entered in Registration --► Patient/Worker Insurance <Insurance Company Name>.
16.1 Displays the unpaid charges that are the responsibility of the patient ('G' in the Who column ledgers).
16.2 Displayed by individual accounts with a family total.
17. Ins/Bal ![]()
17.1 Displays the unpaid charges that are the responsibility of the insurance carrier ('P' or 'S' in the Who column ledgers).
17.2 Displayed by individual accounts with a family total.
18.1 Displays total unpaid charges
18.2 Displayed by individual accounts with a family total.

19.1 [Add Patient] goes to the Registration --►Regular --►Patient --►Add screen where a new patient may be added. If Utility --► Set Up --►Parameter <Check Duplicate Pt> = 'Y,' the system checks for duplicate accounts (which is highly recommended).
Press [Enter] to move the focus to the next field to display the search screen:
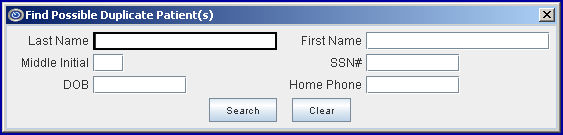
19.1.1 Pressing [ESC] bypasses this search. See more on Duplicate Patient.
19.1.2 After entering the new patient information, click [Add] to save your entries, [Clear] to clear all fields on the screen, OR click [Exit] to return to the Account screen without saving changes.
After selecting [Clear] or [Exit], this pops up:
• Click [Yes] to save the changes.
• Click [No] to NOT save the changes. Intellect returns to the Account screen.
• Click [Cancel] to return the focus to the Add Patient screen. Any changes that were made are still reflected on the screen.
19.2 [Modify Patient] goes to the Registration --►Regular --►Patient --►Modify screen where information may be modified or added as needed for the selected patient. Changes to insurance may also be made at this time. After entering modifications, click [Modify] to save your changes, [Clear] to clear all fields on the screen, OR click [Exit] to return to theAccount screen without saving changes.
After selecting [Clear] or [Exit], this pops up:

• Click [Yes] to save the changes.
• Click [No] to NOT save the changes. Intellect returns to the Account screen.
• Click [Cancel] to return the focus to the Modify Patient screen. Any changes that were made are still reflected on the screen.
19.3 [View Patient] goes to the Registration --►Regular --►Patient --►View screen where information may be viewed for the selected patient. Click [Clear] to clear all fields on the screen, OR click [Exit] to return to the Account screen.
19.4 [Open Ledger] goes to the Ledger --►Open Item screen where information may be modified or added as needed for the selected patient. After entering modifications, click [Modify] to save your changes. See Ledger --►Open Item for additional information for this screen.
19.5 [Accounting Ledger] goes to the Ledger --►Accounting screen where information may be modified or added as needed for the selected patient. After entering modifications, click [Modify] to save your changes. See Ledger --►Accounting for additional information for this screen.
19.6 [Cancel] exits from the Account screen and returns to Intellect's main menu.


