
Intellect™
LEDGER MENU OPTIONS

Open Item
Display
This menu option displays charge activity in DATE OF SERVICE order, with payments and adjustment listed below the charges to which they were posted. It tracks:
• Detailed history of the charges, payments, and adjustments posted to the patient’s account
• Patient and total balances with aging group breakdown
• Automatic remarks added when billing, statements, letters, and forms are generated
• User-added remarks
In this Topic Hide
Video Available: Click Ledger to access the link. Depending on the system set up, the media player may need to be activated. Speakers need to be attached to the workstation to hear the instructions.
Note: To view the videos, log-in through the www.primeclinical.com website. Current support is required.
For this menu, the security level defaults for the options of Add, Modify, Delete, and View are set as ADD-50, MODIFY-40, DELETE-60, and VIEW-10. Security level defaults may be modified based on particular needs. For Utility --►Set Up --►Security --►Login Users <Security Level> Security Level Group (1, 2, 3, 4), the recommended starting security levels are Administrators-99, Billers-60, and Front Desk/Reception-40. Security Groups used to limit menu access are determined by daily tasks.
Security Groups are added and maintained in Utility --► Set Up --►Menus --►Programs where every function is assigned to a Security Group with a security level. See the online documents Setting Security In Intellect and/or Security Groups: Understanding and Setting Up.
Additionally, Prime Clinical offers webinars/workshops on a variety of topics. For more information, contact PCS support.
Effective version 9.12.32 - New Feature.
As of version 9.12.32, the Ctrl-C keys may now be used to copy the fields in the second portion of the Accounting and Open Item screens (from the <Home> field through the <Group4> field) for use in Excel, Word, etc. For example, to not have to re-type the subscriber number, place the pointer in <Sub No> field, click and drag the pointer to highlight the number, and press Ctrl-C to copy it. Now, if in Excel, Word, etc. just paste the subscriber number into the new document.
1. To display the patient's Open Item Ledger in Intellect, go to Ledger --► Open Item --► Display
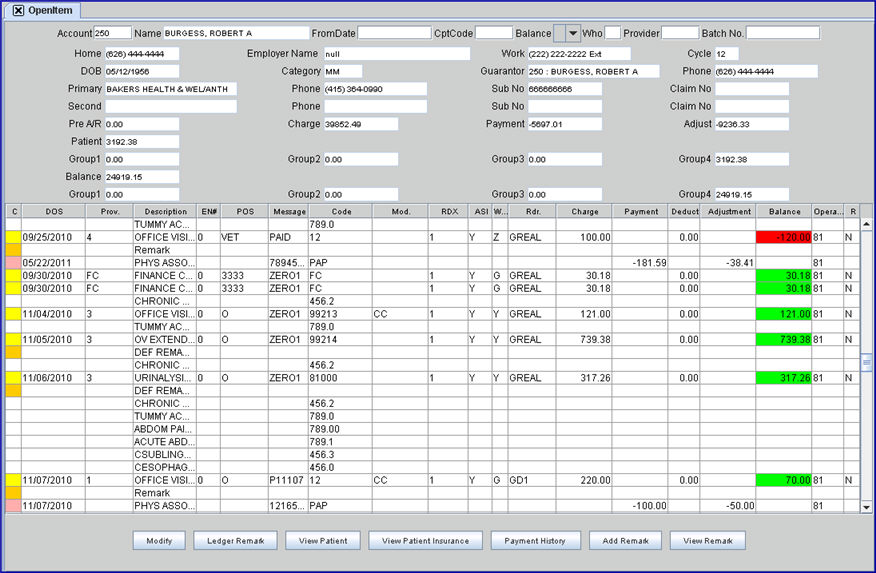
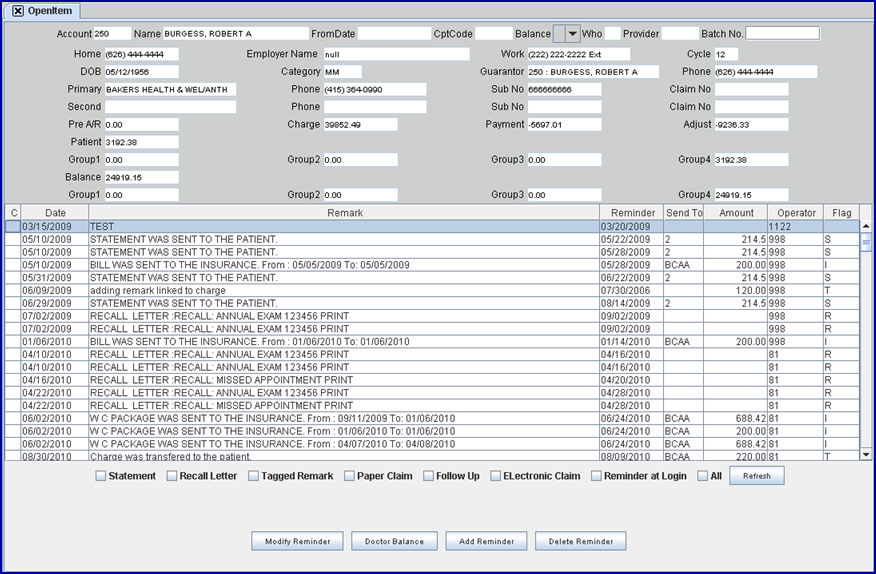
The OpenItem screen displays:
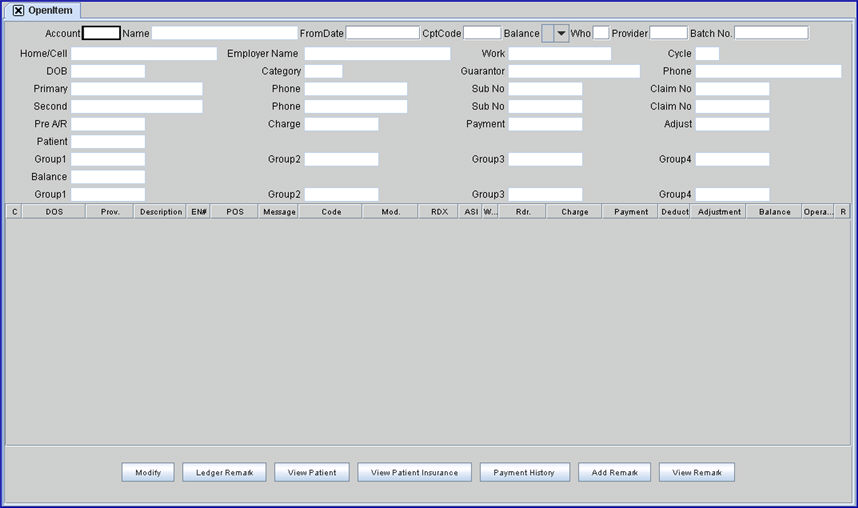
2.1 Enter the account number of the patient to be viewed
2.2 If the system defaults a recent Patient Number, either accept the number OR use the [Spacebar] or [Backspace] to clear the field and enter the desired number.
2.3 Effective version 9.12.18 - New Feature: Fill-in just the patient's <Account> field and the <FromDate> field, skip the <CptCode>, <Balance>, <Who>, <Provider>, and <Batch No> fields, and the desired information is displayed on the screen. This ability is available through the use of the new <Skip Ledger Criteria> field (added in version 9.12.18) on the Utility --►Set Up --►Parameter screen. For more information on setting up this feature, refer to Utility --►Set Up --►Parameter <Skip Ledger Criteria>.
3. Name 
3.1 The patient name displays Last, First. This is a read-only field and may not be modified.
4.1 If desired, enter the beginning date of service for transactions to view.
4.2 Leave this blank to view all patient transactions.
4.3 Effective version 9.12.18 - New Feature: Fill-in just the patient's <Account> field and the <FromDate> field, skip the <CptCode>, <Balance>, <Who>, <Provider>, and <Batch No> fields, and the desired information is displayed on the screen. This ability is available through the use of the new <Skip Ledger Criteria> field (added in version 9.12.18) on the Utility --►Set Up --►Parameter screen. For more information on setting up this feature, refer to Utility --►Set Up --►Parameter, <Skip Ledger Criteria>.
4.4 Effective version 18.06.01, this field works in conjunction with the Ledger --►Collection Report <Min Patient Balance> field.
5. CptCode 
5.1 If desired, enter a specific CPT code to view only that procedures' related activity.
6. Balance 
6.1 If desired, select from the drop-down list to view only the transactions with the specified balance OR leave blank to request all records.
P = all balances greater than '0'
N = all balances less than '0'
Z = all balances equal to '0'
7. Who 
7.1 If desired, enter a specific Who code to view only the transactions involving that payer.
7.2 Effective version 18.06.01, this field works in conjunction with the Ledger --►Collection Report <Min Patient Balance> field.
8. Provider 
8.1 If desired, enter a specific Utility --►Provider <Provider Code> to view only the transactions involving that provider.
8.2 Effective version 13.04.10: This field accepts 20 characters, and more than one doctor code may be entered, separated by commas with no spaces. For example:
 .
.
9.1 This field is used to limit the amount of items displayed.
9.1.1 For example, enter 20 in this field to display only those payments entered in batch number 20.
9.2 The Batch No. can be either alpha or numeric.
9.3 The Batch No. can be set up from either the Payment or Charges option.
9.3.1 If payments have been entered into the system with a batch number, the batch number displays in the <Batch No.> field when moving up and down the table.
9.3.2 The <Batch No.> is also shown in the last column of the Journal Report when it is saved as an Excel file.
9.4 Press [Enter] to populate the rest of the header display data and adds a multi-line table.
At this point, after entering the desired search parameters, Intellect completes the remaining fields and, if results are returned, displays either the Multi-Line Table Display or this message:
Select [Yes] to display the Ledger Remark Multi line Table Display
Select [No] to return the focus to the <Account> field.
10. Home 
10.1 Effective version 19.04.12, this field was changed from <Home> to <Home/Cell> and now displays the patient's Registration --► Patient <Cell Phone No> after the Registration --► Patient <Home Phone No>. For example:

10.2 In versions prior to 19.04.12, the patient’s home phone number displays based on information completed on the Patient Registration screen <Home Phone No> field.
11. Employer Name 
11.1 The patient’s employers name displays based on information completed on the Patient Registration screen <Employer Name> field.
12. Work 
12.1 The patient’s work phone displays based on information completed on the Patient Registration screen <Phone> field.
13.1 If Utility --► Set Up --► Parameter <Cycle> = 'Y,' Intellect displays a value based on the patient’s registration date.
13.2 Effective version 9.12.30 - Modification: When using family statements, the Ledger <Cycle> displays the Guarantor's Cycle Number. The reason for the change is because family statements always print for all family members on one statement using the Guarantor's Cycle number, not the individual patient's cycle number. Therefore, it is less confusing when looking at the Ledger screen of the patient to know when the next statement is generated.
14.1 The patient’s date of birth displays based on information completed on the Patient Registration screen <DOB> field.
15. Category 
15.1 The patient’s Utility --► Category displays based on information completed on the Patient Registration screen <Category> field.
16. Guarantor 
16.1 The patient’s Guarantor's account number and name (shown Last name, First) displays based on information completed on the Patient Registration screen <Guarantor> (account number) field.
17. Phone 
17.1 The patient’s Guarantor’s phone number displays based on information completed on the Patient Registration screen <Phone> (Guarantor) field.
18. Primary 
18.1 The primary insurance company name displays based on information completed on the Registration --► Patient Insurance screen <Insurance Company Name> field.
19. Phone
19.1 The primary insurer's phone number displays based on information completed on the Registration --► Patient Insurance screen <Phone> field for the primary insurer.
20. Sub No 
20.1 The subscriber number displays based on information completed on Registration --► Patient Insurance screen field <Subscriber No> for the primary insurer.
21. Claim Number 
21.1 The claim number displays based on information completed on Registration --► Patient Insurance screen field <Claim No> for the primary insurer.
22. Second 
22.1 The insurance company name displays based on information completed on Registration --► Patient Insurance screen field <Insurance Company Name> for the secondary insurer when available.
23. Phone
23.1 The insurance company phone number displays based on information completed on Registration --► Patient Insurance screen field <Phone> for the secondary insurer when available.
24. Sub No 
24.1 The subscriber number displays based on information completed on the Registration --► Patient Insurance screen <Subscriber No> field for the secondary insurer when available.
25. Claim No 
25.1 The claim number displays based on information completed on the Registration --► Patient Insurance screen <Claim No> field for the secondary insurer when available.
26. Pre A/R 
26.1 This field, which is rarely populated, shows account discrepancies.
27. Charge 
27.1 This field displays the total of all charges for the selected <FromDate> forward.
27.2 Data is from committed charges on the Charges --► Charge screen.
28. Payment 
28.1 This field displays the total of all payments for the selected <FromDate> forward.
28.2 Data is from committed payments on the Payment --► Open Item screen.
29. Adjust 
29.1 This field displays the total of all adjustments for the selected <FromDate> forward.
29.2 Data is from committed adjustments on the Payment --► Open Item screen or the Charges --► Charge screen.
30. Patient 
30.1 This field displays the total of all unpaid charges that are the responsibility of the patient (guarantor).
30.2 Effective version 18.06.01, this field works in conjunction with the Ledger --►Collection Report <Min Patient Balance> field.
31. Group1 
31.1 This field displays the total of all unpaid charges that are the responsibility of the patient (guarantor) that fall within the aging period designated in Utility --► Category <Aging Group 1>.
32. Group2 
32.1 This field displays the total of all unpaid charges that are the responsibility of the patient (guarantor) that fall within the aging period designated in Utility --► Category <Aging Group 2>.
33. Group3 
33.1 This field displays the total of all unpaid charges that are the responsibility of the patient (guarantor) that fall within the aging period designated in Utility --► Category <Aging Group 3>.
34. Group4 
34.1 This field displays the total of all unpaid charges that are the responsibility of the patient (guarantor) that fall within the aging period designated in Utility --► Category <Aging Group 4>.
35.1 This field displays the total of all unpaid charges that are the responsibility of the patient’s insurers.
36. Group1 
36.1 This field displays the total of all unpaid charges that are the responsibility of the patient’s insurers that fall within the aging period designated in Utility --► Category <Aging Group 1>.
37. Group2 
37.1 This field displays the total of all unpaid charges that are the responsibility of the patient’s insurers that fall within the aging period designated in Utility --► Category <Aging Group 2>.
38. Group3 
38.1 This field displays the total of all unpaid charges that are the responsibility of the patient’s insurers that fall within the aging period designated in Utility --► Category <Aging Group 3>.
39. Group4 
39.1 This field displays the total of all unpaid charges that are the responsibility of the patient’s insurers that fall within the aging period designated in Utility --► Category <Aging Group 4>.
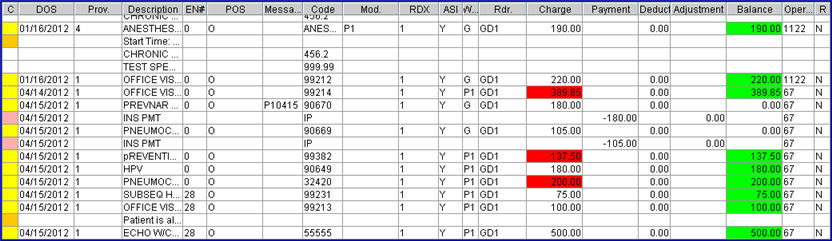
The Multi-line Table Display appears after pressing [Enter] with the focus in the <Batch No> field. This area is primarily for display. There are a limited number of functions and color codes as shown with an [F2] search in the command column described below.
Note that the colors in the Command 'C' column are different on the Ledger --► Accounting multi-line table.
Effective version 21.02.26, a new <Color> field on the Utility --► Procedure --► Procedure screen allows the selection of a color for a procedure charge record to display in Ledger --►Accounting and Ledger --►Open Item. For example:

For set up information, see Utility --► Procedure --► Procedure <Color>, and Utility --►Set Up --►User Interface for more information on using the Color Pallet.
40. Right clicking anywhere in the multi-line table displays this context menu:
40.1 Modify: Performs the same function as typing 'M' in the Command column for a procedure; i.e., the focus moves to the <DOS> field and these fields may be modified for that procedure: <DOS>, <Message>, <Mod>, <RDX >, <POS>, <Days>, <Ref>, and <WHO>.
40.2 Remark: Performs the same functions as typing 'Q' in the Command column or clicking on the [Ledger Remark] button at the bottom of the screen; i.e., it changes the display to a Ledger Remark screen.
40.3 Payment History: Performs the same function as typing 'I' in the Command column for a payment; i.e., it displays any payment history. If there is no history, this message displays:

40.4 Start from the beginning: Returns the focus to the <Account> field.
40.5 View CoPay/Deductible Due (Effective version 15.03.10): After right-clicking on a charge and selecting this option, Intellect displays this view-only information. Note: The amounts shown are the result of what was entered either at the time the charges were posted or in Charge Modify.
40.5.1 <Expected Co-Pay>: Displays co-payments made on this charge.
40.5.2 <Expected Deductible>: Displays the amount paid toward the deductible.
40.5.3 <Expected Co-Insurance>: Displays the amount paid by the patient.
41. Click the header of any column in the display area to sort the display either ascending or descending by the data in the selected column (indicated when the pointer displays):
![]()
Press [F2] to display the list of commands that can be entered in the command column:
42.1 M: Type 'M' in the command column for a procedure to allow modifications to be made in these fields: <DOS>, <Message>, <Mod>, <RDX >, <POS>, <Days>, <Ref> and <WHO>.
42.2 Q: Type 'Q' in the command line to change the display to a Ledger Remark screen of previously created remarks for this account. See Column Explanations for the Ledger Remark screen at the end of this document.
42.3 I : Type 'I' in the command column for a procedure to display payment history for that procedure.

42.4 / : Enter '/' anywhere on the multi-line table display to close the multi-line table display and place the focus in the <Account> field on the Open Item screen.
42.5 Esc: Press the [Esc] button anywhere on the multi-line table display to close the multi-line table display and place the focus in the <Account> field on the Open Item screen.
42.6 F: Type 'F' in the command column on any line to move the focus to the command column of the very first line of the multi-line table display screen.
42.7 L: Type 'L' in the command column on any line to move the focus to the command column of the very last line of the multi-line table display screen.
42.8 Yellow  indicates a panel/procedure.
42.9 Orange  indicates a remark.
42.10 Pink  Effective version 9.12.32, pink for payment/adjustment was added to the Key's Help chart.
42.11 A: Type 'A' in the command column for a procedure to add a box with a field to add a remark:

In software versions prior to 14.08.28, when adding a new remark, it was possible to enter or modify the date in the first column. Effective version 14.08.28, the date cannot be changed and it is only possible to enter the remark in the second column.
- OR -
Effective Version 9.12.32, press [F2] to display diagnosis descriptions from Intellect's Diagnosis table, scroll to the appropriate diagnosis, and press [Add].
Note: The Diagnosis table is the default table. To pull a Remark from a different table, go to Utility --► Set Up --►Screen Fields --►Modify Change Default Table.
42.12 V: Type 'V' in the command column for a procedure to allow the remarks for the highlighted charge to be viewed.

If there are no remarks associated with the highlighted charge, Intellect displays:
42.13 B (not shown on Key's Help): Type 'B' in the command column on any line to close the multi-line table display screen and place the focus in the <Account> field on the Open Item screen.
43.1 Date of service as entered in Charges --►Charge <From/Date>. May be modified.
44. 
44.1 Attending Physician as entered in Charges --►Charge <Dr>. May not be modified.
44.2 As of software version 9.12.18, this field has been expanded, allowing the entire Provider information to display.
45. 
45.1 Description for the procedure or diagnosis. This is a read-only field and may not be modified.
46. 
6.1 Displays the attached Charges --► Encounter entered when posting. This is a read-only field and may not be modified.
47. 1 Displays the Utility --► Facility <Facility Code> as entered in Charges --►Charge <Facility>. This is a read-only field and may not be modified.
47.2 As of software version 9.12.18, this field has been expanded, allowing the entire Facility information to display.
48.1 Displays the Status message appended by the date of the last transaction for the procedure (billed, paid, etc). It may be modified.

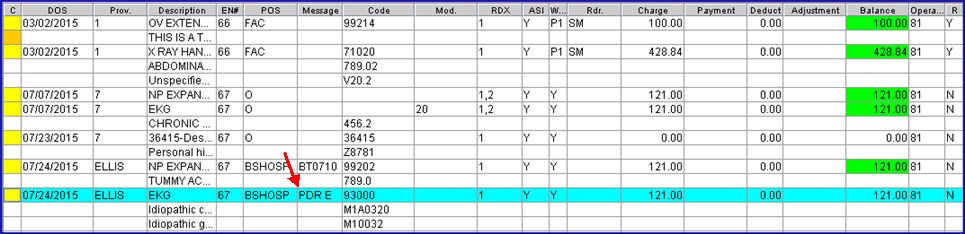
48.2 Effective version 16.02.22: A Dispute Resolution Request form was added for use by the office to dispute payments or underpayments. Before a dispute resolution form may be requested via the <Form Type> on the Billing --►Insurance --►Batch of Patients screen:
• Each provider for whom a dispute resolution form is generated must have his/her own PDR code set up in the <Message Code> field of Utility --►Messages --►Message.
• The appropriate PDR code must be added in either the Message column on this screen OR the Message column on the Payment --►Open Item screen for the charge/payment in dispute.
For example, if the PDR code for Dr. Ellis was set up as PDR E, and there is a dispute regarding a payment for a charge on 07/24/2015 for a service provided by Dr. Ellis, enter PDR E in the Message column for the payment in question, as shown below.
49. 
49.1 Displays the Utility --► Procedure <Code C>, <Code R>, <Code E>, or <Revenue Code> as determined by the Utility --► Insurance <Code R/C/E/U> of the Charges --►Charge <Insurance> (company). This is a read-only field and may not be modified.
50. 
50.1 Holds any attached modifier codes or Utility --► Diagnosis <Diagnosis Code>. May be modified.
50.2. Effective version 9.12.18, this field was expanded, allowing 8 characters of the Modifier to display.
51. 
51.1 Displays the order number of posted diagnosis as attached to a posted procedure. This is a read-only field and may not be modified.
52.1 Indicates the assignment of 'Y' (yes) or 'N' (no) as entered when posting Charges --►Charge <ASI>. May be modified.
53.1 Displays the current responsibility for any charge or balance. If Charges --►Charge <Who> = P1 then 'P1' displays until modified or a payment is posted to this procedure. The Who automatically updates to the next line of responsibility (e.g., S1, G). May be modified.
54.1 Displays the Utility --► Referring <Referring Code> as posted from Charges --►Charge <Ref Prv>. This is a read-only field and may not be modified.
54.2 Effective version 9.12.18, this field was expanded, allowing the entire Referring information to display.
55.1 Displays the dollar amount of the posted charge. This is a read-only field and may not be modified.
55.2 Effective version 9.12.33, this option works in conjunction with the Charges --►Charge Bill Copay right-click option released in version 9.12.32. If a co-pay amount greater than zero on the Charges screen has been tagged using the Bill Copay option, then, on the Open Item screen, the background is red for the charge(s) with the unpaid co-pay:
56. 
56.1 Displays the dollar amount of the posted payment. This is a read-only field and may not be modified.
57. 
57.1 Displays the amount entered in the Payment --► Open Item <Deduct> column. This is a read-only field and may not be modified.
58. 
58.1 Displays either the amount entered in Payment --► Open Item <Adjust> column of a Capitated automatic adjustment write off or that entered in Charges --►Charge <Adjustment>. This is a read-only field and may not be modified.

59.1 The total of all payments and adjustments applied on the procedure line are displayed. This is a read-only field and may not be modified.
59.2 Effective version 9.12.18, positive balances are highlighted in green, negative balances (credit) are displayed in red, and when a balance is zero, the color remains the same color as the table. See [Charge] above for an example of a positive balance.
60. 
60.1 Displays the Utility --► Set Up --► Security --► Login Users <User Number> of the person who executed the transaction. This is a read-only field and may not be modified.
61. 
61.1 Displays either a 'Y' or 'N' for any procedure. 'Y' (yes) indicates that a ledger remark has been added from the Ledger by typing 'A' in the Command Column.
Effective version 9.12.14, buttons were added to the bottom of both the Open Item and Accounting screens:

Note: Some of the buttons mimic actions entered in the 'C' (Command) column:
62. [Modify] - Click to produce the same result as entering 'M' in the Command column.
63. [Ledger Remark] - Click to produce the same result as entering 'Q' in the Command column.
Note: Additional options were added in version 9.12.14 to the screen that displays when either 'Q' is typed in the Command column or the [Ledger Remark] button is clicked.
64. [View Patient] - Effective version 16.10.11 - Click to open the View PATIENT or View WORKER screen, depending on the patient category. Changes and/or additions may not be made to these screens.
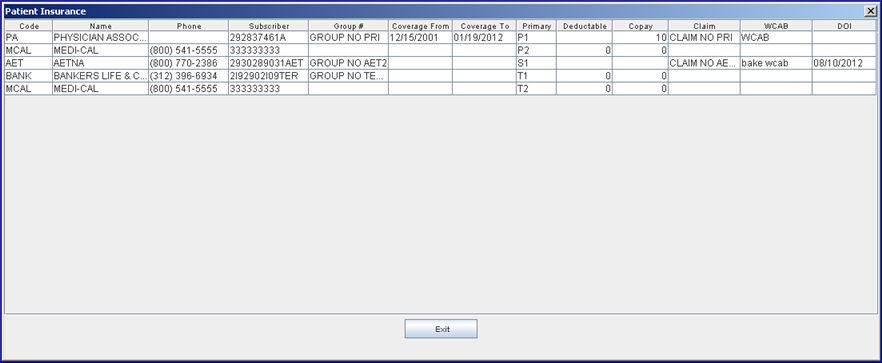
65. [View Patient Insurance] - Effective version 9.12.35 - Click to display a Patient Insurance screen (see below), which shows all the insurance(s) associated with the patient, as entered in Registration --► Regular --►Patient Insurance.
66. [Payment History] - Click to produce the same result as entering 'I' in the Command column.
67. [Add Remark] - Click to produce the same result as entering 'A' in the Command column.
68. [View Remark] - Click to produce the same result as entering 'V' in the Command column.
From the multi-line table display, press Q OR click on the [Ledger Remark] button to display the Ledger Remark screen:
Effective version 15.02.17, when printing via Registration --►Worker --►First Report --► Batch and Group, the comment 'First Report is printed' is inserted into the Ledger remarks on both the Ledger --►Accounting and Ledger --►Open Item screens for each patient for which the report is run.
Effective version 15.02.17, when printing via Registration --►Worker --►PR2 Form, PR3 Form, PR4 Form, or STPR, a comment stating '[report name] is printed' is inserted into the Ledger remarks on both the Ledger --►Accounting and Ledger --►Open Item screens for each patient for which the report is run.
Right clicking any where in the line area of the Ledger Remark screen's multi-line table displays this context menu:
69. Back Up to Financial Area of Ledger: Returns the focus to the main OpenItem screen.
70. Start from the beginning: Returns the focus to the <Account> field.
71. Doctor Balance: After selecting/highlighting an item on the screen, click this button to display a list of individual providers with balances relevant to this patient. For a sample, click here: Doctor Balance.
72. Add Reminder Comment: With an item on the screen highlighted, click on this option to go to the bottom of the Remark column with the focus in the <Remark> field.
73. Modify Reminder Comment (except I, L, G, E): After selecting/highlighting an item on the screen, click this button to enter new information in the <Remark> field.
Note: This button may not be used for items that have a code of I, E, S, F, or R in the <Flag> column. If [Modify Reminder] is clicked on an item with an inappropriate Flag Code, this error message displays:
74. Delete Reminder Comment: After selecting/highlighting an item on the screen, click this button to display this pop-up:
74.1 Press [Yes] to delete the comment on that row.
74.2 Press [No] to close the pop up and return the focus to the command column of the selected line.
![]()
75. ![]() (Command Column)
(Command Column)
These commands may be entered in the command column:
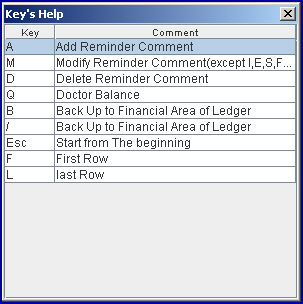
75.1 A: Type 'A' anywhere on the ledger remark screen to cause the focus to jump to the bottom of the screen and adds a row where a comment may be entered. After entering the comment, press [Enter].

75.2 M: Click on the line to modify, type 'M' in the command column to move the focus to the <Remark> column, then enter the modifications. After making the changes, press [Enter].

75.3 D: Click on the line to delete, then type 'D' in the command column to display a pop up message verifying the deletion of the selected row:
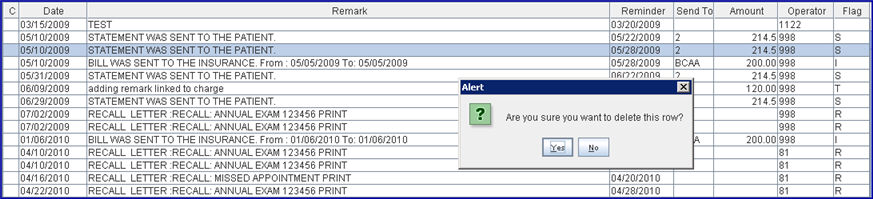
Press [Yes] to delete the comment on that row; press [No] to close the pop up and return the focus to the command column of the selected line.
75.4 Q: Type 'Q' anywhere on the ledger remark screen to display a list of individual providers with balances relevant to this patient.
Press [Esc] to return to the OpenItem screen, with the focus in the <Account> field.
75.5 B: Type 'B' in the command column on any line to close the ledger remark screen and place the focus in the <Account> field on the Open Item screen.
75.6 /: Enter '/' anywhere on the ledger remark screen to close the screen and place the focus in the <Account> field on the Open Item screen.
75.7 Esc: Press the [Esc] button with the focus anywhere on the ledger remark screen to close the screen and place the focus in the <Account> field on the Open Item screen.
75.8 F: Type 'F' in the command column on any line to move the focus to the command column of the very first line of the ledger remark screen.
75.9 L: Type 'L' in the command column on any line to move the focus to the command column of the very last line of the ledger remark screen.
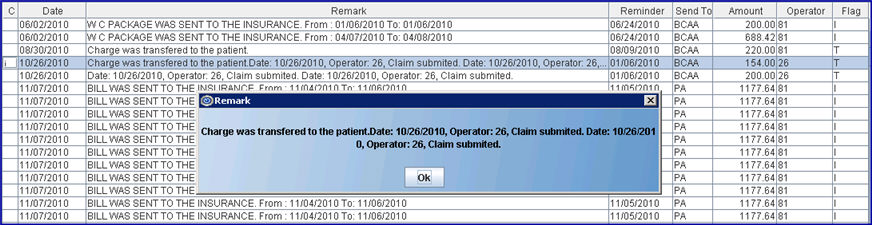
75.10 I (Not shown on list): If there is a lengthy note on the patient's ledger, it may be viewed in a pop up box by typing 'I' in the command column for that remark.
76. 
76.1 If manually added in the Collection ledger (command 'A' from Ledger --►Collection, or 'Q' from either Ledger --►Open Item or Ledger --►Accounting) this column defaults to the clinic date, and may only be changed the first time when adding. This date, once entered, keeps a permanent record of this transaction.
76.2 If manually added in other Ledgers by attaching to a procedure (command 'A') it displays the calendar date and cannot be modified.
77.1 If a system task is completed, then the Remark displays the appropriate description and cannot be modified.
77.2 If this is a user-created remark, type a brief description.
78. 
78.1 This is defined by the calendar day of the task if it is system generated, or the posting date if it is a user-defined remark and is attached to a procedure, otherwise a date can be manually entered or it can be left blank.
79. 
79.1 Tasks for Insurance Billing and letters display the insurance company code.
79.2 Statements sent to attorneys show the referring code.
79.3 Statements to patients display '1' or the providers' <Statement Group>.
79.4 Letters and Recalls to patients leave the column blank.
79.5 This is a read-only field and may not be modified.
80.1 Tasks completed by the system (statements, billing, letters, and follow-up) cause a value to be present here. This is a read-only field and may not be modified.
80.2 A task manually added enables this field to accept a value if desired.
80.3 A Task attached to a procedure in one of the ledgers displays the line balance amount.
81. 
81.1 This displays the Utility --►Set Up --►Security --►Login Users <User Number> of the user active (with an operator logged on) when the task was completed.
81.2 If a task is completed by automation, Intellect reads the Utility --►Set Up --►Clinic <Administrator Password> to determine the user number (this number is coded by our staff).
81.3 If a user added the remark, the Operator number may be modified. Effective version 18.05.03, the <Operator> field on the Ledger Remark screen was expanded from 4 digits to a maximum of 6 digits to allow an operator code to be added with more than 4-digits.
81.4 When a remark is added it always defaults to the current operator number.
82. 
82.1 All tasks have an assigned Flag indicating the type of remark.
82.2 Press the [F2] search key to display the valid choices.
82.2.1 Most Flag types indicate a task has been completed, but a noted exception is the 'X' Flag, which, when configured with a Reminder date, displays the Multi Row Table Display of the active account to all subsequent user log-ons for that date. Flag Code I, E, S, F, and R may not be modified, but may be deleted.
82.2.2 For other types, the Remark, Reminder, Amount, Operator, and Flag columns may be modified. The entire Remark may be deleted.
The selection options (shown below) added in version 9.12.14, allow the information on the screen to be filtered as selected.
![]()
For example, click on the Recall Letter box ![]() and then click on the [Refresh] button
and then click on the [Refresh] button ![]() displays only those items where the ledger remark pertains to recall letters.
displays only those items where the ledger remark pertains to recall letters.
To return the display to include all of the items, click on the All box ![]() and then click the [Refresh] button.
and then click the [Refresh] button.
These buttons were added in version 9.12.14:

83. [Modify Reminder]: After selecting/highlighting an item on the screen, click this button to enter new information in the <Remark> field.
Note: This button may not be used for items that have a code of I, E, S, F, or R in the <Flag> column. If [Modify Reminder] is clicked on an item with an inappropriate Flag Code, this error message displays:
84. [Doctor Balance]: After selecting/highlighting an item on the screen, click this button to display a list of individual providers with balances relevant to this patient.
85. [Add Reminder]: After selecting/highlighting an item on the screen, click this button to display the following pop-up which allows a remark to be entered. To exit the pop-up, press [Enter].

86. [Delete Reminder]: After selecting/highlighting an item on the screen, click this button to display this pop-up:
86.1 Click [Yes] to delete the row.
86.2 Click [No] to return to the [Ledger Remark]/'Q' screen.


 (Who)
(Who) 


