
Intellect™
REGISTRATION MENU OPTIONS

Regular
Patient Insurance
Add Insurance
This screen allows the addition of a separate screen for each of the patient’s current and terminated insurances, including primary, secondary, tertiary, alternate primary, etc. If the patient has a Guarantor account, the insurance information is always entered under the patient’s account since this information is used to generate paper claims and/or electronic billing. Terminated insurances are indicated by completion of the <Coverage To> field. For information on expiring a patients' insurance, click here.
For PCM users only. Effective version 15.02.17, whatever is selected in the <Payer SOP Code> field on the Utility --►Insurance --►Insurance Add INSUR_CO screen is set internally to the patient’s PA_PAYER_SOP_CODE when adding or modifying the primary insurance of either a regular or worker’s comp patient. Note: There is not a <Payer SOP Code> field on either of Intellect’s patient or worker screens but the information is used by PCM.
1. There are three ways to access the Add PATIENT_INSURANCE screen to add Insurance to a patient account in Intellect:
1.1 Via Registration --► Regular --► Patient Insurance --►Add
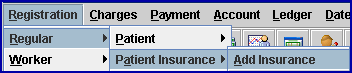
- OR -
1.2 When a new patient is registered through Registration --► Regular --► Patient --► Add, select [Add] on the Add PATIENT screen to display a prompt if the patient’s Category is NOT set up as no insurance (Utility --► Category <Type (C/P/W/O/F/G)> = G).
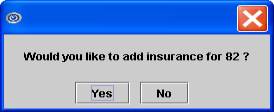
1.2.1 Select [Yes] to continue adding an insurance screen.
- OR -
1.3 There are two options when updating an existing account through Registration --► Regular --► Patient --► Modify on the Modify PATIENT screen:

1.3.1 [Modify]: When there is no existing insurance AND Utility --► Category <Type (C/P/W/O/F/G> is not ‘G’ for the patient’s <Category>, select [Modify] to save changes and display this message:
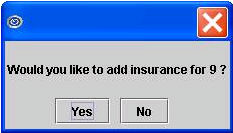
1.3.1.1 Select [Yes] to continue adding an insurance screen.
1.3.2 [Add Insurance]: This option allows a new insurance to be added even if the patient has an existing insurance screen.
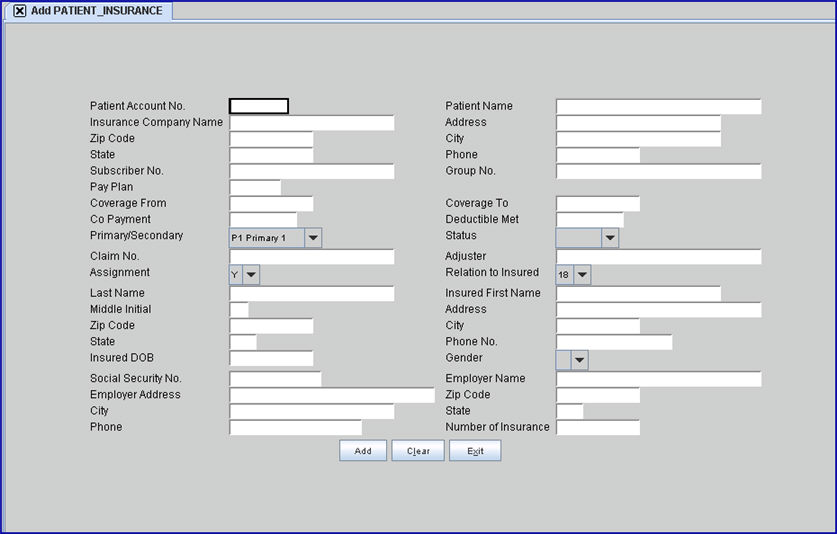
All of these open the Add PATIENT_INSURANCE screen:
Effective version 14.02.04, the <Insurance Company Code> and <Insured Employer> fields were removed.
2. Patient Account No 
2.1 When adding insurance from the Add PATIENT screen (see step 1.2 above) or Modify PATIENT screen (see step 1.3 above), press [Enter] to accept the patient’s account number which automatically defaults.
2.2 When adding insurance through Registration --► Regular --► Patient Insurance --► Add, it might be necessary to search for the patient’s account number.
2.2.1 Press the [Space Bar] to clear the field.
2.2.2 Press the [F2] key to display the Searching PATIENT_ACCTBAL:
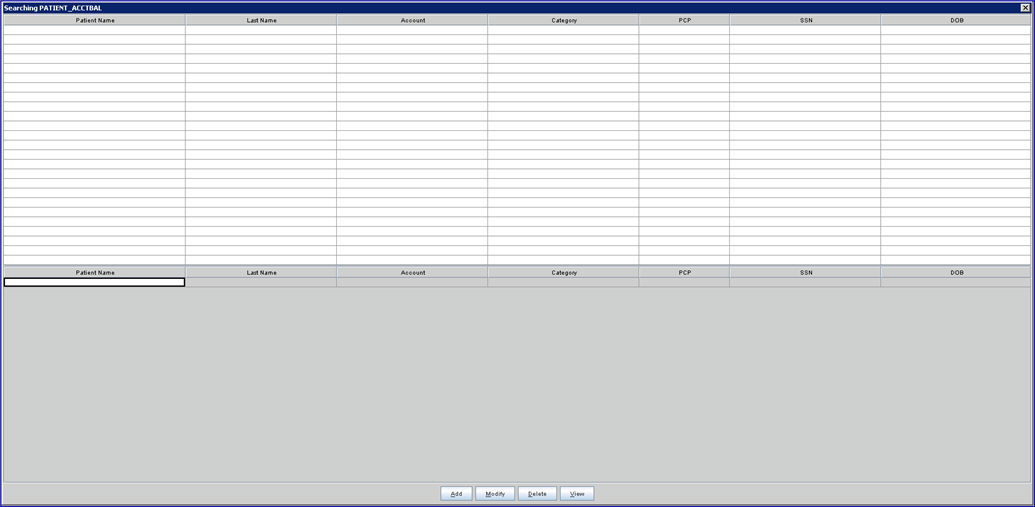
2.2.3 With the cursor focus on the last line (below the column headings), enter the patient’s last name in the <Last Name> column OR the patient’s partial full name (formatted as LASTNAME, FIRSTNAME) in the <Patient Name> column OR patient’s date of birth in the <DOB> column, and then press [F2] to search.
2.2.4 Highlight the correct account using the up/down arrows or the mouse, then press [Enter] OR double-click.
2.3 This field is mandatory. If left blank, a pop-up message displays:
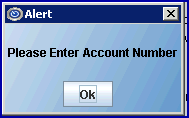
2.3.1 Click [OK] to return to the <Patient Account No.> field
3. Patient Name 
3.1 The name of the patient is displayed. This is a read-only field and may not be accessed.
4.1 Effective version 14.02.04, the <Insurance Company Code> field was removed. Functions associated with that field are now connected to the <Insurance Company Name> field.
4.2 This field is mandatory. If left blank, a pop-up message displays:
4.3 Enter an insurance name (or portion of a name) in the <Insurance Company Name> field and then press [Enter]. Intellect displays a record search screen (similar to the [F2] screen) which lists all the available options from which to choose.
4.3.1 Effective version 14.03.20, the display was changed for ease of use. In the prior version, only the name displayed. As of this update, both the code and name display, separated by a '/.'
4.3.2 Effective version 14.3.20, this field may be set to search either by Utility --►Insurance --►Insurance <Name> or <Insurance Co Code>. To search by code, please contact PCS support to request this change.
Note 1: The <Insurance Company Name> field on the Registration --► Worker --► Worker Insurance screen is set to the same search criteria.
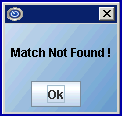
Note 2: The default search is set to the Utility --►Insurance --►Insurance <Name> field, not the Utility --►Insurance --►Insurance <Insurance Co. Code> field. For example, if the <Insurance Co. Code> is ‘MCAR’ and the <Name> is NORIDIAN, entering either ‘MEDICARE’ or ‘MCAR’ in the <Insurance Company Name> field displays the message ‘Match Not Found!.’
4.4 To select the insurance from the displayed list, either highlight the record and press the [Enter] key, OR double-click on the record.
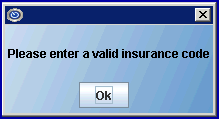
4.5 When new insurance company or invalid search criteria is entered, Intellect displays:

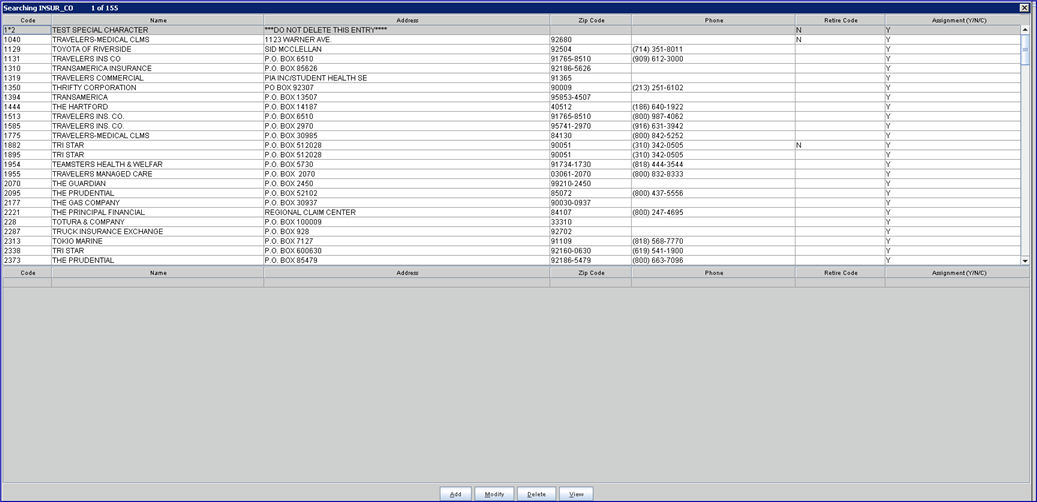
4.5.1 Click [Ok] to display the Searching INSUR_CO screen:
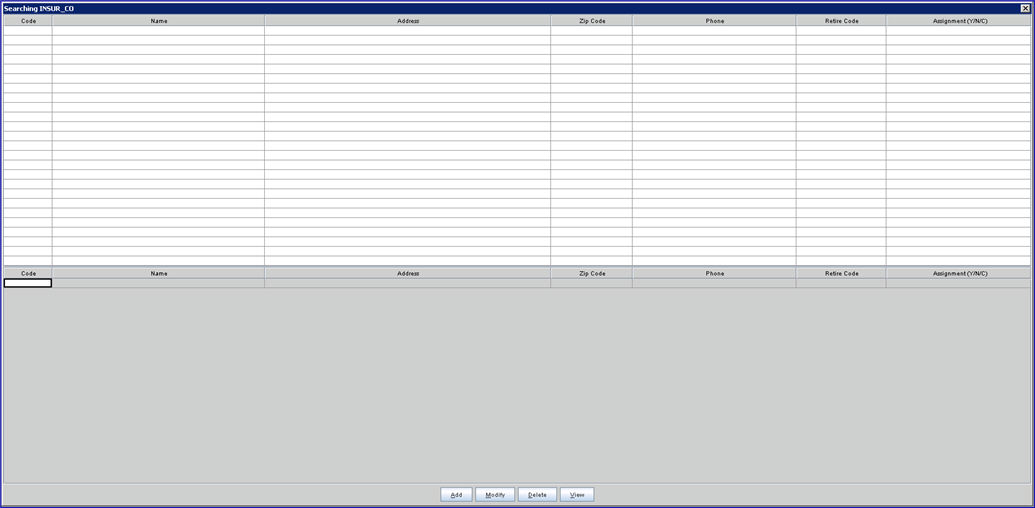
4.5.2 If this is a new Insurance Company, press [Add] to display the Utility --► Insurance --► Insurance --► Add screen where the appropriate information may be entered and saved. WARNING: It is strongly recommended to search by address to avoid adding duplicate records.
4.5.3 With the cursor focus on the last line (below the column headings), enter search criteria for any column (Code, Name, Address), and then press [F2] to search. Highlight the correct record using the up/down arrows or the mouse, then press [Enter] OR double-click to select the record.
NOTE: When searching, asterisks (*) may be used as wild cards to replace any portion of the data. For example: Type *60007 (the street number) in the <Address> column to replace ‘P O Box.’
4.6 When adding or modifying a patient insurance record, if the selected Insurance Code has been retired, a list of Alternate Codes may be displayed if the <Alternate Code> field has been set up in Utility --►Insurance --►Insurance.
Once the <Alternate Code> field has been filled-in and saved for a retired Insurance Code, if an attempt is made to modify or add the expired insurance, the system displays a message containing all possible alternative codes to prevent the expired insurance being added to a patient's account. For example, if someone tries to attach a retired code to a patient's record, Intellect displays this message:
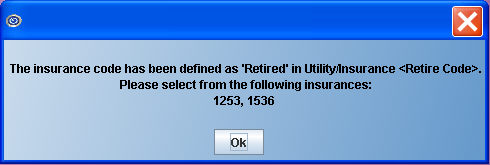
Click on [OK] to go back to the <Insurance Company Name> field and enter a code listed on the pop-up. For more information on setting up the Alternate Codes, refer to Utility --►Insurance --►Insurance <Alternate Code>.
4.7 For additional information when setting up Medicare and Medi-Medi patients, see the document Medicare Patient Registration for more detail.
5.1 Automatically displays the Utility --►Insurance --►Insurance <Address> for the selected Insurance Company. This is a read-only field; data may not be modified.
6.1 Automatically displays the Utility --►Insurance --►Insurance <Zip Code> for the selected Insurance Company. This is a read-only field; data may not be modified.
7.1 Automatically displays the Utility --►Insurance --►Insurance <City> for the selected Insurance Company. This is a read-only field; data may not be modified.
8.1 Automatically displays the Utility --►Insurance --►Insurance <State> for the selected Insurance Company. This is a read-only field; data may not be modified.
9.1 Automatically displays the Utility --►Insurance --►Insurance <Phone> for the selected Insurance Company. This is a read-only field; data may not be modified.
10.1 If this field contains data, the default is the patient’s <Social Security No.> pulled from the Add PATIENT screen.
Effective version 16.12.02: Options of masking the SSN (displaying only the last 4 digits) or not masking the SSN were added. For additional information, see Utility --►Set Up --►Screen Fields Mask/Unmask the Social Security Number (SSN).
Effective version 16.11.10, if this field contains a SSN, only the last 4 digits of the social security number are displayed; the rest are represented with asterisks (***-**-1234), unless the data in the database is malformed or incomplete.
10.1.1 If the displayed information is correct, press [Enter] or [Tab] to accept.
10.1.2 If the information is not correct, use the [Spacebar] to clear the field and then type the appropriate Insurance ID or Member ID number. For example, for Medi-Cal patients this must be the patient's Medi-Cal Identification number (from his/her Benefits Identification Card (BIC)) not a Social Security number.
10.1.2.1 When entering information in this field, do NOT include punctuation, special characters, or spaces even if it is on the patient's card.
Example 1: Including spaces in the <Subscriber No.> has caused clients' Eligibility Verification to not work properly.
Example 2: Some ERA files have patients which Intellect cannot post, and on the Error Report it says 'Patient not found.' Sometimes this is because when the claim is transmitted, the program strips out the special characters and spaces that were initially entered in the <Subscriber No.> field. The ERA file has the Subscriber No. the same as it was transmitted - without special characters and spaces. But, when posting, Intellect tries to find a match in the patient insurance records for the exact same Subscriber No. that is in the ERA file. Because the patient record has the spaces or characters and the ERA file does not, it cannot find a match.
10.2 Intellect completes Box 1A on HCFA (CMS 1500) with this number.
![]()
11.1 Type the patient’s group number for this insurance carrier or, if there is not a group number available, leave blank.
12.1 Type the code for the pre-defined payment plan, if applicable.
12.2 Existing Pay Plans may be defaulted in the following order: first from the insurance company, second from any Utility --►Business <Plan Code> when configured with a pay plan, third from the patient's Utility --►Category <Default Plan> or, last, from Utility --►Set Up --►Parameter <Default Pay Plan>.
12.3 If defaulted, either accept or change it as follows: Press the [Spacebar] to clear and then enter the desired Plan Code, OR type up to 6 characters of the name and press the [F2] key. To select the code from the list, either highlight the record and press the [Enter] key, OR double-click on the record. Alternately, after clearing the field, press the [F2] key twice to view the entire list of codes. For example:

* Pay plans are added through the Utility --► Insurance --► Pay Plan menu.
13.1 Type the effective date of the patient’s insurance coverage. This field is mandatory if the patient’s previous insurance coverage was terminated.
13.2 This insurance is only billed for dates of service on or after this date.
14.1 This field should be left blank for the patient’s current insurance.
14.2 This date should only be entered when insurance coverage has terminated.
14.2.1 Go to Registration --►Regular --►Patient --►Modify.
14.2.2 Enter the account number for the patient for whom the insurance is being expired, and press [Enter].
14.2.3 Click on the [Modify Insurance] button.
14.2.4 Use the [Next] and [Back] buttons to display the insurance to expire.
14.2.5 In the <Coverage To> field, enter the last date the insurance is valid.
14.2.6 Click on the [Modify] button.
14.2.7 This is the only method that expires an insurance.
14.3 This insurance is NOT billed for any dates of service after this date.
15.1 Defaults to amount in the Utility --►Insurance --►Pay Plan <Co Payment Amount> field for the <Pay Plan> entered above, if applicable.
15.2 The copayment amount listed on the patient’s insurance card or eligibility verification obtained from the insurance may be manually typed.
15.3 This is an informational field which may print on forms and is displayed on the following screens:
15.3.1 Patient Info tab on the Add Appointment, Modify Appointment, Inquire Appointment, Search Appointment and Delete Appointment dialog boxes in Schedule --► Appointment --► Full Day.
15.3.2 Add RECEIPT through Schedule --► Appointment --► Receipt or Context Menu (right-click) on Schedule --►Appointment --► Full Day. Also displayed on Schedule --►Appointment --►Receipt options for Modify, Delete, and View.
15.3.3 Charges --► Charge
15.3.4 Payment --► Open Item
15.3.5 Self Check-In, if accepting credit card payments.
16.1 The patient's deductible.
16.2 Defaults to amount in the Utility --►Insurance --►Pay Plan --►Pay Plan <Deductible> field for the <Pay Plan> entered above, if applicable.
16.3 The patient’s deductible may be manually typed.
16.4 This is an informational field which may print on forms and is displayed on these screens:
16.4.1 Patient Info tab on the Add Appointment, Modify Appointment, Inquire Appointment, Search Appointment and Delete Appointment dialog boxes in Schedule --► Appointment --► Full Day.
16.4.2 Add RECEIPT through Schedule --► Appointment --► Receipt or Context Menu (right-click) on Full Day schedule. Also displayed on Schedule --► Appointment --►Receipt options for Modify, Delete, and View.
16.4.3 Charges --► Charge
16.4.4 Payment --► Open Item
17.1 Effective Version 9.12.10 Field Modification. The one- and two-character code choices on the drop-down lists have been replaced with explanatory choices, making the code selection more user-friendly and comprehensive.
Note: The drop-down list descriptions for the code choices have remained the same, allowing correlation between the old and new code choices.
17.2 This determines the order the insurances are billed.
17.3 There may be multiple primaries with a link to a specific secondary.
17.4 Click on the field, OR press the [F2] key to display the valid choices.
To view the list of only the codes, click on the arrow. To select, click on the correct code, OR use the ↑ (up) and ↓ (down) arrows to highlight the correct code and then press the [Enter] key to select.
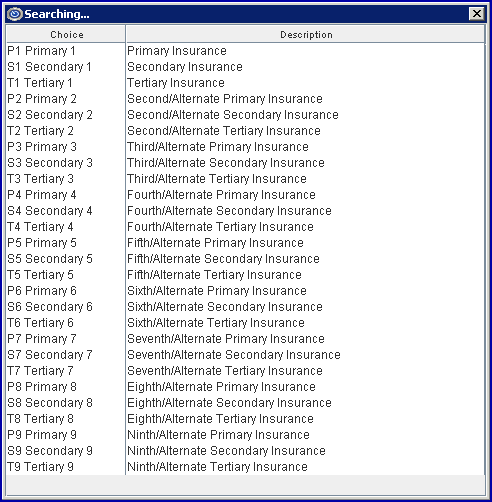
All versions prior to 9.12.10
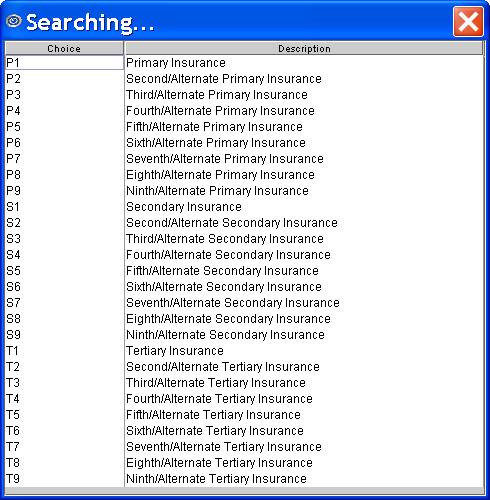
Effective version 9.12.10
18.1 This field should be completed if the patient has Medicare with a secondary OR Medicare is the secondary. See the document 'Medicare Patient Registration' for more detail.
18.1.1 When Medicare is the secondary, a numeric status must be selected ( e.g., 12, 16, 47, etc.); do not leave the field blank or select an alpha status.
Note: If not sure which one to enter, it is suggested to select 12 or 47.
18.1.2 ANSI 5010 billing requires numeric codes.
18.1.3 It is important to complete this area for electronic claims or they may be rejected.
18.2 Click on the field, OR press the [F2] key to display the valid choices.
To view the list of only the codes, click on the arrow. To select, click on the correct code, OR use the ↑ (up) and ↓ (down) arrows to highlight the correct code and then press the [Enter] key to select.
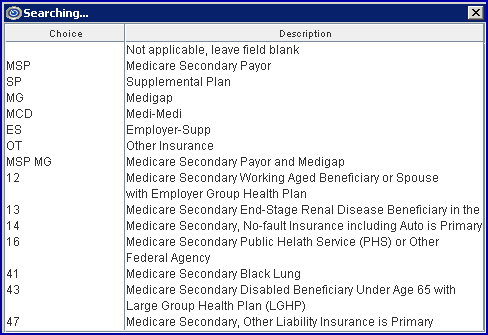
Note: The set up of the <CrossOver> and <COBA> fields on the Utility --► Insurance --► Insurance --► Add screen affects this <Status> field as follows:
<COBA> field: If this field is completed on the Add_INSUR_CO screen when entering a secondary insurance for patients with Medicare as Primary, this <Status> field is defaulted to MG (MediGap).
<CrossOver> field: If this field is marked 'Y' (Yes) on the Add_INSUR_CO screen, and the <COBA> field is left blank when entering a secondary insurance for patients with Medicare as Primary, this <Status> field is defaulted to SP (supplemental plan).
19.1 Type the claim number or the plan name for this insurance carrier.
19.2 Intellect completes Box 11on form CMS 1500 or the electronic equivalent.
![]()
20. Adjuster 
20.1 When available, type the assigned adjuster’s first and last name.
20.2 This field is used primarily for Workers Compensation cases.
20.3 Intellect completes the heading in the Workers Statement.
![]()
Effective version 9.12.15
Clients can now print the Adjuster Name on the top right corner of the Worker Compensation paper claim. However, there are three requirements which must be met for the name to print:
a - For each insurance being used, the Utility --►Insurance --►Insurance <Print Name on Claim> field must be set to X - Print the Adjuster name.
b - The <Adjuster> name field must be completed on either the patient's Registration --►Regular --►Insurance or Registration --►Worker --►Insurance screen.
c - The patient's category <Type> must be either W or F. See Utility --►Category
Note: The 'Adjuster Name' data element has been added to the programming file but has not been added to the form. Therefore, offices wanting to have the Adjuster Name printed on the paper WC Claims, should call PCS Support and request it be added.
21.1 This determines whether or not an insurer accepts the assignment.
21.2 Accept the default OR use the drop-down list to make an alternate selection.
21.3 Intellect completes Box 27 on form CMS 1500 (HCFA), or the electronic equivalent, unless changed at the time of posting.
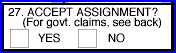
21.4 A default value can be configured for a particular insurer in Utility --► Insurance --► Insurance <Assignment (Y/N/C)>.
21.5 Effective version 18.05.24, the setting of this field affects the function of the Utility --►Set Up --►Parameter <Hold Imported Charges> field. See <Hold Imported Charges> for details.
22.1 Accept the default '18' (self), OR use the drop-down list to make an alternate selection.
22.2 Click on the field, OR press the [F2] key to display the valid choices.
To view the list of only the codes, click on the arrow. To select, click on the correct code, OR use the ↑ (up) and ↓ (down) arrows to highlight the correct code and then press the [Enter] key to select.
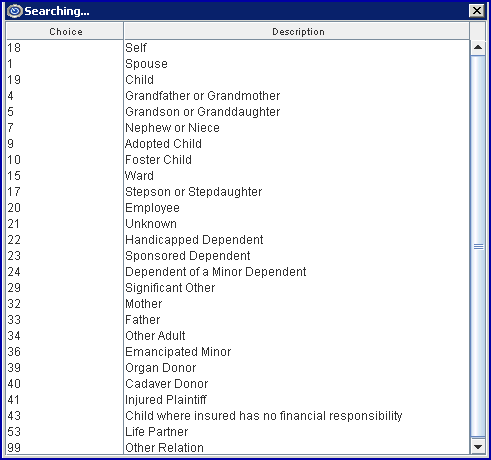
22.3 Effective version 13.12.12, when the <Relation to Insured> field is set to 20 (i.e., Employee, which is used for worker insurance), Intellect responds the same as when the relation is 18 (Self).
22.4 If the field is set to ‘18’ for self or ’20’ for employee, Intellect does not allow entry in the remaining fields. After pressing [Enter], the focus is on the [Add] button at the bottom of the screen.
22.5 If this field is NOT set to ’18’ or ‘20,' the insured’s information auto-populates as follows:
22.5.2 If the <Guarantor> account is the same as the <Patient Account No.> field on the PATIENT screen, then the patient’s last name, address, and home phone number default as the insured’s <Last Name>, <Address>, <Zip Code>, <City>, <State>, <Phone>.
22.5.3 If NOT set to ’19’ and the <Guarantor> account is different from the <Patient Account No>, then the patient’s last name, address and home phone number default as the insured’s <Last Name>, <Address>, <Zip Code>, <City>, <State>, <Phone>.
22.5.4 If set to ’19’ and the <Guarantor> account is different from <Patient Account No>, then Intellect completes the remaining fields with information from the account of the patient’s guarantor.
22.5.4.1 Based on the Utility --► Set Up --► Parameter <Guarantor> field, Intellect may display this message after pressing [Add]:
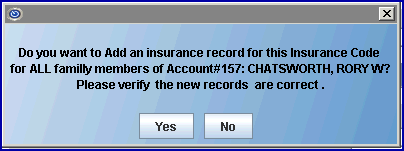
22.5.4.2 WARNING: Selecting [Yes] adds this insurance to ALL accounts linked to the same guarantor account.
22.6 Intellect places an 'X' in Box 6 CMS1500 (HCFA) with this selection.
![]()
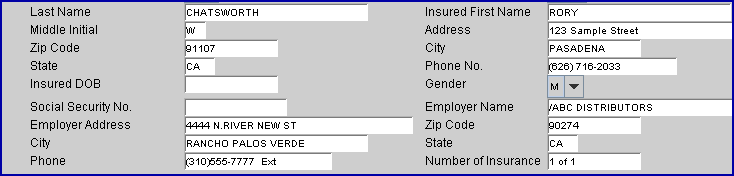
23.1 If not already populated with other insured info and if <Relation To Insured> does Not = 18 or 20, then type the last name of the insured.
23.2 If <Relation To Insured> does Not = 18 or 20, then Intellect completes Box 4 CMS 1500 (HCFA).
![]()
24.1 If not already populated with other insured info and if <Relation To Insured> does Not = 18 or 20, then type the first name of the insured.
24.2 If <Relation To Insured> does Not = 18 or 20, then Intellect completes Box 4 CMS 1500 (HCFA).
25.1 If not already populated with other insured info and if <Relation To Insured> does Not = 18 or 20, then type the insured middle initial.
26.1 If not already populated with other insured info and if <Relation To Insured> does Not = 18 or 20, then type the insured street address with number.
26.2 If <Relation To Insured> does Not = 18 or 20, then Intellect completes Box 7 CMS 1500 (HCFA).
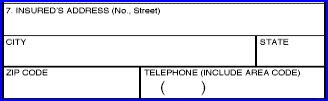
27. Zip Code 
27.1 If not already populated with other insured info and if <Relation To Insured> does Not = 18 or 20, then type the zip code for the insured.
27.2 If <Relation To Insured> does Not = 18 or 20, then Intellect completes Box 7 CMS 1500 (HCFA).
28. City 
28.1 If not already populated with other insured info and if <>Relation To Insured> does Not = 18 or 20, then type the name of the city for the insured.
28.2 If <Relation To Insured> does Not = 18 or 20, then Intellect completes Box 7 CMS 1500 (HCFA).
29. State 
29.1 If not already populated with other insured info and if <Relation To Insured> does Not = 18 or 20, then type the state code for the insured
29.2 If <Relation To Insured> does Not = 18 or 20, then Intellect completes Box 7 CMS 1500 (HCFA).
30. Phone No. 
30.1 If not already populated with other insured info and if <Relation To Insured> does Not = 18 or 20, then type the phone number for the insured.
30.2 If <Relation To Insured> does Not = 18 or 20, then Intellect completes Box 7 CMS 1500 (HCFA).
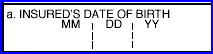
31.1 If not already populated with other insured info and if <Relation To Insured> does Not = 18 or 20, then type the insured date of birth.
31.2 If <Relation To Insured> does Not = 18 or 20, then Intellect completes Box 11a CMS 1500 (HCFA).
32.1 If <Relation To Insured> does Not = 18 or 20, select the appropriate gender from the drop-down list.
32.2 If <Relation To Insured> does Not = 18 or 20, then Intellect places an 'X' in Box 11a SEX CMS1500 (HCFA).
![]()
33. Social Security No. 
33.1 If <Relation To Insured> does Not = 18 or 20, type the social Security Number of the Insured.
Effective version 16.11.10, the SSN only displays the very last 4 digits and the rest are represented with asterisks (***-**-1234), unless the data in the database is malformed or incomplete.
Effective version 16.12.02: Options of masking the SSN (displaying only the last 4 digits) or not masking the SSN were added. For additional information, see Utility --►Set Up --►Screen Fields, Masking/Unmasking the Social Security Number (SSN).
33.2 This field is informational only.
34.1 Effective version 14.02.04, the <Insured Employer> field was removed, and its information was incorporated into this field.
34.2 If <Relation To Insured> = 18 or 20, this field is disabled and the focus does not stop here.
34.3 Effective version 14.02.04: Enter the name of the insured’s employer (or portion of a name) and press [Enter]. Intellect displays a record search screen. The record search screen (similar to the [F2] screen) lists all the available options from which to choose.
34.3.1 Effective version 14.02.04, the display was changed for ease of use. In the prior version, only the name displayed. As of this update, both the code and name display, separated by a ‘/’.
34.3.2 Effective version 14.03.20, this field may be set to search either by Utility --► Business <Name> or <Company Code>. To search by code, please contact PCS support to request this change. Note: The <Employer Name> field on the Registration --► Regular --► Patient screen and the <Employer> field on the Registration --► Worker --► Worker Insurance screen are set to the same search criteria.
34.4 To select the code from the displayed list, either highlight the record and press the [Enter] key OR double-click on the record.
34.5 When a new or invalid employer name is entered, Intellect displays:
34.5 1 Click [OK] to display the search window.
34.5.2 In the search window:
34.5.2.1 If this is a new Employer Name, click [Add] to display the Utility --►Business --►Add -- Add EMPLOYER screen where the appropriate information may be entered and saved.
34.5.2.2 Press [Esc] to return to the Add PATIENT_INSURANCE screen where the employer name may be entered, and then press [Enter].
34.6 Entering an Employer Name automatically completes the <Employer Address>, <Zip Code>, <City>, <State>, and <Phone> fields based on information completed for the <Company Code> in Utility --► Business.
35. Employer Address 
35.1 If not already completed, type the insured employer's Street address and number.
36. Zip Code 
36.1 If not already completed, type the insured employer's Zip Code.
37. City 
37.1 If not already completed, type the insured employer's City.
38. State 
38.1 If not already completed, type the insured employer’s letter state code.
39. Phone 
39.1 If not already completed, type the insured employer's phone number.
40. Number of Insurance 
40.1 This field automatically shows the number of insurance records added for this account.
41. When the PATIENT INSURANCE screen is completed, select one of these options:

41.1 [Add]: If there is an existing Insurance for the account, Intellect displays:
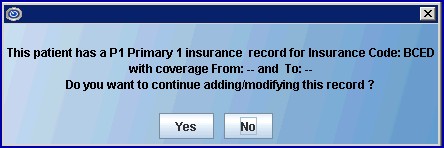
41.1.1 Click [Yes] to add the record, clear the form, and return the focus to the <Patient Account No.> field.
41.1.2 Click [No] to return the focus to the Add Insurance screen.
41.2 [Clear]: When clicked, a message displays:
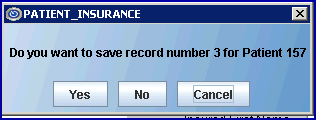
The message shows the <Number of Insurance> displayed on Add PATIENT_INSURANCE screen as the record number for the patient’s account.
41.2.1 [Yes] displays another message:
41.2.1.1 Click [Yes] to add the record and move the focus to the <Patient Account No.> field for a new record for the same patient.
41.2.1.2 Click [No] to close the message box, and return to the Add Insurance screen without clearing.
41.2.2 [No] clears the screen and moves the focus to the <Patient Account No.> field for a new record for the same patient.
41.2.3 [Cancel] returns the focus to the [Clear] button.
41.3 [Exit]: Displays this message:
41.3.1 [Cancel] returns the focus to the [Exit] button.
41.3.2 [No] closes the screen without saving.
41.3.3 [Yes] displays this message:
41.3.3.1 Click [Yes] to move the focus to a new record for the same patient.
41.3.3.2 Click [No] to close the screen without saving.


