Intellect™
SCHEDULE MENU OPTIONS

Appointment
Full Day
Appointment Booking and Management
Modify Appointment Dialog Box
Modify Patient Appointment
1. Once inside the Appointment Schedule, use any of the following three options to open the Modify Appointment dialog box:
1.1 Use the Day View Scheduling Short Cut icons:
1.1.1 Select the day/date and time slot of the scheduled patient for whom to modify an appointment:
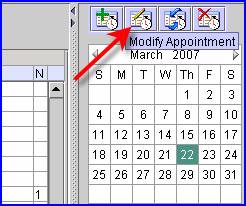
1.1.2 Click the icon Modify Appointment ![]() to open the Modify Appointment dialog box.
to open the Modify Appointment dialog box.
- OR -
1.2 With the cursor/pointer in any appointment time slot (scheduled or unassigned):
1.2.1 Right click (in any view) to open the context menu:
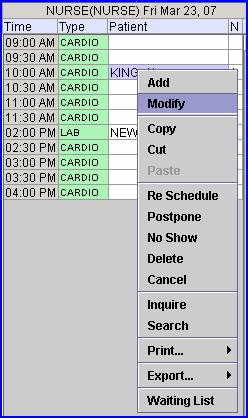
1.2.2 Select and click on Modify to open the Modify Appointment dialog box.
- OR -
1.3 With the cursor/pointer in the appointment time slot for the scheduled patient whose appointment should be modified:
1.3.1 Type the letter 'M' (in any view).
All three options open the Modify Appointment dialog box:
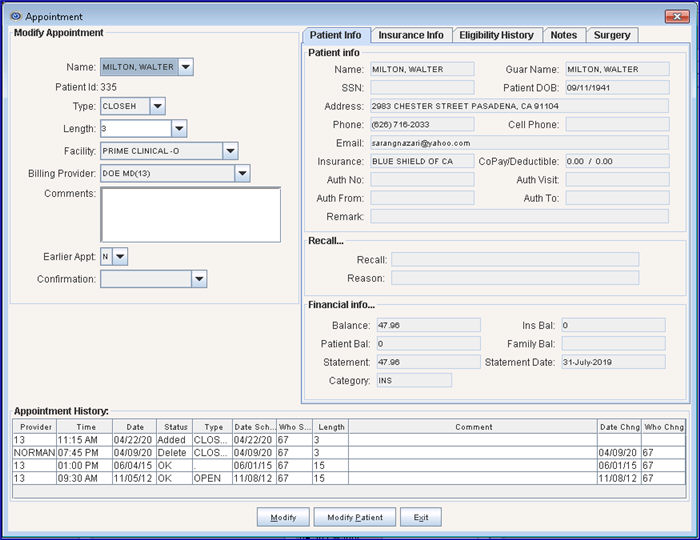
Explanations for the Modify Appointment dialog box:
Action Buttons (at the bottom of the dialog box)
1. Name: ![]()
1.1 This field displays the name of the patient listed in the selected time slot. This is a read-only field and may not be modified.
1.2 If more than one appointment is scheduled to start at the same time, the drop-down list displays those names.
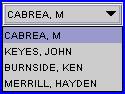
1.3 Click on the name of the patient whose appointment should be modified.
2. Patient Id: ![]()
2.1 This automatically displays the Patient <Patient Account No> of the patient selected to have their appointment modified. This is a read-only field and may not be modified.
3. Type: ![]()
3.1 This field displays the Type of the current appointment.
3.2 Accept the default OR use the drop-down list to select an alternate Type.
4. Length: ![]()
4.1 This field displays the scheduled Length of the current appointment for the selected appointment type.
4.2 Accept the current amount OR use the drop-down list to modify the Length.
4.3 A custom appointment length may also be typed right into the 'combo box.'
5. Facility: ![]()
5.1 This field displays the place of service via the Utility --►Facility <Name> followed by the Utility --► Facility <Facility Code>. The available list is all items from Utility --►Facility and is sorted alphabetically.
5.2 Accept the current facility OR use the drop-down list to modify the selection.
6.1 The Billing Provider field is for clients using the Cost Center/Billing Provider feature, set up in Utility --►Provider --►Provider <Cost Center/Dr>. If Billing Provider does not apply, press the [Enter] key to accept the default.
6.2 When an appointment is scheduled for a provider whose Utility --►Provider --►Provider <Cost Center/Dr. (C/D)> = 'C' and Utility --►Provider --►Provider <Billing Provider> is completed, the program defaults the Utility --►Provider --►Provider <Billing Provider>.
6.3 When the Utility --►Provider --►Provider <Cost Center/Dr. (C/D)> = 'D', the Scheduled Provider is always defaulted, even if Utility --►Provider --►Provider <Billing Provider> is completed.
7. Comments: 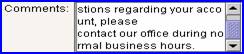
7.1 This field displays the message written in Utility --►Message --►Message when the <Message Code> matches the <Type Code>. If Utility --►Set Up --►Parameter <Prep Notes> = 'N', the Comment section remains blank.
7.2 The message displays in the Appointment History section <Comment> field at the bottom of this and other dialog boxes.

7.3 It also prints under 'DESCRIPTION' when the Print Patient’s Appointments function is used.

7.4 A new comment may be typed or a change made to the existing one; however, if the associated Appointment Type is changed here, or when modifying an appointment, all changes to this comment field are lost.
7.4.1 Note: When entering comments, the word 'TODAY' may not be used in all capital letters as that format is reserved for programming; however, it may be entered as 'today' or 'Today.'
8.1 This Yes/No drop-down is used to add patients to a waiting list for scheduling an earlier appointment.
8.2 The default is 'N' (No), meaning the patient is not put on a waiting list.
8.3 Select 'Y' (Yes) when adding or modifying the appointment to place the patient on a waiting list for earlier scheduling.
8.4 A patient may be added to or removed from the Waiting List when either adding or modifying an appointment. See Waiting List Features and Scheduling from the Waiting List for additional waiting list information.
Video Available: Click Confirm Appointments to access the link. Depending on the system set up, the media player may need to be activated. Speakers need to be attached to the workstation to hear the instructions.
Note: To view the videos, log-in through the www.primeclinical.com website. Current support is required.
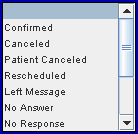
9.1 This drop-down is used to update and color code the current appointment status.
9.2 Optionally, this tool may be used by selecting the appropriate status.
9.3 Effective version 17.06.09 - 'Patient Canceled' was added to the drop-down list to differentiate between appointments that are canceled by the patient via a Twilio appointment reminder and appointments that are canceled in the office. Appointments canceled by patients by pressing '2' in response to appointment reminders display 'Patient Canceled' in the <Confirmation> field and have a red color code in the 'N' column on the schedule.
Note: For offices that do not have Twilio, office staff may change the color code in the 'N' column, as determined by their office, by choosing 'Patient Canceled' for red or 'Canceled' for pink.
9.4 The 'N' column on the schedule changes colors to reflect the status:
|
Confirmation Status |
Color |
|
Confirmed |
1 Green |
|
Canceled |
1 Light Pink (Effective version 17.06.09 - appointment canceled manually in the office by selecting 'Canceled' in the <Confirmation> field) |
|
Patient Canceled |
1 Red (Effective version 17.06.09 - appointment canceled when a patient receives an appointment reminder via Twilio and presses '2' to cancel the appointment. When a patient cancels his/her appointment, the <Confirmation> field displays 'Patient Canceled' [added in version 17.06.09]) |
|
Rescheduled |
1 Magenta |
|
Left Message |
1 Light Gray |
|
No Answer |
1 Light Gray (Tried x times nobody answered) |
|
No Response |
1 Light Gray (either a person or an answering machine picked up and did not respond) |
|
Hung Up |
1 Light Gray (a person picked up and hung up the call with no response) |
|
Busy |
1 Light Gray (Tried x times, got busy signal ) |
|
Invalid Phone Number |
1 Yellow (there is not a 10-digit phone number in the Patient's Registration screen <Home Phone No.> or <Cell Phone No.> |
|
Sent Message |
None - SMS only |
|
Error |
1 Yellow (unable to contact patient for an unknown reason) |
* CallSTAFF Automatic Dialer/Updater is available for purchase. Contact PCS for details.
The fields in the Patient Info tab are identical to those that appeared on the Add Appointment screen prior to version 9.12.01.
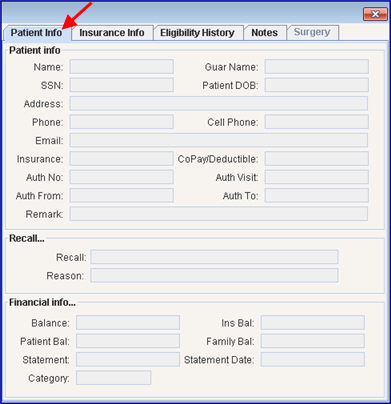
Explanations for the Patient Info tab:
See previously described characteristics under Add Appointment.
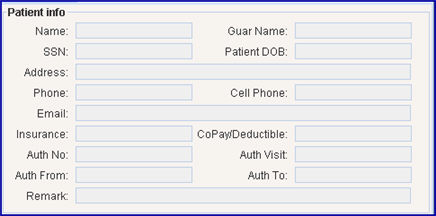
These are read-only fields and may not be accessed for modification of data.
1.  : Displays the Registration --►Patient <Last Name> and <First Name> fields.
2.  : Displays the Registration --►Patient <Social Security Number> field.
Effective version 16.11.10, this field only displays the last 4 digits of the social security number; the rest are represented with asterisks (***-**-1234), unless the data in the database is malformed or incomplete.
Effective version 16.12.02, use the options of masking the SSN (displaying only the last 4 digits) or not masking the SSN. For additional information, see Utility --►Set Up --►Screen Fields, Masking/Unmasking the Social Security Number (SSN).
3.  : Displays the patient’s address from the Registration --►Patient <Address> field.
4.  : Displays the Registration --►Patient <Home Phone Number> field.
5.  : Displays the Registration --►Patient <Email> field.
6.  : Displays the P1 insurance name from the Registration --►Patient Insurance <Insurance Company Name> field.
7.  : Displays the most current Charges --►Encounter .
8.  : Charges --►Encounter <Authorization From> is displayed.
9.  : Displays any remarks from the Registration --►Patient < Remark> field.
10.  : Displays the Registration --►Patient <Guarantor Name> field.
11.  : Displays the Registration --►Patient <DOB> field.
12.  : Displays the Registration --►Patient <Cell Phone> field.
13.  : Displays the Registration --►Patient Insurance <Co Payment> and <Deductible Met> fields.
14.  : Displays the Charges --►Encounter <Authorized Visits Left> field.
15.  : Displays the Charges --►Encounter <Authorization To> field.

These are read-only fields and may not be accessed for modification of data.
1.  : In versions prior to 9.12.31, this field displays the date of the patient’s most future appointment. Effective version 9.12.31, the program now displays the date of the patient’s next upcoming appointment.
2.  : Displays the recall message created in Utility --►Messages --►Message and assigned a Remark Type designation 'R' and then attached to the Utility --►Set Up --►Appointment --►Appointment Type <Recall> field which is the default reason.
2.1 The use of a remark code type 'R' when used in Schedule --►Recall overrides the value set in Appointment Type.
These are read-only fields and may not be accessed for modification of data.
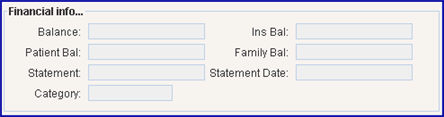
1.  : Displays data from Ledger <Balance> = Total owed by Insurance, Patient, and Family.
2.  : Displays data from Ledger <Patient> Total amount owed by Insurance.
3.  : Displays data from Ledger <Patient> patient’s portion of total.
4.  : Not implemented yet. When completed, it will be the Total of all Patient balances for joined family accounts.
5.  : Displays the account balance on the most current statement.
6.  : Displays the system date when the most current statement was issued.
7.  : Displays the patient's category.
If needed, selecting the Insurance Info tab on either the Add, Inquire, or Modify Appointment screens displays the patients’ insurance(s) and the details of the insurance(s). Sample screen:
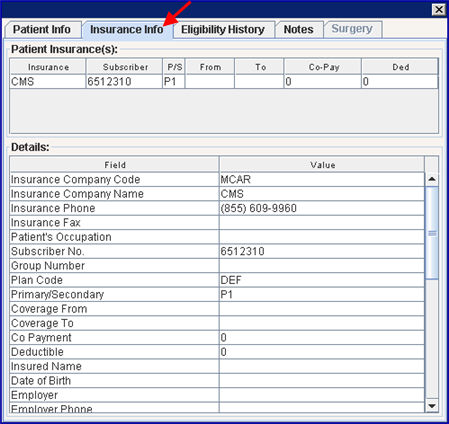
Effective version 17.02.17, the Details section was increased to include additional insurance information.
Click the [Eligibility] button on the Add Appointment or Inquire Appointment screens to submit a Request 270 file via sftp to the vendor and, in real time, receives a reply via Verification 271 file. The information is inserted into a table and may be viewed by selecting the Eligibility History tab on either the Add, Inquire, or Modify Appointment screens. Detailed Eligibility history information for the highlighted/selected record is displayed.
Note: Eligibility responses vary from payer to payer. Some payer responses are very robust and include quite a bit of benefits information in addition to the eligibility response. Others are more limited in the information that they provide. If the information is not required in a 271 response, there is no way to make the payer send it. For example, Trizetto always returns all of the information to the office that they receive from each payer. Please remember that this is just an Eligibility verification. This tells the provider if the patient is eligible for services on the date submitted.
Updates:
Effective version 21.04.14
New Ability All Ease Payer integration for Eligibility Verification is now available.
Prime Clinical Systems developed another API solution for the Eligibility Verification for the Ability the All Ease Payer Solution to function the same as the current method of OnStaff/Intellect Eligibility Verification. Contact PCS for details.
Effective version 13.10.29
As of version 13.10.29, clients who are sending directly to Medicare can now do real time eligibility direct with Medicare. When doing direct Medicare eligibility, modify the Utility --►Insurance --►Insurance <Name>, <Eligibility Receiver>, and <Eligibility> fields as indicated in the online documentation.
For further information on how to use eligibility verification, register for our eligibility webinar/workshop. Contact PCS support for more information.
Effective version 13.10.29 New Utility --►Insurance and Utility --►Insurance --►Tele Com screens are now required for Eligibility verification via Ability. To utilize this portion of the Intellect feature, please let a Support Representative know to complete your set up.
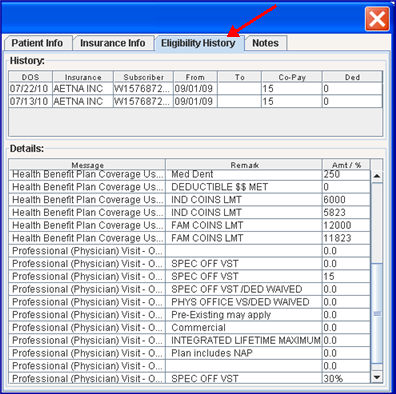
Explanations for the Eligibility History tab:
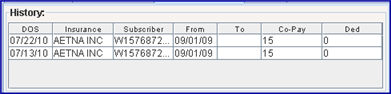
The History section displays the date of service (DOS), Insurance carrier name, Subscriber number, the From/To dates of coverage, the amount of the co-pay (if any), and the amount of the deductible, if applicable.
Effective Version 13.03.01 - HMO information displayed. In prior software versions, when clients submitted Eligibility through TriZetto (formerly Gateway), Intellect did not populate all the return information on the HMO patients. Now, if a patient has an HMO account but another insurance company is the actual payer, both insurance companies are displayed.
• For example, if a patient has the HMO Aids Healthcare Foundation and the actual payer processing claims through the HMO is Aetna, Aetna displays on the Insurance Info tab
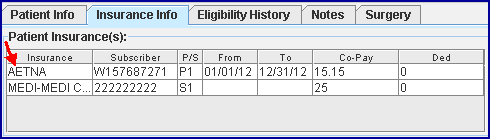
and Aids Healthcare Foundation (the HMO) displays on the Eligibility History tab

Effective Version 9.12.13 - Response Code Added. Prior to this update, Response Code AAA67, used by the insurance when the patient was not found in their eligibility records, was not programmed in Intellect. Therefore, nothing would show in Intellect's Eligibility History. Effective this update, the 271 Response Code AAA67 was added to the eligibility verification programming, allowing the code to be inserted into the patient's Intellect eligibility record and the description to be displayed in the patient eligibility history.
Effective Version 9.12.09 Verification per Calendar Date. Many insurances verify eligibility for dates of service within 24 hours of the request. Some verify within 1 week, or 2 weeks, and some do not apply restrictions. Prior to version 9.12.09, Intellect submitted the scheduled appointment date in the eligibility request file (270), which meant eligibility could only be requested for current appointments. Effective in version 9.12.09, the program sends the calendar date instead of the scheduled appointment date. It is important to know that the eligibility response is verifying the patient eligibility for the current calendar date and does not assure that the patient is eligible for future appointments. This change not only applies to Real Time Eligibility (from the appointment schedule) but also to Batch requests for eligibility either sent via automation or manually sent through Billing --►TeleCom --►Eligibility.
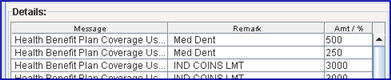
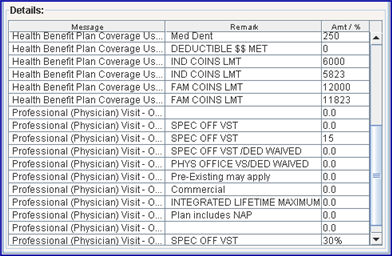
The Details section is divided into the three areas of Message, Remark, and Amt/% (Version 9.12.09 - The heading for the Amount column was changed to Amt/%). All of the information in these sections comes solely from the insurance company and may vary per insurance carrier.
Note: To not see descriptions for certain eligibility remark codes, as sent by the vendor, this information may be suppressed. See the <Status> field information in Utility --►Messages --►Eligibility Remarks.
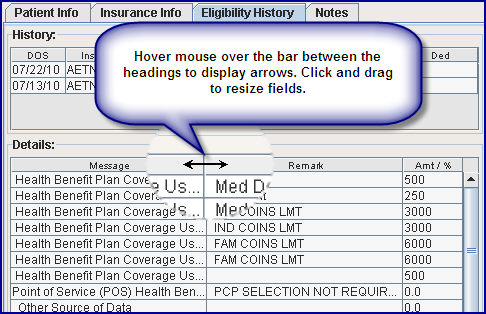
For readability, the size of these fields may be changed. Hover the mouse over the bar between the Message and Remark section headings to display a double-ended arrow, click and hold the left arrow down, and drag the mouse to increase/decrease the size of the fields. See below.
The Amt/% column information is displayed as follows:
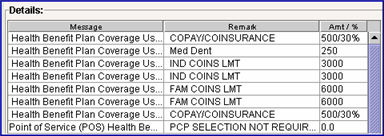
1. If the patient has a flat deductible, the Amt/% column displays the flat amount. For example, a flat deductible of $250 displays as 250, as can be seen on the first line of the screen below.
2. Version 9.12.09 Modification If the line provided by the insurance has an amount which is a percentage, it displays with the % symbol. For example, if a particular insurance has a 30% coinsurance, the Amt/% column displays 30%, as shown on the last line of the screen above.
3. Version 9.12.09 Modification In some cases, a flat deductible is paid up to a certain point and then a percentage coinsurance covers the balance. In such a case, both are displayed in the Amt/% column, separated by a forward slash, as indicated with the entries of 500/30% below.
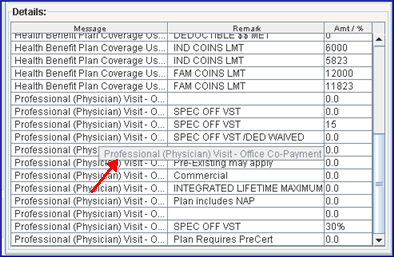
Additionally, hovering a mouse over the descriptions in the Message column causes a pop up box to display the entire description provided by the insurance company. In the example below, the mouse (which is no longer displayed) hovered in the Message column over an entry for Professional (Physician) visit - O... which then displayed the light grey pop-up field that states: Professional (Physician) Visit - Office Co-Payment.
Note: Prior to version 9.12.13, Response Code AAA67, used by the insurance when the patient was not found in their eligibility records, was not programmed in Intellect. Therefore, nothing would show in Intellect's Eligibility History. Effective version 9.12.13, the 271 Response Code AAA67 was added to the eligibility verification programming, allowing the code to be inserted into the patient's Intellect eligibility record and the description to be displayed in the patient eligibility history.
4. Effective version 13.08.20, Intellect’s program has been expanded to include the NM1 I3 when the Eligibility History tab is populated. In prior software versions, when using IPA/HMO eligibility, Intellect only provided limited TriZetto (formerly Gateway) information.
Version 9.12.06 - New feature. Click the [Notes] tab to provide a place to keep unlimited notes on a patient. The Notes are informational only, which means they can be accessed only through the Notes tab and, at this time, cannot be printed.
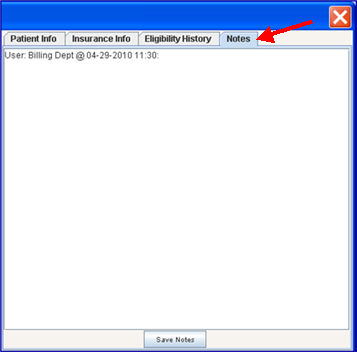
Information entered in the Notes tab are operator and date/time stamped, as shown above. Scroll through the notes to read previous entries, which may be read-only and not modified.
The notes are linked to the patient record, meaning if patients are shared between two clinics, notes entered in either clinic may be read. If patients are NOT shared, clinics are only able to read the notes added in their clinic.
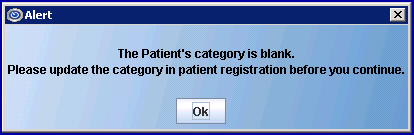
Effective version 17.06.09
To prevent a charge for a patient with a blank name or category to be entered, a message displays in the Charges --►Charge screen and Schedule --►Appointment --►Full Day --►Surgery Tab screen:
Effective version 9.12.18 - New feature; described in the 9.12.22 release note.
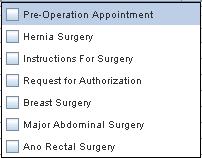
The [Surgery] tab on the Modify Appointment dialog box was added for surgery scheduling. This option allows clients to:
• track information as it is received and enter the date it was received
• enter messages and notes
• enter DX and Cpt Codes and descriptions along with MODIFIERS
• print various forms like Pre and Post procedure directions
Note: If an authorization number is entered, an Encounter is created so when a charge is POSTED it attaches the authorization number.
Once surgery is done, any necessary modifications may be made to the DX, or process and POST the charge.
The [Surgery] tab is only accessible after an appointment is made and the appointment is modified. Click on the [Surgery] tab to display this screen:
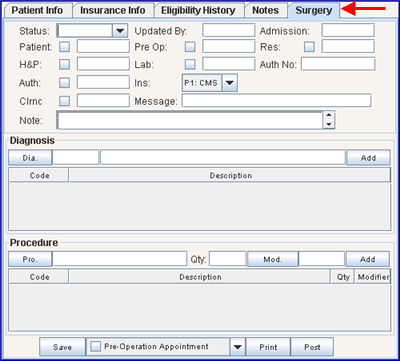
Surgery tab action buttons (at the bottom of the tab)
1. Status ![]()
1.1 The Status drop-down is used to select the status of the surgery; i.e., Booked, PA Canceled, PHY Canceled, or Rescheduled.
2. Updated By ![]()
2.1 Automatically populates with logged-in user’s operator number after pressing [Save].
3. Admission ![]()
3.1 Enter the tentative admission date.
3.2 In versions prior to 9.12.22, this field was labeled Date.
4. Patient ![]()
4.1 Check this box once the patient has been notified when his/her surgery is scheduled with the surgery facility. When the box is checked for this option, the current date fills the box to the right. The date in the box should be the date the patient was notified that his/her surgery was scheduled.
5. Pre Op ![]()
5.1 Check this box if the surgery order packet has been sent to the Pre-Op department at the surgery facility. The pre-op date is entered next to the check box.
6. Res ![]()
6.1 Check this box if the surgery has been scheduled with the surgery facility. The date the surgery was scheduled is entered next to the check box.
7. H&P ![]()
7.1 Check this box if the patient’s history and physical is up-to-date; i.e., within 30 days from the surgery date. Enter the date the H&P box was checked. If this box is not checked, surgeons are notified to dictate a pre-Op H&P.
8. Lab ![]()
8.1 Check this box if all of the patient’s pre-op lab work has been returned to the doctor’s office. Enter the date the Lab box was checked.
9. Auth. No. ![]()
9.1 Once surgery has been authorized by the insurance company, enter the surgery authorization number in this field.
10. Auth ![]()
10.1 Check this box:
10.1.1 If surgery authorization has been obtained from the insurance company.
10.1.1.1 When the box is checked for this option, the current date fills the box to the right. The date in the box should be the date surgery was authorized.
10.1.1.2 Enter the Authorization Number in the <Auth. No.> field.
10.1.2 If no surgery authorization is needed. When the box is checked for this option, the current date fills the box to the right. The date in the box should be the date surgery was authorized.
11. Ins ![]()
11.1 Select the default for this option 'T1:J1 MAC-PALMETTO GBA' OR use the drop-down menu to select 'T2: BLUE CROSS INSURANCE A'.
12. Clrnc (Clearance) ![]()
12.1 If the patient does not need cardiac clearance, check the box and type in the field to the right of the check box, 'No Cardiac Clearance Needed.'
12.2 If the patient needs cardiac clearance, check the box when cardiac clearance is received from the Cardiologist and enter the cardiologist’s name in the field to the right of the check box.
13. Message ![]()
14. Note ![]()
14.1 Important notes may be typed in this field for the surgery scheduler such as, 'Stop Aspirin 5 days prior', 'Need C-Arm', etc. Or the Note section may be used to enter the Confirmation Number after scheduling the surgery, along with the pre-op date and time.
14.2 If the note is long, the arrow keys may be used to scroll up and down through the note to read it in its’ entirety.
This section of the Surgery tab allows the selection of ICD-10 codes and descriptions for the surgery. After the surgery is completed, the surgeon can click on that surgery and submit the codes for billing. Most of the time, the surgeon uses the same ICD-9/ICD-10 codes that were entered by the surgery scheduler. Sometimes the surgeon may add, delete, or change the codes, depending on what the surgeons actually do during the surgery.

15.1 To add a Diagnosis Code to the surgery list, use either of the following options:
15.1.1 Click on the [Dia.] button (see red arrow above) to display the Searching DIAGNOSIS screen. For additional information on using Searching screens, see Introduction to Intellect --►Intellect Characteristics and Features, Searching Screen.
15.1.2 Search for and select the Diagnosis Code (for more information on diagnosis codes, see Charges --►Charge <Diagnosis Code>). The Diagnosis Code and its’ description display to the right of the [Dia.] button (see blue arrow above).
15.1.3 Click on the [Add] button (see green arrow above) to add the selected Diagnosis Code to this surgery.
- OR -
15.1.4 Effective version 15.09.02, for either an ICD-9 code or ICD-10 code, enter a partial diagnosis description/keyword in the field next to the [Dia] button (see blue arrow above), and then press [Enter] to display the ICD-10 Lookup screen* with the available ICD-10 code(s) which match the entered Search Phrase. For example, after entering osteo and pressing [Enter], Intellect displays:

If options are displayed in blue, as shown above, click on a blue code and then click on the [Expand] button at the bottom of the pop up window to expand the code to the next level. For example, with Osteoarthritis of hip selected, as shown above, the next level of codes would be:
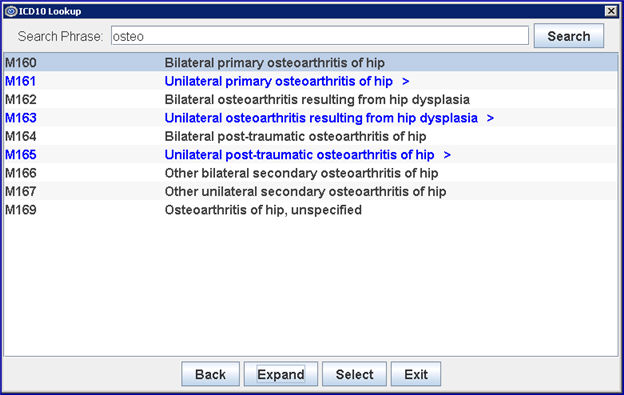
15.1.5 Click [Select] to replace the search phrase entered in step 15.1.4 with the highlighted code. For example, based on the code highlighted above, the original search phrase of osteo would be replaced with M160.
15.1.5.1 To add the diagnosis code to the surgery list, click on the [Add] button (see green arrow in step 15). The code is not added to the surgery list if the [Add] button is not clicked.
15.1.6 If the codes have been expanded, click [Back] to return to the original list. Click [Exit] to close the ICD10 Lookup screen.
* The ICD-10 Lookup screen feature is active only when:
• The Utility --►Set Up --►Parameter <ICD10 Lookup> field is set to ‘Yes’
• The Utility --►Category <ICD10> field is set to ‘Yes’
• The date in the Utility --►Set Up --►Parameter <ICD10 Effective Date> field (added in version 12.12.06) is equal to or greater than October 1, 2015
15.2 Note: To add a new Diagnosis Code into the Intellect program, refer to Utility --►Diagnosis --►Add.
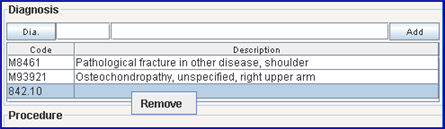
15.3 To remove a Diagnosis Code from the surgery list, click on the code to delete, and then right-click to display the [Remove] button. Click on [Remove].
15.4 Effective version 14.07.01, the RFA now prints the date of the patients’ appointment instead of the Clinic Date.
15.5 Effective version 14.07.11, the RFA can now display diagnosis codes for which there is no charge. Diagnosis codes are added to the RFA via this Diagnosis section.
15.5.1 Enter the applicable diagnosis code (see section 15.1 above for details) and click on the [Add] button to the right.
15.5.2 Once all of the needed diagnosis codes are entered, click on the [Save] button, then click on the [Modify] button at the bottom of this screen.
15.6 Effective version 16.02.22, both the diagnoses codes and their descriptions display in the Requested Treatment section of the RFA. Additionally, changes were made as to how the information related to the diagnosis codes and the procedure codes are printed on the RFA:
• When there are numerous diagnosis codes attached to one CPT code, each diagnosis code prints on a separate line with the same CPT code, etc.
• If the patient has more than one appointment for the same day, then a separate RFA form prints.
This section of the Surgery tab allows the selection of CPT Codes and descriptions for the surgery. After the surgery is completed, the surgeon can click on that surgery and submit the codes for billing. Most of the time, the surgeon uses the same CPT codes that were entered by the surgery scheduler. Sometimes the surgeon may add, delete, or change the codes, depending on what the surgeons actually do during the surgery.
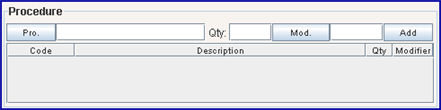
To add a Procedure Code to the surgery list:
16.1  Click on the [Pro.] button to display the Searching PR_Procedure screen. For additional information on using Searching screens, see Introduction to Intellect --►Intellect Characteristics and Features, Searching Screen.
16.2 Search for and select the Procedure Code (for more information on Procedure Codes, see Charges --►Charge <Panel>). The Procedure Code and its’ description displays to the right of the [Pro.] button.
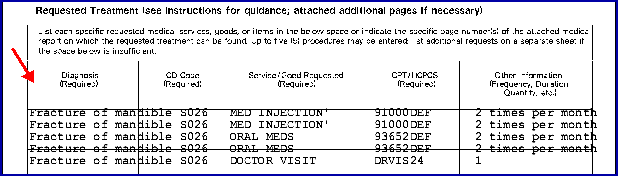
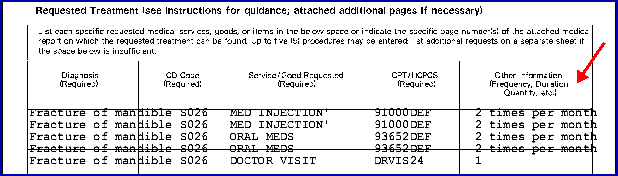
16.3  Effective version 16.02.22, a <Qty> field allows information applicable to the procedure code to be typed in, such as frequency, duration, and quantity. This information displays on the Request for Authorization forms (RFA) in the Requested Treatment section:
16.4  If the procedure requires a modifier, click the [Mod.] button to display the Searching MODIFIER screen from which to select a modifier. For additional information on using Searching screens, see Introduction to Intellect --►Intellect Characteristics and Features, Searching Screen.
16.5  Click on the [Add] button to add the selected Procedure Code to this surgery.
Note: If the [Add] button is not clicked, the procedure code is not added.
16.6 To add a new Procedure Code not already in the system, refer to Utility --►Procedure --►Procedure--►Add.
16.7 Effective version 16.02.22, the procedure codes, their descriptions, and applicable information such as frequency, duration, and quantity display in the Requested Treatment section of the RFA. Additionally, changes were made as to how the information related to the diagnosis codes and the procedure codes are printed on the RFA:
• When there are numerous diagnosis codes attached to one CPT code, each diagnosis code prints on a separate line with the same CPT code, etc.
• If the patient has more than one appointment for the same day, then a separate RFA form prints.
17. Surgery Tab Action Buttons

17.1  : Click on this button to save the information that has been entered.
17.2  : Click the down arrow
  on the surgery/form drop-down to display and select the type of surgery or applicable form on the drop-down list.
17.2.1 Effective version 16.02.22, a Request for Authorization option was added to the drop-down list. This option generates a DWC Form RFA (a.k.a. the State of California Division of Workers' Compensation Request for Authorization for Medical Treatment). The Requested Treatment section of the RFA includes detailed information pulled from the Diagnosis and Procedure sections of the Surgery tab.
17.3  : If a printer has been set up for this workstation, click on this button to print the surgery information.
17.4  : A server needs to be available to use this option.

These are read-only fields and may not be accessed for modification of data.
1.  : Displays the Utility --► Provider --► Provider <Provider Code> for previously booked appointments.
2.  : Displays the time of a booked appointment.
3.  : Displays the date of a booked appointment.
4.  : Displays the most recent action taken in respect to a booked appointment; i.e., Add, Modify, Reschedule, No Show etc.
5.  : Displays the Utility --► Set up --► Appointment --►Appointment Type <Appointment Type> of a booked appointment
6.  : Displays the calendar date when an appointment is booked.
7.  : Displays the operator number of the person that made the patient’s appointment.
8.  : Displays the amount of time allocated for an appointment.
9.  : Displays a comment associated with the Utility --► Set up --► Appointment --►Appointment Type <Appointment Type> for a booked appointment.
10.  : Displays the calendar date that any change was made to the patient’s appointment.
11.  : Displays the operator number of the person that made changes to the patient’s appointment.
Action Buttons for the Modify Appointment Dialog Box
At the bottom of the screen there are three action buttons:
![]()
1. 
1.1 Click [Modify] to save all changes and closes the dialog box.
2. 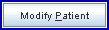
2.1 Effective version 9.12.10: New option: [Modify Patient] button.
2.2 Click [Modify Patient] to open the Modify Patient Screen or Worker Screen depending on the patient's Utility --►Category <Type (C/P/W/O/F/G) >.
2.3 Effective version 16.12.02, the [Modify Patient] button has a security level that can be set so that when modifying a patient through the Appointment Schedule the [Modify Patient] button is not active; i.e., the [Modify Patient] button is grayed-out/inactive for users whose security level does not allow access to the patient demographics screen.
To set the security level, go to Utility --►Set Up --►Menus --►Programs to access the Modify EXECUTABLES screen. In the <Command Name> field, enter ModifyIPA (ModifyIPA is the command name for the [Modify Patient] button). In the <Level> field, enter a security level number greater than that of users who add and modify appointments. For example, if the security level of a user who adds or modifies appointments is 40, enter a number greater than 40 in the <Level> field.
3. 
3.1 Click [Exit] to exit the dialog box without saving any changes.