
Intellect™
UTILITY MENU OPTIONS

Set Up
Screen Fields
To some extent, the fields on some of Intellect's screens may be modified using the Modify FIELD_RECORDS screen. Changes should be made with caution as changes to fields affect the order of other fields in the displays. This is a partial list of screens of fields that may be added or removed: Patient Registration, Encounters, Utility Screens: Category, Provider, Insurance, Pay Plan, Procedure, Facility, Referring and Business. When applicable, a link to the list of additional fields can be found in the document for the section for the screen.
Brief step-by-step instructions in this document include:
Customizing Appointment List Tab Fields
Masking/Unmasking the Social Security Number (SSN)
Version 9.12.33 - New Feature. Prior to version 9.12.33, Remarks on the Ledger --►Open Item screen were limited to what was typed in. As of version 9.12.33, a Remark can be pulled from one of Intellect’s tables (the current default* is the Diagnosis table). Now, when adding a Remark, press [F2] in the Remark field of the Open Item screen to display diagnosis descriptions, scroll to the appropriate diagnosis, and then press [Add].
*For more information on changing the default table, click here.
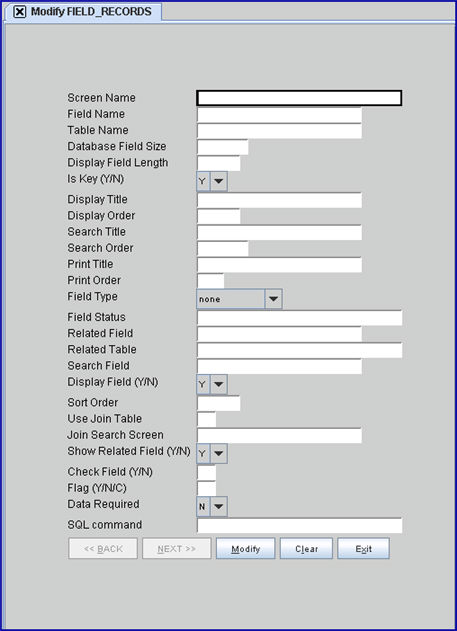
To access the Modify FIELD_RECORDS screen, go to Utility --►Set Up --►Screen Fields --►Modify
The Modify FIELD_RECORDS screen displays:
To remove a field:
1. Open the screen where the field is located. For example, to remove the field <Active> from the PATIENT screen, go to Registration --►Regular --► Patient.

In this example, 'PATIENT' is the name of the patient demographic screen as seen on the tab of the open screen. The screen name is the same whether in Add, Modify, View, or Delete modes.
3. To obtain the name the program uses for the field, click in the field, and then press [F1] to display the Help box with the field's programming name.
As can be seen above, the name the program uses for the <Active> field on this screen is PA_ACTIVE. Note: If the <Active> field displays on multiple screens, the programming name for the <Active> field is different on each screen.
4. Go to Utility --►Set Up --►Screen Fields.
4.1 Enter the name of the screen in the <Screen Name> field. For example, enter PATIENT, as determined in step 2.
4.2 Complete the <Field Name>. For example, enter PA_ACTIVE, as shown in step 3.
4.3 Press [Enter] on the keyboard.
5. Clear the <Display Order> field:
6. Click on [Modify] to complete the change:

To add a field:
1. Open the screen where the field should be added. For example, to add the optional <Active> field to the PATIENT screen, go to Registration --►Regular --► Patient.
2. Verify the screen name (see step 2 in Removing a Field above).
3. Go to Utility --►Set Up --►Screen Fields.
3.1 Enter the name of the screen in the <Screen Name> field. For example, enter 'PATIENT' as determined in step 2 above.
3.2 Press [F2] to display the list of fields available for that screen. For example:
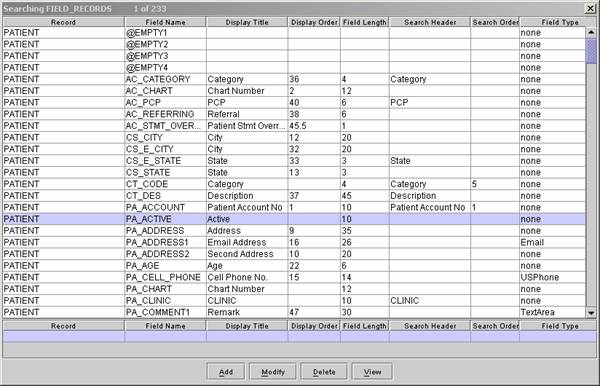
3.3 A blank in the <Display Order> column indicates the field shown in the adjoining <Display Title> column is available. In the example above, the <Active> field is available to be added to the PATIENT screen. It may be necessary to scroll to search for available fields.
4. With the field to be added highlighted on the Searching FIELD_RECORDS screen, press [Enter] on the keyboard to insert the record into Utility --►Set Up --►Screen Fields.
5. In the <Display Order> field, enter a number to indicate where the new field should be located on the screen.
5.1 Fields on the screen are displayed in numerical order, as indicated in the <Display Order> column.
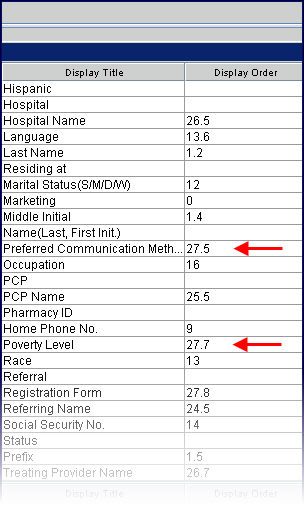
5.1.1 To determine the number of the field to be added, go to the Searching FIELD_RECORDS screen and scroll or search for the fields between which the new field should be placed and note their numbers. The field to be added should be assigned a number between those numbers. For example, to add the <Active> field after the <Preferred Communication Method> and before the <Poverty Level> field, note in the screen shot below <Preferred Communication Method> has a <Display Order> of 27.5 and the <Poverty Level> field has a <Display Order> of 27.7, so the <Active> field should have a <Display Order> number of 27.6.
 .
.
5.2 Be advised that any changes to fields affect the order of other fields in the displays. If adding the field between two others with consecutive <Display Order> numbers, a number plus a fraction (for example to place between 49 and 50 type 49.5) may be designated.
6. Select [Modify] to complete the change
Changing the Default Table (Example is for Ledger --►Open Item):
To change the default table:
1. On the Utility --►Set Up --►Screen Fields --►Modify Modify FIELD_RECORDS screen, enter the appropriate information in the <Screen Name>, <Field Name>, and <Table Name> fields as shown below. See step 4 in Removing a Field for information on obtaining <Screen Name>, <Field Name>, and <Table Name> information.

2. Enter the new field/table information in the <Related Field>, <Related Table>, and <Search Field> fields. If you are not sure of the field and table names, please contact Prime Clinical Support.
The example below shows the set up for the default Diagnosis table:

Masking/Unmasking the Social Security Number (SSN)
The setting of <Field Type> on the Utility --►Set Up --►Screen Fields --►Modify screen determines whether or not social security numbers are displayed completely or the first five digits are masked.

Effective version 16.12.02 the change made in version 16.11.10 to display only the last 4 digits of a SSN number was modified. Users now have the options of masking the SSN or not masking the SSN. To accommodate this modification, two drop-down options of 'MASKED SSN' and 'SSN' were added to the <Field Type> field on the Utility --►Set Up --►Screen Fields --►Modify screen. Selecting 'MASKED SSN' causes all but the last 4 digits of the SSN to be masked; selecting 'SSN' allows the entire SSN to be viewed.
Effective version 16.11.10, if a field contains a SSN, only the last 4 digits of the social security number are displayed; the rest are represented with asterisks (***-**-1234), unless the data in the database is malformed or incomplete.
Customizing Appointment List Tab Fields
Effective version 16.12.02, the fields can be customized that display on the Schedule --►Appointment --►Full Day -- Appointment List Tab. Fields on the original display may be deleted or rearranged, or fields may be added from the APPOINTMENT, PATIENT, or INSUR_INFO tables.
To customize the Appointment List display:
1. Go to Utility --►Set Up --►Screen Fields --►Modify.
2. On the Modify FIELD_RECORDS screen, enter APPOINTMENT_LIST in the <Screen Name> field:

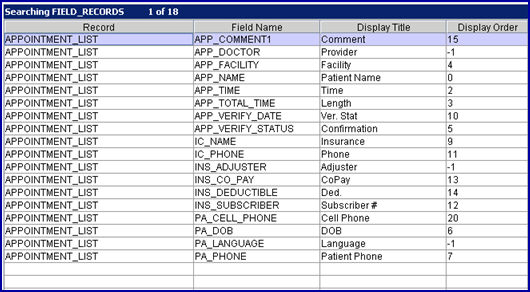
Press [F2] to display a Searching FIELD_RECORDS screen. This screen shows the current set up for the Appointment List Tab.
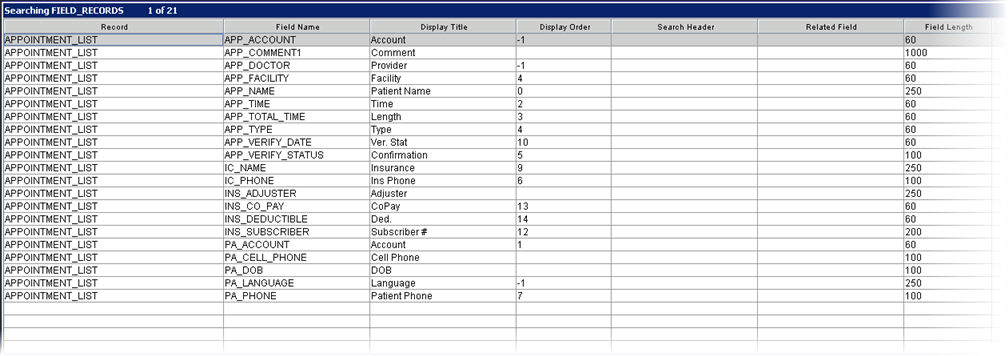
2.1 To delete a field, enter -1 in the <Display Order> column for the appropriate <Field Name>. See fields APP_ACCOUNT, APP_DOCTOR, and PA_LANGUAGE above for examples. Entering -1 causes the field to not display on the Appointment List Tab but leaves it in the system in case it needs to be added later.
2.2.1 Click on the <Field Name> field (see red arrow below), enter the name of the field, and press [Enter] twice to move to the <Display Oder> field.
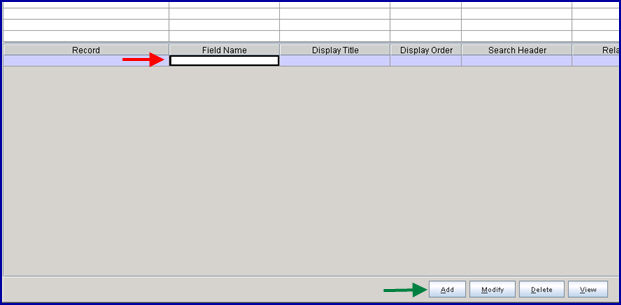
When entering the field name, note that each field on each screen in Intellect has a specific programming name. When adding a field, the exact name must be entered in the <Field Name> column.
For example, to have the patient's account number display next to the patient's name on the Appointment List Tab, go to the Modify FIELD_RECORDS screen, enter PATIENT in the <Screen Name> field, and press [F2] to display the list of fields on the PATIENT screen. As shown below, the name for the patient account number field is PA_ACCOUNT:
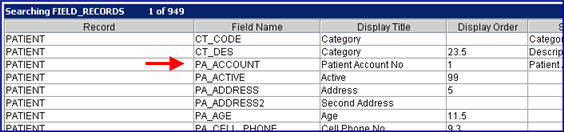
Close the Searching FIELD_RECORDS screen, and while on the Modify FIELD_RECORDS screen, enter APPOINTMENT_LIST in the <Screen Name> field, and press [F2] to display the screen shown in step 2. Click on [Add] and enter PA_ACCOUNT in <Field Name>, as shown in step 2.2.1.
Fields may be added from the APPOINTMENT, PATIENT, or INSUR_INFO tables.
2.2.2 Display Order field:
Fields display in the order noted in the <Display Order> column. Each number must be unique in the <Display Order> column, with the exception of -1. Numbers may include decimals such as 1.5, or 12.5.
Example continued: In step 2.2.1, the patient account number is being added next to the patient name on the Appointment List Tab screen. Once PA_ACCOUNT is entered in <Field Name> (shown in step 2.2), an order number must be entered in the <Display Order> field. As shown below, the patient name (APP_NAME) has a display order number of 0, and the next closest display number is 2, so a display order number of 1 may be entered for PA_ACCOUNT.
2.2.3 Click on the [Add] button at the bottom of the screen to save the change (see green arrow in screen shot in step 2.2.1).