
Intellect™
SCHEDULE MENU OPTIONS

Appointment
Full Day
Appointment Booking and Management
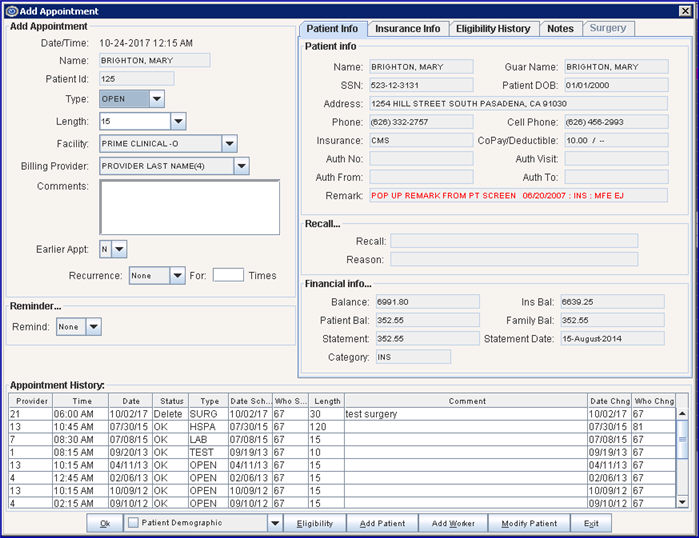
Add Appointment Dialog Box
Appointments are added via the Add Appointment dialog box. From the Appointment Schedule, use any of the following three options below to access the Add Appointment dialog box:
Note: It is possible to set up the appointment schedule to allow multiple appointments for one time slot. See Double-Booking. See View 1 & 2 for information on viewing double-booked appointments on the appointment schedule.
Option 1
1. Use the Scheduling Short Cut Icons (described in Schedule --►Appointment --►Full Day --►Schedule Overview --►Day View).
![]()
1.1 Select the day/date and time slot of the provider’s schedule (in any scheduling view) for which to add an appointment.
1.2 Click the Add Appointment icon ![]() to open the Add Appointment dialog box.
to open the Add Appointment dialog box.
- OR -
Option 2
2. With the cursor/pointer in any unscheduled appointment time slot:
2.1 Right click (in any view) to open the options menu:
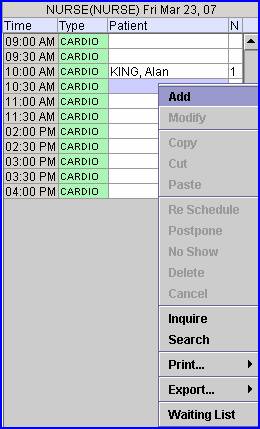
2.2 Select and click on Add to open the Add Appointment dialog box.
- OR -
Option 3
3. With the cursor/pointer in any unscheduled appointment time slot:
3.1 Type the letter 'A' on any schedule time/date slot in any scheduling view.
Any of the above three options opens the Add Appointment dialog box:
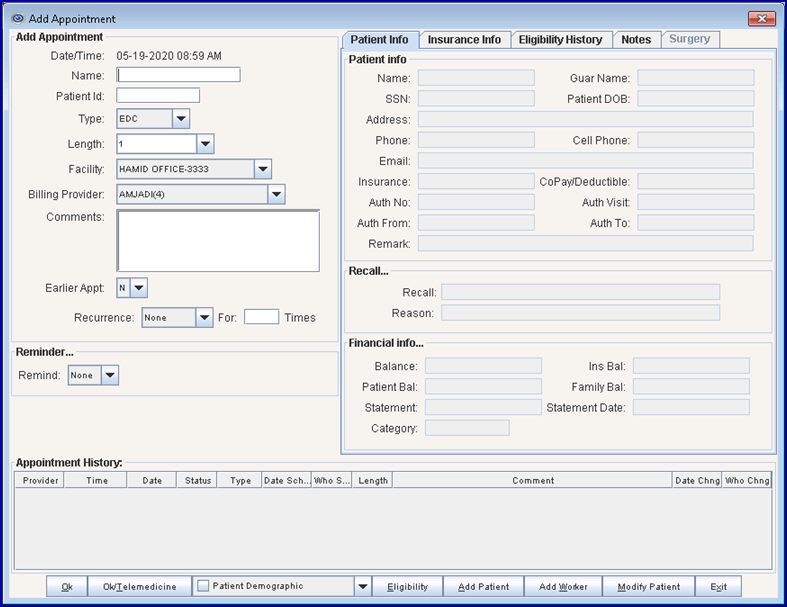
Areas on the Add Appointment box include:
Surgery Tab (This tab is not active on the Add Appointment screen. Since it is only active in the Modify Appointment dialog box, information for it is given under Surgery Tab in the Modify Appointment Dialog Box documentation.)
Updates:
Effective version 9.12.32 - New Feature.
As of version 9.12.32, a PENDING feature prohibits multiple operators from overbooking an appointment time slot.
When an operator accesses the Add Appointment dialog box to begin scheduling an appointment, HOLD displays in the Type column and a PENDING message displays in that time slot for all other operators:
The HOLD/PENDING message displays until either:
• the operator completes the appointment by clicking on [OK] in the Add Appointment dialog box.
- OR -
• the operator exits from the Add Appointment dialog box without saving the appointment.
If the server goes down or the computer is shut off while an appointment is pending, a PENDING/HOLD message box displays. The system automatically clears all pending appointments within 24 hours if they have not been completed.
1. Date/Time: ![]()
1.1 This field displays the date and time of the appointment to be scheduled, based on the particular appointment slot for the selected provider.
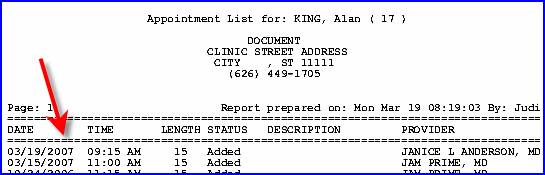
1.2 Once the appointment is added, Date and Time display in the Appointment History section at the bottom of this and other dialog boxes.

It also prints when the Print Patient’s Appointments function is used.
2. Name: ![]()
2.1 This field displays the name of the patient to be scheduled as Last name, First name.
2.2 Type either the Last name, the beginning letters of the Last name, or a patient account number, then press [Enter] OR [F2], and Intellect searches for the patient.
2.2.1 If a Last name was entered and there is more than one patient in the system with that last name, Intellect displays a list of patient choices on the Searching screen. Double-click on the correct patient. For additional information on using Searching screens, see Introduction to Intellect --►Intellect Characteristics and Features, Searching Screen.
2.3 For a new unregistered patient, complete a mini-registration for the patient by clicking on the Add Patient or Add Worker button at the bottom of the Add Appointment dialog box:
![]()
Note: Prior to version 13.08.20, when initially booking new patients through the Appointment Schedule by clicking on the [Add Patient] button on the Add Appointment screen, users were taken to the main Add Patient screen with numerous fields. As of version 13.08.20, mini-registration screens may be customized to display only the needed fields, allowing the remainder of the registration screen to be filled out at a later time. Note: When setting up a new patient, the <First Name>, <Last Name>, <Guarantor>, and <Category> fields are mandatory and MUST be included and completed on the mini-registration screen. Contact your training representative to customize your mini-registration screen.
Click either the Add Patient or Add Worker button to go to the Add Patient/Add Worker screen.
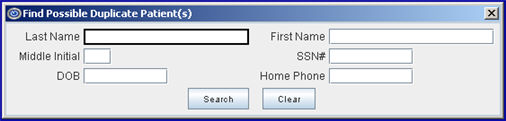
2.3.1 Before adding the new patient's information, check to make sure the patient is not already in the system. Press [Enter] OR the down arrow to display the Find Possible Duplicate Patient(s) box (see sample below) to initiate a search, and enter either the patients' last name/first name, OR date of birth, OR Social Security Number, OR phone number (use only one search criteria at a time), and press [Search].
If there is a possible match, Intellect displays the Possible Duplicate Patient(s) screen. In the example below, a search was made for the surname 'Black' and the possible duplicates are displayed:
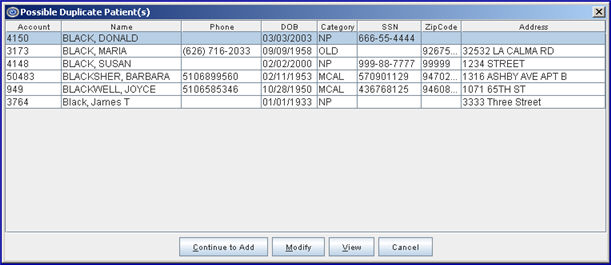
2.3.1.1 If the patient being added is NOT shown on the list:
• Press the [Continue to Add] button to go to the Add PATIENT screen. Complete the Add PATIENT screen and press [Add]. The Add Appointment screen is displayed, showing the new patient. Press [OK] to schedule the new patient.
2.3.1.2 If the patient trying to be added IS already shown on the list, click one of these buttons:
• [Modify]: If the patients' information needs to be changed, highlight the patient, press [Modify] to go to the Modify PATIENT screen, and press [Enter] to populate the screen. Make the change(s), and click on the [Modify] button to save the changes. Press [Cancel] - see below.
• [View]: If it is unknown if a patient on the list is the same as the patient trying to be added, press [View] to go to the View PATIENT screen, and press [Enter] to populate the screen. Press [Exit] to go back to the Possible Duplicate Patient(s) screen.
- If the patient IS a duplicate, press [Cancel] - see below.
- If the patient is NOT a duplicate, press [Continue to Add] - see above.
• [Cancel]: If the information is accurate, press [Cancel] to escape from the Possible Duplicate Patient(s) screen, close the Find Possible Duplicate Patient(s) and Add Patient screens.
- Enter the already-existing patients' account number in the <Name> field of the Add Appointment screen, and press [OK] to make an appointment for that patient.
2.3.1.3 If there are no possible matches in the system, Intellect displays:
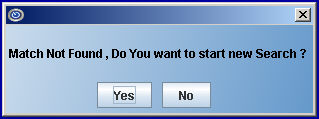
• Press [Yes] to return to the Find Possible Duplicate Patient(s) box, allowing the entry a different type of search criteria.
• Press [No] to return to the Add PATIENT screen. Complete the Add PATIENT screen and press [Add]. The Add Appointment screen is displayed, showing the new patient. Press [OK] to schedule the new patient.
3. Patient Id: ![]()
3.1 This field holds the Registration --►Patient <Patient Account No> of the patient to be scheduled.
3.2 If a name is selected in <Name>, then Intellect completes this field.
3.3 Enter the account number, OR type up to 6 characters of the last name and press the [F2] key to display the Searching screen. To select the account from the list, either highlight the record and press the [Enter] key, OR double-click on the record. For additional information on using Searching screens, see Introduction to Intellect --►Intellect Characteristics and Features, Searching Screen.
3.4 If the Appointment Type allows more than one patient to be scheduled in one time slot, this displays as a drop-down field listing each of the patients.
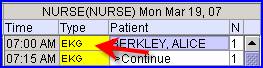
3.4.1 When there are multiple appointments scheduled in the same time slot, they are indexed by name.
3.4.2 In software versions prior to 15.02.17, when there were two names that were exactly the same, the second appointment was not displayed because the names were identical (for example, two different people with the name Jose Gonzalez, or Jose Gonzalez with two different accounts). Effective version 15.02.17, the account number is appended after each of the names so that the names are unique and are indexed accordingly.
4.1 This drop-down holds the Type code indicating the reason for this appointment and governs several schedule configuration and behavior parameters such as default appointment time length, amount of patients per slot, minimum time unit per appointment, and color codes for the schedule. Properties are set in Utility --►Set Up --►Appointment --►Appointment Type. This type may also trigger a comment to display if configured to do so.
4.2 The default Type displayed here is from the Template assigned to the provider’s schedule for this day and time slot.
4.3 Accept the default OR use the down arrow on the drop-down list to select an alternative Type.
4.4 The selected Type and color code display on the schedule Type column.
It displays when the Print Doctor’s Appointments function is used,
![]()
and also displays in the Appointment History section at the bottom of this and other dialog boxes.
![]()
5.1 This field holds the value to determine the length of the appointment to be booked.
5.2 It shows a default value that was set in Utility --►Set Up --►Appointment --►Appointment Type.
5.3 Accept the minimum OR use the down arrow on the drop-down to click on a longer length. The choices are multiples of the minimum.
5.4 A custom appointment length may also be typed right into the 'combo box.'
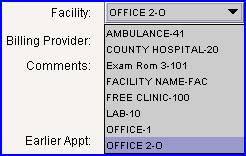
6.1 This field holds the place of service with the Utility --►Facility <Name> followed by the Utility --►Facility <Facility Code>. The available list is all facilities created in Utility --►Facility and is sorted alphabetically.
6.2 Defaults are from the Utility --►Set Up --►Appointment --►Appointment Type <Facility> for the Appointment Type of the time slot selected.
6.3 If the field Appointment Type <Facility> is blank, then Intellect displays the Utility --►Set Up --►Appointment --►Template <POS> of the time slot selected.
6.4 If a value is set during set up, when Type is selected the Facility changes to the facility associated with that Appointment Type’s Utility --►Set Up --►Appointment --►Appointment Type <Facility>. If there is no Utility --►Facility <Facility Code> default set for the newly selected Appointment Type, then the default remains unchanged.
6.5 Accept the default OR use the down arrow on the drop-down to click on the desired Facility.
7.1 The Billing Provider field is for clinics using the Cost Center/Billing Provider feature, set up in Utility --►Provider --►Provider <Cost Center/Dr>. If Billing Provider does not apply, press the [Enter] key to accept the default.
7.2 When an appointment is scheduled for a provider whose Utility --►Provider <Cost Center/Dr. (C/D)> = 'C' and Utility --►Provider <Billing Provider> is completed, the program defaults the Utility --►Provider <Billing Provider>.
7.3 When the Utility --►Provider <Cost Center/Dr. (C/D)> = 'D', the Scheduled Provider is always defaulted, even if Utility --►Provider <Billing Provider> is completed.
8.1 This field displays a message written in Utility --►Message --►Message when the <Message Code> matches the <Type Code>. If Utility --►Set Up --►Parameter <Prep Notes> = 'N,' then the Comment section remains blank.
8.2 It displays in the Appointment History section <Comment> field at the bottom of this and other dialog boxes.

8.3 It also prints under 'DESCRIPTION' when the Print Patient’s Appointments function is used.

8.4 A new comment may be entered or a change made to the existing one; however, if the associated Appointment Type is changed here or when modifying an appointment, all changes to this comment field are lost.
8.4.1 Note: When entering comments, the word 'TODAY' may not be used in all capital letters as that format is reserved for programming; however, it may be entered as 'today' or 'Today.'
8.5 For clinics using WebStaff, this comment displays in the <Memo> field.
Video Available: Click Waiting List to access the link. Depending on the system set up, the media player may need to be activated. Speakers need to be attached to the workstation to hear the instructions.
Note: To view the videos, log-in through the www.primeclinical.com website. Current support is required.
This Yes/No drop-down is used to add patients to a waiting list for scheduling an earlier appointment.
9.1 The default is 'N' (No), meaning the patient is not put on a waiting list.
9.2 Select 'Y' (Yes) when adding or modifying the appointment to place the patient on a waiting list for earlier scheduling. Note: To put a patient on the waiting list, the new appointment has to be with the same doctor AND at an earlier appointment time then the previous appointment.
9.3 A patient may be added to or removed from the Waiting List when either adding or modifying an appointment. See Waiting List Features and Scheduling from the Waiting List for additional waiting list information.
10.1 This is used to create a duplicate appointment, adding it to the schedule for a later date, or dates, using the same parameters as the original appointment.
10.1.1 For example, a patient needs to come in every week for 4 weeks for a blood test. When the first appointment for a blood test is made using the Add Appointment dialog box, selecting 'weekly' for this field, entering '4' in the <For Times> field, and clicking [OK] sets up four new appointments for the patient on the same day of the week at the same time for four weeks.
10.2 Intellect initially uses the same time and day of the week until modified/rescheduled.
10.3 Appointments must be modified or deleted one at a time. This option is only available through the Add Appointment dialog box.
10.3.1 In the example in 10.1.1, four appointments were set up on the same day of the week at the same time for four weeks. If the patient decides it would be better to come in an hour earlier for the remaining appointments, each of the four future appointments need to be modified one at a time.
10.4 Since the default is none, only implement when desired by using the drop-down arrow to select the recurrence interval.
10.5 Effective version 20.03.09, the drop-down for this field includes Monthly, Quarterly, and Half Yearly. These options are counted by weeks; i.e., monthly = 4 weeks, quarterly = 12 weeks, half yearly = 26 weeks.
11.1 This is used in conjunction with the <Recurrence> selection to define the amount of appointments to schedule with the designated interval.
11.2 Type in the desired numeric value. See example in 10.1.1.
12. When this section of the screen is completed, the appointment may be added to the Appointment Schedule by clicking the [OK] button at the bottom of the screen.
NOTE: Clinics planning to send appointment reminders via email or text/SMS must also complete the following section.
Video Available: Click Email/Text Appointment Reminder to access the link. Depending on the system set up, the media player may need to be activated. Speakers need to be attached to the workstation to hear the instructions.
Note: To view the videos, log-in through the www.primeclinical.com website. Current support is required.
Select the applicable option from the drop-down list: XML, Email, SMS (text message), HTML, or None (click a link for details).
Updates:
Effective version 16.10.11, voice reminder messages sent via Twilio may include co-pay and deductible information based on the Registration --►Regular --►Patient --►Modify --►Modify Insurance <Co Payment> and <Deductible Met> fields.
• If the <Co Payment> field is greater than zero, the reminder message can include the following sentence, where '|| ins.ins_co_pay ||' is filled with the amount in the <Co Payment> field.
'Please prepare to pay your co-payment of $' || ins.ins_co_pay || ' for this visit.
• If the <Deductible Met> field is greater than zero, the reminder message can include the following sentence, where '|| ins.INS_DEDUCTIBLE ||' is filled with the amount in the <Deductible Met> field.
'Please keep in mind that you are responsible for your unmet deductible of $' || ins.INS_DEDUCTIBLE '.
To use this option, contact PCS support to set it up.
Effective version 16.02.22, the drop-down list may be organized to have the most frequently used option as the default. For example, for offices who always select the Email option for this field, Email may be set as the default.
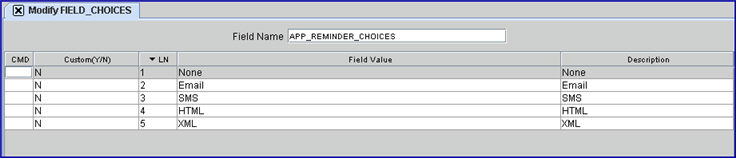
To reorganize the drop-down list, go to Utility --►Set Up --►Field Choices --►Modify, enter APP_REMINDER_CHOICES in the <Field Name> field, and press [Enter] to display this screen where changes may be made:
Example:
The Modify FIELD_CHOICES screen above shows the drop-down options in the order they appear on the drop-down list, numbered from 1 through 5. To have Email be the default (i.e., the first one in the Reminder drop-down list), delete the 'None' option above it and, if 'None' should be on the drop-down list, add it back in below the Email option:
a. Click in the CMD column of line number 1 (None) and type a 'D.' This box appears:
b. Click [Yes] to delete.
c. To have the 'None' option on the drop-down list, click in the CMD column and type an 'A.' The system goes to the bottom of the list with the curser in the Custom(Y/N) column.
d. Type 'N' and press [Enter] to move to the Field Value column.
e. Type 'None' and press [Enter] to move to the Description column.
f. Type 'None' and press [Enter].
g. If no additional changes are needed on the list, close the screen.
1.1 XML: Select this option to create an XML file which can be picked up from an out-sourced vendor.
1.2 Email: Set up is required.
NOTE: Non-commercial email carriers have a cap on the number of emails that may be sent per day. If a clinics current email carrier does not support the number of emails needed to be sent on a daily basis, they need to contract with a commercial email vendor.
Effective version 15.08.06, when appointments have been set with ‘Email’ in the <Remind> field, emails may now be sent to multiple clinic addresses. For more information, please contact PCS Support.
Software versions prior to 15.03.11:
When the Email option is selected, an appointment reminder is immediately sent to the email address entered in the Registration --►Patient <Email> field. Intellect has a default reminder format which may have a custom file and message attached through Utility --►Set Up --►Appointment --►Appointment Type <Email File> <Email Message>.
Note: This option should NOT be selected for offices who plan to send an email which allows the patient to reply by selecting Confirm or Cancel.
Effective version 15.03.11:
When appointments are added, rescheduled, or modified, Intellect defaults the 'Email' option. With this option selected, Intellect sends the patient an email at the same time as the appointment is added, modified, or rescheduled. An additional email is also sent through automation, if this feature is set up.
Offices who do not already have the email setting completed in Intellect receive a pop-up message:
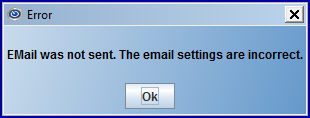
Click on [OK] to close.
Preventing the pop-up from displaying in the future is dependent on whether or not the office sends email messages to patients.
• For offices NOT sending email messages:
When adding an appointment, change the <Remind> field to 'None' (or the applicable option) and click [OK].
• For office sending email messages, set up is required:
A. Enter a Valid Email Address
Go to Utility --►Set Up --►Security --►Login Users and enter a valid email address in the <Operator Email> field.
Offices must have a mail server to forward outgoing Email. Whether an Internet Service Provider is used, a subscription mail server (Yahoo, MSN etc), or an internal server, the following information is needed.
Go to Utility --► Tools --► Configuration and complete these fields:
 : Type the address for the mail server’s outgoing mail. (e.g., smtp.sbcglobal.yahoo.com).
 : If the server accepts port 25, leave this unchanged; otherwise, type in the required port number. Inform PCS if your SMTP server uses a port other than 25 (the default port for SMTP protocol) and also if it needs to use SSL (secured connection). For example, gmail uses SSL.
 : The default is 'N' which indicates no SSL or TLS is required. If required for this server, use the drop-down to select 'Y' (yes).
 : Type the user name for the mail server account, if required. The is the MAIN user name for the address.
 : Type the password for the mail server account, if required. The is the MAIN password for the address.
Press the [Modify] button, shut down Intellect, and re-logon so the settings take effect.

C. Set Up Appointment Types
Go to Utility --►Set Up --►Appointment --►Appointment Type. Each appointment type allowed to send emails to patients must have the <Send Email/SMS> field set to 'Y.'
1.3 SMS: Select this option to send text message appointment reminders to patients cell phones.
Set up includes:
A. Go to Registration --►Regular --►Patient --►Add and verify that the patient's cell phone carrier is entered in the <Cell Phone Carrier> field on the Add Patient screen.
B. Go to Utility --►Set Up --►Appointment --►Appointment Type. Each appointment type allowed to send emails to patients must have the <Send Email/SMS> field set to 'Y.'
See also Schedule --► Appointment Reminder --► SMS Appointment Reminder.
1.4 HTML: Using this option when making an appointment immediately sends an email with confirmation to the patient (assuming everything has been set up correctly for email reminders). Patients may confirm or cancel their appointment by selecting the appropriate button in their email. This function works independent of the scheduled task.
- OR -
Fax: Not functional.
1.5 None: Select None if the office does not send email or text message appointment reminders.
NOTE: The EMAIL and SMS reminder options may be set for automation. See the document on Tasks.

These are read-only fields and may not be accessed for data modification.
1.  : Displays the Utility --► Provider --► Provider <Provider Code> for previously booked appointments.
2.  : Displays the time of a booked appointment.
3.  : Displays the date of a booked appointment.
4.  : Displays the most recent action taken in respect to a booked appointment; i.e., Add, Modify, Reschedule, No Show.
5.  : Displays the Utility --► Set up --► Appointment --►Appointment Type <Appointment Type> of a booked appointment.
6.  : Displays the calendar date when an appointment is booked.
7.  : Displays the operator number of the person that made the patient’s appointment.
8.  : Displays the amount of time allocated for an appointment.
9.  : Displays a comment associated with the Utility --► Set up --► Appointment --►Appointment Type <Appointment Type> for a booked appointment.
10.  : Displays the calendar date that a change was made to the patient’s appointment.
11.  : Displays the operator number of the person that changed the patient’s appointment.
With the exception of the <Email> field, the fields in the Patient Info tab are identical to those that appeared on the Add Appointment screen prior to version 9.12.01.
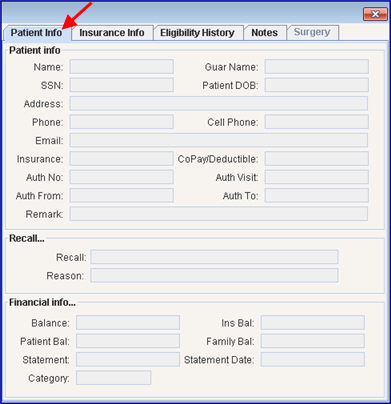
The detailed patient information is divided into three sections: Patient Info, Recall, and Financial Info, each of which is described in detail below.
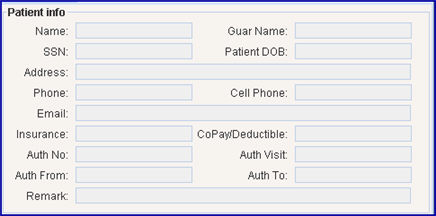
These are read-only fields and may not be accessed for data modification.
1.  : Displays information from the Registration --►Patient <Last Name>, <First Name > fields.
2.  : Displays information from the Registration --►Patient <Guarantor Name> field.
3.  : Displays information from the Registration --►Patient <Social Security Number> field.
Updates:
Effective version 16.12.02, allows the options of masking the SSN (displaying only the last 4 digits) or not masking the SSN. For additional information, see Utility --►Set Up --►Screen Fields, Masking/Unmasking the Social Security Number (SSN).
Effective version 16.11.10, the SSN only displays the very last 4 digits and the rest are represented with asterisks (***-**-1234), unless the data in the database is malformed or incomplete.
4.  : Displays information from the Registration --►Patient <DOB> field.
5.  : Displays the patient’s address from the Registration --►Patient < Address> field.
6.  : Displays information from the Registration --►Patient <Home Phone Number > field.
7.  : Displays information from the Registration --►Patient <Cell Phone> field.
8.  : Effective version 19.05.01, when adding, viewing, or modifying a patient appointment, the patients' email displays.
9.  : Displays the P1 insurance name from the Registration --►Patient Insurance < Insurance Company Name> field.
10.  : Displays information from the Registration --►Patient Insurance <Co Payment> and <Deductible Met> fields.
11.  : Displays the most current Charges --► Encounter .
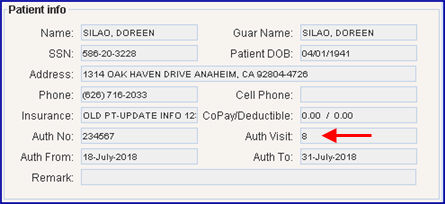
12.  : Displays information from the Charges --►Encounter <Authorized Visits Left> field.
Update:
Effective Version 9.12.18, to assist schedulers in knowing how many remaining visits are available for the current Encounter when an appointment is scheduled, Intellect now calculates the remaining number of visits which can be scheduled and displays that number in the <Auth Visit> field on the Add Appointment screen. This does not affect the <Authorized Visits Left> field in the Encounter screen, and is only a displayed value during Appointment Scheduling.
In the 9.12.18 modification, for the authorized visit to be accurate, it ALWAYS looks for the most recent Encounter set up in Charges --►Encounter for that patient, that Encounter has to have both the <Authorization From> and <Authorization To> dates set, and the appointment date must be within the date range.
For example:
If the Charges --►Encounter screen is set up as shown below for an appointment scheduled for a patient on 07-20-2018
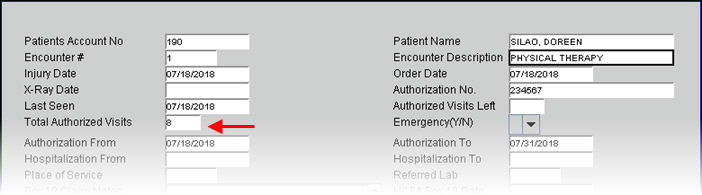
it generates the information shown on the Add Appointment screen:
13.  : Displays information from the Charges --►Encounter <Authorization From> field.
14.  : Displays information from the Charges --►Encounter <Authorization To> field.
15.  : Displays informatsion from the Registration --►Patient <Remark> field.

These are read-only fields and may not be accessed for modification of data.
1.  : In versions prior to 9.12.31, this field displays the date of the patient’s most future appointment. Effective version 9.12.31, the program now displays the date of the patient’s next upcoming appointment.
2.  : Displays the recall message created in Utility --►Messages --►Message and assigned a Remark Type designation 'R' before being attached to the Utility --►Set Up --►Appointment --►Appointment Type <Recall> field and subsequently becoming the default reason.
2.1 The use of a remark code type 'R' when used in Schedule --►Recall overrides the value set in Appointment Type.
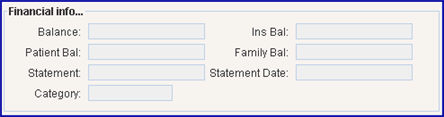
These are read-only fields and may not be accessed for data modification.
1.  : Displays data from Ledger <Balance> = Total owed by Insurance, Patient, and Family.
2.  : Displays data from Ledger <Patient> Total amount owed by Insurance.
3.  : Displays data from Ledger <Patient> patient’s portion of total.
4.  : Not implemented yet. When activated, it will be the Total of all Patient balances for joined family accounts.
5.  : Displays the account balance on the most current statement.
6.  : Displays the system date when the most current statement was issued.
7.  : Displays the patient's category.
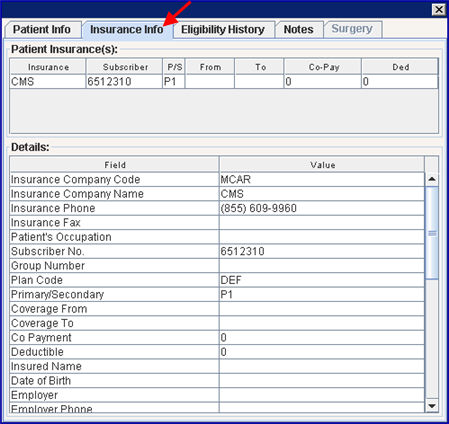
If needed, selecting the Insurance Info tab on either the Add, Inquire, or Modify Appointment screens displays the patients’ insurance(s) and the details of the insurance(s). Sample screen:
Click the [Eligibility] button on the Add Appointment or Inquire Appointment screens to submit a Request 270 file via sftp to the vendor and, in real time, receive a reply by means of the Verification 271 file. Note: Effective version 16.10.11: In the third quarter of 2016, CMS made a mandated change related to eligibility verification. The change required all eligibility transactions to exclude the patient gender. As of version 16.10.11, OnSTAFF/Intellect no longer sends the patient gender in the eligibility request (270).
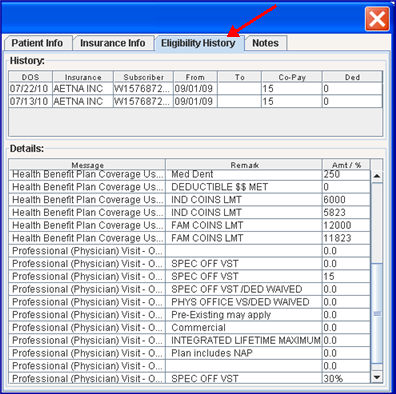
The detailed eligibility information is viewed in the History and Details sections on the Eligibility History tab (see below) via the Add, Inquire, or Modify Appointment screens.
Note: Eligibility responses vary from payer to payer. Some payer responses are very robust and include quite a bit of benefits information in addition to the eligibility response. Others are more limited in the information that they provide. If the information is not required in a 271 response, there is no way to make the payer send it. For example, Trizetto always returns all of the information to the office that they receive from each payer. Please remember that this is just an Eligibility verification. This tells the provider if the patient is eligible for services on the date submitted.
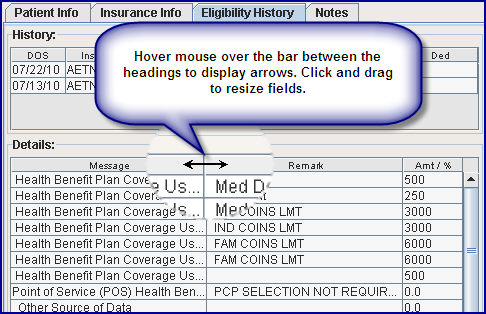
For readability, the size of the columns may be changed in both the History and Details sections. For example, hover the mouse over the bar between the Message and Remark section headings to display a double-ended arrow, click and hold the left arrow down, and drag the mouse to increase/decrease the size of the fields. See below.
Updates:
Effective version 21.04.14
New Ability All Ease Payer integration for Eligibility Verification is now available.
Prime Clinical Systems developed another API solution for the Eligibility Verification for the Ability the All Ease Payer Solution to function the same as the current method of OnStaff/Intellect Eligibility Verification. Contact PCS for details.
Effective version 13.10.29 Clinics who are sending directly to Medicare can now do real time eligibility direct with Medicare. When doing direct Medicare eligibility, modify the Utility --►Insurance --►Insurance <Name>, <Eligibility Receiver>, and <Eligibility> fields as indicated in the online documentation.
For further information on how to use eligibility verification, register for our eligibility webinar/workshop. Contact PCS support for more information.
Effective version 13.10.29, new Utility --►Insurance and Utility --►Insurance --►Tele Com screens were required for Eligibility verification via Ability. Offices wishing to utilize this portion of the Intellect feature should let their Support Representative know so he/she can complete their set up.
Effective version 9.12.09 Verification per Calendar Date. Many insurances verify eligibility for dates of service within 24 hours of the request. Some verify within 1 week, or 2 weeks, and some do not apply restrictions. Prior to version 9.12.09, Intellect submitted the scheduled appointment date in the eligibility request file (270), which meant eligibility could only be requested for current appointments. Effective in version 9.12.09, the program sends the calendar date instead of the scheduled appointment date. It is important to know that the eligibility response verifies the patient eligibility for the current calendar date and does not ensure that the patient is eligible for future appointments. This change not only applies to Real Time Eligibility (from the appointment schedule) but also to Batch requests for eligibility either sent via automation or manually sent through Billing --►TeleCom --►Eligibility.
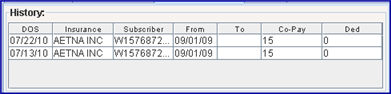
The History section displays the date of service (DOS), Insurance carrier name, Subscriber number, the From/To dates of coverage, the amount of the co-pay (if any), and the amount of the deductible, if applicable.
Updates:
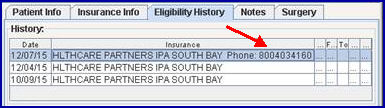
Effective version 16.02.22, the phone number is included in the insurance field. The phone number may be viewed either by hovering the mouse over the field or by expanding the column.
Effective version 13.08.20, Intellect’s program was expanded to include the NM1 I3 when the Eligibility History tab is populated. In prior software versions, when using IPA/HMO eligibility, Intellect only provided limited Cognizant/TriZetto (formerly Gateway) information.
Effective version 9.12.13, the 271 Response Code AAA67 was added to the eligibility verification programming, allowing the code to be inserted into the patient's Intellect eligibility record and the description to be displayed in the patient eligibility history. Prior to version 9.12.13, Response Code AAA67, used by the insurance when the patient was not found in their eligibility records, was not programmed in Intellect. Therefore, nothing would show in Intellect's Eligibility History.
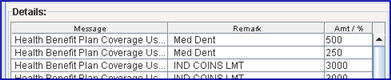
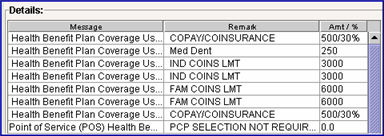
The Details section is divided into the three areas of Message, Remark, and Amt/% (Effective version 9.12.09 - The heading for the Amount column was changed to Amt/%). All of the information in these sections comes solely from the insurance company and may vary per insurance carrier.
Note: To NOT see descriptions for certain eligibility remark codes, as sent by the vendor, this information may be suppressed. See the <Status> field information in Utility --►Messages --►Eligibility Remarks.
The Amt/% column information is displayed as indicated:
1. If the patient has a flat deductible, the Amt/% column displays the flat amount. For example, a flat deductible of $250 displays as 250, as can be seen on the first line of the screen below.
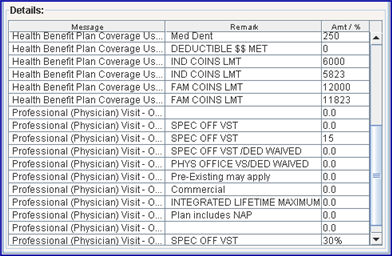
2. Version 9.12.09 Modification If the line provided by the insurance has an amount which is a percentage, it displays with the % symbol. For example, if a particular insurance has a 30% coinsurance, the Amt/% column displays 30%, as shown on the last line of the screen above.
3. Version 9.12.09 Modification In some cases, a flat deductible is paid up to a certain point and then a percentage coinsurance covers the balance. In such a case, both are displayed in the Amt/% column, separated by a forward slash, as indicated with the entries of 500/30% below.
Updates:
Effective version 16.02.22, the name of the primary care provider displays in the Remark column if it is returned by the insurance.
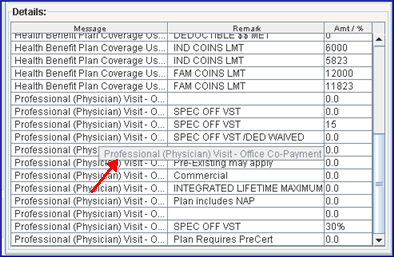
Effective version 9.12.09
Hovering a mouse over the descriptions in the Message column causes a pop up box to display the entire description provided by the insurance company. In the example below, the mouse (which is no longer displayed) hovered in the Message column over an entry for Professional (Physician) visit - O... which then displayed the light grey pop-up field that states: Professional (Physician) Visit - Office Co-Payment.
Version 9.12.06 - New feature. Click the [Notes] tab to provide a place to keep unlimited notes on a patient. The Notes are informational only, which means they can be accessed only through the Notes tab and, at this time, cannot be printed.
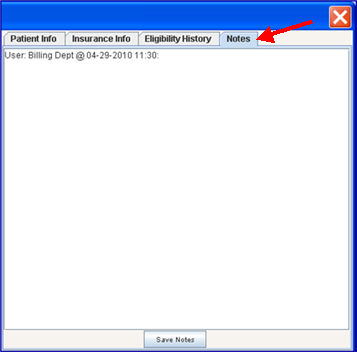
Information entered in the Notes tab are operator and date/time stamped, as shown above. Scroll through the notes to read previous entries, which may be read-only and not modified.
The notes are linked to the patient record, meaning if patients are shared between two clinics, all notes entered in either clinic may be read. If patients are NOT shared, clinics are only able to read the notes added in their logged-in clinic.
This tab is only active in the Modify Appointment dialog box so information for it is given under Modify Appointment Dialog Box.
Located at the bottom of the screen, the seven action buttons are:

Click the appropriate link for specific button information: Ok, Ok/Telemedicine, Patient Demographic, Eligibility, Add Patient, Add Worker, Modify Patient, and Exit.
1.  : Adds the appointment and closes the dialog box.
See enhancements in versions 16.05.20, and 19.09.23.
Effective version 16.05.20, if the <Add Task> field on the Modify APPOINTMENT TYPE screen is set to 'Manual', the Office Task Screen pops up when the [OK] button is clicked.
Note: To utilize the Office Task Manager option, the Modify APPOINTMENT TYPE screen must also have the <Self Sched Treating Provider> and <Self Sched First Avail> fields set to 'N,' and the <Self Sched Description> field must be empty.
When Office Task Manager opens, some fields display information pulled from the Add Appointment dialog box.
For example, for the Add Appointment dialog box above, the Office Task Manager is filled as indicated:

1.1 <Subject> pulls information from the Add Appointment dialog box <Name> and <Type> fields
1.2 <Account> pulls the <Patient Id> information
1.3 <Date Due> and <Time Due> are filled via the <Date/Time> field
1.4 <Notes> may be filled several ways:
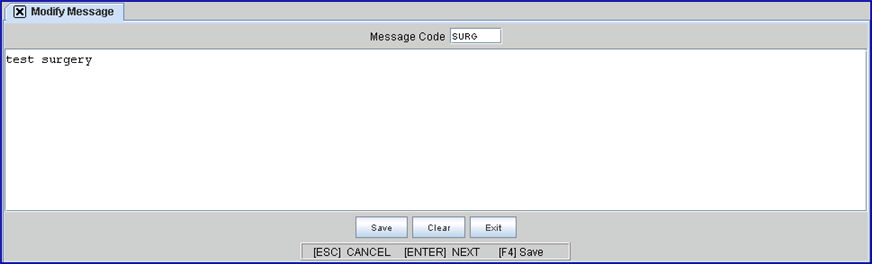
- If the Appointment Type used to make the appointment is set up as a <Message Code> in Utility --►Messages --►Message, the information shown on the Modify Message screen (see below) displays in the <Notes> section for a Surgery appointment (see Office Task screen above).
- If info is typed in the Add Appointment <Comments> box, it displays in the <Notes> section on the Office Task Manager screen.
- Additional info may also be typed directly into the Office Task <Notes> section.
See Office Task Manager or Utility --►Set Up --►Appointment --►Appointment Type <Add Task> in the online documentation for additional information.
Effective version 19.09.23 - PCM users only. When an appointment is added and a task created, the documents from PCM are also available to view in the Tasks. PDF documents with Autofill fields are also included.
2.  : New Button - Effective version 20.05.11, this option performs the same functions as the [Ok] button to add the appointment and close the dialog box, and then opens the Telemedicine window.
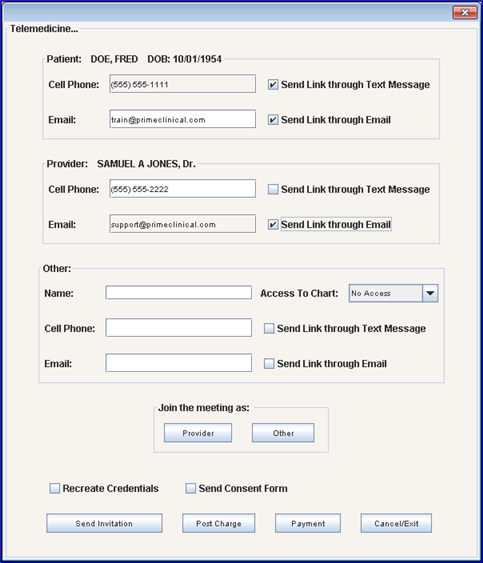
2.1 If the appointment start time is in less than 24 hours, an invitation may be sent containing the URL for the video session via text message and/or email to the Patient, Provider and optional Other. See the Telemedicine documentation for details on the setup requirements and sending invitations.
2.2 When not using the Telemedicine feature for interactive video appointments OR the appointment start time is more than 24 hours from the current time, click [Cancel/Exit] to close the window without sending invitations.
3.  : Effective version 17.10.20, the [OK/Print] button was removed and replaced with the [☐ Patient Demographic] button. This button is used to send patients an email which includes a link to their Demographic or Insurance information for their review and update.
NOTE1: Your office email address must be set up in Intellect prior to using this feature.
NOTE2: The [☐ Patient Demographic] button uses https and requires a Basic SSL Certificate for IIS with 2048-bit Encryption for the encryption of data.
• Offices who do not already have an SSL certificate should ask their IT department to assist them with the purchase of the certificate from a domain registrar company.
• Offices who currently have an SSL certificate should be sure to renew their current certificate before its' expiration date, depending on the duration of the certificate.
NOTE3: When the email contains a link with an authorization token, the patient must complete the form using the [Update] icon before the interval defined in the <Auth. Token Expiration (mins)> field on the Utility --►Set Up --►Parameter screen has expired. PCS recommends the <Auth. Token Expiration (mins)> field should not be set for a long period of time.
NOTE4: These documents/forms may be customized but would be billable.
NOTE5: For Intellect users who DO NOT HAVE PCM: Before sending the ‘Patient Demographic’ or/and ‘Patient Insurance’ emails, the Utility --►Set Up --►Parameter <Create PCM Chart> field must be set to ‘Yes’ to allow for patient review and update of their demographic and insurance information.
NOTE6: For PCM users only: If email forms are sent to patients before they are seen by the clinic, the <Create PCM Chart> field must be set to ‘Yes’ on the Utility --►Set Up --►Parameter screen so the patient’s chart is available for updating Patient Data Tables and filing completed forms.
3.1 Click the [☐ Patient Demographic] button to display a drop-down list where any or all types of information may be selected to be reviewed/updated. Option samples are available in 3.3 below.
Effective version 18.12.12: Clinics have the option to have their own forms added to this drop-down list. To include your forms on the drop-down list, your office must email Prime Clinical a copy of your form in a PDF format. The addition of forms is considered customized and is billable.
3.2 After clicking on their choice(s), the  button is clicked which then generates the email and sends it to the patient. The patient sees the office email address as the sender. Note: The office email address must be set up in Intellect prior to using this feature.
NOTE: Once the form is emailed by the patient, it cannot be emailed a second time.
3.2.1 The email received by the patient varies, based on whether or not the selection made from the drop-down list includes a PDF attachment.
Sample email without a PDF attachment
Sample email with a PDF attachment
Sample email without a PDF attachment
Effective version 18.10.30. In previous versions, Intellect included the organization's name and address from the Utility --►Set Up --►Clinic file. Users with version 18.10.30 and greater can request to pull the facility's <Name> and <Address> from the Utility --►Facility for the options in 2.3.1. The change is only available by request.
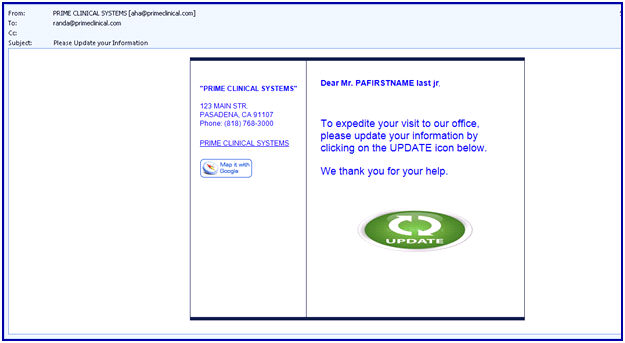
• As the above email indicates, patients must click on the ![]() [UPDATE] icon to open their default web browser to review and update information. Note: Currently, [Tab] is the only key that can be used to move from field to field within these forms.
[UPDATE] icon to open their default web browser to review and update information. Note: Currently, [Tab] is the only key that can be used to move from field to field within these forms.
• Once the information is reviewed/updated, the patient clicks on the blue [UPDATE] button or [SUBMIT] button at the bottom of the page to send the updated demographic and insurance information to Intellect OR questionnaire responses and electronically signed forms to the patient’s chart in PCM.
Sample email with a PDF attachment
Effective version 19.05.01, Intellect includes a PDF version of the forms available in the [☐ Patient Demographic] drop-down. The PDF is included as an attachment when the form is emailed. This option allows patients to print a hard copy of the form and fill it out by hand.
The email options that include a PDF attachment are listed below ****** PDF TO EMAIL *****. See 3.3.2 for the complete list.
• Clinics who do not plan to use the PDF version of the form sent as an attachment may request to have the forms removed from Report Designer. Clinics may also choose to send ONLY the PDF form and not the interactive form.
• PCM users only. All PDF forms include a bar code to make filing of the forms easier in PCM. Prior to emailing PDF forms from Intellect, set up must be completed in PCM to allow for automatic filing to patient charts when scanning the barcoded documents. See PCM Set Up for PDF Documents and Utility --►Set Up --►Parameter <PCM Tab> for more information.
Below is a sample of the default content of the email to which the forms are attached:
Dear Mr. Jones,
This is a friendly appointment reminder for Emit Jones, with Dr. Adler on May 2, 2019 at 315PM.
We have attached a printable Form for your convenience to download and print. We kindly ask that you fill out and present the completed form to our office upon arrival of your appointment. Your time is appreciated and we look forward to seeing you soon.
• The content of this email may be modified to include the clinics' wording choice. Clinics may make changes via Utility --►Tools --►Formatted Text by populating the <Template Name> field with appforms.
• All URL and logo data already being used on other emails is also included.
3.3 Option samples and additional information are available via the links below.
3.3.1 Samples of Online Forms: These options display content through a web browser when the [Update] button is selected in the forms email, see Sample email without a PDF attachment. NOTE: Only the Patient Demographic and Patient Insurance options are available for Intellect users who DO NOT HAVE PCM, all other options are available for PCM users only.
~ Patient Eye Questionnaire - Effective version 18.05.03
~ Covid-19 Patient Disclosures - Effective version 20.07.27
~ HIPAA Accounting of Disclosures of Protected Health Information *
~ Authorization for Release of Protected Health Information *
~ Emailing Protected Health Information *
~ Safeguarding and Storing Protected Health Information *
~ Patient Financial Responsibility Form *
~ Advanced Directive - Effective version 19.12.04
* Effective version 18.12.12, these forms include a signature field which can be electronically signed and sent back to the clinic by selecting the [Submit] button on the individual form. The completed form is then filed in the patient’s PCM chart. Patient Signature options when signing the forms include:
• Mobile Phone, I-Pad: Most Mobile phone carriers have the signature capability
• Laptop, PC: If the device supports touch screen, otherwise the mouse can be initiated for signature.
3.3.2 Samples of PDF Attachments: These options are available to all Intellect users regardless of whether or not they have PCM. NOTE: The samples include a bar code for PCM users only.
~ HIPAA Accounting of Disclosures of Health Info - Effective version19.05.01
~ HIPAA Authorization for Release of Health Info - Effective version19.05.01
~ HIPAA Emailing Protected Health Info - Effective version19.05.01
~ HIPAA Faxing Protected Health Info - Effective version19.05.01
~ HIPAA Notice of Privacy Practices - Effective version19.05.01
~ HIPAA Safeguard and Store Protected Health Info - Effective version19.05.01
~ HIPAA Uses and Disclosures Health Info - Effective version19.05.01
~ Medication List Form - Effective version 19.12.04
3.4 Effective version 21.01.06: When the forms are chosen via the [☐ Patient Demographic] drop-down feature, and after the patient receives and updates the interactive form, Intellect updates the Misc --►View Sent Items option with the date and time the form was updated by the patient. See Misc --►View Sent Items for additional information on the Sent Items screen.
4.  : Submits a Request 270 file via sftp to the vendor and, in real time, receives a reply via Verification 271 file. The information is inserted into a table and may be viewed by selecting the Eligibility History tab on either the Add, Modify, or Inquire Appointment screens.
5.  : Opens an Add Patient Screen to add a new patient.
Effective version 13.08.20 - Mini Registration. In software versions prior to 13.08.20, when initially booking new patients by clicking on the [Add Patient] button, users were taken to the main Add Patient screen with numerous fields. As of this update, a mini-registration screen may be customized to display only the needed fields, allowing the remainder of the registration screen to be filled out at a later time. Contact your training representative to customize your mini-registration screen.
6.  : Opens an Add WORKER APPOINTMENT screen to add a new workers compensation patient.
7.  : Opens the Modify PATIENT screen or Modify WORKER APPOINTMENT screen, dependent upon the patient's Utility --►Category <Type (C/P/W/O/F/G)>.
8.  : Closes the Add Appointment dialog box without adding the appointment.
Scheduling From The Waiting List:
Using the Waiting List to reschedule patients is similar to the Reschedule function currently available from the context menu.
1. Select the time slot to receive the rescheduled patient.
2. Right-click to open the context menu:

3. Select Waiting List.
4. Only those patients eligible to be rescheduled in this slot are displayed.

5. Scroll the focus to select the desired patient using [Enter], the up arrow [↑], the down arrow [↓], or using the mouse click to select.
6. Click the [ReSchd] button, which causes the appointment to be removed from the current appointment and from the Waiting List, and pasted into the new slot.
7. The appointment history shows the original appointment time with Status = 'Reschedule' and the new appointment with Status = 'Added.'
8. The date and operator who rescheduled the appointment is shown in the patient’s Appointment History.
Effective version 18.10.30, when an appointment is cancelled, rescheduled, or deleted, the program now has the capability to send a text message to a patient on the waiting list. Before a text message may be sent, complete steps 1. and 2.
Sample Text:
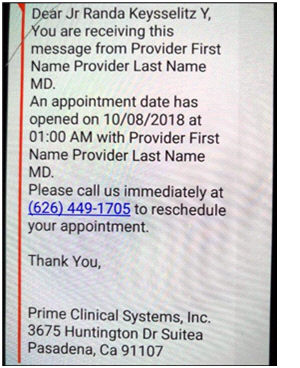
The program checks for which provider the appointment was cancelled/rescheduled/deleted and sends to the first patient on the list for that providers' schedule, based on the appointment date of the patient. Once the appointment is scheduled, that patient no longer appears on the waiting list.
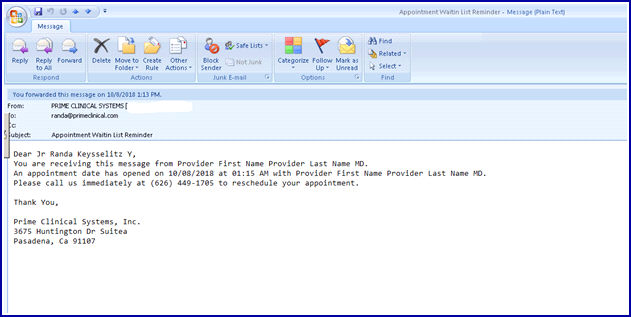
Sample E-mail:
 OR
OR 