
Intellect™
UTILITY MENU OPTIONS

Set Up
Appointment
Appointment Type
Use the Appointment Type option to (1) define the reason for booking an appointment, (2) set up the appointment types needed for template(s), and (3) color-code template appointment types. With the first use of this option, the default length of the appointment can be set. The second use allows the configuration of the maximum number of times (per time slot) this appointment type may be scheduled, whether this appointment type is limited to mornings or afternoons, and tell Intellect whether or not patients may be scheduled for a particular appointment type.
Note: Each use causes different results on the schedule and, in some instances, it is advisable to create types with only one function in mind.
Videos Available: Click Intro to Appointment Setup and Appointment Type Set Up to access the link. Depending on the system set up, the media player may need to be activated. Speakers need to be attached to the workstation to hear the instructions.
Note: To view the videos, log-in through the www.primeclinical.com website. Current support is required.
1. To set the appointment types in Intellect, go to Utility --► Set Up --► Appointment --► Appointment Type --► Add:

The Add APPOINTMENT_TYPE screen opens:
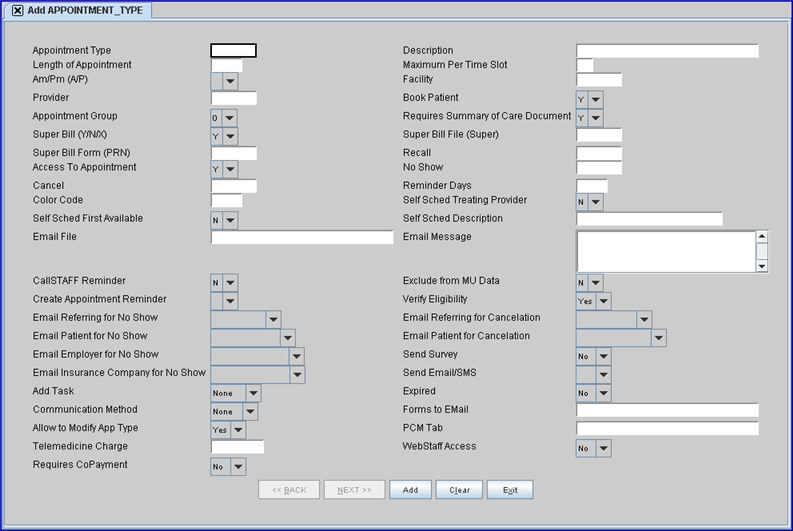
2.1 This code may be used to identify the reason for the patient's visit. It is also used to attach to a scheduling template type so that a meaningful code displays on the left-hand side of the columns in the schedule's time slots.
2.2 The field is mandatory and must be completed. If left blank, an error message displays:
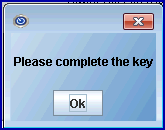
Press the [Ok] button to return the focus to the <Appointment Type> field.
2.3 Type a user-defined code for the appointment using up to 6 characters.
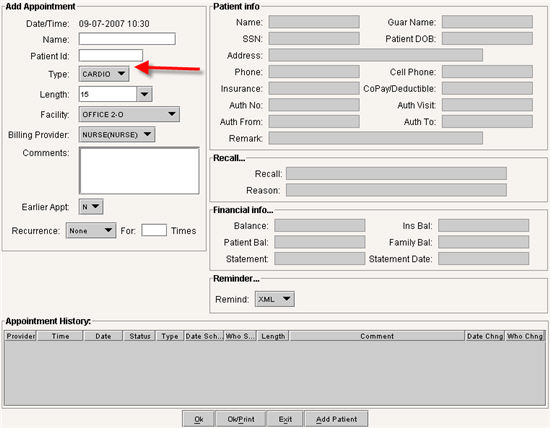
2.4 The Appointment Type created here appears in several places on the Add Appointment dialog box:
2.4.1 The Appointment Type displays as a selection on the <Type> drop-down:
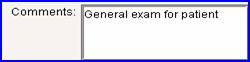
2.4.2 The Appointment Type can be tied to a message (see Utility --►Message --►Message) with the same code to display in the Comments window of the Add Appointment dialog box:
2.4.3 Appointment Type also displays as 'Type' in the Appointment History section, and prints on reports:
![]()
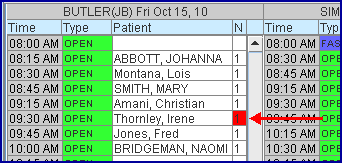
2.5 The Appointment Type is attached to a scheduling template type in Utility --►Set Up --►Appointment --►Template <Type>:
![]()
which displays as a default on the schedules' time slots for the template:
![]()
3. Description 
3.1 Type a description for the appointment type.
3.2 This description appears in the underlying table.
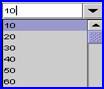
4. Length of Appointment 
4.1 Type the minimum number of minutes this appointment type requires.
4.2 This amount displays as the default option for this type in the <Length> drop-down in the Add Appointment dialog box.
4.3 Each time option also increases by this amount.
![]()
5.1 When a time slot on the template is set to this type, this field defines the maximum number of appointments allowed to start a the same time. Attempting to add an appointment to a slot already at the maximum generates this warning message:
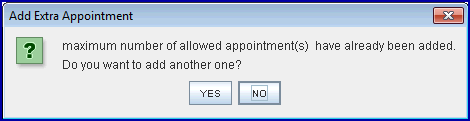
NOTE: If Utility --► Set Up --► Appointment --► Template <Double Book> = 'Y' the system allows more than one patient to be booked in the time slot while ‘X’ restricts the number of appointments based on this field and 'N' only allows one, regardless of how Utility --► Set Up --► Appointment --► Appointment Type <Maximum Per Time Slot> is set. For more information, see the document on Double Booking.
5.2 Type the desired maximum number.
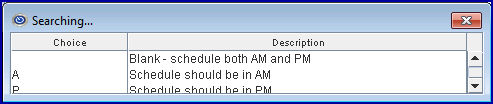
6. Am/Pm (A/P) 
6.1 Determines whether this type of appointment may be scheduled only in the morning, only in the afternoon, or at anytime.
6.2 Accept the default 'blank,' OR use the drop-down list to make an alternate selection.
6.3 Press the [F2] search key to display the valid choices:
7.1 Use this field if this appointment type is to be designated for a particular facility.
7.2 When changing the Appointment Type using the drop-down on the Appointment Dialog Box to this type, the Facility drop-down defaults to the Facility set here.
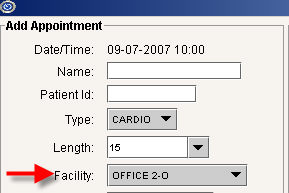
7.3 Enter the Facility Code, OR type up to 6 characters of the description and press the [F2] key to display the Searching screen. To select the code from the list, either highlight the record OR press the [Enter] key, OR double-click on the record. Alternately, after clearing the field, press the [F2] key twice to view the entire list of codes. For more information on the Searching screen, see Introduction to Intellect --► Intellect Characteristics and Features -- Searching.
8. Provider 
8.1 Not Available at this time
9. Book Patient 
9.1 Determines whether or not to use this appointment type when making a patient's appointment.
9.2 Accept the default 'Y' (yes) OR select 'N' (no) to block the scheduling of this type.
10.1 This field is used to create groups for the purpose of scheduling.
10.2 Accept the null default OR use the drop-down list to make an alternate selection.
10.3 To select the code from the list, either highlight the record OR press the [Enter] key, OR double-click on the record. Alternately, after clearing the field, press the [F2] key twice to view the entire list of codes.

11. Requires Summary of Care Document 
11.1 For PCM users only. Effective version 14.12.30 - New field.
11.2 This field supports Meaningful Use and EMR, and is used to indicate whether or not this appointment type is for a consultation.
11.3 Accept the default 'Y' if the appointment type is for a consultation; e.g., the patient is a new patient, the patient was referred to your office, etc.
11.4 Select ‘N’ if the appointment type is for a visit from an established patient.
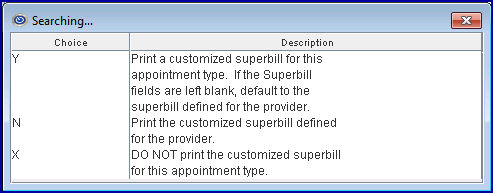
12.1 Determines whether or not a super bill can be printed for this appointment type, and if so, whether to print the super bill based on the provider the patient was scheduled to see or the type of appointment scheduled.
12.2 Accept the default 'Y' OR use the drop-down list to make an alternative selection.
12.3 For an appointment for count towards Meaningful Use requirements, this field must be set to print a superbill and the <Exclude from MU Data) field must be set to 'N.' If <Exclude from MU Data> is set to 'Y' or if this field is set to NOT print a superbill, the appointment will NOT be counted towards Meaningful Use.
Note: For Meaningful Use, patients must be checked in ONLY through PCM, NOT Intellect, for the Encounter Log to be created.
12.4 To view the list of codes with descriptions, press the [F2] key. To view the list of only the codes either click on the arrow, OR press the → (right arrow) on the keyboard. To select, double-click on the correct code, OR use the ↑ (up) and ↓ (down) arrows to highlight the correct code, and then press the [Enter] key to select.
13. Super Bill File (Super) 
13.1 When your super bill has been programmed and loaded to your system, your vendor completes this field as appropriate.
14. Super Bill Form (PRN) 
14.1 When your super bill has been programmed and loaded to your system, your vendor completes this field when appropriate.
15.1 This field is used to generate an appointment recall letter.
15.2 Type a valid recall code from Utility --►Message --► Remark <Remark Code>.
15.3 When an appointment is scheduled using this appointment type and there is a valid recall code set, Intellect adds the recall date for the letter, the reason, and message to the Recall box in the Modify Appointment dialog box.
![]()
15.4 The date for the recall letter may be viewed and modified in Schedule --► Recall --►Modify.
15.5 Effective version 20.02.17, when <Recall> is populated, the date is set to the calendar date, NOT the appointment date.
16. Access To Appointment 
16.1 This field is used to determine whether or not to display this appointment type on the Appointment Schedule
16.2 Accept the default 'Y' (yes) OR use the drop-down list to select 'N' (no).
16.3 NOTE: When set to ‘N,’ the Appointment Type is not displayed on the Schedule --► Appointment --► Full Day screen ONLY if not attached to any other record. The <Expired> field on this screen determines whether or not the Appointment Type is displayed in the drop-down on the Add Appointment window.
17.1 This field is used to issue an appointment no show letter.
17.2 Type a valid no show code where Utility --►Messages --►Remark <Remark Type> = 'N.'
17.3 When an appointment is scheduled using this type, and if there is a No Show Code set here, Intellect schedules a recall letter with the corresponding No Show message.
18. Cancel 
18.1 Version 9.12.32 - New Field.
18.2 This field is used to generate an appointment cancel letter.
18.3 Type a valid cancel code from Utility --► Message --► Remark <Remark Code>.
18.4 When an appointment is cancelled (the user has to right-click and select 'Cancel' on the appointment schedule) and there is a valid cancel code set, Intellect schedules a recall letter with the corresponding Cancel message.
18.5 Letters are scheduled to print with the current date unless modified. Recall schedules may be viewed and modified in Schedule --► Recall --►Modify.
19. Reminder Days 
19.1 Not Available at this time
20. Color Code 
20.1 This field allows the color coding of types. When attached to scheduled templates, the <Appointment Type> name displays this as a background color.
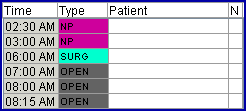
For example: With <Appointment Type> set to 'NP,' entering magenta in this field:

displays 'NP' with a magenta background on the appointment schedule:
20.2 Press the [Spacebar] on the keyboard to display the Color Pallet pop-up.
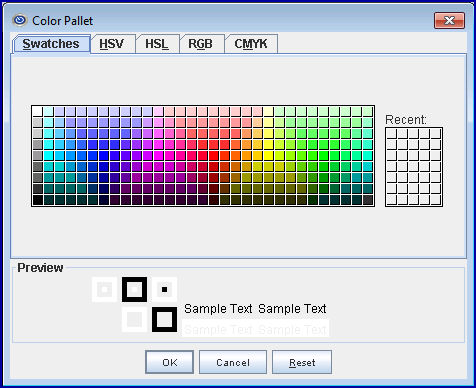
20.3 Click once on the desired color and select [OK]. The <Color> field displays the selected color for this Appointment Type. Click on [Add] or [Modify] to save the color change.
Changing the <Appointment Color> parameter option works retroactively. For example:
• If <Appointment Color> = 1 and it is changed to 2, the next time the schedule is opened the color shown in the Type column matches the color in the Color Code field of the scheduled Appointment Type.
• If <Appointment Color> = 2 and it is changed to 1, the next time the schedule is opened the color shown in the Type column matches the color of the Appointment Type set up in the Template for that schedule.
21. Self Sched Treating Provider 
21.1 This field is for the Self Check In feature. If this feature is not used, accept the default 'N' (no).
21.2 If the Self Check In feature is being used, select either 'Y' (yes) or 'N' (no), based on the following:
21.2.1 If 'Y' is selected for this Appointment Type, self scheduling is restricted to patients whose provider, as listed in the <Treating Provider> field on the Registration form, has a Utility --► Provider <Provider Code> that has this appointment type entered in the Utility --► Provider <Self Schedule App Type> field.
21.2.2 If 'N,' patients can self-schedule at check-in for any available provider that has this Utility --► Provider <Self Schedule App Type>. Note however:
21.2.2.1 When set to 'N' (no) and <Self Sched First Available> (see below) is set to 'N' (no), Intellect displays a list of providers available to accept this appointment.
21.2.2.2 When set to 'N' (no) and <Self Sched First Available> is set to 'Y' (yes), Intellect automatically selects the first available time slot for this Appointment Type, regardless of the provider. If two or more providers have time slots available, Intellect chooses randomly or tries to distribute evenly as more appointments are added.
21.3 This field must be set to 'N' if Office Task Manager should pop up when scheduling an appointment.
22. Self Sched First Available 
22.1 This field is for the Self Check In feature. If this feature is not used, accept the default 'N' (no).
22.2 If the Self Check In feature is being used, select either 'Y' (yes) or 'N' (no), based on the information in 21.2.2.1 and 21.2.2.2 above.
22.3 This field must be set to 'N' if Office Task Manager should pop up when scheduling an appointment.
23.1 This field is for both the Self Check In feature and Patient Portal Appointments features. If neither feature is being used, leave this field blank. This field must be blank if Office Task Manager should pop up when scheduling an appointment.
23.2 For PCM users only. If either the Self Check In feature or Patient Portal Appointment feature are being used, enter the description for this Appointment Type to appear on the Self Schedule Patient Appointment Screen and/or the Patient Portal screen. For example, entering:

displays:
The <Email File> and <Email Message> fields below refer to the message for email appointment reminders without confirmation. The message, when configured for automation or manually selected via the Schedule --► Appointment Add Appointment Dialog Box <Remind> field, comes with a hard-coded body of text. Use <Email Message> to attach a custom header to the reminders with this Appointment type that meet any of the other criteria (see Task Manger). The <Email File> field is used to enter a path to a desired file to attach to the Email. Examples might include a map to your office, a registration form, pre-appointment preparations, etc.
24.1 Use of this field is optional.
24.2 This field is used to attach a custom document to the appointment reminder email.
24.3 When attaching a document, type the path of the source file to attach.
24.4 Effective version 15.08.06, when appointments have been set with ‘Email’ in the <Remind> field on the Schedule --►Appointment Add Appointment Dialog Box, emails may now be sent to multiple clinic addresses. For more information, please contact PCS Support.
25.1 Use of this field is optional.
25.2 For versions prior to 9.12.10, which do not allow patients to respond to email reminders, this field is used to change the default message that is sent in the appointment reminder email. Note: This only applies to HTML email reminders.
25.2.1 To include a message to all patients with this Appointment Type, type the message to include. It displays as shown below:
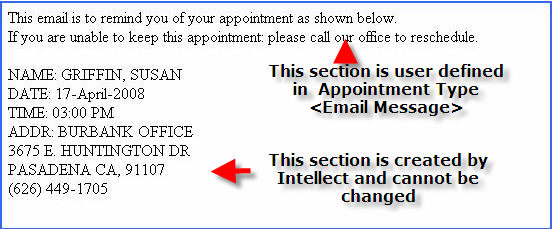
25.3 For versions 9.12.10 and later, which allow patients to respond to email appointment reminders, this field allows users to enter a customized message applicable to the Appointment Type which displays in the Instructions section of the email.
25.3.1 To include a message to all patients with this Appointment Type, type the message to include.
Note: The message appears as one paragraph irregardless of whether it contains hard returns, indents, bullets, or other formatting when it is entered.

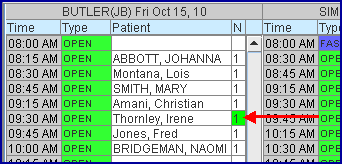
• If a patient clicks on the [Confirm] button, this message displays:
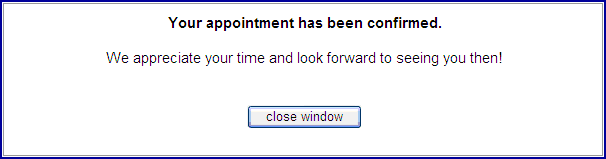
and the 'N' column on the Appointment Schedule changes to green, indicating the appointment was confirmed. Note: CalSTAFF also uses green for confirmed appointments.
• If a patient clicks on the [Cancel] button, this message displays:
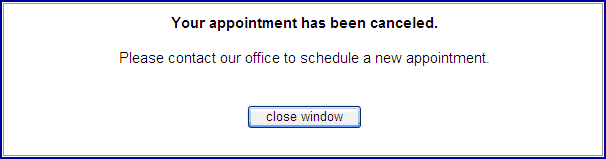
and the 'N' column on the Appointment Schedule changes to red, indicating the appointment was cancelled. Note: CalSTAFF also uses red for cancelled appointments.
Additionally:
* Intellect has the option for the user to send an "Instant Email Reminder Message" when adding Appointments to the schedule.
* Reminders may be set-up for automation.
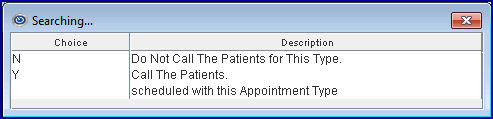
26.1 This is used to enable the telephone appointment reminder for this appointment type. With this field set to 'Y' (Yes), when any provider has this Appointment Type in their schedule and if Utility --► Provider <Call Staff Reminder > is also = 'Y,' then the provider's scheduled patients for this type are called (see the set up requirements).
26.2 Press the [F2] search key to display the valid choices:
27.1 Version 9.12.21 - New field.
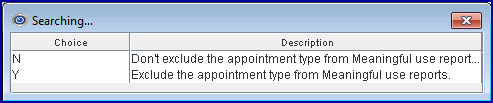
27.2 This field gives clients the option of excluding the appointment type from Meaningful Use reports.
27.3 For an appointment to count towards Meaningful Use requirements, this field must be set to 'N' and the <Superbill Y/N/X> field must be set to print a superbill. If this field is set to 'Y' or if <Superbill Y/N/X> is set to NOT print a superbill, the appointment does NOT count towards Meaningful Use.
Note: For Meaningful Use, patients must be checked in ONLY through PCM, NOT Intellect, to create the Encounter Log.
27.4 Press the [F2] search key to display the valid choices:
28. Create Appointment Reminder 
28.1 For PCM users only. Effective version 9.12.32 - New field. Set this field to ‘Y’ to allow appointments to be set up in Intellect to populate in PCM.
29. Verify Eligibility 
29.1 Effective version 13.12.12 - New field.
29.2 Use this field to indicate whether or not patient insurance eligibility should be verified for a group of appointments:
• Select 'Yes' to verify patient insurance eligibility with this appointment type.
• Select ‘No’ to not have patient insurance eligibility verified.
Note: This selection ONLY applies when verifying patient insurance eligibility for a group of appointments. When requesting eligibility for individual appointments, this field is ignored.
30. Email Referring for No Show 
30.1 Effective version 14.02.04, this option may be used to notify a referring provider when a Worker’s Comp patient fails to keep his/her appointment.
30.2 Select ‘WC No Show’ to allow Intellect to send a pre-written notification email with an encrypted attachment to the referring provider when an appointment is tagged as ‘No Show’ via the right-click menu option in the schedule. The password to open the encrypted attachment is then sent in a separate email.
30.3 The pre-written email is set up in Report Designer. It can be modified, but modifications are billable. Please contact Support for additional information.
30.4 Before using this feature:
30.4.1 The email option must be set up in your system.
30.4.2 The referring provider must have a completed email address on file in Intellect.
31. Email Referring for Cancelation 
31.1 Effective version 14.02.04, this option may be used to notify a referring provider when an appointment is canceled for a Worker’s Comp patient.
31.2 Select ‘WC Cancelled’ to allow Intellect to send a pre-written notification email with an encrypted attachment to the referring provider when an appointment is tagged as ‘Cancel’ via the right-click menu option in the schedule. The password to open the encrypted attachment is then sent in a separate email.
31.3 The pre-written email, as set up in Utility --►Messages, cannot be modified.
31.4 Before using this feature:
31.4.1 The email option must be set up in your system.
31.4.2 The referring provider must have a completed email address on file in Intellect.
32. Email Patient for No Show 
32.1 Effective version 14.02.04, this option may be used to notify a patient when he/she has not kept his/her appointment.
32.2 Select ‘Patient No Show’ to allow Intellect to send a pre-written notification email with an encrypted attachment to the patient when their appointment is tagged as ‘No Show’ via the right-click menu option in the schedule. The password to open the encrypted attachment is then sent in a separate email.
32.3 The pre-written email, as set up in Utility --►Messages, cannot be modified.
32.4 Before using this feature:
32.4.1 The email option must be set up in your system.
32.4.2 The patient must have a completed email address on file in Intellect.
33. Email Patient for Cancelation 
33.1 Effective version 14.02.04, this option may be used to notify a patient when an appointment is canceled for him/her.
33.2 Select ‘Patient Cancelled’ to allow Intellect to send a pre-written notification email with an encrypted attachment to the patient when their appointment is tagged as ‘Cancel’ via the right-click menu option in the schedule. The password to open the encrypted attachment is then sent in a separate email.
33.3 The pre-written email, as set up in Utility --►Messages, cannot be modified.
33.4 Before using this feature:
33.4.1 The email option must be set up in your system.
33.4.2 The patient must have a completed email address on file in Intellect.
34. Email Employer for No Show 
34.1 Effective in 08/2019, this option may be used to notify a patient's employer when the patient does not keep his/her appointment.
34.2 Before using this feature:
34.2.1 The email option must be set up in your system.
34.2.2 There must be a completed email address for the patient's employer on file in Intellect.
35.1 This field determines if a survey may be sent to patients for this appointment type.
35.1.1 Select 'Y' to allow a survey to be sent to patients for this appointment type.
35.1.2 Select 'N' if a survey should not be sent for this appointment type.
35.2 Additional set up is required before surveys may be sent. See Schedule --►Appointment --►Full Day --►Survey List Tab for set up information.
36. Email Insurance Company for No Show 
36.1 Effective in 08/2019, this option may be used to notify a patient's insurance company when the patient does not keep his/her appointment.
36.2 Before using this feature:
36.2.1 The email option must be set up in your system.
36.2.2 There must be a completed email address for the patient's insurance company on file in Intellect.
37.1 This field determines if email and SMS (text message) appointment reminders may be sent to patients for this appointment type.
37.1.1 Select 'Y' to allow email/text messages to be sent to patients for this appointment type.
37.1.2 Select 'N' if email/text messages should not be sent for this appointment type.
37.2 To request email and text messages, additional set up is required. See Schedule --►Appointment --►Full Day --►Appointment Booking and Management --►Add Appointment Dialog Box, <Remind> field.
38.1 Effective version 16.05.20, this field sets this appointment type to function in one of two ways:
• to display the Office Task Manager when scheduling an appointment
- OR -
• to allow patients to use self check-in and/or self-schedule appointments through patient portal
An appointment type can not be set to perform both functions.
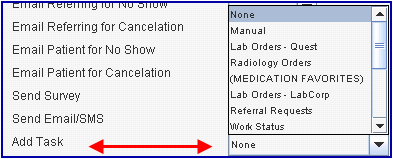
38.1.1 'None': This is the default. With 'None' selected, the self check-in and/or self-schedule appointments through patient portal options may be set for patients' use.
38.1.2 'Manual': With 'Manual' selected, when an appointment is scheduled for this appointment type, the Office Task Manager option pops up. Through the Office Task Manager, the person making the appointment can assign a task that needs to be completed in conjunction with the appointment. For example, if the appointment type is Surgery, a task could be assigned for completion of pre-surgery lab work. See Schedule --►Appointment --►Full Day --►Appointment Booking and Management --► Add Appointment Dialog Box - Action Buttons: [OK] for additional information.
To utilize the Task Manager option, this screen must have the <Self Sched Treating Provider> and <Self Sched First Avail> fields set to 'N,' the <Self Sched Description> field must be empty, and this <Add Task> field must be set to 'Manual.'
38.1.3 'Automatic': For PCM users only. In version 16.05.20 when the <Add Task> field was added this option was not active. Effective version 16.06.06, the original 'Automatic' option on the drop-down list was replaced with the task choices available from PCM's treatment plans; i.e., the tabs. These options are automatically inserted onto the drop-down list during the update. For example:
For each appointment type, when an option on the drop-down list is selected that matches a PCM treatment plan, a task for that treatment plan is added to the Office Task Manager when an appointment is made for that appointment type.
For example: If 'Surgery Orders' is a valid PCM treatment plan, and if the OPEN appointment type has the <Add Task> field set to 'Surgery Orders', when an appointment is made with the OPEN appointment type, the Office Task Manager displays a new Surgery Order task.
Note: When tasks are added this way, the Category defaults to 'Order':
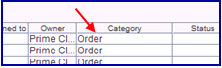
The Category (and other task settings such as assignment, reminders, and status), may be changed as needed. See the Office Task Manager online documentation under Office Task Screen, 1.5 Category for details.
38.2 Effective version 19.09.23, when an appointment is added and a task created, the documents from PCM are also available to view in the Tasks. PDF documents with Autofill fields are also included. See the online documentation for more information on using the Office Task Manager.
39. Expired 
39.1 Effective version 19.12.04 - New field. Note: This feature only applies when adding an appointment.
39.2 This field allows offices to omit appointment types they no longer use.
39.3 The drop-down list includes these choices:

39.3.1 When this field is set to ‘No,’ the appointment is not expired and displays in the appointment type list when making an appointment.
39.3.2 When set to 'Yes,' that Appointment Type is omitted from the appointment type list when adding an appointment.
40.1 Effective version 19.08.06, this field was changed from <Waiting List Reminder> to <Communication Method>.
40.2 For this appointment type, select the appropriate notification method for patients placed on the waiting list. See 37.3.2 for additional information.
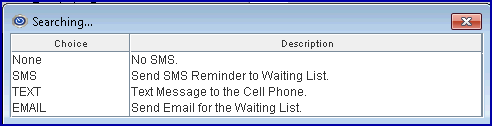
40.3 Effective version 19.08.06, when an appointment is cancelled, a text or email message can be sent to the first patient on the waiting list to let them know an appointment has opened up (see sample below). Note: This only sends to the first person on the waiting list until the patient is moved from the waiting list to an actual appointment.
To send a message:
40.3.1 There must be a file called 'Waiting' in Utility --►Tools --►Formatted Text. Contact Support for more information.
40.3.2 This field must be populated with SMS, TEXT, or EMAIL to trigger the text or email message to be sent. Note: All three options use the same Utility --►Tools --►Formatted Text ‘Waiting’ file (see 37.3.1 above).
• If 'SMS' is selected, Twilio sends the message to the patient in the form of a text message to his/her cell phone.
• If 'TEXT' is selected, the SMTP email server sends an email SMS (an email to a cell phone number) which should be sent to the patients' phone as a text message.
Note: We do not recommend using the 'TEXT' option as carriers specifications may vary on the services. In addition, for the message to be sent, the Patient --►Registration <Cell Phone Carrier> field must always be populated.
• If 'EMAIL' is selected, a standard email is sent to the patient using the email entered in the Patient --►Registration <Email Address> field.
Sample email sent to first waiting list patient
Subject:Appointment Waiting List Reminder
Dear Jane Doe,
You are receiving this message from Auto Dialysis .
An appointment date has opened on 08/06/2019 at 10:15 AM with Auto Dialysis.
Please call us immediately at (222) 222-2222 to reschedule your appointment.
Thank You,
Dialysis Center,
5437 Dialysis Road
Tustin, CA 92780
Additionally, the person cancelling his/her appointment receives a notification when he/she cancels, as shown in the sample below:
Subject: Appointment Cancelation Reminder
Dear Mr. John Doe ,
You are receiving this message from Dr. Mathew Rowder .
Your appointment has been canceled for July 25, 2019 at 08:07 AM with Dr. Mathew Rowder.
Please call us at (222) 222-2222) to reschedule your appointment.
Thank You,
Mathew Rowder MD
1234 Franklin Ave South
Atlanta, GA 30326
41. Forms to Email 
41.1 Effective version 19.01.18 - New field added.
41.2 The <Forms to Email> field allows the entry of forms which can be emailed to patients. When adding an Appointment Type where a form is included in <Forms to Email>, Intellect automatically sends an email with the form(s) to patients whose email address is populated in the Registration screen. NOTE: Offices that do not already have email set up in Intellect and would like to have it set up, please contact support@primeclinical.com.
41.2.1 To populate the <Forms to Email> field, click on the <Forms to Email> field and press [Enter] to display a pop-up with a selection list of forms:
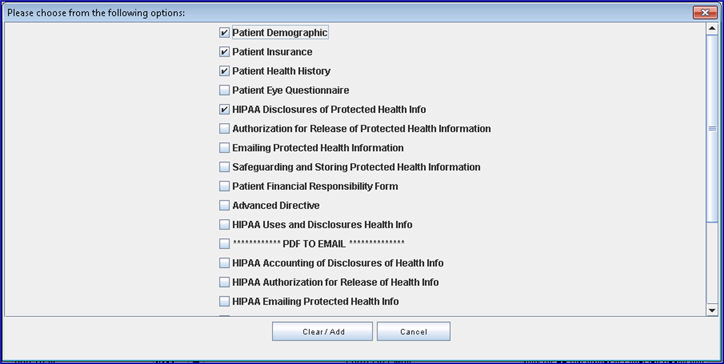
Note: This list contains the same forms available on the [☐ Patient Demographic] drop-down list on the Schedule --►Appointment --► Full Day --►Add Appointment screen.
Click the box next to a form name and then click the  button to add the form to the <Forms to Email> field. Multiple forms may be selected. For example:

41.2.2 To remove forms, click on the <Forms to Email> field and press [Enter]. Click on the checked box for each form to be removed and then click on the button.
To remove all forms, simply click on the <Forms to Email> field and press [Delete].
41.2.3 Note: Offices who will be implementing this feature need to have an SSL certificate installed on the server to ensure patient data security.
• Offices who do not already have an SSL certificate should ask their IT department to assist with the purchase of the certificate from a domain registrar company.
• Offices who currently have an SSL certificate should be sure to renew the current certificate before its' expiration date, depending on the duration of the certificate.
42. Allow to Modify App Type 
42.1 Effective version 19.10.04 - New field
42.2 When this field is set to ‘No,’ changes are not allowed for that Appointment Type in the actual appointment.
42.3 When set to 'Yes,' that Appointment Type may be modified in the actual appointment.
43.1 Effective version 20.05.08 - New field
43.2 For PCM users only, visit notes added during the Telemedicine video session are saved to the PCM chart tab designated in this field.

43.2.1 If this field is left blank, the document is saved under the chart tab ‘Progress Report.’
43.2.2 To save the visit notes to another chart tab, enter the chart tab name.
43.3 See the Telemedicine documentation for details on adding visit notes.
44. Telemedicine Charge 
44.1 Effective version 20.06.11 - New field.
44.2 In a future release, a collection of patient credit card payments during the Telemedicine visit will be available with the default payment amount based on this field.
45.1 Effective version 20.07.27 - New field.
45.2 When <WebStaff Access> is set to:
• No: This appointment type is not available when adding an appointment in WebStaff or using the Schedule an Appointment tab on the split screen displayed for PCM providers during a Telemedicine video session.
• Yes: This appointment type is listed when adding an appointment in WebStaff or using the Schedule an Appointment tab on the split screen displayed for PCM providers during a Telemedicine video session.
45.3 NOTE: When using the Schedule --► Appointment --► Full Day screen in Intellect to add appointments, select an Appointment Type with <Webstaff Access> = ’No’ (unless <Expired> is set to ‘Yes’) and the scheduled appointment is displayed in both Intellect and WebStaff.
45.4 ATTENTION: When updated to version 20.07.27, <WebStaff Access> is set to ‘No’ for all Appointment Types, so the Appointment Types used for scheduling patient appointments must be modified to ‘Yes’ before using WebStaff or the Schedule an Appointment tab during a Telemedicine video session. Contact support to restart the WebStaff services if the Appointment Types are not displayed after updating the <WebStaff Access> field.
46.1 Effective version 21.05.21 - New field.
46.2 This field is used to handle any co-pays for certain types of appointments. Field options include:
• No: When this option is selected, during Self Check In the patient sees ‘0.00’ as the Copayment due.
• Yes: When this option is selected, during Self Check In the program pulls the amount which was added in the Registration --► Regular --► Patient Insurance <Co Payment> field.
46.3 See also Schedule --► Appointment --► Self Check In.
47. When the information is completely entered, select one of these options:

47.1 Click [Add] to clear the screen and return the focus to the <Appointment Type> field, saving the new type.
47.2 Click [Clear] to display this message:
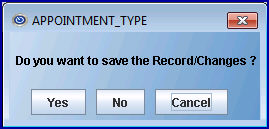
47.2.1 Select [Yes] to clear the screen and return the focus to the <Appointment Type> field, saving the new type.
47.2.2 Select [No] to clear the screen and return the focus to the <Appointment Type> field without saving.
47.3 Click [Exit] to display this message:

47.3.1 Select [Yes] to clear the screen and return the focus to the main screen, saving the new type.
47.3.2 Select [No] to clear the screen and return the focus to the main screen without saving.
Field Removed from this Screen:
1. Other Dependencies ![]()
Not used at this time.


