
Intellect™
ADDITIONAL FEATURES

Patient Portal
Appointments
Effective version 15.09.28
For PCM users only.
Patients using Patient Portal may make their own appointments via their Portal Connection. As an appointment is scheduled through Patient Portal, the patient information and selections are put in an Add Appointment screen. Once an appointment is scheduled, it displays on Intellect’s Appointment Schedule.
Set up is required before this feature may be used.
In this Topic Hide
Set up must be completed in both PCM and Intellect before patients may use this feature.
1. Log-in to Patient Portal as the Administrator.
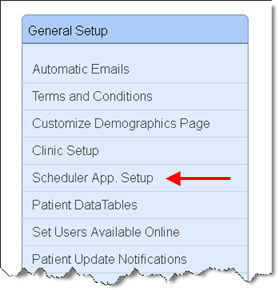
2. Click on [General Setup]
3. Click on [Scheduler App Setup]:
4. Click on the 'Allow Patients to Book Their Own Appointments (Client Must Use Intellect Scheduler)'. See red arrow below).
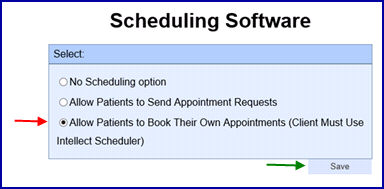
5. Click on [Save]. See green arrow above.
For questions regarding PCM set up, please contact a PCM trainer.
1. Go to Utility --►Tools --►Configuration.
1.1 The <External IP> field must contain the clinic’s internet address. For example, Prime Clinical’s internet address is www.primeclinical.com. Clinics should contact their IT person for additional information.
1.2 The <Webserver Port> field must be filled. Enter the port to be used by the webserver. The recommended port is 8080, but if that port is already being used for another purpose, another port may be used as long as it is an open port through the firewall. For example, enter http://primeclinical.net:8080/app_confirm. Clinics should contact their IT person for additional information.
2. Go to Utility --►Set up --►Appointment --►Appointment Type.
2.1 This must be completed for each appointment type on the drop-down list of the <Reason for this visit> field on the Patient Portal screen:
2.1.1 In the <Appointment Type> field, enter the appointment code. Appointment codes may not include spaces or special characters such as *, !, #.
2.1.2 In the <Self Sched Description> field, enter the description that should appear in the drop-down list for the patients; for example, Allergy Injection. The drop-down selection list only includes appointment types that have the <Self Sched Description> filled.
Note: For clinics also using the Self Check In feature, this description appears on the Self Schedule Patient Appointment Screen.
2.1.3 Make sure the <WebStaff Access> field is set to ‘Y.’ The <WebStaff Access> field must be set to ‘Y’ for every appointment type that should be on the drop-down list. If this field is set to ‘N’, the appointment type does not display on the drop-down list.
2.2 For the appointment type(s) used on the Utility --►Set up --►Appointment --► Template <Type> field:
2.2.1 Patient Portal only displays time slots for Appointment Types where <Self Sched Description> is completed (see 2.1.2 above). For example: When the template is set to display ‘OPEN’ for available time slots, these time slots are only displayed in Patient Portal if Utility --►Set up --►Appointment --►Appointment Type <Self Schedule Description> is set to ‘OPEN’ or ‘AVAILABLE’.
NOTE: If the template is set to the same appointment type code for the entire day (such as ‘OPEN’) but patients should NOT be allowed to schedule in all time slots, then modify specific time slots to a different appointment type (such as LUNCH, HOLD, CLOSED) where <Self Sched Description> is blank.
2.2.2 Patient Portal can be set to display ONLY time slots where the template has been set to specific appointment type(s). For example: If patients only schedule for follow-up appointments and at specific times, set those time slots on the template to the follow-up visit appointment type code where <Self Sched Description> is completed.
Utility --►Set up --►Appointment --► Template:
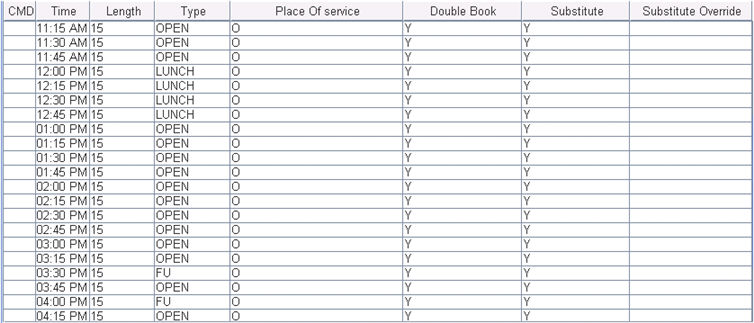
Schedule displayed in Intellect:

3. Go to Utility --►Provider --►Provider to add providers to the drop-down list of the <Provider> field on the Patient Portal screen.
3.1 In the <Provider Code> field, enter the code for the appropriate provider.
3.2 Make sure the <WebStaff Access> field is set to ‘Y.’ The <WebStaff Access> field must be set to ‘Y’ for every provider that should be on the drop-down list. If this field is set to ‘N,’ the provider does not display on the drop-down list.
3.3 Verify that the <Access To Appointment> field is set to ‘Y.’ The <Access To Appointment> field must be set to ‘Y’ for every provider that should be on the drop-down list. If this field is set to ‘N,’ the provider does not display on the drop-down list.
4. Go to Utility --►Facility.
For each facility that should be on the drop-down list of the <Facility> field on the Patient Portal screen:
4.1 In the <Facility Code> field, enter the facility code.
4.2 Make sure the <WebStaff Access> field is set to ‘Y.’ The <WebStaff Access> field must be set to ‘Y’ for every facility that should be on the drop-down list. If this field is set to ‘N,’ the facility does not display on the drop-down list.
4.3 Verify that the <Access To Appointment> field is set to ‘Y.’ The <Access To Appointment> field must be set to ‘Y’ for every location/facility that should be on the drop-down list. If this field is set to ‘N,’ the facility does not display on the drop-down list.
Note: Any facilities for which appointments are made must be in the provider's template (see Utility --►Set up --►Appointment --►Template).
After logging-in to the patient portal, patients see this screen:
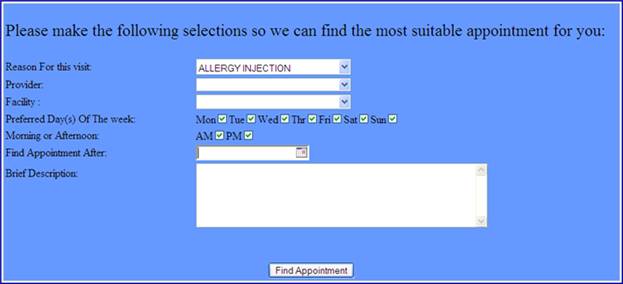
Patients should populate the screen as indicated:
1.1 Click the drop-down arrow to display available appointment types.
1.2 Click on the appropriate appointment type.
1.3 Authorized personnel may add appointment type options to the drop-down list. See Intellect Set Up, step 2.
2.1 This is an optional field.
2.2 To see all the providers with available appointments, this field should be left blank.
2.3 To limit appointment selections to one specific provider:
2.3.1 Click the drop-down arrow to display available providers.
2.3.2 Click on the provider with whom to make an appointment.
2.4 Authorized personnel may add providers to the drop-down list. See Intellect Set Up, step 3.
3.1 This is an optional field.
3.2 To see all facilities/locations with available appointments, this field should be left blank.
3.3 To limit appointment selections to one specific location:
3.3.1 Click the drop-down arrow to display available locations/facilities.
3.3.2 Click on the facility/location for the appointment.
3.4 Authorized personnel may add facilities to the drop-down list. See Intellect Set Up, step 4.
4. ![]()
4.1 The default setting has every day of the week selected. To remove days from the selection list, click on the boxes of the days to remove. Days of the week whose boxes are unchecked are not included as appointment selections.
5. ![]()
5.1 The default setting has both morning and afternoon appointments selected. For appointments only in the morning, click on the PM box to remove the check, and vice versa.
6. ![]()
6.1 This is an optional field.
6.2 To see all appointments, regardless of date, leave this field blank. Leaving this field blank starts the search on the current day.
6.3 To limit appointment selections to be after a particular calendar date:
6.3.1 Click on the mini calendar in the right portion of the field. A calendar displays for the current month with today’s date selected:
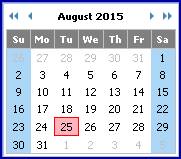
6.3.2 Use the arrows to advance one month at a time forward or one month at a time back.
6.3.3 Click the day on the calendar to begin appointment selections. Available appointments on the highlighted day are included.
7. 
7.1 This field allows patients to describe current symptoms, voice concerns, or ask questions.
7.2 Text may include numbers and symbols; for example, a temperature of 103°F.
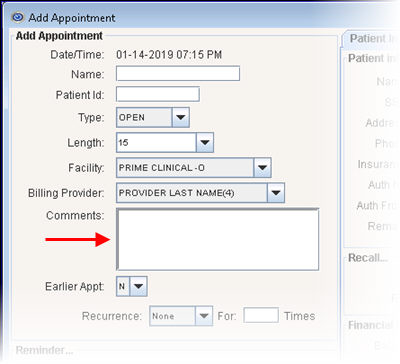
7.3 Text entered in this field displays on the Add Appointment screen in the <Comments> field:
8. After making their selections, patients click the ![]() button to display available appointments from which to choose. See sample below:
button to display available appointments from which to choose. See sample below:
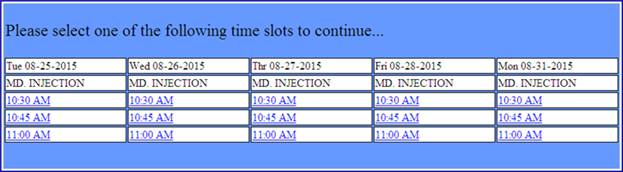
8.1 If no appointments are available meeting the patients' criteria, a message displays instructing them to change their initial selections:

9. Click on the desired appointment. After clicking on an appointment, a confirmation screen displays:

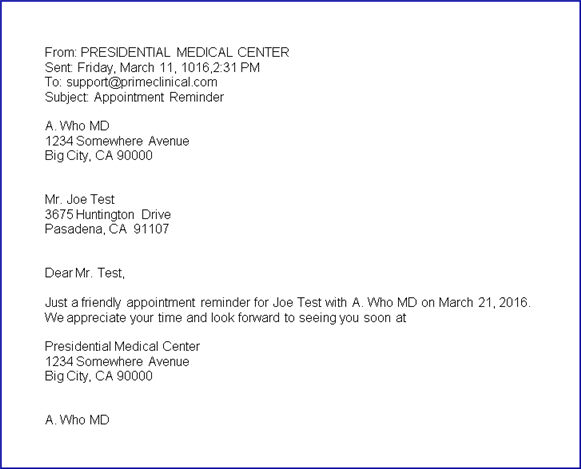
9.1 Patients whose email is on file and enabled are sent an email with their appointment information (see sample below). Patients cannot respond to the email.
10. As an appointment is scheduled through Patient Portal, the patient information and selections are put in an Add Appointment screen. Once an appointment is selected, it displays on Intellect’s Appointment Schedule.