Intellect™
SCHEDULE MENU OPTIONS

Appointment
Self Check In
For clinics wishing to utilize it, Intellect comes equipped with an appointment check in and/or self-schedule option. This functionality allows scheduled patients to check in and add walk-in patients to the current day’s schedule for specific appointment types, either as first available or restricted by provider. All this can be accomplished with minimal receptionist involvement, thus freeing time and saving money. A magnetic stripe card reader may be added, or the clinic may use a keyboard available for patient use.
Please note, these conditions apply:
• The system only accepts previously registered patients.
• If Self-Scheduling is enabled, then the appointment added by the patient is scheduled for the current day.
• If a patient has a previously scheduled appointment for the current day, then the patient can only perform Self Check In.
This topic includes:
Set Up Self Check In/Scheduling
Access the Self Check In/Scheduling Screen
Results Within the Appointment Scheduler
Results on Intellect's Main Screen
Set Up Self Check In/Scheduling
Before using this feature, a few screen fields must be updated to enable various functions including self-scheduling for same day walk-in appointments, editing demographics and making credit card payments. The steps do not need to be completed in a certain order and some are optional.
1. Go to Utility --►Set Up --►Security --►Login Users --►Modify to set the <Facility> field of all users.
1.1 Enter the <User Number> and press [ENTER].
1.2 In the <Facility> field, enter the Utility --►Facility <Facility Code> in which this user works.
1.3 NOTE: This field restricts check in and self-scheduling functions to the Facility associated with the logged on user accessing the Self Check In screen (see below).
2. Go to Utility --► Set Up --► Parameter --► Modify to designate if patients are allowed to view or edit existing demographic and insurance information during self check-in.
2.1 In <Modify on Self Checkin> field, use the drop-down to make a selection.
2.1.1 Select ‘No’ to allow patients to view patient demographic information.
2.1.2 Select ‘Yes’ to allow patients to modify patient demographic information.
2.1.3 Select ‘Exclude’ to allow check-in without displaying demographic information.
3. Self-Scheduling:
The following steps must be completed to allow walk-in patients to schedule their own appointment for the current day.
3.1 Go to the Utility--►Provider --►Provider --►Modify screen for all Provider Codes used on the appointment schedule.
3.1.1 In the <Walk-In Appointment> field, select ‘Y’ if this Provider allows patients to schedule appointments for the current day.
3.1.2 In the <Self Schedule Appointment Type> field, enter the Appointment Type(s) patients are allowed to select when self-scheduling for this Provider. Separate multiple Appointment Types with commas.
3.1.3 NOTE: If patients are NOT allowed to self-schedule appointments for the Provider, the <Walk-In Appointment> field must be set to ‘N’ and <Self Schedule Appointment Type> field must be left blank.
3.2 Go to Utility --► Set Up --► Appointment --► Appointment Type --► Modify to set the Appointment Types available for patients to self-schedule an appointment.
These 3 fields are required and impact the performance of this feature:

3.2.1 <Self Sched Treating Provider>
3.2.1.1 If 'Y' (yes) is selected, self-scheduling for this Appointment Type is restricted to the <Treating Provider Name> on the patient’s Registration screen and the selection in the <Self Sched First Available> field (see 3.2.2) is ignored. The outcome is also dependent on the <Walk-In Appointment> (see 3.1.1) and <Self Schedule Appointment Type> (see 3.1.2) fields on the Utility--►Provider --►Provider screen. See Condition 1.
3.2.1.2 If 'N' (no) is selected, the outcome is dependent on the setting for the <Self Sched First Available> field. See 3.2.2.
3.2.2 <Self Sched First Available>
3.2.2.1 The selection in this field is ignored, if <Self Sched Treating Provider> is set to ‘Y’. (See 3.2.1)
3.2.2.2 If 'N' (no) is selected for this field AND <Self Sched Treating Provider> is also set to ‘N’, then the Self Check In screen displays a list of providers available to accept walk-in appointments (see 3.1). See Condition 2.
3.2.2.3 If 'Y' (yes) is selected for this field AND <Self Sched Treating Provider> is set to ‘N’, then Intellect automatically selects the first available time slot for this Appointment Type, regardless of the provider. See Condition 3.
3.2.3 <Self Sched Description> The short description typed in this field is display on the Self Check In screen when the patient is prompted ‘OK, Please tell me what is the purpose of your visit’.
3.3 Go to Registration --►Regular --►Patient to populate the <Treating Provider Name> field, if allowing patients to schedule their own appointments (see 3.1 and 3.2.1).
4. To Accept Credit Card Payments:
4.1 The clinic must first sign up with a third-party vendor to process credit card payments. For details on the supported vendor and setup instructions, see Third-Party Vendor Options for Credit Card Authorization.
4.2 After sign up is completed with the third-party vendor, the following fields on the Utility --► Set Up --► Clinic screen are required to process credit card payments:
4.2.1 <Credit Card Authorization Login>
4.2.2 <Credit Card Authorization Password>
4.2.3 <Credit Card Authorization URL>
4.2.4 <Credit Card Test Mode>
4.3 (Effective version 21.05.21) For all Appointment Types, designate whether or not the prompt to make a copayment is displayed.
4.3.1 Go to Utility --► Set Up --► Appointment --► Appointment Type --► Modify.
4.3.2 In the <Requires CoPayment> field, use the drop-down to make a selection.
4.3.2.1 Select ‘No’ if a copayment is NOT collected for this appointment type.
4.3.2.2 Select ‘Yes’ if a copayment is collected for this appointment type.
4.4 A magnetic strip card reader must be connected to workstation used for patient self-check in.
Access the Self Check in/Scheduling Screen
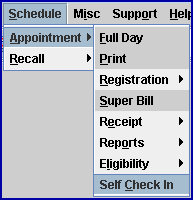
To access the Self Check In screen, go to Schedule --► Appointment --► Self Check In:
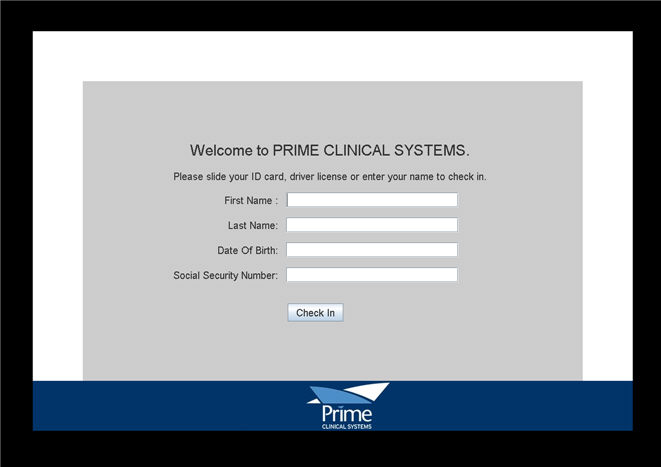
NOTE: Effective version 14.07.24, the Welcome screen now includes a border, as shown below, where individual clinics may place ads and/or information for their practice. For additional information, please contact PCS support.
NOTE for clinics: To exit from the Welcome screen, press Alt-Ctrl-Q. This key combination should not be available to patients.
To access self check-in, the <First Name> and <Last Name> fields are required; the <Date of Birth> and <Social Security Number> fields are optional, but they are the only way Intellect can differentiate between patients with the same name.
Once the main screen (above) has been filled-in, and the [Check In] button clicked, a demographic screen displays, based on the current software.
In software versions prior to 15.09.02, after initially signing-in, the patient demographic information displayed. Effective version 15.09.02, Intellect may be set up so that the patient demographic screen is not displayed, affording greater patient privacy, and the patient is directed to be seated. This setting is controlled via the 'Exclude' option in the <Modify on Self Checkin> field on the Utility --►Set Up --►Parameter screen.
For version 9.12.26, please click here for screen examples and information on updating existing patient information.
Effective version 14.07.24:

• If changes need to be made to a patient's demographics and/or insurance information, he/she can enter the changes and then click on [OK].
• Note: Co-payments are NOT made on this screen. Only the amount of the co-pay may be modified.
• If no changes need to be made, the patient can just click on either [OK] or [Cancel].
Once the [OK] button is clicked, the outcome is dependent on whether or not a clinic is set up to allow patients to make credit card payments:
• If so, the credit card screens display at this point. Go to Make a Credit Card Payment for screen samples.
• If not, this screen appears:

• Click on [Yes]:
If the patient has a scheduled appointment for that day, Intellect displays the message: 'I just checked you in. Please have a seat, someone will assist you soon'. In versions 9.12.26 and greater, when a patient checks-in, the [Patient Icon] at the top of Intellect's main screen begins to blink. See Results on Intellect's Main Screen for more information.
If the patient does NOT have a scheduled appointment for that day, the patient is directed to see the receptionist.
• Click on [No] displays this screen:

• Click on [No] to return the display to the Welcome screen.
• Click on [Yes] to display screens based on Intellect's set up:
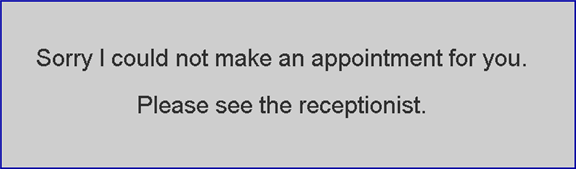
If the person trying to schedule an appointment is NOT a registered patient:
The display changes to: 'Sorry I could not make an appointment for you. Please see the receptionist'.
If the person trying to schedule an appointment IS a registered patient, the outcome is determined by three Conditions:
a. Condition 3: If in Utility --► Set Up --► Appointment --► Appointment Type the <Self Sched Treating Provider> field is set to 'N' and the <Self Sched First Available> field is set to 'Y,' the display changes to: 'I just checked you in. Please have a seat, someone will assist you soon'.
In version 9.12.26 and greater, when a patient checks-in, the [Patient Icon] at the top of Intellect's main screen begins to blink. See Results on Intellect's Main Screen for more information.
b. Condition 2: If in Utility --► Set Up --► Appointment --► Appointment Type the <Self Sched Treating Provider> field is set to 'N' and the <Self Sched First Available> field is set to 'N.'
- OR -
Condition 1: If in Utility --► Set Up --► Appointment --► Appointment Type the <Self Sched Treating Provider> field is set to 'Y' (which then ignores the selection in the <Self Sched First Available> field), the display changes to:
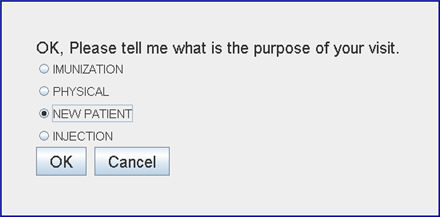
NOTE: The available appointment description check boxes represent all Utility --► Set Up --► Appointment --► Appointment Type where <Self Sched Description> has a value.
• The patient should make a selection by clicking on a radio button and then clicking on [OK]. Clicking on [Cancel] returns the display to the previous screen.
After clicking on [OK], the outcome is dependent on the set up of the Providers and the availability of time slots:
• If the patient has a treating Provider with available time slots, Intellect adds the patient to the schedule. The display changes to: 'I just checked you in. Please have a seat, someone will assist you soon'. In versions 9.12.26 and greater, when a patient checks-in, the [Patient Icon] at the top of Intellect's main screen begins to blink. See Results on Intellect's Main Screen for more information.
• If the patient has a treating Provider but the Provider does not have any available time slots, the display changes to : 'Sorry I could not make an appointment for you. Please see the receptionist'.
• If the selected Appointment Type is available for more than one Provider, this screen offers a choice of Providers:
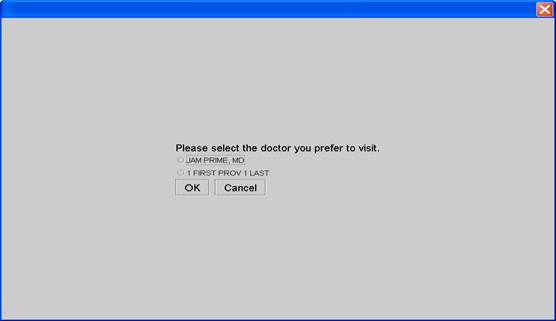
After the patient clicks on a radio button to select a Provider, and then clicks on [OK], Intellect adds the patient to the schedule. If the patient clicks on [Cancel], the display returns to the previous screen.
Note: If the patient reaches this point, Intellect has verified that they are a registered patient and that appointments are available for this type.
After clicking on [OK], the display changes to: 'I just checked you in. Please have a seat, someone will assist you soon'. In versions 9.12.26 and greater, when a patient checks-in, the [Patient Icon] at the top of Intellect's main screen begins to blink. See Results on Intellect's Main Screen for more information.
Effective version 9.12.26, patients may make credit card payments if a clinic is set up to allow patients to do so. Set up includes:
• Your clinic must be registered with a credit card vendor. See Third-Party Vendor Options --► Credit Card Authorization.
• On the Utility --► Set Up --►Parameter screen, the <Modify on Self Checkin> field must be set to Yes.
• On the Utility --► Set Up --► Appointment Type screen, the <Requires Copayment> field must be set to Yes.
• When registered with a third-party vendor as one account for the clinic, the following fields must be populated on the Utility --► Set Up --► Clinic screen: <Credit Card Authorization Login>, <Credit Card Authorization Password>, <Credit Card Authorization Token> (if applicable), and <Credit Card Authorization URL>.
• When registered with a third-party vendor as separate accounts for individual providers, the following fields must be populated: Utility --► Set Up --► Clinic <Credit Card Authorization URL>, and Utility --► Provider --► Provider <Credit Card Authorization Login>, <Credit Card Authorization Password>, and <Credit Card Authorization Token> (if applicable).
NOTE: When this feature is enabled on a Self Checkin Kiosk, it requires that a card reader is attached to the kiosk. The program does not allow the user to type in the Credit Card information.
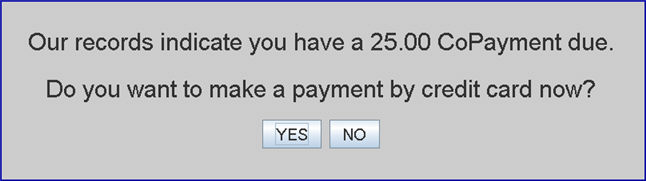
Once the clinic is set up to allow patients to make credit card payments, clicking the [OK] button on the demographic screen, displays a screen which includes the patient's co-pay, if they have one, and/or the patient's account balance, and then gives the patient the option to make a payment via credit card:
- OR -
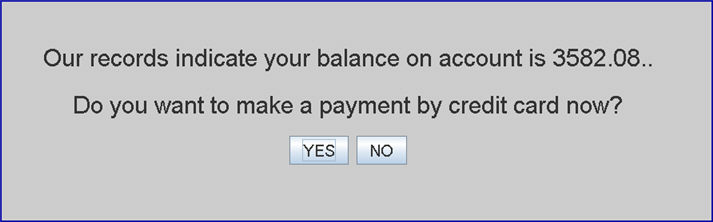
NOTE: On the screens shown above, the Copay amount is pulled from the Primary Insurance screen, and the account balance displays the Patient Balance.
For either of the above screens:
• If [No] is selected, he/she is directed to have a seat and wait for further assistance.
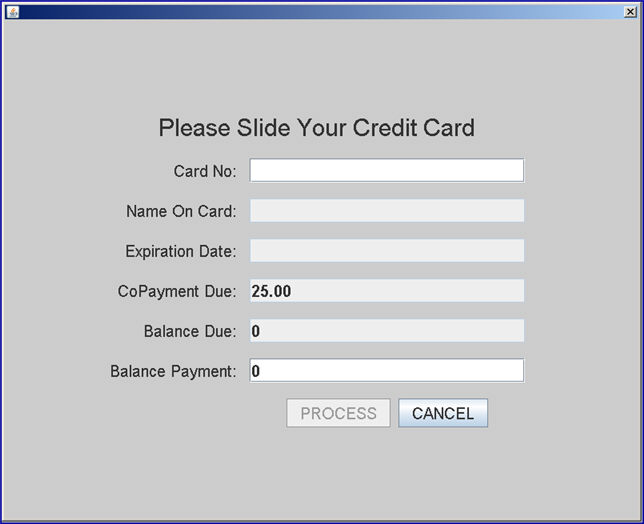
• If [Yes] is selected, a credit card payment screen is displayed. The first example below is for a patient with a $25.00 co-payment. The second example below is for a patient with $3,582.08 balance due.
Example 1:
Example 2:
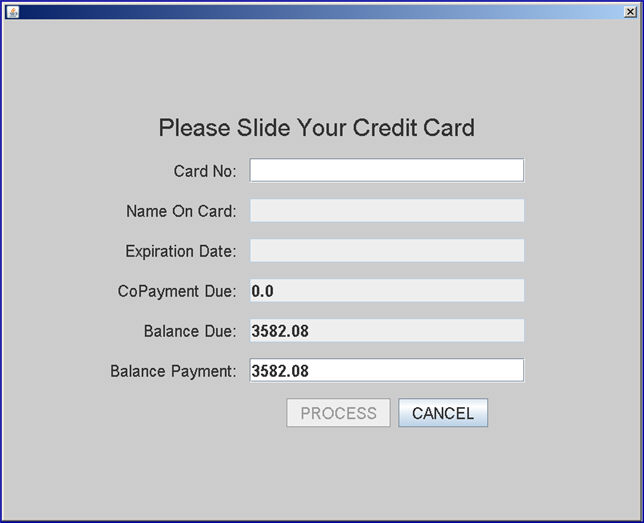
If using the Credit Card:
• Patients must slide their card; they cannot type in their Credit Card information.
• The Balance shown on both screen 1 and 2 above are the patient balance, not the family balance.
Patients can type in the amount they want to pay in the <Balance Payment> field; other fields are filled-in by the credit card swipe. Patients cannot modify the amount of the co-pay, but they can type in the amount they want to pay in the <Balance Payment> field.
• Press [Process] to complete the payment, otherwise, press [Cancel]. If either [Process] or [Cancel] are selected, Intellect displays:

Results Within the Appointment Scheduler
In all software versions, results within the Appointment Scheduler show:
• The newly scheduled appointment.
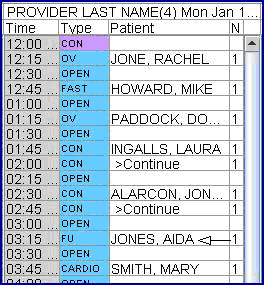
• The patient added to the Check In Out View.
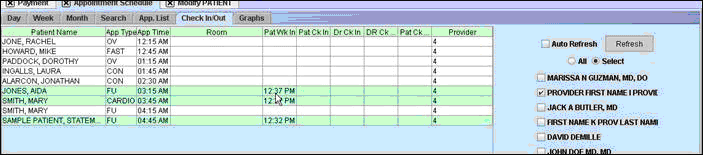
• And displays a comment in all Appointment History displays.
![]()
NOTE: To close this feature, log out of Intellect. X does not work on purpose in order to prevent patients from accidentally shutting down the system.
Results on Intellect's Main Screen
There is a [Patients Check In] icon at the top of Intellect's main screen:
Once a patient has checked-in, the [Patients Check In] icon begins to blink, changing from the original figure (see above) to a figure with a 'plus' sign: ![]()
Click on the blinking [Patients Check In] icon to display a report showing only the patients which have checked in since the last time the report was viewed. If the patient made a co-pay or payment to his/her balance, the payment shows on this screen:

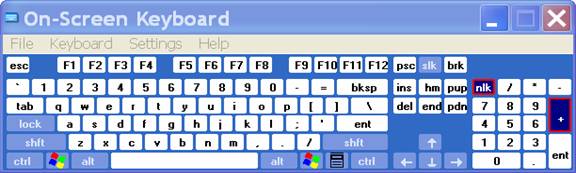
Additionally, on the Self Check In screen, an on-screen Keyboard is also displayed:
If any required condition fails, Intellect then displays:
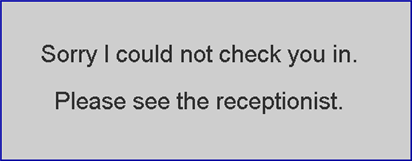
When trying to check in as Scheduled with no appointment or an error in name displays:
If a patient has a previously scheduled appointment and clicks 'Yes' to 'Do You Have an Appointment':