
Intellect™
ADDITIONAL FEATURES

Office Task Manager
BETA - Effective version 16.05.20
In this Topic Hide
Intellect's Office Task Manager may be used whether or not an office uses Patient Chart Manager (PCM). Office Task Manager is an organizational tool used for general 'to-do' items not associated with PCM patient charts, and it may also be used to keep track of action items either in association with PCM patient charts or documents in charts.
The information in Intellect's Task Manager is completely shared with PCM, and vice-versa. Note, however, that the PCM Task Manager should be used for prescriptions and Meaningful Use categories.
The Intellect Office Task Manager and the PCM Task Manager are very similar in their usage. The general idea of how the Task Manager is used can be seen in the PCM Task Manager Overview video -- actual screens, keystrokes, and options vary when using Intellect's Office Task Manager.
The ability to use the Task Manager feature is not related to security levels.
Each workstation where Intellect's Task Manager will be used must have PCM loaded onto it since Intellect's Task Manager and the PCM Task Manager share files. However, PCM may only be used if you have purchased a license for it. In this documentation, 'PCM user' refers to users with a licensed copy of PCM.
No set up is required in PCM.
To set up Intellect:
1. Go to Utility --►Set Up --►Security --►Login User --►Modify
1.1 In the <User Number> field:
• For clinics not using PCM, enter your Intellect user number.
• For clinics using PCM, enter the Intellect user number which should be linked to a PCM user.
1.2 In the <PCM UserInit> field:
• For clinics not using PCM, leave this field blank.
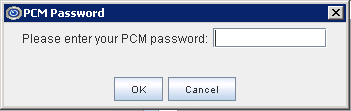
• For PCM users, enter the initials of the PCM user exactly how they are displayed in PCM. This can be found on PCM's Password Login Screen under the UserInit column.
1.3 In the <User Type> field:
• For clinics not using PCM, select an option according to the user's role in the office. For example, select Provider for doctors, select T User for mid-level users such as PAs, NPs, etc., or select Other for clerical and other office staff such as front desk, MAs, billers, etc.
• For PCM users, this field automatically changes to the user type associated with the user in <PCM UserInit>. If the user type needs to be changed, use the drop-down menu to select the type of user as indicated on PCM's Password Login Screen in the Cat column; e.g., T User (T), Provider (P), or Other (O).
1.4 Click on [Modify]. A pop-up box displays:
• For clinics not using PCM (and therefore leaving the <PCM UserInit> field blank), the pop up box does not display.
• For PCM users, enter the password for the PCM user entered in the <PCM UserInit> field, and then click [OK].
2. Go to Utility --►Set Up --►Appointment --►Appointment Type --►Modify (optional)
Effective version 16.06.06, appointment types may be set so that the Office Task Manager opens when an appointment is scheduled with that appointment type. Through the Office Task Manager, the person making the appointment can assign a task that needs to be completed in conjunction with the appointment. For example, if the appointment type is Surgery, the Office Task Manager could be used to assign a task for completion of pre-surgery lab work. To set up this feature:
2.1 Verify that the <Self Sched Treating Provider> field is set to 'N.'
2.2 Verify that the <Self Sched First Avail> field is set to 'N.'
2.3 Verify that the <Self Sched Description> field is empty.
2.4 In the <Add Task> field, select 'Manual.'
NOTE: Each appointment type can only be set to either allow the Task Manager to display when scheduling an appointment, or it can be set to allow patients to check-in/self-schedule appointments via patient portal -- it cannot be set to perform both functions. For more information on patient appointment scheduling, see the online documentation under New Features --►Patient Portal --► Appointments.
The Task Manager may be opened two ways:
1. Click on the Office Task Manager icon on Intellect's main menu tool bar:
1.1 This icon blinks yellow ![]() :
:
• On the due date of a task. See <Date Due> for additional information.
• On the reminder date as set for this task. See <ʘ Start Reminder On MM/DD/YYYY> for additional information.
1.2 Effective version 19.09.03, when clicking on the Tasks Icon, the screen now condenses when the resolution is changed.
- OR -
2. Schedule an appointment for a designated appointment type.
For additional information, see Set Up, step 2 above, OR go to Schedule --► Appointment --►Full Day --►Appointment Booking and Management --►Add Appointment Dialog Box - Action Buttons: [OK] in the online documentation.
The main Task Manager screen displays a task list which can be filtered for ease of use. This screen includes [New Task], [Open Task], and [Open Doc] buttons. Click either the [New Task] or [Open Task] buttons to open the Office Task screen to set up new tasks or view the details of existing tasks. Click the [Open Doc] button to open a window to view documents attached to tasks.
Main Task Manager Screen Overview
Add Task/View Task or Document
Multi-Line Task List Column Definitions/Options
Task Assignment, Reminders, and Status
Action Buttons at the Bottom of the Screen
Main Task Manager Screen Overview
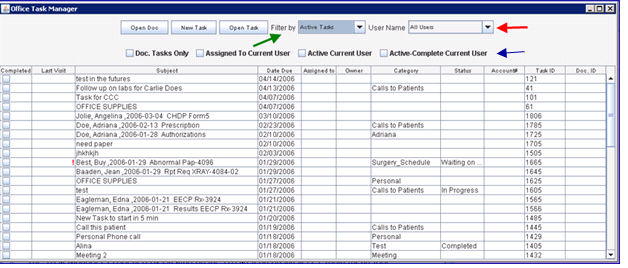
The top portion of the main Task Manager screen includes options to filter the task list to control what and how much information is displayed on the multi-line task list. It also provides buttons to add tasks, or view existing tasks and documents.
The sample screen below shows a multi-line list of tasks for all Task Manager users.
Add Task/View Task or Document
Multi-Line Task List Column Definitions/Options
1. ![]()
The <User Name> field (see red arrow above) has a drop-down list. When a user who is logged-in to Intellect opens the Task Manager, his/her operator name displays in the <User Name> field and is added to the drop-down list. The user's operator name displays on the list as set up in Utility --►Set Up --►Security --►Login User <Operator Name>. Use the drop-down list to select the desired user.
2. With the appropriate user selected in the <User Name> field, the amount and type of information displayed on the multi-line task list for that user can be controlled either via the <Filter by> drop-down list (see green arrow above) or the check boxes (see blue arrow above):
2.1 <Filter by> drop-down list:
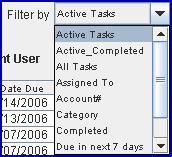
2.1.1 Active Tasks: This is the default. When selected, this view shows tasks the user is the owner of that have not yet been fully marked completed. For example, ‘Completed’ could show in the Status column but the task still shows in this view if the user is the owner and has not marked off the Completed checkbox. It also shows tasks the user has been assigned that have not yet been marked completed. This option performs the same function as clicking the ☐ Active Current User box.
2.1.2 Active_Completed: For the selected user, this option displays tasks that the user is the owner of and that have a Status of Completed. This option performs the same function as clicking the ☐ Active-Complete Current User box.
2.1.3 All Tasks: Regardless of the selected user, select this option to display both the tasks that are currently active and the tasks that have been completed for all users.
2.1.4 Assigned To: Select this option to display all tasks to which the selected user has been assigned either by another user, or by him/herself, depending on how the Task Manager is used. This option performs the same function as clicking the ☐ Assigned to Current User box.
2.1.5 Account#: Select this option to cause the <User Name> field to be replaced with an <Account> field. Entering a patient's account number into this field limits the display to only that patient.
2.1.6 Category: Select this option to cause the <User Name> field to be replaced with a <Category> drop-down list. Selecting a category from the drop-down limits the display to only those tasks with that category. For more information on Categories, see 1.5 Category in the Task Identification section.
2.1.7 Completed: Select this option to display all tasks which the selected user has completed. Both the tasks initiated as a task owner and the tasks assigned to that same user are included.
2.1.8 Due in next 7 days: Select this option to display all tasks which are due in the next seven days for the selected user. Both the tasks initiated as a task owner and the tasks assigned to that same user are included.
2.1.9 Overdue tasks: Select this option to display all tasks which are overdue for the selected user. Both the tasks initiated as a task owner and the tasks assigned to that same user are included.
2.1.10 Patient name: Select this option to cause the <User Name> field to be replaced with a <Name> field. If a last name is entered, e.g., ‘Smith’, all tasks for patients with the last name of Smith are displayed. The display may be limited to just one specific patient by entering the patients' entire last name and first name.
![]()
2.2.1 Doc. Tasks Only: For the selected user, click this box to filter the display to show the tasks that have documents attached.
2.2.2 Assigned to Current User: Clicking this box has the same result as selecting the Assigned To option on the <Filter by> field. The display shows all tasks to which the selected user has been assigned by another user.
2.2.3 Active Current User: Clicking this box has the same result as selecting the Active Tasks option on the <Filter by> field. The display shows all tasks that have not yet been completed by the selected user.
2.2.4 Active-Complete Current User: Clicking this box has the same result as selecting the Active Completed option on the <Filter by> field. For the selected user, this option displays tasks that the user is the owner of and that have a Status of Completed.
Add Task/View Task or Document
3. Buttons are provided for adding new tasks, opening tasks to view or modify, and opening documents to view.
3.1 ![]()
Click on the [New Task] button to open the Office Task screen and add a task. See the Office Task Screen for information on adding tasks.
3.2 ![]()
Click on the [Open Task] button to open the Office Task screen to access an existing task. See the Office Task Screen for information on opening an existing task.
3.3 ![]()
This button may only be used for tasks that have a document attached. Click the task with the desired document to view, and then click the [Open Doc] button to open the document. The document opens in a JPView frame.
3.3.1 If the orientation or size of the document needs to be changed, right-click on the document to display a pop-up menu from which to select the applicable option; e.g., Rotate View, Zoom Out, Full Screen, etc.
3.3.2 If there is no document attached to the selected task, this pop-up displays:
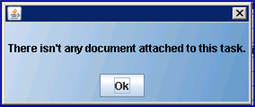
Multi-Line Task List Column Definitions/Options
4. At the multi-line task list, right-click on a task to display the Open Doc and Open Task options:

[Open Doc] performs the same function as the [Open Doc] button at the top of the screen.
[Open Task] performs the same function as the [Open Task] button at the top of the screen.
Columns on the multi-line list display identifying information for the tasks. Click on the column header to sort the information in each column. Columns include:
4.1 ![]()
If the logged-in user is the owner of a task he/she has marked as Completed, the box in this field may be clicked to remove the task from the multi-line task list.
4.2 ![]()
Indicates the date of the last day of service for the patient, if applicable. Additionally, if the task has been marked as a high priority, a red exclamation point displays in this field. See Task Identification, 1.6 High Priority for additional information.
4.3 ![]()
Displays the subject of the task as entered in the <Subject> field on the Office Task screen.
4.4 ![]()
Indicates the date that the task is scheduled to be completed, as set up in the <Date Due> field on the Office Task screen.
4.5 ![]()
Indicates the user to whom this task has been assigned. See 2.4 Assign the Task to Other User(s) section, 2.4.2 Assign To for additional information.
4.6 ![]()
Indicates the user who originally set up the task. See 2.3 Owner section for additional information.
4.7 ![]()
Displays the Category as entered in the <Category> field on the Office Task screen.
4.8 ![]()
Indicates the progress of the task, as selected in the <Status> field on the Office Task screen. See 2.4 Assign the Task to Other User(s) section, 2.4.4 Status for additional information.
4.9 ![]()
Displays the patient's account number, if applicable, as entered in the <Account#> field on the Office Task screen.
4.10 ![]()
Displays a number generated by the system when the task is initially set up.
4.11 ![]()
If there is a document attached to the task, this number indicates the document in PCM to which the chart is attached.
Click on either the [New Task] or [Open Task] buttons on the main Task Manager screen (see below) to display the Office Task screen:

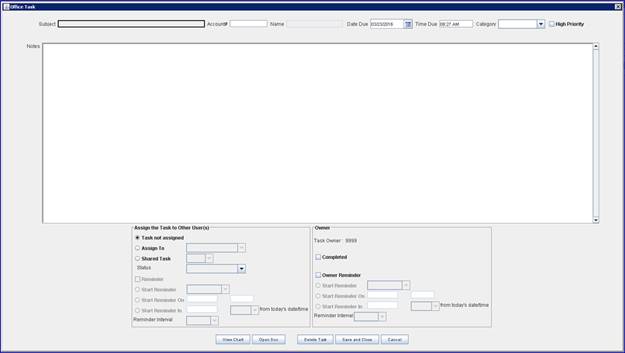
The Office Task screen allows users to set up new tasks, view tasks, assign tasks to other users, set task reminders, and change or view the status of tasks.
The top portion of the Office Task screen contains the task identification information included on the multi-line list on the main Task Manager screen. The middle portion of the Office Task screen handles the settings for task assignment, reminders, and status. The bottom portion of the Office Task screen provides action buttons for further task management.
Task Assignment, Reminders, and Status
Action Buttons at the Bottom of the Screen
1. Fields on the Office Task screen apply to both setting up new tasks and viewing existing tasks, as noted in the field descriptions below.
1.1.1 This field is similar to the Subject line of an email.
1.1.2 It is a required field when setting up a new task.
1.1.3 It displays in the Subject column on the multi-line task list on the main Task Manager screen.
1.2.1 The <Account #> and <Name> fields work together. When a patient account number is entered in the <Account #> field, the <Name> field is automatically filled with the corresponding patient name.
Alternately, users may type a last name and hit [Enter] to access Intellect's standard search screen.
Note: Once the task is saved, the account # cannot be changed.
1.2.2 For a new task, if a task is related to a patient, the patient account number should fill this field.
1.2.3 For a new task, if a task is not related to a patient, this field is not required and may be left blank.
1.2.4 This account number displays in the Account# column on the multi-line task list on the main Task Manager screen.
1.3.1 When setting up a new task, this field is automatically filled when the Office Task screen is opened. It defaults to 24 hours after the task is started.
1.3.2 The date can be changed by typing a new date over the default date
- OR -
Click on the calendar icon to display a calendar. If setting up a new task, the current month and day defaults. To change the month, use the arrows at the top of the display. Dates may be added or removed by mouse-clicking to select or deselect individual days. After selecting a date, click the X to close the calendar.
1.3.3 This date displays in the Date Due column on the multi-line task list on the main Task Manager screen.
1.4 ![]()
1.4.1 When setting up a new task, this field is automatically filled with the time that the Office Task screen is opened.
1.4.2 The date can be changed by typing a new date over the default date
1.5.1 This allows for the classification of a task. Although it is not required, it is a good way to group and filter tasks.
1.5.2 The drop-down list is shared with PCM.
Note: Categories may be free-typed in Intellect tasks, but they are not saved to the drop-down list. Anything to be added to or deleted from the drop-down list must be done in PCM.
1.5.3 If it is necessary to delete a duplicate Category, or clean up the list, Categories must be deleted using PCM.
1.5.4 This category displays in the Category column on the multi-line task list on the main Task Manager screen.
1.5.5 Note: The following categories may only be marked as 'Completed' in PCM: Prescriptions, Meaningful Use, Pharmacy Request, and Sent Messages Failed. If an owner in Intellect tries to mark the task as complete, a message displays stating tasks with that category cannot be set to Completed in Intellect. See Task Assignment, Reminders, and Status, 2.3.2 Completed for additional information.
1.6.1 Click this box to cause a red exclamation point to display next to the task on the main Task Manager screen, indicating that it is a high priority item:

With a task selected on the main Task Manager screen, click the [Open Task] button to open the Office Task screen and display the selected task in the Notes section.
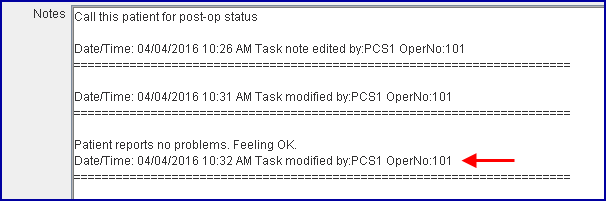
This field is a free-type field for both existing tasks and for new tasks. When an addition is made in this section and the [Save and Close] button is clicked at the bottom of the screen, the system adds the date and time, along with the name and operator number of the person making the addition. Past notes may not be changed or modified.
Task Assignment, Reminders, and Status
2. When a new task is set up, the owner has ultimate control over the task. The owner decides if the task is just for him/her and if he/she would like to be reminded to complete the task (see Example 1 below). Or, the owner can decide to assign the task to another user, or group, and set controls for the status of the task and reminders to the assigned user (see Example 2 below). In turn, the assigned user can also re-assign the task, and change the status. The reminder settings for the ‘assigned’ group or user can only be edited by the owner.
2.1 Example 1
The screen below shows the owner of the task as PCS1 with the task not being assigned to another user, and no reminders having been set for the owner.
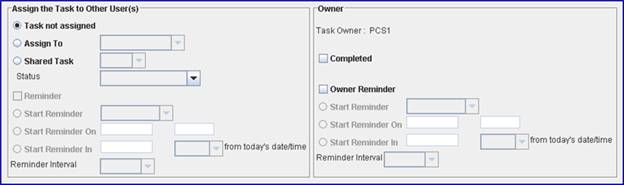
2.2 Example 2
The screen below shows the owner of the task as PCS1 with the task being assigned to another user, Anthony A. Gonzales, and a reminder set to begin when the task is due with reminders sent every hour.
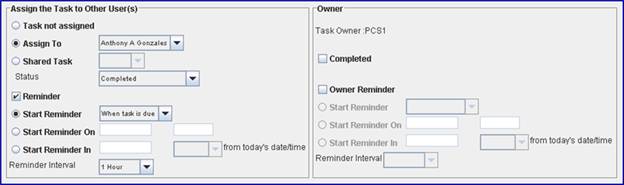
This section of the screen is divided into two sections: an Owner section on the right, and an Assign the Task to Other User(s) section on the left. Field set-up guidelines are given below for these sections, beginning with the Owner section. Unless otherwise noted, fields on this screen apply to both setting up new tasks and modifying existing tasks.
2.3.1 ![]()
The person who originally sets up the task is the owner, and his/her Intellect Operator name displays in this field. As shown here, 9999 is the task owner's Intellect Operator Name.
Only the owner of the task can click this box to identify the task as being completely done. Assigned users can only indicate in the <Status> field that what is required of them is done.
Note: If a task has one of the following categories, it can only be marked Completed by the owner in PCM, not Intellect: Prescriptions, Meaningful Use, Pharmacy Request, and Sent Messages Failed. For example: Clicking the box here or in the Completed column for a task with one of the above categories produces a message stating tasks with that category cannot be set to Completed in Intellect.
Task owners can click this box to request reminders for themselves even if they assign the task to another user. For example, a reminder could be set to check the progress made by the assigned user.
2.3.3.1 ![]()
With this choice selected, use the drop-down list to select when the reminder should be sent. Options range from 'When task is due,' to a time allocation by the minute, hour, day, and week. For example, if '15 minutes' is selected, a reminder is sent 15 minutes before the task due date.
Selecting this option fills the fields with today's date and the current time. To change either the date or time that the reminder should begin, click in the field and type in the new information.
2.3.3.3 ![]()
Selecting this option places a 5 in the first field and defaults to Minutes in the drop-down field, indicating the reminder should start in 5 minutes. To change the time increment in the first field, click in the field and type in the new information. Use the drop-down to select Minutes(s), Hour(s), Day(s), Week(s), Month(s), or Year(s).
2.3.3.4 ![]()
Use the drop-down list to select how often you would like the reminder to be sent. Intervals can be sent in minutes, hours, days, or weeks.
2.4 Assign the Task to Other User(s) section
2.4.1 ![]()
This field is selected by default, and remains selected until the Task owner selects either <ʘ Assign To> or <ʘ Shared Task> when delegating responsibility to another user or group of users.
Click the radio button for this field to activate the drop-down list from which an assignee for the task may be selected. Task owners may select an assignee who in turn may reassign the task to another user or group of users (see <ʘ Shared Task> below). Any user can reassign a task, which allows for situations such as when a user needs to reassign a task to him/herself because the original assigned user had to leave on medical leave for a week.
Click the radio button for this field to activate the drop-down list from which a group of assignees may be selected for the task; e.g., All, Provider, T User, or Other. Groups are defined as:
• All = All Intellect users
• Provider = All Intellect users assigned to a PCM user with 'Provider' selected in the <User Type> field of Utility --►Set Up --►Security --►Login User.
• T User = All Intellect users assigned to a PCM user with 'T User' selected in the <User Type> field of Utility --►Set Up --►Security --►Login User.
• Other = All Intellect users assigned to a PCM user with 'Other' selected in the <User Type> field of Utility --►Set Up --►Security --►Login User.
Only task owners may select a group to whom the task should be assigned
Note: Users may not assign a task to a random selection of users; tasks may only be assigned to one individual user or to a group as defined above.
Task owners and assignees may use the drop-down to indicate progress of the task:
2.4.5 ![]()
If the task owner assigns the task to someone else, he/she can click this box to set up reminders for his/her assignee.
The remaining Reminder options work the same as those described in the Owner section, beginning with 2.3.3. Owner Reminder. Please refer to those options for additional information.
Action Buttons at the Bottom of the Screen
3. These buttons provide access to charts and documents, and allow the user to delete tasks, save changes, or exit from the screen:

3.1 ![]()
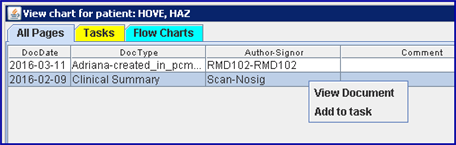
With a task open that includes a patient account number, click this button to open the View chart for patient screen for the associated patient:
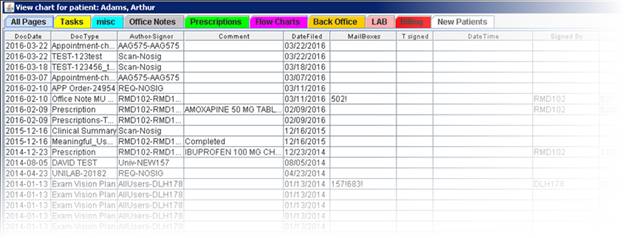
This screen is similar to the list of documents in the bottom left corner of the patient chart in PCM.
A tab displays for each type of information in the patient's chart. Click on a tab to limit the display to just the type of information associated with the selected tab. For example, to only see the patient's prescriptions, click the Prescriptions tab. These tabs directly correspond to the chart tabs in PCM.
Hover the mouse between the column headings to display a left-right arrow (see below -- arrow enlarged). When the arrow displays, users may hold down the left mouse button and drag it to re-size the column.
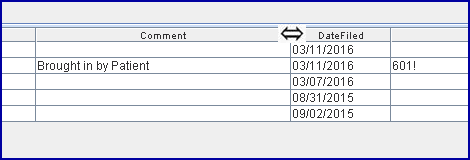
3.1.1 
The date assigned to the document when it was attached/filed; i.e., basically, the date of service.
3.1.2 
The name of the document. For tasks (files displayed under the 'Tasks' tab), the name is the same as the <Subject>.
Note for PCM users: The format for this column is 'Category' - 'Subject.' The document starts with 'Task' if no Category is chosen.
3.1.3 
Information in this field begins with the identification of the documents' author, followed by initials of the documents' signor, if needed.
For example:

In the sample above:
• Scan-Nosig indicates the document was scanned or filed from PCM's General inbox and was not signed.
• RM102-RMD102 shows the initials of the user who attached the document, followed by the signor's initials (in this case, it is the same person).
• Univ-NEW157 indicates the document was attached and is a universal type document, and gives the initials of the last user to update the document.
• REQ -NOSIG indicates the document is a requisition of some sort; e.g., lab requisition. In this case, no signature is required.
• AllUsers-DLH178 indicates the document is available for all users to attach, followed by the signor's initials.
3.1.4 
Comments may be added or modified through PCM's Document Properties box. See Charts, Chapter: The Patients Chart; Section: Chart Documents; Document: Correct Document Properties, IV - Document Comments. In Intellect, there is no way to add or modify information in this column.
3.1.5 
Indicates the actual date the document was filed/attached to the chart.
3.1.6 
If a PCM user's mailbox contains a copy of the document, this column indicates the PCM user's ID. For example, 654! displays if the PCM user's ID is CFG654.
3.1.7 
Displays the user ID of the T-User that signed the document when a document is set up for two signatures.
3.1.8 
Displays the date and time the document was signed by the T-User shown above in the [T signed] field.
3.1.9 
Displays the user ID of the Provider that signed the document which required a signature.
3.1.10
Displays the date and time the document was signed by the Provider shown above in the [Signed by] field.
3.1.11 
If there is a diagnosis related to the document, this field displays the ICD code for that diagnosis.
3.1.12 
Whenever anything is filed in a patient's chart a unique number is assigned to the document and populates this field.
3.1.13 
Displays the internal code of the practice.
3.1.14 
Displays the date and time the document was added to the chart.
3.1.15 
Displays the user ID of the person who added the document in the chart.
3.1.16 
Displays the date and time the document was last modified.
3.1.17 
Displays the user ID of the person that made the last modification to the document.
3.1.18 
Displays the Chart Tab under which the document is filed.
3.1.19 
Evaluation and Management codes may be calculated for a document in PCM. When a code is calculated, this field shows that code.
3.1.20 
Documents which are listed on PCM's Forms to Attach for filing in a patient's chart have a unique number assigned to the document. Each time the document is filed in a patient's chart, that number populates this field.
3.1.21 
If a task has been created relating to the document, or if the document is a task, the Task ID number appears in this field.
3.1.22 
A 'Y' in this field indicates the document is available to the patient through Patient Portal.
3.1.23 
A 'Y' in this field indicates the document may be shared through Patient Portal with the patient's referring doctor.
3.1.24 
A 'Y' in this field indicates the document has been shared through Patient Portal with the patient's referring doctor.
[View Document] and [Add to task] right-click options are available in this screen:
3.1.25 ![]()
This button works like the [Open Doc] button on the initial Office Task Manager screen. It may only be used for records that have a document attached. Click on a record, right-click to display the [View Document] option, and then click on [View Document] to display the document in preview mode - editing is not allowed.
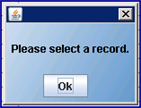
Note: If a user right-clicks before selecting a record, this warning message pops-up:
3.1.26 ![]()
The [Add to task] option adds the document to the task from which [View Chart] was selected. The [Add to task] option is only available if the task does not already have a document associated with it. If a document is already associated with the task, the [Add to task] option does not display.
For example:
a. A user opens the Task Manager screen and selects [New Task].
b. The user then enters a subject, enters a patient account number, and clicks on [View Chart].
c. On the View Chart screen, the user selects the record to link to the task, right-clicks on it, and clicks [Add to task].
d. Finally, the user closes the View Chart screen, and, on the Office Task screen, clicks the [Save and Close] button. The user is then returned to the main Task Manager screen and the new task with its' attached record displays on the list.
3.2 ![]()
This button works exactly like the [Open Doc] button on the initial Office Task Manager screen. It may only be used for tasks that have a document attached. Click the [Open Doc] button to open the document to preview only, editing is not allowed.
3.3 ![]()
With the task open that you want to delete, click the [Delete Task] button. This pop-up displays:
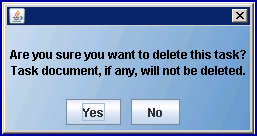
• Click [Yes] to delete the task. Note: The task is deleted immediately after clicking [Yes] and the program returns to the Office Task screen.
• Click [No] to not delete the task and return to the Office Task screen.
This button must be clicked to save changes made to this screen; i.e., adding information to the <Notes> section, modifying the due date or time, modifying the assignees, reminders, or status, etc.
3.5 ![]()
Click this button to return to the main Task Manager screen. Any changes made on the Office Task screen are lost.
1. When opening an active task for which the task owner has not yet clicked the ☐ Completed box, this pop-up displays if the due date for the task has passed:
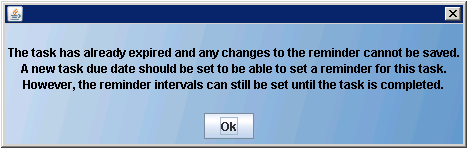
Click on [OK] and change the <Date Due> field to a future date.
