
Intellect™
SCHEDULE MENU OPTIONS

Appointment
Full Day
Special Features
Email Appointment Reminder with Confirmation
Effective Version 9.12.10
and
Appointment Reminder
Email Appointment Reminder with Confirmation
NOTE: Non-commercial email carriers have a cap on the number of emails that may be sent per day. If a clinics current email carrier does not support the number of emails needed to be sent on a daily basis, they need to contract with a commercial email vendor.
What Is Email Appointment Reminder with Confirmation?
In prior software versions, Intellect offered the ability to automatically email patients to remind them of an upcoming appointment (click here for additional information). Now, the email appointment reminder message has been enhanced to allow patients to either confirm or cancel their appointments.
Appointment reminder emails can only be sent through Intellect's Scheduler (Daily, Monthly, etc.). They may not be sent manually. Effective version 9.12.15 and above, an appointment with confirmation can be sent while adding an appointment by selecting 'HTML' in the reminder area on the Add Appointment screen.
Note: When an email is sent, verify if that email went through or not by going to Misc --►View Sent Item.
For clinics already using email appointment reminders, the set up for this enhancement is minimal:
See also Using Patient Response to Email Reminders.
Before using this feature, Intellect needs to be set up as indicated:
1. Go to Utility --►Tools --►Configuration
1.1 These fields should already have been set up based on information from your DSL carrier: <SMTPSERVER>, <USERNAME>, and <PASSWORD>.
Set up should be completed by the clinics' IT person. If a clinic does not have an IT person, they should contact Prime Clinical to complete the set up of these fields.
• <External IP>: Enter your public (external) IP address. If your IP address is unknown, open a web browser (i.e., Internet Explorer), type http://www.whatismyip.com and hit [Enter]. A web page pops up displaying your IP address.
• <Webserver Port>: Enter the port to be used by the web server. The default port is 8080. The recommended port is 8080 but if that port is already being used for another purpose, you can use another port as long as it is an open port through the firewall.
1.3 After entering the information, press [MODIFY], and exit from Intellect to save.
2. Go to Utility --►Set Up --►Security --►Login Users --►Modify
2.1 Verify that the <Operator Email> field has been set up. Use the email address registered by the DSL provider.
NOTE: The security records of all users who intend to email must include the same <SMTPSERVER> address that was entered in the <SMTPSERVER> field of Utility --►Tools --►Configuration.
3. Go to Utility --►Task Manager --►Modify
3.1 In the top box, use the scroll bar to find and select the TaskName TASK_APP_REMINDER_EMAIL with the Daily Type – see below:
3.2 Click in the box to the left of TASK_APP_REMINDER_EMAIL (indicated above), type a capital ‘M,’ and press [Enter]. The parameters for TASK_APP_REMINDER_EMAIL display in the Parameter box (see below).
3.3 In the Parameter box, check these areas and make changes as needed:
3.3.1 For the line that reads <parameter name="REMIND_METHOD" value="EMAIL"/>, change EMAIL to EMAIL_HTML. See sample below:
3.3.2 Verify that the printer name is correct; if necessary, enter the correct printer name. The printer is generally listed in the first line. In the examples both above and below, the printer name is “HP.”
3.3.3 Indicate how many days prior to the appointment the patient should be sent an email. In the following example, the number two indicates that the email reminder should be sent two days from today. Change the number, if needed.
3.3.4 Additional information is available in Utility --►Task Manager --►Tasks for Twilio and Email.
3.4 If changes were made, click on the [Apply Changes] button.
4. Go to Schedule --►Appointment --►Full Day --►Add Appointment.
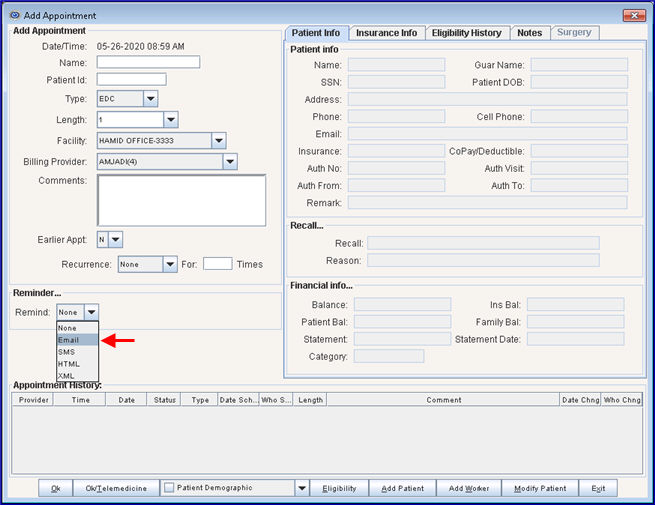
On the Add Appointment dialog box, there is a <Reminder field. Select Email from the Reminder drop-down list for an email reminder to be sent immediately to the patient's registered email address when an appointment is added, reschedule, or modified. See below.
5. Go to Utility --►Set Up --►Appointment --►Appointment Type (optional)
5.1 To include a message to all patients with this Appointment Type, type a message in the <Email Message> field. This message displays in the Instructions section in the bottom portion of the email appointment reminder. NOTE: The message displays as one paragraph regardless of whether or not it contains hard returns, indents, bullets, or other formatting when it is entered.
Set up should be completed by the clinics' IT person. Clinics who do not have an IT person should contact Prime Clinical’s hardware department to complete the set up of these fields.
1. Open port 8080 (or whatever port was entered in the <Webserver Port> field on the Configuration screen during set up -- see Intellect Set Up, step 1.2 above) in the clinic's firewall and forward it to the Intellect server.
1.1 Check to see if the firewall setting is correct and the port is forwarded correctly:
1.1.1 Open a web browser (i.e., Internet Explorer) in a workstation at the Prime Clinical office.
1.1.2 Type http://[client's external IP address]:8080
1.1.3 Hit [Enter]
• A page displaying 'OnStaff Intellect web server is up and running' means that it's working/running.
Note: If it is working on a clinic's computer but not working at Prime Clinical, it is a hardware problem.
• An error page means there is something wrong with the firewall setting.
2. Go to the home/staff/app directory and run InstallOnstaffWebServerService.bat. A new service called Onstaff Web Server (like the Onstaff server) is added to the Windows services.
3. Start the 'OnStaff Web Server' service (it is started the same way as the OnStaff Server). See Start/Restart OnStaff Web Server Service for additional information.
3.1 Check to see if the 'onstaff web service' is up and running:
3.1.1 Open a web browser on the same machine; i.e., Internet Explorer.
3.1.2 Type http://localhost:8080
3.1.3 Hit [Enter]
• A page displaying 'OnStaff Intellect web server is up and running' means that it's working/running.
• An error page means that the web server is set up or the service is not started. Please contact PCS support.
Using Patient Response to Email Reminders:
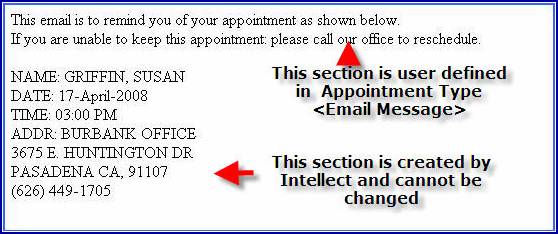
In Intellect software versions prior to 9.12.10, the email appointment reminder, as shown below, did not allow patients to respond and was only customizable in the top portion of the message.
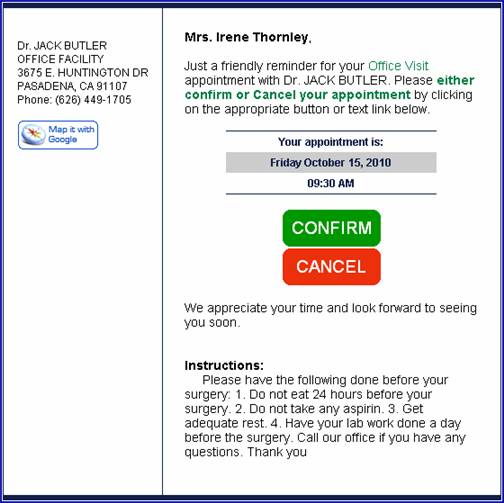
As of software version 9.12.10, the email appointment reminder message was enhanced to include both [Confirm] and [Cancel] buttons to allow patients to either confirm or cancel their appointments. Additionally, an Instructions section at the bottom of the email reminder is available for customized messages by Appointment Type (see either Intellect Set Up, step 5, or Utility --►Set Up --►Appointment --►Appointment Type, <Email Message> field for more information). Sample of the email appointment reminder with response:
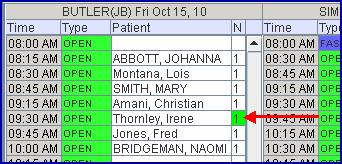
• If a patient clicks on the [Confirm] button, this message displays:

and the 'N' column on the Appointment Schedule changes to green, as shown below, indicating the appointment was confirmed. Note: CallSTAFF also uses green for confirmed appointments.
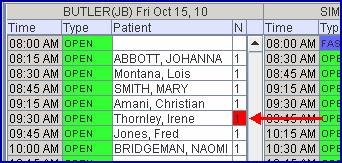
• If a patient clicks on the [Cancel] button, this message displays:
and the 'N' column on the Appointment Schedule changes to red, as shown below, indicating the appointment was cancelled. Note: CallSTAFF also uses red for cancelled appointments.
For additional information to set up appointment reminder emails, please contact PCS Support. See also the online documentation under Schedule --►Appointment --►Appointment Reminder --►Email Appt Reminder without Confirmation.