Intellect™
UTILITY MENU OPTIONS

Set Up
Parameter
This menu option is used to set certain system configuration parameters including some default values, billing options, and behavior options of the application. The Modify option must be used to set the Parameter screen.
This screen contains many drop-down list fields. To view the list of codes with descriptions, press the [F2] key OR click directly on the field. To view the list of only the codes, either click on the arrow, OR press the → (right arrow) on the keyboard. To select, double-click on the correct code, OR use the ↑ (up) and ↓ (down) arrows to highlight the correct code, and then press the [Enter] key to select. An example of a Drop Down List field is Follow Up Letters.
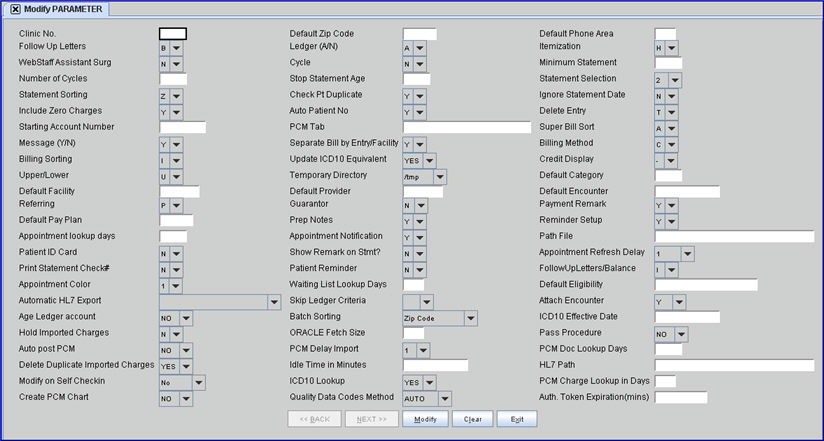
1. To set the parameters in Intellect, go to Utility --►Set Up --►Parameter --►Modify
The Modify PARAMETER screen displays:
2. Clinic No. 
2.1 Enter the number of the clinic to define.
2.2 This field is mandatory. If left blank, an error message displays:
Press the [Ok] button to return the focus to the <Clinic No> field.
3.1 Data entered here populates the Registration --►Regular --►Patient <Zip Code> field in both the patient's home and employer area if data is not entered in those fields.
4.1 At this time, this field is only for CallSTAFF users. If the patient's area code in the <Home Phone Number> field in Registration --►Regular --►Patient is NOT the same as this field, the system dials the 1 and area code. If the patient's <Home Phone Number> area code DOES match this field, Intellect does NOT dial 1 and area code.
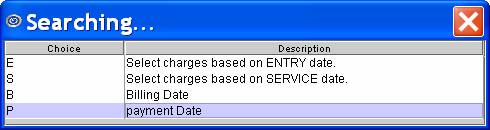
5. Follow Up Letters 
5.1 Use this option to determine which date to use in processing follow-up letters.
5.1.1 For example: unpaid since last billing date, payment date, entry date of the charge, or service date of the charge.
5.2 Accept the default 'B' entry date OR use the drop-down list to make an alternate selection.
5.3 Press the [F2] search key to display the valid choices:
6. Ledger (A/N) 
6.1 This option allows the system to sort the printout of ledgers. For example, ledgers would be printed and filed in the patient's chart prior to purging accounts.
6.2 Clinics with charts filed alphabetically might want to select 'N' in this field.
6.3 Press the [F2] search key to display the valid choices:
7.1 This field allows charges on the HCFA claim form to be sorted.
7.2 It works in conjunction with the <Separate Bill by Entry/Facility> field parameter on this screen.
7.3 This field controls the print order of the WC Form 1, WC Form 2, PI Form 1, and PI Form 2 statements accessed via the <Statement Type> field on the Billing --►Worker --►Statement screens.
7.4 Accept the default 'H' (Print highest amount to lowest amount), OR use the drop-down list to make an alternate selection.
7.5 Press the [F2] search key to display the valid choices:
8.1 This field is for use with the WebStaff program.
8.2 If 'Y' is selected, charges are automatically added for the assistant surgeon if the surgeon is in the practice and the <Assistant Status> field is set to Internal on WebStaff's Appointment Editor screen.
8.3 If 'N' is selected, charges need to be manually added for both the surgeon and the assistant surgeon.
9.1 This field allows cycle printing of statements.
9.1.1 It is recommended to assign a 28-day cycle and have this automated so that statements are printed on a daily basis.
All versions prior to 9.12.10: If the <Cycle>field on the Parameter screen was set to X, the patient's cycle was changed to the current date when a payment was posted.
Effective version 9.12.10: The patient cycle is changed ONLY if, after committing, the Who Column will be a 'G.' Following are examples of how this change affects the patient cycle:
• If the Who Column was a G and the patient made a partial payment, and the Who remains a G, the patient cycle is changed.
• If the Who Column was a P1 or S1 and the insurance payment was posted, changing the Who to a G, the patient cycle is changed.
9.2 Accept the default 'N' (No cycle billing) OR use the drop-down list to make an alternate selection.
9.3 Press the [F2] search key to display the valid choices:
9.4 Effective version 18.02.27, when 'X' is selected for this field, 'O' is selected for the Utility --►Category <Statement> field, and a guarantor account has been set up for the patient, Intellect updates all the accounts under the guarantor/family to the same cycle number.
10. Minimum Statement 
10.1 Indicate the minimum family balance for a statement to qualify to be printed.
10.2 It should be in decimal format NNN.NN, and can be a negative value.
11.1 This field works in conjunction with the <Cycle> field on this screen when set to Y or X.
11.2 This field sets the frequency with which statements are to be printed based on a 28-day period. Type the appropriate value: 28 = every day, 1 = once every 28 days, 2 = twice every 28 days.
All versions prior to 9.12.10: Patients registered on the 29th, 30th, or 31st of the month are all added to cycle 1.
Effective version 9.12.10: To more evenly distribute patients, now patients registered on the 29th are added to cycle 1, patients registered on the 30th are added to cycle 2, and, if registered on the 31st patients are added to cycle 3. This does NOT reassign the cycle numbers on existing patients if the <Cycle> field on this screen = Y or N; it only affects patients registered after this update. If the <Cycle> field on this screen = X, the cycle number is changed based on the last payment.
12. Stop Statement Age 
12.1 Use this option to set the length of time charges are to be included in the balance on a patient's statement. Type the appropriate value.
12.1.1 This does not affect the patient's balance displayed on the Ledger screen <Balance> field.
12.2 Prior to version 9.12.20 a value from 1 to 16 could be entered. These values have the following meaning:
1 = over 30 days
2 = over 60 days
3 = over 90 days
4 = over 120 days
Every increment of 1 adds 30 days.
Effective version 9.12.20, a value as great as needed may be entered. This field controls at what length of time the charges are no longer printed on the patient statements.
• The program uses the number entered in the <Stop Statement Age> field multiplied by 30 to calculate the ‘Stop Statement Age’ for the charge. For example, if <Stop Statement Age> is set to 24, the age a charge stops printing on the statement is 720 days (approximately 2 years).
• The age of the charge is calculated using the <Aging Method> of the <Category> currently assigned to the patient. In our examples, a <Stop Statement Age> of 24 is used:
o If the date of service was over 2 years ago but the charge was not posted until 1 year ago and the <Category>'s <Aging Method> is set to E (Entry Date), the charge continues to print on the statement.
o If the date of service was over 2 years ago but the charge was not posted until 1 year ago and the <Category>'s <Aging Method> is set to S (Service Date), the charge does NOT print on the statement.
o If the date of service was over 2 years ago but the last payment was posted 6 month ago and the <Category>'s <Aging Method> is set to P (Last Payment Date), the charge continues to print on the statement.
13.1 Select the type of statement the office uses for manual printing.
13.2 The statement selected here is the default Intellect displays in Billing --►Statement <Statement Selection>.
13.3 Press the [F2] search key to display the valid choices:
14. Statement Sorting 
14.1 This is used to determine how the statements are sorted.
14.2 Accept the default 'Z' (Zip) OR use the drop-down list to make an alternate selection.
14.3 Press the [F2] search key to display the valid choices:
15.1 Accept the default 'Y' to enable a duplicate patient search box when registering a new patient.
15.1.1 This is the search box that displays:
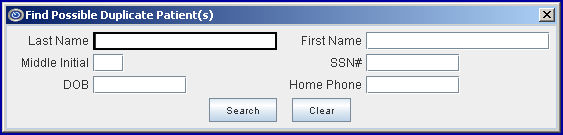
More information on Duplicate Patient.
15.2 Selecting 'N' does not display a patient search box. .
16. Ignore Statement Date 
16.1 Select 'Y' to include all charges with an open balance on statements regardless of the date entered when selecting statements.
16.2 Accept the default 'N' to include only charges with an open balance that meet all other criteria set for having statements printed.
17.1 This is used to determine whether or not to include charges with zero balances on statements, or to include only statements with positive balances.
17.2 Accept the default 'Y' to include all charges, OR use the drop-down list to make an alternate selection.
17.3 Press the [F2] search key to display the valid choices:
18.1 This is used to determine whether or not to enable automatic patient account numbers for new registrations. New numbers are assigned sequentially.
18.2 Accept the default 'Y' to enable automatic account numbers, OR use the drop-down list to make an alternate selection.
18.3 Press the [F2] search key to display the valid choices:
19.1 This field establishes which charges can be deleted after their initial entry.
19.2 Accept the default 'T' (today's charges) OR use the drop-down list to make an alternate selection.
19.2 Press the [F2] search key to display the valid choices:
20. Starting Account Number 
20.1 If 'Y' was entered in the <Auto Patient No.> field (above), type the starting account number for registering patients.
20.2 This is a numeric value only. It increases sequentially for each new patient.
21.1 For PCM users only. Effective version 15.06.10 - New Field
21.2 This field works in conjunction with the PDF forms accessed via the Schedule --►Appointment --►Full Day --►Add Appointment [☐ Patient Demographic] drop-down list.
21.3 Forms selected from the [☐ Patient Demographic] drop-down that are being returned via email can be assigned a ‘predetermined' tab within PCM. This is accomplished as follows:
21.3.1 Prior to populating the new <PCM Tab> in Intellect, first create the Tab in PCM. In the example below, a tab labeled 'Forms' was created:

21.3.2 The patient must also have a Chart in PCM for this feature to work. In the case where the patient will be assigned an account in Intellect and not in PCM at the same time, go to the <Create PCM Chart> field on this Parameter screen and set it to YES to create a chart in PCM at the same time the patient is added to Intellect.
21.3.3 Next, populate this <PCM Tab> field with the name of the tab set up in PCM. The name entered must be exactly the same as the actual PCM tab in PCM. In our example in 21.3.1, the new PCM tab was labeled Forms, therefore, Forms must be entered in this <PCM Tab> field:

21.4 If the <PCM Tab> field is left blank, the form is not filed.
22.1 The entry in this field selects the sorting of printed superbills when utilizing either the Schedule --► Appointment --► Print OR the Schedule --►Appointment --► Super Bill.
22.2 Accept the default 'A' (account number), OR use the drop-down list to make an alternate selection.
22.3 Press the [F2] search key to display the valid choices.
23. Message (Y/N) 
23.1 This is used to determine whether or not to automatically include a comment in the patient’s ledger comments area on certain claim forms, statements, and letters.
23.2 Accept the default 'Y' to include, OR use the drop-down list to make an alternate selection.
23.3 Press the [F2] search key to display the valid choices.
24. Separate Bill by Entry/Facility 
24.1 Claims can be separated using this option.
24.2 Accept the default 'Y' (separate each) OR use the drop-down list to make an alternate selection.
24.3 Press the [F2] search key to display the valid choices.
25.1 This is used to determine the method of billing claims to resolve conflicts when multiple clinics are involved with similar patients.
25.2 Unless set to 'L,' this overrides the Utility --►Category <Billing Method)> (formerly <Billing C/D/N>).
25.3 Accept the default 'C' (Clinic), OR use the drop-down list to make an alternate selection.
25.4 Press the [F2] search key to display the valid choices:
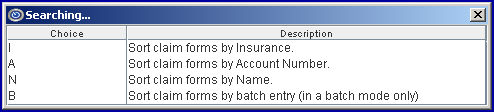
26.1 Used to determine the sort order for claim forms and the pre-billing report
26.2 Accept the default 'I' (sort by insurance), OR use the drop-down list to make an alternate selection.
26.3 Press the [F2] search key to display the valid choices:
26.4 Effective version 9.12.30 - New Option 'B'. This change affects Billing --► Insurance, Billing --► Worker --► Statement, Billing --► Worker --► HCFA Form, and Billing --►TeleCom --►Submit Claims.
26.4.1 The 'B' option is used only for Batch of Patient tasks.
26.4.2 When 'B' is selected, the system bills the claims in the order the account numbers were entered through the Batch of Patient option.
26.4.3 When billing by Group of Patient, if <Billing Sorting> is set to B, the results are ordered by Account Number.
26.5 Effective version 9.12.34 - Removed Option 'B'. Because this option affected Batch of Patient and the other options for this field affect Group of Patient, this option was moved from the <Billing Sorting> field to the <Batch Sorting> field added in version 9.12.34.
27.1 For PCM users only. Effective version 15.06.10 - New Field
27.2 When this field is set to YES, PCM tracks the usage for the ICD-10 code selected in the Charges --►Charge <Diagnosis Code> field. Note: The Utility --►Category <ICD10> field should also be set to YES (the default) to use this feature.
27.3 When this field is set to NO, PCM does not track the usage for the selected ICD-10 code.
28. Credit Display 
28.1 This is used to determine whether or not the minus sign appears in displays.
28.2 Accept the default '-' (show), OR use the drop-down list to make an alternate selection.
28.3 This is a cosmetic feature only and is not to be confused with credit due a patient
29. Upper/Lower 
29.1 Entry in this field establishes which case to use when completing screens.
29.2 Accept the default 'U' (upper case), OR use the drop-down list to make an alternate selection.
Note: In software prior to version 9.12.16, if this was set to 'U,' the program did not convert the Charges --►Charge <Batch> to upper case. Effective version 9.12.16 and greater, the data entered is now converted.
29.3 Press the [F2] search key to display the valid choices:
30. Temporary Directory 
30.1 This is the directory used as a place holder for temporary files.
30.2 Usually the setting for this field is pre-determined; therefore, leave this field at its' default setting.
31.1 To have a default <Category Code> automatically display when adding a new patient to Intellect, enter the Utility --►Category <Category Code>.
31.1.1 During patient registration, accept this default OR supply another appropriate code (a category code is mandatory).
32.1 To have a default <Facility Code> automatically display when posting charges, enter the Utility --►Facility <Facility Code>.
32.1.2 For example: Enter the Utility --►Facility <Facility Code> for the place of service where the majority of charges are encountered, OR leave this field blank to fill-in screens on a case-by-case basis.
32.2 Effective version 14.07.01, if the system has an Automated Task to charge patients a yearly administrator fee, a Facility code must be chosen to apply to these charges. If none is mentioned when the set up is completed, Intellect pulls the Facility from this <Default Facility> field. For additional information, see <Administrator Fee> in Utility --►Category.
33.1 To have a default <Provider> automatically display when posting charges, enter the Utility --►Provider --►Provider <Provider Code>.
33.2 If several providers are used, leave this field blank and fill-in the Charges --►Charge screen on a case-by-case basis
.
34. Default Encounter 
34.1 This field is used for the encounter number field <EN#> that automatically displays when posting charges.
34.2 Type an encounter number, OR leave this field blank and fill-in the Charges --►Charge screen on a case-by-case basis.
35.1 This field determines the order Intellect uses to determine the source of the referring doctor's information for billing and referral reports.
35.2 Effective version 14.11.19: In prior software versions for Medicare paper claims, if the <Ref Prv> field on the Charges --►Charge screen was not populated, and the <Referring Name> field was not filled on the Registration --►Regular --►Patient screen, the rendering provider was used as the referring provider on the EB file, as well as printed on Box 17 of the HCFA claims.
As of this update, the referring provider only populates the EB file and the HCFA Box 17 if the Utility --►Insurance --►Insurance <Insurance Type> field is set to 'D', 'C', '1', '5' (WI Medicaid), or 'O' and a referring provider is added in the <Ref Prv> field on the Charges --►Charge screen at the time of posting charges, or when the Registration --►Regular --►Patient <Referring Name> field is filled. The <Referring> field on this Utility --►Set Up --►Parameter screen determines if the Referring Provider is pulled from the Charges --►Charge <Ref Prv> field or the Registration --►Regular --►Patient <Referring> field.
ATTENTION: This IMMEDIATELY affects billing and other daily tasks.
35.3 Accept the default 'P' (patient registration) OR use the drop-down list to make an alternate selection.
35.4 Press the [F2] search key to display the valid choices:
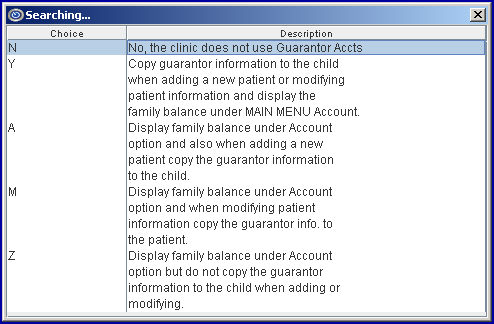
36.1 This option allows Intellect to automatically add or modify a dependent's information based on the guarantor's information.
36.2 Accept the default 'N' (indicates the clinic does not use guarantor accounts), OR use the drop-down list to make an alternate selection.
36.3 Press the [F2] search key to display the valid choices:
37. Payment Remark 
37.1 This field is used to determine whether or not a source of payment list is displayed when the payment screen is accessed.
37.2 Accept the default 'Y,' OR use the drop-down list to make an alternate selection.
37.3 Press the [F2] search key to display the valid choices:
38.1 To have a default <Pay Plan> automatically display when adding a new patient's insurance to Intellect, enter the Utility --►Insurance --►Pay Plan --►Pay Plan <Plan Code>.
38.2 Pay plans may be added or modified for accounts on a patient-by-patient basis.
39. Prep Notes 
39.1 For appointment types that require specific instructions, this option allows the display of those instructions in the comment area of the Add Appointment dialog box at the time the appointment is added to the schedule.
39.2 Press the [F2] search key to display the valid choices:
40. Reminder SetUp 
40.1 After logging on to Intellect, this option allows reminders to be immediately viewed that have been entered in patients' ledgers.
40.2 Accept the default 'Y' ( yes), OR use the drop-down list to make an alternate selection.
41.1 The entered value creates a default for the Schedule --►Appointment --►Full Day -- Search Tab <Search Within> field. It indicates how many days into the future to search. See Display Configuration Parameters.
41.2 Note: The higher the number entered, the slower the program will be as this feature requires a lot of memory to operate.
42. Appointment Notification 
42.1 Not available at this time.
43.1 The path to the directory where configuration files are stored.
44. Patient ID Card 
44.1 This is used to determine whether or not a Patient ID Card is required/used.
44.2 Accept the default 'N' to not require a Patient ID Card, OR use the drop-down to select 'Y' if a Patient ID Card is not wanted or required.
45.1 In older versions, this field is titled Payment Comment on Stmt?
45.2 This is used to determine if the Payment --►Open Item <Comment> prints on statements.
45.3 Use the drop-down to make a selection.
45.3.1 Effective version 9.12.16, Statement Forms which print without payment and adjustment detail can now print the Payment Comment and Check Number if the associated parameters are set up. To print Payment Comments and Check Numbers, this field should be set to 'Y.'
45.4 Press the [F2] search key to display the valid choices:
46.1 Determines the time lapse between when the server updates workstations for any change made on the schedule.
46.2 This is only important when more than one person is scheduling.
46.3 Systems are set at a default of 3 seconds, but may be adjusted up or down, depending on the needs of the clinic.
46.4 Press the [F2] search key to display the valid choices:

47.1 This is used to determine whether to print entries from Intellect's various 'Check' fields on statements, and the method to print.
47.2 Accept the default 'N' (do not print), OR use the drop-down to make an alternate selection.
47.2.1 Effective version 9.12.16, Statement Forms which print without payment and adjustment detail can now print the Payment Comment and Check Number if the associated parameters are set up. To print Payment Comments and Check Numbers, this field should be set as follows:
• Select 'D' to have the check number detail display after each payment.
• Select 'S' to have a check number summary at the bottom of the statement.
47.3 Press the [F2] search key to display the valid choices:
48.1 Not available at this time.
49.1 This is used to determine whether or not to include patient account balances, and what format, on statements.
49.2 Accept the default 'I' (itemize), OR use the drop-down to make an alternate selection.
49.3 Press the [F2] search key to display the valid choices:
50.1 This is used to determine whether or not the Appointment Type color should change.
50.2 Accept the default '1' for the color to remain the same, OR use the drop-down to make an alternate selection.
50.3 Press the [F2] search key to display the valid choices:

51.1 This is used to specify how soon a patient should be displayed on the wait list.
51.2 For example, enter 15 in the <Waiting List Look Up Days> field if a patient appointment is booked 30 days in the future and you do not want to see that patient on the wait list until 15 days prior to his/her appointment.
52. Default Eligibility 
52.1 This is used in conjunction with the Eligibility Verification feature.
52.2 Enter the insurance code of the eligibility vendor.
52.3 This is used only for Real Time Eligibility (not used for Batch Eligibility).
53. Automatic HL7 Export 
53.1 Effective version 9.12.09 - New field added.
53.2 This is used to determine whether or not to generate an HL7 file and, if so, when.
53.2.1 Generated HL7 files are sent to the server for the client's vendor to pick up.
53.3 Accept the default 'blank,' OR use the drop-down to make an alternate selection.
53.3.1 Blank: No HL7 file is generated.
53.3.2 Appointment: When an Appointment is added, modified, rescheduled, cancelled, or postponed, an HL7 file is generated.
53.3.3 Patient: When adding new patient demographics and/or insurance, an HL7 field is generated. Note: Worker is not available at this time.
53.3.4 Both: An HL7 file is generated when an Appointment is added, modified, rescheduled, cancelled, or postponed, and when adding new patient demographics and/or insurance.
53.3.5 Customized: Contact PCS support for customized options.
54.1 Effective version 9.12.18 - New field added.
54.2 Affects input on both the Ledger --►Accounting and Ledger --►Open Item screens.
54.3 The options for this field are 'Yes' and 'No.'
• Select 'Yes' for the ability to enter just the patient’s account number and the desired date and then have the program skip to the <CptCode>, <Balance>, <Who>, <Provider>, and <Batch No> fields.
• Select 'No' to allow the program to be used as in versions prior to 9.12.18.
55.1 Effective version 9.12.21 - New field added.
55.2 This field adds the ability to attach the latest encounter to a charge that is imported into Intellect.
55.3 The Y/N options of this field allow the choice of whether or not to attach an encounter to the imported charges.
55.4 Accept the default 'Y,' OR use the drop-down to make an alternate selection.
Effective version 14.11.9:
55.4.1 Select 'Y' to have the latest encounter number entered not older than 30 days attached to a charge.
55.4.2 Select 'N' to have an encounter not attached to a charge.
55.4.3 Time increments in 30-minute intervals were added to the drop-down list. To select a time increment, such as 180, to initiate a search for the last patient encounter in the number of days selected -- in this case, 180 days.
55.4.4 Effective version 18.04.11, Intellect allows the Date of Admission (DOA) and Date of Discharge (DOD) to be included on any hospital charges coming from the HL7 vendor. To facilitate this option, this <Attach Encounter> field must not be set to ‘N’ or ‘X.’ When 'N' or 'X' are not selected for this field, Intellect inserts HL7 hospital charge information into a Charges --►Encounter --►Generic screen which populates the <Hospitalization From> field with the Date of Admission listed in the PV1-44, populates the <Hospitalization To> field with the Date of Discharge listed in the PV1-45, populates the <Encounter Description> field with the words IMPORTED DATA, and attaches the Encounter number to the charge data being imported.
Effective version 14.07.01 to 14.11.9:
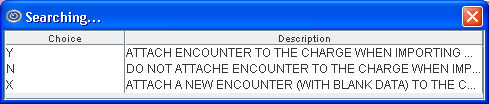
55.4.5 PCM users only: The 'X' option was added to the drop-down list. Select 'X' to direct Intellect to add an encounter to an imported charge. Note: In addition to selecting 'X', the <PCM Doc Lookup Days> field on this screen must also be set up, and PCM document types need to be selected. See Utility --►Set Up --►PCM Documents for additional information.
Versions prior to 14.07.01:

56. Age Ledger Account 
56.1 Version 9.12.32 - New Field.
56.2 In prior software versions, every time the Ledger --►Accounting and Ledger --►Open Item screens were accessed the system would age all of the patient accounts in the system. This really is not necessary since an automated task ages every account every night. With the default setting of 'No,' the system no longer ages all the accounts every time the Ledger --►Accounting and Ledger --►Open Item screens are opened, thereby speeding up access to these screens.
56.3 The options for this field are 'NO' and 'YES':

• Select NO to NOT have the accounts aged every time the Ledger --►Accounting and Ledger --►Open Item screens are accessed.
• Select YES to have the program age all accounts in the system every time a patient ledger is viewed.
57.1 Version 9.12.34 - New Field.
57.2 The system uses this field to sort the results when printing a report or form from Batch of Patient screens in Billing --►Insurance, Billing --►Statement, Billing --►Worker --►Statement, Billing --►Worker --►HCFA forms, and Billing --►Worker --►Attorney.
57.3 The <Batch Sorting> field has the options of:
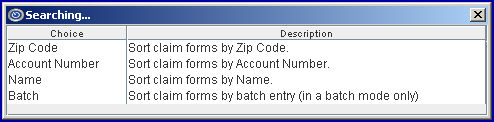
57.3.1 Zip Code: Sorts the batch by zip code.
57.3.2 Account Number: Sorts the batch by account number.
57.3.3 Name: Sorts the batch by client name.
57.3.4 Batch: Sorts the batch in the order the accounts were entered into the Batch Entry screen.
58.1 Effective version 12.12.06 - New Field
58.2 Starting on the date entered in this field, an ICD-10 code should be used instead of an ICD-9 code at the time of posting charges.
58.3 Intellect helps in the selection of the correct ICD-10 code.
58.4 See the Charges --►Charge <Diagnosis> field for more information.
59.1 Effective version 12.12.06 - New Field
59.2 This field is used in the charge import program and allows imported charges to be reviewed before billing.
59.3 The options for this field are 'Yes' and 'No.'
• If the import feature is not used, select the default 'N' (no) to skip this field.
• If the import feature is used to import charges into intellect, select 'Y' and all of the imported charges will be on hold (if Who = Y) even if FT1 ,17 is not set to 'Y' in the DFT File.
59.4 In releases prior to 18.05.24, all charges being imported using HL7 from an EHR program were held, based on the setting of the <Hold Import Charges> field. Effective version 18.05.24, the program works the same as the Charges --►Charge screen, allowing limits to be put on the held charges based on a single procedure. To accommodate this change, a fix was made when the Utility --►Set Up --►Parameter <Hold Imported Charges> field is not = 'Y' and FT1,17 in the HL7 file is not = ‘Y’. Additionally, the following conditions apply:
• Utility --►Procedure --►Procedure <Parties to Bill> = ‘C’ or Utility --►Category <Responsibility (G/P/X)> = 'G'
- OR -
• Utility --►Category <Responsibility (G/P/X)> = 'X' and Registration --►Regular --►Patient --►Patient Insurance <Assignment> = 'N'
60. ORACLE Fetch Size 
60.1 Effective version 13.03.01 - New Field
60.2 This field indicates how many records can be fetched at any given time.
60.3 This field should be set to 3000.
61.1 Effective version 13.03.01 - New Field
61.2 This field affects the Charge screen when posting charges for a panel code with more than one procedure. It determines whether or not the system should stop on <RDX>, <Insurance>, <Who>, <Mod>, <QTY>, etc. for each procedure.
61.2.1 If 'NO' (the default) is selected, the system stops on those fields for every procedure.
61.2.2 If 'YES' is selected, the system stops on the above fields for only the first procedure of the panel.
62.1 For PCM users only. Effective version 13.08.20 - New Field
62.2 This field supports PCM charge posting.
62.2.1 If 'NO' (the default) is selected, FTP for file transfer of charges continues as it has in the past between PCM and Intellect.
62.2.2 If 'YES' is selected, FTP is not used. Instead, Intellect reads the posted charges directly from the database.
62.3 Effective version 16.02.22 - New function. This field works with the <PCM Charge Lookup in Days> field, allowing Intellect to pull charges back from PCM the amount of days indicated in the <PCM Charge Lookup in Days> field.
62.3.1 For example: If <Auto post PCM> is set to ‘Y’ (yes) to automatically pull the charges over from PCM, and the <PCM Charge Lookup in Days> is ‘2,’ Intellect goes back 2 days to pull any charges posted in PCM. If a value has not been inserted in the <PCM Charge Lookup in Days> field and the <Auto post PCM> field is set to 'Y,' the default is 5 days.
63.1 For PCM users only. Effective version 13.08.20 - New Field
63.2 This field only works if the <Auto post PCM> field (see above) is set to 'YES.' It allows added flexibility for PCM users to be able to modify the charges from PCM before they are actually posted in Intellect.
63.3 The drop-down options indicate the number of hours for which a delay may be set. It can be set anywhere from 1 to 24 hours. There is no immediate import option - the earliest is one hour.
Example 1: If set to delay import for 1 hour, the charges in PCM can be modified/deleted up until the hour, after which a message displays indicating the charges have been sent.
Example 2: Setting the delay for 8 - 10 hours allows the whole day in which to modify the charges, if necessary.
64.1 For PCM users only. Effective version 14.07.11 - New Field
64.2 This field works in conjunction with the <Attach Encounter> field on this screen and the Utility --►Set Up --►PCM Documents option to automatically fill the <Identification Code> field on the Charges --►Encounter screen.
64.3 This field enables Intellect to check for documents for a charge. Enter the number (i.e., 30) of days in which your office would like to look back at the charges based on the Date of Service going forward to any future dates of service. For example, if a doctor does not complete a document on the day of the patient’s July 1 visit, Intellect checks 30 days back from the service date (June 1) and to all future dates of service for an encounter attached to the charge.
Note: Adding a number in this field activates the auto-fill function for the <Identification Code> field on the Charges --►Encounter screen (this is NOT retroactive). Removing the number immediately deactivates this function.
64.4 Effective version 14.08.25, any Intellect report may be exported to PCM for storage. The reports can be stored in PCM indefinitely. Reports are exported in .pdf format.
To used this feature, verify this field has a number greater than 0 (zero). Additional set up is required in both Intellect and PCM as instructed in Notes for PCM Users --►Export Intellect Reports to PCM.
65. Delete Duplicate Imported Charges 
65.1 Effective version 15.06.10 - New Field
65.2 This field, used in conjunction with the charge import program, allows users who import charges from PCM, HL7, etc. to import duplicate charges.
Note: Charges with different modifiers are no longer considered duplicates.
65.2.1 Select 'Yes' (the default) to delete previous charges when duplicate charges are imported.
65.2.2 Select 'No' to allow duplicate charges to be imported without deleting the previous charge.
66.1 Effective version 14.07.24 - New Field
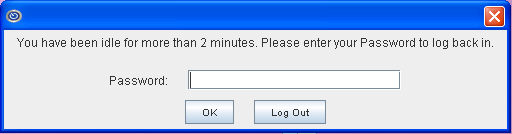
66.2 Use this field enter the number of minutes Intellect may be allowed to remain active once keyboard or mouse activity end. Two minutes is the shortest time that may be entered. For example, enter 2 in this field to display the following pop-up once Intellect has been idle for 2 minutes. The pop-up allows either a request for re-entry to Intellect via a password, or logout of the system (effective version 15.10.15). See HIPAA-Compliant Security in Intellect Characteristics and Features for additional information for the pop-up screen.
66.3 If the <Idle Time in Minutes> field is left blank, the default time is 5 minutes.
66.4 To not have a pop-up to display, enter 9999.
67. HL7 Path 
67.1 Effective version 14.11.10 - New Field
67.2 If this field is left blank (the default), HL7 information is sent to home/staff/hl7.
67.3 To have HL7 information sent to a different location, enter the new path.
68.1 Effective version 15.03.23 - New Field
68.2 For clinics using the self check-in feature, this field controls whether or not the patient demographics screen displays after patients sign-in, and whether or not patients are allowed to modify personal data.
68.3 Accept the default 'No,' OR use the drop-down to make an alternate selection.
68.3.1 Select 'No' to allow patients to view patient demographic information after initially signing-in.
68.3.2 Select 'Yes' to allow patients to modify patient demographic information after initially signing-in.
68.3.3 Select 'Exclude' (effective version 15.09.02) to direct patients to have a seat, after initially signing-in, without displaying the patient demographic information, affording patient privacy.
69.1 Effective version 15.06.10 - New field
69.2 This field is used to toggle the functions of the Charges --►Charge <Diagnosis Code> field.
69.2.1 Select 'Yes' (the default) to allow the <Diagnosis Code> field on the Charges --►Charge screen to display ICD-10 code choices. Note: Additional set up is required. See Charges --►Charge <Diagnosis Code> for specific information.
69.2.2 Select 'No' to allow either ICD-9 or ICD-10 codes to be entered without ICD-10 search-by-description options being provided.
70.1 For PCM users only. Effective version 16.02.22 - New field.
70.2 This field works with the <Auto Post PCM> field, allowing Intellect to pull charges from PCM back the amount of days indicated in this field.
70.2.1 For example: If <Auto Post PCM> is set to ‘Y’ (yes) to automatically pull the charges over from PCM, and this <PCM Charge Lookup in Days> is ‘2,’ Intellect goes back 2 days to pull any charges posted in PCM. If a value has not been inserted in this <PCM Charge Lookup in Days> field and the <Auto Post PCM> field is set to 'Y,' the default is 5 days.
71.1 For PCM users only. Effective version 16.05.20 - New field.
71.2 If set to YES, a Chart/MEDICAL RECORD # is automatically created in PCM whenever a patient is added in Intellect through the Registration screen or while scheduling.
71.2.1 Note: The first time the new ACCOUNT/CHART is accessed in PCM, a message displays stating the patient folder is not created. Users simply need to click the [OK] button, which sets up the folder, and then continue with their task.
71.3 The default for this field is NO. When NO is selected, a PCM account is not automatically created.
71.4 Intellect users who DO NOT HAVE PCM: Set this field to 'Y' to send patients an email which includes a link to their Demographic or Insurance information for their review and update. See Schedule --►Appointment --►Full Day --►Add Appointment - [☐ Patient Demographic] button for details.
72.1 Effective Intellect version 17.06.09 - New field.
72.2 This field is only used for offices posting Quality Data Codes (QDCs) for MIPS Quality measure reporting. It controls the inclusion of QDCs on the Charges --►Charge screen when posting charges in Intellect or on the Charges --►Charge Review screen for imported charges. See Charges --►Speciality Charges- -►MIPS Quality Measures for set up instructions.
72.3 Select from the drop-down list how the QDCs will be posted when Utility --►Insurance --►Insurance <Report PQRS> is set to 'Yes' on the patient's primary insurance:
72.3.1 AUTO: When 'AUTO' is selected, Intellect automatically posts every QDC listed in the Utility --►Procedure --►Procedure <Quality Data Codes> field for the Panel Code posted in either Intellect or PCM, where the <Related Diagnosis Codes>, <Gender Related>, <Age From>, and/or <Age To> fields on the Utility --►Procedure --►Procedure screen for the QDC do not exclude the patient from quality measure reporting.
Note: Automatically posted QDCs may be deleted on the Charges --►Modify screen if not applicable for the patient encounter.
72.3.2 MANUAL: With this option selected, when a charge is posted for a diagnosis listed in Utility --►Procedure --►Procedure <Related Diagnosis Codes> for the QDC panel code, and/or Panel Code where QDCs are listed under Utility --►Procedure --►Procedure <Quality Data Codes>, a window pops-up on the Charges --►Charge screen which allows the selection of which QDCs will be reported:
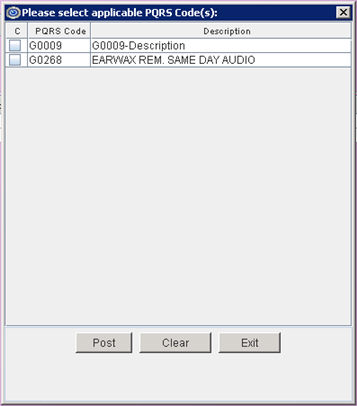
Note: See Charges --►Speciality Charges --►MIPS Quality Measures for posting instructions.
72.3.3 BOTH: The 'BOTH' option is a combination of the 'MANUAL' and 'AUTO' options. When this option is selected:
72.3.3.1 Intellect responds as if 'MANUAL' were selected; i.e., a pop-up window displays on the Charges --►Charge screen allowing a selection of which QDCs to post.
72.3.3.2 PCM responds as if 'AUTO' were selected; i.e., all QDCs linked to the charges imported from PCM are automatically posted. Note: Automatically posted QDCs may be deleted on the Charges --►Modify screen if not applicable for the patient encounter.
73. Auth. Token Expiration (mins) 
73.1 This field defines the expiration time in minutes for the authorization token used to grant limited access to the database for several features.
73.1.1 When emails are sent to patients through which they can fill out a form, such as emails sent via the [☐ Patient Demographic] button on the Schedule --►Appointment --►Full Day --►Add Appointment screen, patients have a certain amount of time to reply back. The time interval begins when the email is sent.
73.1.2 When using the Telemedicine feature through the Full Day Schedule, this field must be left blank or at least 1440 minutes, since the authorization token is valid for 24 hours after sending the invitation.
73.2 Enter the interval time in minutes; i.e., enter 5 for a 5-minute interval. Entering 0 (zero) counts as 1440 minutes, which is 24 hours.
73.3 If the amount of time entered in this field has passed and the link is clicked, a message displays stating the Authentication token has expired.
74. When the information is completely entered, select one of these options:

74.1 Click [Modify] to clear the screen and return the focus to the <Clinic No> field, saving any modifications.
74.2 Click [Clear] to clear the screen and return the focus to the <Clinic No> field without saving modifications or additions.
74.3 Click [Exit] to exit the screen and return to the main Intellect screen.
1. Date Selection ![]()
1.1 Effective version 14.11.10, this field was removed from the Parameter screen.
1.2 This field determines the default for which date(s) are used when submitting electronic claims or when printing paper claims.
1.3 The <Sorted> field on the Management --►Detail screen defaults to this field. Note: Since <Date Selection> is an optional field, it may not be on the screen. Offices needing this field should contact PCS support.
1.4 The default is 'E' (entry).
1.5 The [F2] search key displays the valid choices:
Removed Field:
1. Debug On 
This field was removed in version 19.05.01
1.1 This field determines the level of information provided if a printout fails. 0 is off, i is on.
1.2 The setting for this field is generally pre-determined; therefore, leave this field at the current setting.