
Intellect™
UTILITY MENU OPTIONS

Category
Category is the financial classification of the patient and determines many aspects of how the account is handled, including whether or not follow up letters should be generated, if the patient should receive statements and, if so, what messages should print, how the account balance should be aged, if the patient is part of a Capitated plan and, if so, should the charges be adjusted off at the time they are posted, whether finance charges will be applied to overdue balances, and if services should be billed to the insurance.
Video Available: Click Category Set Up to access the link. Depending on the system set up, the media player may need to be activated. Speakers need to be attached to the workstation to hear the instructions.
Note: To view the videos, log-in through the www.primeclinical.com website. Current support is required.
This screen contains many drop-down list fields. To view the list of codes with descriptions, press the [F2] key. To view the list of only the codes, either click on the arrow, OR press the → (right arrow) on the keyboard. To select, double-click on the correct code, OR use the ↑ (up) and ↓ (down) arrows to highlight the correct code, and then press the [Enter] key to select. <Aging Method> is an example of a drop-down list field.
This screen, like many in Intellect, has several optional fields. See the documentation on adding/removing fields. The graphics in this documentation may vary slightly from your actual clinics.'
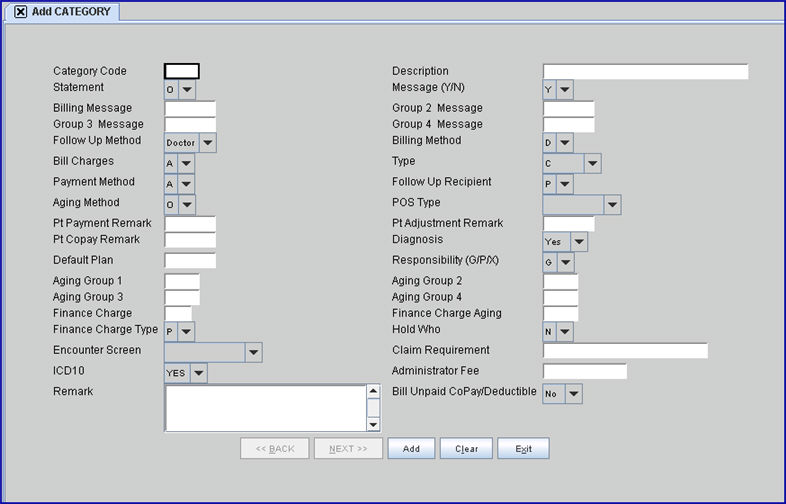
1. To add a Category in Intellect, go to Utility --►Category --►Add
The Add CATEGORY screen displays:
2.1 Type a unique user-defined code for this category in any combination of up to 4 letters or numbers. For example, NP could be entered to indicate New Patient.
2.2 The field is mandatory and must be completed. If left blank, an error message displays:
. 
Press the [OK] button to return the focus to the <Category Code> field.
3.1 Type a meaningful description of the category.
4.1 This field determines whether or not a statement prints for patients assigned this category and, if so, what type.
4.2 Press the [F2] key to display the valid choices:
4.3 Accept the default 'O' to print a statement for an individual, or small batches of patient accounts, if charges have a balance and Who = G.
4.3.1 Effective version 18.02.27, when 'X' is selected for the Utility --►Set Up --►Parameter <Cycle> field, 'O' is selected for this field, and a guarantor account has been set up for the patient, Intellect updates all the accounts under the guarantor/family to the same cycle number.
4.4 Enter 'N' if you do NOT want a statement to print.
4.5 Enter 'R' to print a statement for an individual, or small batches of patient accounts, if charges have a balance not yet paid by insurance.
4.6 Effective version 9.12.14 - New option. Enter 'C' so charges are included on the patient statement with a balance where Who = S or T. This option prints for everything except Who = P (or Y). If the patient is responsible for the balance after the Primary has paid, the client can send a Bill to the secondary or tertiary insurance and generate a statement for the patient.
Note: The program does NOT automatically change the Who value. It is the user's responsibility to change the Who to a G when they no longer want to bill the secondary insurance. Users can use the Ledger --►Create Collection feature to find claims where the Who = S or T and tag them to change the Who to G.
Note: If an office wants to use the Courtesy Statement they should review the option in the Utility --►Category screen and the Utility --►Set Up --►Parameter screen to see how the new feature will affect their system when combined with the other selected set up options.
5.1 This field allows messages to print on statements.
5.2 Accept the default 'Y' (yes) to allow messages to print on statements, OR use the drop-down to select 'N' (no) to prevent messages from printing on statements.
5.3 Press the [F2] key to display the valid choices:

6.1 Type the message code of the statement message to print when the balance is considered current.
6.2 Messages are created in Utility --►Messages --►Message.
6.3 If there has not been any activity on the account since the last statement (i.e., the balance now falls into Aging Group 2), Intellect does not print the Billing Message but instead selects the <Group 2 Message> entry (see below) and so on.
7. Group 2 Message 
7.1 Type the message code of the statement message to print when the oldest balance falls into the second aging group.
7.2 Only the message from the oldest group with a balance prints.
8. Group 3 Message 
8.1 Type the message code of the statement message to print when the oldest balance falls into the third aging group.
8.2 Only the message from the oldest group with a balance prints.
9. Group 4 Message 
9.1 Type the message code of the statement message to print when the oldest balance falls into the fourth aging group.
9.2 Only the message from the oldest group with a balance prints.
10. Follow Up Method 
10.1 Version 9.12.10 - New Field
10.2 Accept the default 'Doctor' OR use the drop-down to make an alternate selection.
10.2.1 Doctor = Print a separate letter for each provider treating the patient. If there are three providers in one group, it is possible to get three letters. Each letter has the charges for only the one provider
10.2.2 Clinic = Print one letter per patient for all providers.
10.2.3 No = If follow up is not necessary.
10.3 Click on the field, OR press the [F2] key to display the valid choices.
To view the list of only the codes, click on the arrow. To select, click on the correct code, OR use the ↑ (up) and ↓ (down) arrows to highlight the correct code and then press the [Enter] key to select.
Note: If the <Billing Method> field on the Utility--►Set Up--►Parameter screen = D and the <Billing Method> field on this screen is set to 'C' (Clinic), manually print a Follow Up Letter for a patient to see if the letterhead is printed. When PCS sets up letterhead it is only set up for Utility --►Provider/Doctor letters if the <Billing Method> on this screen = D, so if an office prints by Clinic it may not include letterhead.
11.1 Version 9.12.14 name change. The name prior to version 9.12.14 was <Billing (D/C/N/)>.
11.2 When Utility--►Set Up--► Parameter <Billing Method> = 'L,' this field determines the billing method for patients assigned to this category.
11.3 Accept the default 'D,' OR use the drop-down to make an alternate selection.
11.4 If 'N' is selected, no claims are printed.
11.5 Press the [F2] key to display the valid choices:
12.1 Designed for use with Capitated accounts where Utility --►Category <Type> = 'P' or 'Q'. To use this feature, select option 'C' from the drop-down list.
12.2 Press the [F2] key to display the valid choices:
13.1 Version 9.12.14 name change. The name prior to version 9.12.14 was <Type (C/P/W/O/F/G)>.
13.2 The Type determines certain aspects of how Intellect performs during the process of posting and billing charges.
13.3 It is critical to have the <Type> set correctly BEFORE posting charges.
13.4 Accept the default 'O' when no other option applies to this category, OR use the drop-down to make an alternate selection.
13.5 If set to 'P' or 'Q,' Intellect handles the accounts according to the set up for Capitated accounts. For more information, refer to the section on Capitated Accounts.
13.6 If set to 'W' or 'F' (Worker Comp Accounts) Intellect pulls some patient information from the Worker Registration screens; for example, employer name and date of injury. If set to F, the system prompts to add First Report of Injury information.
Effective version 9.12.15, the Adjuster Name can now be printed above the insurance company's name and address on the Worker Compensation paper claim. There are three requirements which must be met for the Adjuster Name to print. Setting this field to 'W' or 'F' is only one of the requirements. For additional information, see Billing --►Worker or Billing --►Insurance.
Note: The 'Adjuster Name' data element has been added to the programming file but has not been added to the form. Therefore, if an office wants to have the Adjuster Name printed on the paper WC Claims, they should call PCS Support and request it be added.
13.7 If set to 'C' (company account) when posting charges, Intellect prompts for the patient name. Billing for Company Accounts is done through Billing --►Company. For more information on posting charges for Company Account refer to documentation on companies.
13.8 If set to 'G' when registering patients, Intellect does not prompt the user to add insurance information.
13.9 Effective version 9.12.14 New option: Option 'L' - Collection. If set to 'L' AND there is an unpaid balance on the patient's account, the field 'Balance in Collection' displays on the Management Financial Report. For additional information, see Management --► Financial.
13.10 Press the [F2] key to display the valid choices:
 s
s
14. Payment Method (A/S/I/P) 
14.1 This field determines the default method used to post payments. The payment method entered here displays in Payment --►Open Item <Method>.
14.2 This method may be changed at the time of posting payments.
14.3 Accept the default 'A' (according to approved amount) OR use the drop-down to make an alternate selection.
14.4 Press the [F2] key to display the valid choices:
15. Follow Up Recipient 
15.1 Effective Version 9.12.14 - name change. The name prior to 9.12.14 was <Follow Up (P/I/A/N)>.
15.2 This field determines to whom follow up letters may be sent.
15.3 Accept the default 'P' (patients only) OR use the drop-down to make an alternate selection.
15.4 Press the [F2] key to display the valid choices:
16.1 This field controls the aging method for the patient accounts with this category.
16.2 Accept the default 'O' (based on entry date), OR use the drop-down to make an alternate selection.
16.3 Press the [F2] key to display the valid choices:

17.1 Effective version 14.11.10, the K3 segment (see 17.2 below) is now converted to a .pdf file before being sent to the parties selected in this field. For PCM users only, the <PCM Import> field on the Utility --►Insurance --►Telecom screen gives users the option whether or not to send the .pdf file back to PCM.
17.2 Effective version 13.12.12, Workers Compensation Claims can now include a packet as part of the attachments that are being sent to WC EDI. Version 13.12.12 and later include a ‘K3’segment for the parties that WC EDI serves when the claims are received (Note: The K3 files are the same files entered in the <Identification Code> field on the Charges --►Encounter screen). Previously, the information was being populated in the PWK and sent as a text document. In order for the K3 Qualifier to populate in the EB file, the Utility --►Insurance --►Telecom <Special Requirement> must equal ‘W.’ See 17.5 for available options in this field.
17.3 Effective version 13.10.29: These options support electronic Worker's Comp submissions.
17.4 Use the drop-down to make a selection.
17.5 Press the [F2] key to display the valid choices:
EPOSQME: This option sends the patient’s name and address, the DEU (disability evaluation unit) assigned to the facility, and all insurances (up to six Primary coverages) that are attached to the patient file.
EPOSQMEP: This option sends the Applicant Attorney, Defense Attorney, and all insurances (up to six Primary coverages) that are attached to the patient file.
EPOSWC: This option sends the Referring Provider from the Registration screen, Applicant Attorney, Defense Attorney, and all insurances (up to six Primary coverages) that are attached to the patient file.
18. Pt Payment Remark 
18.1 For new systems, this field is pre-set to POP (Patient Office Payment) or PCP (Patient Co-Payment).
18.2 This code MUST describe a patient payment, NOT an insurance payment.
18.3 The code entered here is employed for payments posted through the Charge screen.
18.4 To choose the code, enter the Remark Code, OR type up to 6 characters of the description and press the [F2] key. To select the code from the list, either highlight the record and press the [Enter] key, OR double-click on the record. Alternatively, after clearing the field, press the [F2] key twice to view the entire list of codes.
19. Pt Adjustment Remark 
19.1 For new systems, this field is set to WOP (Write Off Per MD) or DC (Dr. Courtesy Adjustment).
19.2 This code MUST describe an adjustment related to the patient, NOT an insurance adjustment.
19.3 To choose the code, enter the Remark Code, OR type up to 6 characters of the description and press the [F2] key. To select the code from the list, either highlight the record and press the [Enter] key, OR double-click on the record. Alternately, after clearing the field, press the [F2] key twice to view the entire list of codes.
20.1 Effective Version 9.12.14 - New field.
20.2 This field is used as a remark code when using Payment --►Apply Receipt to post the Co-Payment amount. [F2] searches the Remark table.
20.3 For more information on using this field, refer to Payment --►Apply Receipt <CoPay>.
21.1 This field determines the source of the diagnosis.
21.2 Accept the default 'Yes,' if the diagnoses entered for the last visit should be pulled into the current charge session, OR use the drop-down to make an alternate selection.
21.3 Press the [F2] key to display the valid choices:
21.4 Effective version 15.09.28, select 'PCM' to pick up the diagnosis from PCM. Prior to posting charges:
• Providers must have entered the patient’s issues in PCM
• A superbill number must be assigned either in PCM or Intellect and used in the <SB> field of Charges --►Charge.
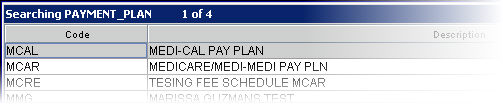
22.1 Type the Insurance --►Pay Plan <Plan Code> for the pay plan to default when adding patient Insurance records <Pay Plan> for patients in this category.
22.2 When adding or modifying Insurance for a patient, the Pay Plan may be changed.
22.3 Enter the Plan Code, OR type up to 6 characters of the description and press the [F2] key. To select the code from the list, either highlight the record and press the [Enter] key, OR double-click on the record. Alternately, after clearing the field, press the [F2] key twice to view the entire list of codes.
For more information on searching in Intellect, refer to the section on Searching.
23.1 This field determines who is initially responsible for the charges and assigns the appropriate responsibility in the Charges --►Charge <Who> column to each item at the time of posting charges:

See the Charges --►Charge <Who> field for set up information.
23.2 Accept the default 'P' (primary insurance) OR use the drop-down to make an alternate selection.
23.3 New systems: All insurance-type categories provided by Intellect are set to 'P' (i.e., category codes PPO, MCAR, INS, etc.). The CASH category is set to 'G'. Using 'X' allows Intellect to make this determination at the time of posting based on the patient's insurance assignment.
23.4 Press the [F2] key to display the valid choices:
23.5 Effective version 18.05.24, the setting of this field affects the function of the Utility --►Set Up --►Parameter <Hold Imported Charges> field. See <Hold Imported Charges> for details.
24.1 This field holds the category-specific starting day of the current balance, based on the <Aging Method> set on this screen.
24.2 New systems should always be set to '0' (zero) days old.
24.3 Any amount unpaid up until the day before the start of Aging Group 2 is included.
24.4 Effective version 19.04.12: The Aging Groups are normally set by the clinics as to when to begin aging the charges in coordination with the <Aging Method>. When this was left blank in previous versions, the program was giving an exception. As of this update, when the Category Groups are left blank, Intellect automatically defaults the Groups as follows (in addition to no longer giving an exception):
<Aging Group 1>: 0 - 30 Days
<Aging Group 2>: 31 - 59 Days
<Aging Group 3>: 60 - 90 Days
<Aging Group 4>: 91 - 120 Days
25. Aging Group 2 
25.1 This field holds the category-specific starting day of the patient’s second aging period for any balance equal to or greater than Aging Group 1, but less than the start of Aging Group 3, based on the <Aging Method> set on this screen.
25.2 New systems are set to '31' days old as a default, but may be modified as desired.
26. Aging Group 3 
26.1 This field holds the category-specific starting day of the patient’s third aging period for any balance equal to or greater than Aging Group 2, but less than the start of Aging Group 4, based on the <Aging Method> set on this screen.
26.2 New systems are set to '61' days old as a default, but may be modified as desired.
27. Aging Group 4 
27.1 This field holds the category-specific starting day of the patient’s fourth aging period for any balance equal to or greater than Aging Group 3, based on the <Aging Method> set on this screen.
27.2 New systems are set to '91' days old as a default, but may be modified as desired.
28.1 Enter the percentage (or flat rate amount) to charge against the balance that falls into the <Finance Charge Aging> period (see below). This only applies to those charges selected when applying the charge through Charges --►Finance Charge.
29. Finance Charge Aging 
29.1 Indicate how old (in days) the charge must be before applying the finance charge. For example: 30, 60, 90, etc. Aging is dependent on the <Aging Method> field entry.
30.1 This field defines the method to apply the value entered in the <Finance Charge> field above. It is a fixed rate or percentage.
30.2 Accept the default 'P' percentage OR select 'F' fixed.
30.3 Press the [F2] key to display the valid choices:

31.1 This field determines who is responsible for the charges.
31.2 Accept the default 'N' to allow payment responsibility to change during payment posting.
31.2.1 Example: Depending on a patient's insurance, billing can vary between a primary insurance (P1), a secondary insurance (P2), or the patient as the guarantor (G).
31.3 Select 'Y' to keep the payment responsibility from changing.
31.4 Version 9.12.14 - New option. Select 'X' to determine whether or not to change the Who column to a G when payments are posted when the balance is zero after the primary payments and adjustments. Users with software versions prior to version 9.12.14 need to modify the Who column to G if they do not want a secondary or tertiary claim to generate when the balance is zero.
31.5 Press the [F2] search key to display the valid choices:
Note: This option can be used for Worker Compensation patients so that partial payments will NOT change the balance to be the patient's responsibility.
Note: This feature works only when posting payments through Payment --►Open Item.
32.1 Effective version 9.12.31- New Field.
32.2 The <Encounter Screen> and <Claim Requirement> fields work together. Choices made in the <Encounter Screen> are displayed in the <Claim Requirement> field and subsequently affect whether or not an Add CLAIM_REQUIREMENT screen displays on the Charges --►Charge screen. If, after pressing [Enter] at the <Charge> field, there is information missing that is required for billing, the Add CLAIM REQUIREMENT screen displays to allow the information to be entered. The <Encounter Screen> and <Claim Requirement> fields dictate which fields are displayed on the Add CLAIM_REQUIREMENT screen and help ensure that the necessary information is included on the claim form before it is sent.
Here is an example of how the <Encounter Screen> and <Claim Requirement> fields work, and how to set them up:
32.2.1 Suppose an office is adding <Category Code> BCBS for Blue Cross Blue Shield and would like to be reminded to include the admission date on the claim. At the <Encounter Screen> field, click on the field to display the following choices, and then click on the type of Encounter.
32.2.2 Once the type of Encounter has been selected, press [Enter] to display the options for that type of encounter. The following screen displays for the 'UB-Encounter' choice:
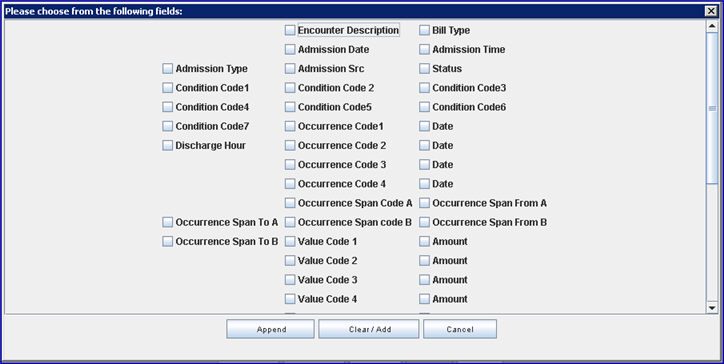
Note: Effective version 13.03.01: To facilitate organizations that rely on the description field to distinguish between encounters, an ‘ Encounter Description’ option was added to the pop-up box.
32.2.3 Click on the appropriate items -- in our example for Category Code BCBS, the office would select <Admission Date>.
32.2.4 Once all the choices have been selected, click on the appropriate button at the bottom of the screen:

[Append]: If there are already selections in the <Claim Requirement> field, clicking [Append] adds the new choices to what is already displayed there (as set up on Intellect’s tables).
[Clear/Add]: If there are already selections in the <Claim Requirement> field, clicking [Clear/Add] clears the previous selections in the <Claim Requirement> field and adds the selections that were just made. For this example, <Admission Date> was selected and the <Claim Requirement> field displays:

[Cancel]: Closes the Encounter screen.
32.2.5 At the Charges --►Charge screen, if <Facility Code> 21 is entered, press [Enter] at the <Charge> field to display an Add CLAIM_REQUIREMENT screen if there is information missing that is required for billing.
Note: This screen does not display if the Who is set to G or if there is no insurance.
The Add CLAIM_REQUIREMENT screen always includes the <Patient Account No> and <Encounter #> fields. The remaining fields are dependent on what is required for the claim form (i.e., HCFA) and on the choices selected here through the <Encounter Screen> field.
32.2.6 In order for the claim to go through, the fields on the Add CLAIM_REQUIREMENT screen must be entered. In our example, Admission Date was selected so that field would be included on the Add CLAIM_REQUIREMENT screen and must be filled.
33.1 Effective version 9.12.31- New field.
33.2 The <Claim Requirement> and <Encounter Screen> fields work together. Please refer to the documentation for the <Encounter Screen> field (above) for additional information.
34.1 Effective version 13.03.01 - New field.
34.2 Accept the default 'YES' to indicate this <Category Code> supports ICD-10 Diagnosis codes.
34.3 Select 'NO' to indicate this <Category Code> does not support ICD-10. Charge posting for patients with this <Category Code> should be done with ICD-9, and, in this case, Onstaff will not pop up the ICD-10 selection list (see 34.4 & 34.5 below) when users post using an ICD-9 .
34.4 This field works in conjunction with the <ICD10 Effective Date> field on the Utility --►Set Up --►Parameter screen and affects whether or not Intellect will display an ICD-10 selection list for the <Diagnosis> field on the Charge screen.
34.5 If the <ICD10 Effective Date> on the Utility --►Set Up --►Parameter screen is set to display an ICD-10 selection list, setting the <ICD10> field to ‘Yes’ allows the selection list to display, while ‘No’ will not pop up the ICD-10 selection list when users post using an ICD-9 code.
34.6 PCM users only: Effective version 15.06.10, this field works in conjunction with the Utility --►Set Up --►Parameter <Update ICD10 Equivalent> field. When both this field and the <Update ICD10 Equivalent> field are set to YES, PCM tracks the usage for the ICD-10 code selected in the Charges --►Charge - <Diagnosis Code> field.
35.1 Effective version 14.07.01 - New field.
35.2 This field allows users to enter the dollar amount for an administrator fee to be charged to patient accounts on a yearly basis, via the Automated Task. Before using the <Administrator Fee> field, please note the following:
35.2.1 The amount that is entered in this field is applied to the Provider who displays in the Registration --►Regular --►Patient <Treating Provider Name> field.
35.2.2 The office must choose a Facility code to apply to these charges. If none is mentioned when the set up is completed, Intellect pulls the Facility from the <Default Facility> field as set up in Utility --►Set Up --►Parameter.
35.2.3 When an offices' system is updated to version 14.07.01 (or greater), Intellect includes a Panel Code of ‘ADMINFEE’. Offices who prefer to use a different Panel Code for the Administrator Fee should see Utility --►Procedure --►Procedure --►Add Procedure <Panel Code> field, 2.6, for required settings.
35.2.4 The Yearly Task is set up by Prime Clinical in Utility --►Task Manager. To run the Yearly Task, go to Management --►Run Tasks --►Run Yearly Tasks.
35.2.5 To review accounts to which the Administrator Fee was applied, run the Charges --►Charge Review report. For report settings and additional information on running this task and/or reviewing the report, please see Charges --►Charge Review.
35.2.6 The administrator fee charge appears on the patient ledger. For specifics, please see the online documentation for Ledger --►Accounting --►Display.
36. Remark 
36.1 This is an informational field which defaults to the Patient Registration screen <Remark> field for patients with this category.
37. Bill Unpaid CoPay/Deductible 
37.1 Effective version 15.09.02 - New field.
37.2 This field allows offices to bill patients with secondary insurance for the unpaid copay and deductible before billing the patient's secondary insurance.
37.3 Accept the default 'No,' OR use the drop-down arrow to select 'Yes.'
37.3.1 With this field set to ‘No,’ Intellect functions the same as it did prior to the addition of this field. 'No' would be used in the majority of cases.
37.3.2 With ‘Yes’ selected for this field, patients with secondary insurance are billed for the unpaid copay and deductible before the secondary insurance is billed.

38. When the information is completely entered, select one of these options:

38.1 [Modify]: Click to clear the screen and return the focus to the <Category Code> field, saving the modification. Note: If Utility --►Category --► Add was initially selected to add a new Category Code, the following options display at the bottom of the screen:

38.1.1 Clicking [Add] clears the screen and returns the focus to the <Category Code> field, saving the new category.
38.2 [Clear]: If no changes were made to the screen after it was initially opened, click [Clear] to return the focus to the <Category Code> field. If changes were made to the screen, click [Clear] to display this message:
38.2.1 Clicking [Yes] clears the screen and returns the focus to the <Category Code> field, saving the new category.
38.2.2 Clicking [No] clears the screen and returns the focus to the <Category Code> field without saving.
38.3 [Exit]: If no changes were made to the screen after it was initially opened, click [Exit] to close the screen and returns the user to Intellect's home screen. If changes were made to the screen, click [Exit] to display this message:
38.3.1 Clicking [Yes] clears the screen and returns the focus to Intellect's home screen, saving the new category.
38.3.2 Clicking [No] clears the screen and returns the focus to Intellect's home screen without saving changes.


