Intellect™
CHARGES MENU OPTIONS

Charge
This menu option is used to post most charges incurred by a patient. There are several specialty charge types such as Anesthesia billing and Company accounts where this screen has slightly different behavior. These are discussed in the documents linked above.
Before using this screen, first complete these items on the appropriate Utility --►Set Up screens:
• There must be a provider
• There must be a procedure
• There may be a fee schedule
• There should be diagnoses
• There may be a pay plan
• There may be medication
• There may be modifiers
• There may be Quality Data Codes
In this topic:
Charge Screen Field Definitions
Multi-line Display Posting Area
Summary Area in the Bottom Region of the Screen
An instructional video is available: Click Charge Entry to access the link. Depending on the system set up, the media player may need to be activated. Speakers need to be attached to the workstation to hear the instructions.
Note: To view the videos, log-in through the www.primeclinical.com website. Current support is required.
Prime Clinical also offers webinars/workshops on a variety of topics. For more information, contact PCS support.
Updates:
Effective version 21.03.02: HL7 DFT Changes - ACK
When a DFT message is received into Intellect, part of the DFT is the MSH and with the MSH (10) there is a message control ID that is used by the Vendor to identify the message. In the example below, we see MSH-10 with the value of ‘5.’ When the ACK is sent back to the Vendor, we now include the message control ID as seen in the MSA|AA|5|
MSH|^~\&|PYXISCC|MUA1005|EPIC|MUA1005|20210226154136||ACK^R01|5|T|2.3|||||||
MSA|AA|5|
Effective version 19.12.04
In the current version of Intellect, new fields were added to the Utility --►Diagnosis --►Diagnosis screen to accommodate Medicare Advantage or other insurance plans that uses Risk Adjustment Factor (RAF) scores to calculate reimbursement.
The HCC (Hierarchical Condition Category)/RAF point system is a 'shadow' calculation that affects every physician's reimbursement, no matter what goes on the bill. The HCC/RAF regulation assigns a point value to a relatively small number of ICD diagnosis codes that indicate serious disease (ESRD Value, RxHCC). These values are inserted into Intellect's Diagnosis Table based on the CMS guidelines. However, Prime Clinical Systems only inserts the values for the non-dual group.
Data is inserted when posting charges gives the ability to choose from the displayed HCC Groups that apply to that <Diagnosis Code>. NOTE: This new option is added as an informational tool and cannot be changed. Each new cycle of HCC RAF that is put out by CMS is loaded into Intellect when distributed by CMS.
Effective version 17.06.09
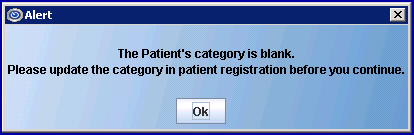
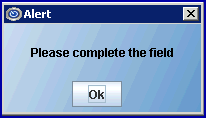
To prevent a charge for a patient with a blank name or category being entered, a message displays in the Charges --►Charge screen and Schedule --►Appointment --►Full Day --►Surgery Tab screen:
For Intellect users that are importing/receiving charges from PCM. As of version 16.02.22, when charges are posted in PCM for the same date of service and same 'posting session' but are committed in PCM at different intervals and imported into Intellect, the Intellect program checks the visit number and if it is the same the Intellect program deletes the existing charges for that visit and re-imports ALL of the existing charges in PCM for that visit. This does NOT save any of the changes made to those charges on Intellect, including any changes to the Dx, as they are imported again with whatever is currently in PCM. These charges are then considered as posted on the current clinic date and the charges that were overwritten (deleted) show up on the deleted charge report.
To utilize this update, the <Auto Post PCM> field on the Utility --►Set Up --►Parameter screen must be set to ‘Y.’
Effective Version 14.04.15
As of version 14.04.15, when printing CHDP forms, Intellect accepts the Utility --►Insurance --►Insurance <Form Type> options of:
|
Choice |
Description |
|
B |
1500 Claim Form (old red form) |
|
6 |
CHDP 6 |
|
7 |
CHDP 7 |
|
NEW HCFA RED |
HCFA 1500 (02-12) red form |
Effective Version 9.12.35
New <From Date> and <To Date> fields were added to the Utility --►Procedure --►Fee Schedule Add FEE_SCHEDULE screen. These fields are used to facilitate more than one fee schedule per From/To Date. At the time of charge posting, Intellect looks for a Fee Schedule with a From Date and To Date that covers the date of service.
For example, Medicare's fee schedule may authorize a charge of $80.00 for an office visit (panel code 99213) in 2012 and their fee schedule for 2013 may authorize a charge of $100.00 for the same type of office visit (panel code 99213). Therefore, even though a panel code of 99213 for a December 31, 2012 Medicare office visit is entered and then the same panel code for a January 4, 2013 Medicare office visit is entered, the charge amount would differ by $20.00, based on the <From/To Dates> of the fee schedules.
This change affects all the charge postings from the Charge Screen, the CHDP Screen, and imported charges from PCM.
For more information, see <From Date> on the Add FEE_SCHEDULE screen.
Outside Vendor Charge Import HL7
Effective version 16.02.22:
Charges imported from an outside vendor into Intellect where the rendering provider's <Cost Center/Dr> field is set to 'C' must include a Billing Provider in the HL7 file before the charges are posted:
MSH|^~\&|VENDOR|PVN|VENDOR|PVN|201601201439||DFT^P03|wcsl_101901_101901_2016_01_15_17_06_08_840625||2.3.1
EVN|P03|201601150000
PID||101901|||PTLASTNAME^PTFIRSTNAME|19460731|F||||||||||||
PV1|1|O|13||||50^BILLINGPROVIDER^
FT1|1|||20160115||CG|99202|||1||||||13^^^13^^PCS - ORGANIZATIONNAME |||D22.5~D22.61~D22.62~D22.71~D22.72~D22.39~D22.4|52^RENDERINGPROVIDERCODE^||||||25
Effective version 9.12.30:
If importing charges from a vendor, not from Patient Chart Manager, the codes provided in the HL7 file need to be 'mapped' to the codes set up in Intellect using the HL7 Mapping table.
See Charges --►Charge Review Outside Vendor Charge Import HL7.
Depending on if there are/are not Modifiers and Modifier Codes, mapping can include the following screens and fields:
• Utility --►Messages --►HL7 Mapping <Source>, <Table Name>, <HL7 Code>, and <Code Name>.
• Utility --►Procedure --►Procedure <Professional Charge>
• Utility --►Procedure --►Modifier <Charge G/P/TR>
• Utility --►Procedure --►Fee Schedule <Professional Charge> and <Professional Approved>
Effective Version 9.12.27:
Due to an increase in rejections applied by Medicare and other payers in ANSI 5010, PCS added several new edits in Charge Posting:
1. When posting charges, Intellect can send an alert when a Referring Provider or Modifier are required for the procedure posted. See <Ref Prv> and <Mod> in this document for edit details. Set up is in Utility --►Procedure --►Procedure in fields <Requires Referring Prv> and <Requires Modifier>.
2. If the Rdx contains pointers for which there is not a valid diagnosis, a warning pops up. See <RDX> in this document for details.
3. The Diagnosis column now renumbers if a diagnosis is deleted. In this document, see Multi Line Display Posting Area, Typing 'D' in the Command Column for details.
Update 9.10.21: Identifying the Pay Plan
Based on the system set up when charges are posted, Intellect records many pieces of information regarding the patient, insurance, and charge as it was at the time of posting. Some examples are the patient's category code, primary insurance, approved amount, the percentage of the approved amount the primary insurance is expected to pay, and, if the patient has a capitated plan, is the charge a 'carve out' procedure*, etc. Much of this is calculated using information set up in a Pay Plan table. The program uses a defined hierarchy to determine which Fee Schedule and/or Pay Plan to use. Another level has been added to the hierarchy to determine which, if any, Pay Plan code to apply. For an example, look at the prior version and current version of Calculating the Approved:
Prior to update 9.10.21:
To match the services posted with a Pay Plan and Fee Schedule, Intellect would look first to find a match in the Utility --►Procedure --►Fee Schedule table with the Provider/Dr (not the Billing Provider), Patient Primary Insurance and posted Procedure code (not the Panel Code). If a match was not found, the program would retrieve the Patient Insurance screen <Pay Plan> code.
Effective update 9.10.21:
If a match is not found in the Utility --►Procedure --►Fee Schedule table and the Patient Insurance screen <Pay Plan> field is blank or the code entered is invalid, Intellect uses the Provider code entered during Charge posting to match to the Utility --► Insurance --► Pay Plan --►Pay Plan <Code> field. If the Provider code matches the Pay Plan Code, Intellect uses that pay plan record.
From this point forward Intellect works as it previously has.
* Identifying Carve Out services:
Prior to update 9.10.21: To determine whether or not a procedure should be carved out when the patient’s Utility --►Category <Type> is P or Q, Intellect retrieves the Patient Insurance screen <Pay Plan> code.
Charge Screen Field Definitions
1. To Add a Charge to a patient's account in Intellect, go to Charges --► Charge
The Charge screen displays.
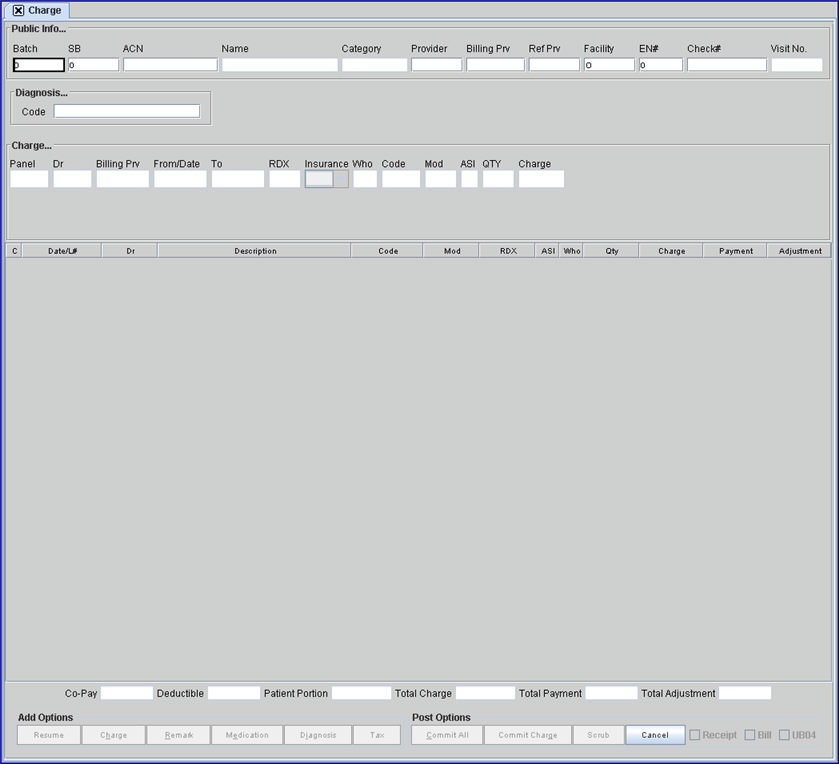
Warning: Use the keyboard on this screen. Only use the mouse to select the buttons at the bottom of the screen.
Note: To save changes, enter all the way through to the end of the screen.
2. Batch 
2.1 Batch allows certain payments and charges to be grouped.
2.1.1 Numbers, letters, names, or a date may be used to designate a batch.
2.1.2 Version 9.12.14 - This field was increased to 20 characters. It now matches the Payment --►Auto Payment, Payment --►Guarantor Payment, and Payment --►Open Item screens.
2.2 A Batch identifier entered when posting charges allows the charges to be reversed/removed if necessary. Use Utility --►Maintenance --►Reverse Entry to reverse any charge where the clinic date has not been changed. Batch identifiers may also be useful when searching for posted information.
2.3 A Batch identifier may be used to designate this batch of posted bills; for example, a morning batch (AM).
2.4 Type a new batch designation, use an existing batch, OR leave blank.
2.5 Enter a new Batch code, OR press the [F2] key to display the Searching BATCH screen to select an existing Batch code. To select an existing <Batch> from the list, either highlight the record and press the [Enter] key, OR double-click on the record. This field may also be left blank.
For additional information on using Searching screens, see Introduction to Intellect --►Intellect Characteristics and Features, Searching Screen.
2.5.1 If there are no associated Batch numbers, press [F2] to display:
Click [OK] to return to the Searching BATCH screen.
3.1 Effective version 19.08.12, the program does not allow the <SB> field on either the Charges --►Charge screen or the Charges --►Modify screen to be left blank. An actual valid Super Bill (charge ticket) number must be entered. The program now defaults a zero in the Super Bill field if one is not entered.
3.1.1 Effective in version 15.09.28:
When pulling diagnosis codes from PCM:
• the super bill number from that visit must be entered in this field
• the PCM option must be selected for the <Diagnosis> field on the Utility --►Category screen
• providers must have entered the patient's issues in PCM
3.1.2 Effective version 9.12.35:
• If a super bill is not entered on the Charge screen, the system fills-in the <Provider> and <Facility> fields with the information given in the Registration --►Patient screen <Treating Provider> and <Hospital> fields.
• If the <Treating Provider> and <Hospital> fields are not filled-in on the Registration --►Patient screen, the system fills the <Provider> and <Facility> fields (on the Charge screen) with the information in the <Default Provider> and <Default Facility> fields on the Utility --►Set Up --►Parameter screen.
3.2 Intellect completes the <ACN> (account number), <Name>, <Category>, <Provider> (scheduled), associated <Billing Prv>, and <Facility> (scheduled facility code) from information that was completed on the Registration --►Patient screen as it was at the time the Super Bill was printed. When entering the <Panel> code (also on this screen) the DOS from the Superbill defaults to <From/Date>.
3.3 Super Bills are designed to be posted only once. When entering an already-used number, this warning displays:
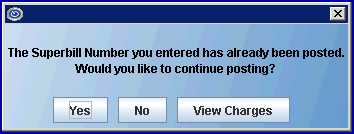
[Yes] allows the Superbill Number to get posted a second time. The focus advances to the <Provider> field.
If the patient does not have insurance, the following screen is displayed, giving options to continue with the Superbill, set up a new patient, or simply return to the Charge screen.

[No] returns to the Charge screen.
[View Charges] displays a window listing the charges previously posted using the same Superbill Number. To close the dialog box, click on the X in the top right corner, OR press either the [Esc] or [Up] key. See example below:
4. ACN 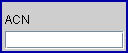
4.1 When a Superbill is used, the patient's account number displays.
4.1.1 Otherwise, type the number for the patient's account of where to post.
4.2 This is a required field; the focus does not advance unless completed.
4.3 Enter the patient account number, OR type up to 6 characters of the last name and press the [F2] key. To select the account from the list, either highlight the record and press the [Enter] key OR double-click on the record. For additional information on using Searching screens, see Introduction to Intellect --►Intellect Characteristics and Features, Searching Screen.
5. Name 
5.1 The patients' name displays: Last Name, First Name.
5.2 This is a read-only field and may not be accessed.
6.1 The category code associated with the patient account displays.
6.2 This is a read-only field and may not be accessed.
7.1 Effective version 9.12.35: If a super bill is not entered on the Charge screen, Intellect fills-in this field with the information given in the Registration --►Patient screen <Treating Provider> field. If the <Treating Provider> field is not filled-in on the Registration --►Patient screen, Intellect fills this field with the information in the <Default Provider> field on the Utility --►Set Up --►Parameter screen.
7.2 When a Superbill number is used, the Utility --►Provider --►Provider <Provider Code> from that SB displays and this field is skipped. If using a SB number from the appointment screen, the entered Billing Provider displays in this field.
7.3 A default code displays if Utility --►Set Up --►Parameter <Default Provider> was used to enter a default.
7.4 If the patient saw a provider other than the one scheduled, press the [Up Arrow] key to go back to this field.
7.4.1 Enter the Provider Number, OR type up to 6 characters of the last name and press the [F2] key to display the Searching screen. To select the code from the list, either highlight the record and press the [Enter] key, OR double-click on the record. Or, after clearing the field, press the [F2] key twice to view the entire list of codes. For additional information on using Searching screens, see Introduction to Intellect --►Intellect Characteristics and Features, Searching Screen.
8.1 This Provider Code is used to complete the paper claim or electronic equivalent.
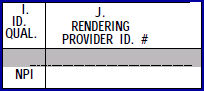
8.1.1 Intellect completes Box 24J on the CMS 1500 or electronic equivalent with Utility --►Provider--► Provider <NPI>.
8.1.2 If the Billing Method is by Doctor (Utility --►Set Up --►Parameter <Billing Method> = D or L with Utility --►Set Up --►Clinic <Billing Method> = D), Intellect completes the following based on the Billing Provider:
8.1.2.1 Utility --► Provider --►Provider <I.R.S. Id> for Box 25 on the CMS 1500 or electronic equivalent.

8.1.2.2 Utility --►Provider --►Provider <Organization Name> OR, if blank, Provider Name (<First name>, <Middle Initial>, <Last Name>, <Title>) and address (<Address>, <City>, <State>, <Zip Code>) and <Phone Number> for Box 33 on the CMS 1500 or electronic equivalent.
8.1.2.3 Utility --►Provider --►Provider <Group NPI> for Box 33a on the CMS 1500 or electronic equivalent.
8.1.3 See CMS 1500 Box Definitions for more details, including the shaded boxes 24J and 33b for legacy numbers.
8.2 Used for Cost Center/Doctor billing (a provider number where the record is set as a cost center can never be entered here). If using a SB number from the appointment screen, then the Billing Provider number for the appointment displays in this field.
8.3 If Utility --► Provider <Cost Center> is set to 'C' (Cost Center), and if Utility --►Provider <Billing Provider> has a valid provider code entered, then that code defaults here. The field is mandatory and must be completed. If left blank, Intellect displays an error message:
Press the [OK] button to return the focus to the <Billing Prv> field.
8.4 If Utility --►Provider <Cost Center> is set to 'D' (Doctor), then the <Provider> code entry displays in this field.
8.5 If the entry is correct, press [Tab] or [Enter] to accept and move the focus to the next field OR enter the Provider Number, OR type up to 6 characters of the last name and press the [F2] key. To select the code from the list, either highlight the record and press the [Enter] key, OR double-click on the record. Or, after clearing the field, press the [F2] key twice to view the entire list of codes.
9.1 If, during patient registration, the <Referring Name> field is completed, that code displays in this field if the Utililty --►Referring <Doctor/Other> field = D.
Effective version 15.09.28, for all Billing functions (i.e., HCFA, eBilling, UB, etc.), if the Utililty --►Referring <Last Name> field is empty, Intellect does not use that <Referring Code>. It is equivalent to an invalid Referring Code.
9.2 If the entry is correct, press [Tab] or [Enter] to accept and move the focus to the next field OR enter the Referral code. OR, type up to 6 characters of the last name and press the [F2] key to display the Searching screen. To select the code from the list, either highlight the record and press the [Enter] key, OR double-click on the record. Additionally, after clearing the field, press the [F2] key twice to view the entire list of codes. For additional information on using Searching screens, see Introduction to Intellect --►Intellect Characteristics and Features, Searching Screen.
Note: The order Intellect uses to determine the source of the referring doctor's (a.k.a. ordering physician's) information for billing and referral reports is controlled by the selection in the Utility --►Set Up --►Parameter <Referring> field.
9.3 Effective version 14.11.19: In prior software versions for Medicare paper claims, if the <Ref Prv> field on the Charges screen was not populated, and the <Referring Name> field was not filled on the Registration --►Regular --►Patient screen, the rendering provider was used as the referring provider on the EB file, as well as printed on Box 17 of the HCFA claims.
As of this update, the referring provider only populates the EB file and the HCFA Box 17 if the Utility --►Insurance --►Insurance <Insurance Type> field is set to 'D', 'C', '1', '5' (WI Medicaid), or 'O' and a referring provider is added in the <Ref Prv> field on the Charges screen at the time of posting charges, or when the Registration --►Regular --►Patient <Referring Name> field is filled. Utility --►Set Up --►Parameter <Referring> determines if the Referring Provider is pulled from the Charges <Ref Prv> field or the Registration --►Regular --►Patient <Referring> field.
ATTENTION: This IMMEDIATELY affects billing and other daily tasks.
9.4 Effective Version 9.12.27 - New Edit. When posting charges, Intellect can send an alert when a Referring Provider is required for the procedure posted. Before using this feature, the <Requires Referring Prv> field needs to be set up in Utility --►Procedure --► Procedure.
9.4.1 If <Requires Referring Prv> is set to 'N,' a Referring Physician is not required.
9.4.2 If <Requires Referring Prv> is set to 'Y,' a Referring Physician is ALWAYS required.
When posting a charge where <Requires Referring Prv> is set to 'Y' (yes), this message pops up:
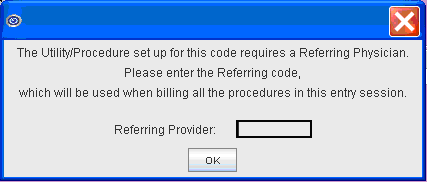
In the message box, either type in the Referring Provider code OR search for the appropriate referral by placing the cursor in the <Referring Provider> field and using the same searching steps used in other fields; i.e., type in part of the referring physician name and press [F2], OR press [F2] key twice for the entire list.
10.1 Effective version 9.12.35: If a super bill is not entered on the Charge screen, Intellect fills-in this field with the information given in the Patient screen <Hospital> field. If the <Hospital> field is not filled-in on the patient screen, Intellect fills this field with the information in the <Default Facility> field on the Utility --►Set Up --► Parameter screen.
10.2 Type the Facility <Facility Code> where the services were rendered. OR, press [F2] twice to view options.
10.3 This field is mandatory and must be completed. If left blank, an error message displays:
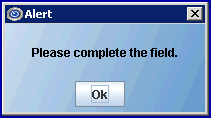
Press the [OK] button returns the focus to the <Facility> field.
10.4 Intellect completes box 32 HCFA (CMS 1500) with Facility information. Information must be completed in Utility --►Facility.
10.5 A default value displays if a Facility code was entered in Utility --►Parameter<Default Facility>. If this code is correct, press [Enter] to accept, OR manually type the correct facility code. OR, type up to 6 characters of the description and press the [F2] key to display the Searching screen. To select the code from the list, either highlight the record and press the [Enter] key, OR double-click on the record. Alternately, after clearing the field, press the [F2] key twice to view the entire list of codes. For additional information on using Searching screens, see Introduction to Intellect --►Intellect Characteristics and Features, Searching Screen.
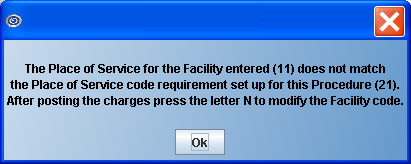
10.6 Version 9.12.14 - New feature: Facility POS error checking. During Charge posting as of version 9.12.14, Intellect verifies whether or not the place-of-service (POS) code for this <Facility> field (as set up in Utility --►Facility --►Facility <Place of Service>) matches the POS for the <Panel> code, as selected in the Utility --►Procedure --►Procedure <POS> field. If the POS codes do not match, a warning message displays, as shown below, when [Enter] is pressed at the <Panel> code field:
11.1 Encounter is used to add claim-specific information to the CMS 1500 or UB04 form. For example:
• CMS1500: Box 18 Hospital Admit Dates, Box 23 Authorization #, Box 19 Notes, Box 24C Emergency Y/N
• UB04: Box 12 Admission Date, Box 13 Admission Time, Box 63 Authorization #, Box 67 Principal Diagnosis, Box 74 Principal Procedure, etc.
11.2 Press [Enter] through this field to default the most recent Charges --►Encounter <Encounter #> for this patient if an encounter has been created.
11.3 When billing charges for a work-related injury or illness OR a capitated patient that requires authorization prior to treatment, first complete an Encounter screen to link to the charges. The [F2] window is available for this. See Utility --►Provider --►Provider <Doctor Encounter> to select the type of encounter -- Generic Encounter is the default.
11.4 A default value displays if an Encounter code was entered in Utility --►Parameter <Default Encounter>. If this code is correct, press [Enter] to accept, OR manually type the correct encounter code.
11.5 If required, manually type the appropriate encounter number. Alternately, after clearing the field, press the [F2] key twice to view the entire list of this patient’s encounters.
11.6 If [Enter] is pressed without entering a code, the system automatically links the charges with the most current Encounter. To prevent linking, enter 0 (zero) and then press [Enter].
11.7 Version 9.12.18 New Feature: When the Charges --►Encounter <Total Authorized Visits> field is greater than zero and an Encounter number is entered in the <EN#> field, the program compares the entered Encounter number to the Charges --►Encounter <Authorized Visits Left> field. If the <Authorized Visits Left> field is zero, which means there are no remaining visits, this warning displays:
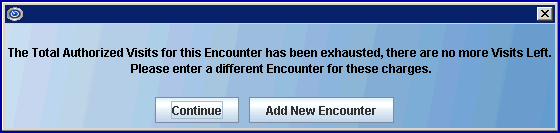
[Continue]: Continue with the entered Encounter number even though the visits remaining are zero.
[Add New Encounter]: Enter a new Encounter with the current authorized visits for the charges being posted.
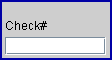
12.1 This field is used to enter information about any payments made at the time of posting charges. Entries appear in Ledger Payment History.
12.1.1 If paid by check, type the check number.
12.1.2 If paid by cash, write 'Cash.'
12.1.3 If paid by credit card, type the credit card number.
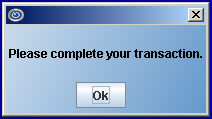
12.2 Effective version 13.12.12 New Feature: Per this software version, when a check number is entered but a payment is not entered before pressing [Commit All], Intellect displays the message:
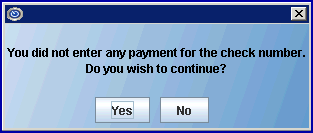
• Select ‘Yes’ to continue posting charges without entering a payment.
• Select ‘No’ to enter a payment amount before posting charges.
13.1 Version 9.12.18 and greater:
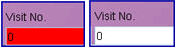
If entering an Encounter Number at the <EN#> field, the program verifies there are still remaining visits for the Encounter when Charges --►Encounter <Total Authorized Visits> is greater than zero. The number of remaining visits display in the <Visit No.> field:
![]()
As charges are posted, the remaining visits displayed in <Visit No.> are reduced for each new Date of Service:
![]()
If the number of Remaining Authorized Visits is exhausted, the <Visit No> box flashes, alternating between Red and White:
13.2 Versions prior to 9.12.18:
If a number is displayed, it was defaulted from the entered <EN#>, pulling the value entered in the patients' corresponding encounter <Authorized Visits Left> field.
The <Diagnosis Code> field is a key element in posting charges; as a result, there is a lot of information for this field. The following review by data entry method includes features available on version 15.09.28 or higher:
Automatically Populate Based on Category
Automatically Populate Based on Category
14.1 Diagnosis code(s) may automatically populate the multi-line display area based on the patient’s category.

14.1.1 When the Utility --►Category <Diagnosis> field is set to ‘Yes’, then up to 12 diagnosis codes from the patient’s previous date of service are displayed.
14.1.2 PCM users only. When the Utility --►Category <Diagnosis> field is set to ‘PCM’, then diagnosis codes are pulled from PCM for the date of service linked to the superbill number entered in the <SB> field. The following must be completed prior to posting the charges:
14.1.2.1 A superbill number is generated for the date of service either in PCM or Intellect.
- AND -
14.1.2.2 The Provider entered the final diagnosis for the date of service in PCM.
14.2 Any automatically populated diagnosis code(s) NOT related to this posting session must be deleted.
14.2.1 The first twelve (12) diagnosis codes print on the CMS1500 form in box 21 or the electronic equivalent, even if a diagnosis line is NOT listed as a diagnosis pointer for a charge line in the <RDX> field.
14.2.2 See Multi-line Display Posting Area option ‘D’ for more information.
14.3 If additional diagnosis code(s) must be posted for the visit, use one of the other data entry methods below.
14.4 See General Information below for additional details about this field.
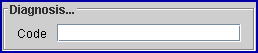
14.5 Enter the Utility --►Diagnosis --►Diagnosis <Diagnosis Code> for the ICD10 code and press [Enter] key.
14.5.1 The <Diagnosis Code> used as the entry code is usually the ICD-10 code without a period.
14.6 If the <Billable> field on that ICD-10 code’s Utility --►Diagnosis --►Diagnosis screen has been set to ‘No’, which indicates there is a higher level of specificity for that ICD-10 code, this pop up displays:
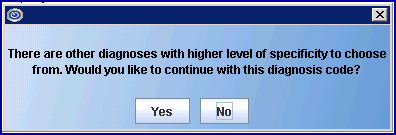
14.6.1 Click [Yes] if it is OK to bill with that ICD-10 code.
14.6.2 Click [No] to return to the <Diagnosis Code> field to change the diagnosis code.
14.7 If the <Retire Code> field on that ICD-10 code’s Utility --►Diagnosis --►Diagnosis screen has been set to ‘R’, a pop up displays:
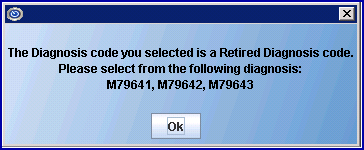
For this example, the Utility --►Diagnosis --►Diagnosis <Alternate Diagnosis> was set to ‘M79641, M79642, M79643’ to indicate which code(s) to use in place of the retired code.
14.7.1 Click [Ok] to continue.
14.8 See General Information below for additional details about this field.
14.9 This feature is active only when:
14.9.1 The Utility --►Set Up --►Parameter <ICD10 Lookup> field is set to ‘Yes.’
- AND -
14.9.2 The Utility --► Category <ICD10> field is set to ‘Yes’ for the category on the patient’s Registration screen.
- AND -
14.9.3 The Utility --►Set Up --►Parameter <ICD10 Effective Date> field is ‘10/01/2015’ (the date of service transition from ICD-9 codes to ICD-10 codes).
14.10 Enter a partial diagnosis description/keyword, and then press [Enter] to display the ICD10 Lookup screen with the available ICD-10 code(s) matching the entered Search Phrase. For example, after entering ‘GOUT WRIST’ and pressing [Enter], Intellect displays:
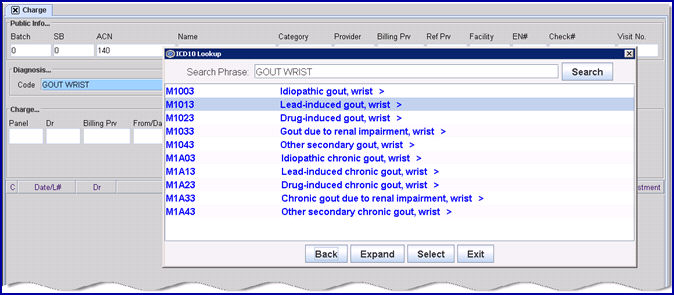
14.10.1 If the diagnosis is displayed in blue text, as shown above, click [Expand] to advance the screen to the next level of specificity, as shown below.
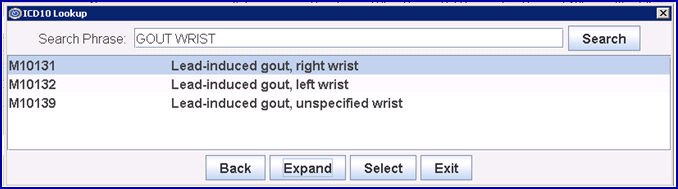
14.10.2 If the diagnosis is displayed in black text, as shown above, click [Select] to choose a diagnosis code at the highest level of specificity.
14.10.3 Click [Back] to return to the original list.
14.10.4 Click [Exit] to close the ICD10 Lookup screen without making a selection.
14.11 See General Information below for additional details about this field.
14.12 Enter a partial diagnosis description, and then press [F2] to display the Searching DIAGNOSIS window. NOTE: Typing an asterisk (*) at the beginning of the description acts as a wildcard to find all descriptions containing the entry.
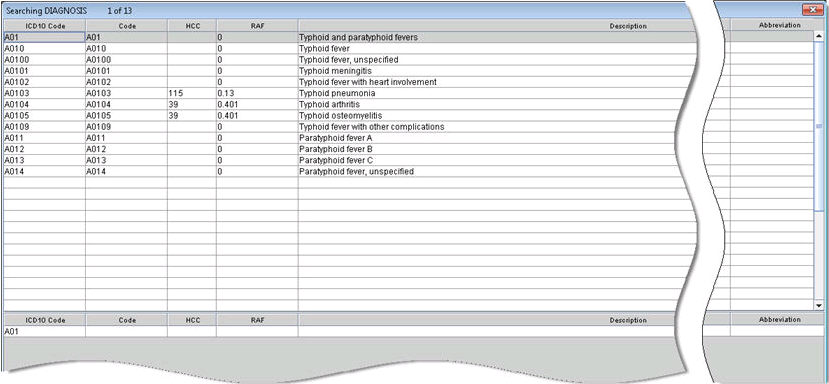
14.12.1 The ICD10 Code column displays the Utility --► Diagnosis --► Diagnosis <ICD10 Code> field associated with the diagnosis code.
14.12.2 The Code column displays the Utility --► Diagnosis --► Diagnosis <Diagnosis Code> field which is entered in the <Code> field on the Charges --► Charge screen.
14.12.3 Effective version 19.12.04 – New column. The HCC column displays the Hierarchical Condition Category (HCC) on the Utility --► Diagnosis --► Diagnosis <HCC Group> field associated with the diagnosis code.
14.12.4 Effective version 19.12.04 – New column. The HCC RAF column displays the Risk Adjustment Factor (RAF) on the Utility --► Diagnosis --► Diagnosis <HCC RAF Value> field associated with the diagnosis code.
14.12.5 The Description column displays the Utility --► Diagnosis --► Diagnosis <Description> field associated with the diagnosis code.
14.12.6 The Abbreviation column displays the Utility --► Diagnosis --► Diagnosis <Abbreviation> field associated with the diagnosis code.
14.13 If a second search is needed based on other criteria, move the cursor focus to the last line (below the column headings) to enter an ICD10 code in the <ICD10 Code> column OR an ICD10 code in the <Code> field OR an HCC code in the <HCC> column, and then press [F2].
14.14 To select the code from the displayed list, either highlight the record and press the [Enter], OR double-click on the record.
14.15 See General Information below for additional details about this field.
14.16 This feature is active only when:
14.16.1 The criteria is met to display the ICD10 Lookup screen, see 14.9 above.
- AND -
14.16.2 The Utility --►Diagnosis --►Diagnosis <Abbreviation> field is set to an abbreviation code. For example, the <Abbreviation> field is set to ‘UTI’ for the most commonly used urinary tract infection diagnosis codes.
14.17 Enter ‘@’ followed by an abbreviation code in the <Diagnosis Code> field to display the ICD10 Lookup screen with a list of all diagnosis codes set up with that abbreviation code. For example, entering ‘@UTI’ in the <Diagnosis Code> field displays a list of all diagnosis codes that have ‘UTI’ in the Utility --►Diagnosis --►Diagnosis <Abbreviation> field.
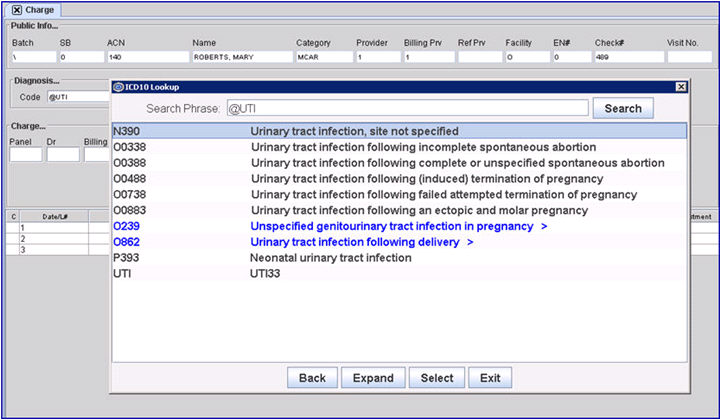
14.17.1 If the diagnosis option is displayed in blue text (as shown above), click the [Expand] to advance the screen to the next level of specificity, as shown below.

14.17.2 If the diagnosis option is displayed in black text, as shown above, click [Select] to choose that diagnosis at the highest level of specificity.
14.17.3 Click [Back] to return to the original list.
14.17.4 Click [Exit] to close the ICD10 Lookup screen without making a selection.
14.18 See General Information below for additional details about this field.
14.19 For dates of service on or after the October 1, 2015 transition from ICD-9 codes to ICD-10 codes, entry of an ICD-9 code triggers the appearance of a pop up window to select the appropriate ICD10 code, if all these conditions are met:
14.19.1 The Utility --►Set Up --►Parameter <ICD10 Effective Date> field is set to ‘10/01/2015’.
- AND -
14.19.2 The Utility --►Category <ICD10> field is set to ‘Yes’ for the patient’s category.
- AND -
14.19.3 The ICD-9 code is linked to ICD-10 code(s) on the Utility --►Diagnosis --►Crosswalk screen.
14.20 When the Utility --►Category <Diagnosis (Y/N)> field is set to ‘Y’ for the patient’s category, an initialization window pops up the first time a charge entry is made for the patient after the October 1, 2015 transition. This window allows the selection of ICD-10 code(s) that correlate to the ICD-9 code(s) entered on the most recent date of service as defined on the Utility --►Diagnosis --►Crosswalk screen.
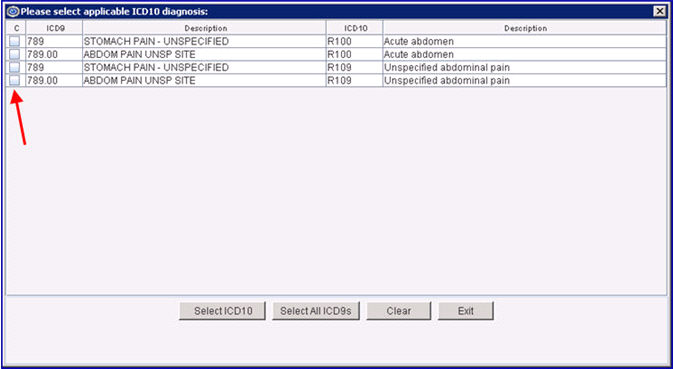
NOTE: After posting charges, the initialization screen does not display again for that patient. Intellect replaces the ongoing diagnosis with the selected ICD-10 code(s) for subsequent posting sessions.
14.20.1 [Select ICD10] adds the ICD10 code(s) associated with the checked box(es) (see red arrow above) to the multi-line display posting area. More than one code may be selected, if appropriate.
- OR -
14.20.2 [Select All ICD9s] adds the ICD9 code(s) associated with the checked box(es) (see red arrow above) to the multi-line display posting area. More than one code may be selected, if appropriate.
- OR -
14.20.3 [Clear] removes the check from previously selected codes.
- OR -
14.20.4 [Exit] closes the pop up window and allows the entry of a diagnosis code in the <Diagnosis Code> field.
14.21 When a Utility --►Diagnosis <Diagnosis Code> for an ICD-9 code is entered and the [Enter] key is pressed, Intellect displays a selection box with a list of related ICD-10 codes. Choose the appropriate ICD-10 code to add to the multi-line display posting area. For the example below, the ICD-9 code of 285.0 was entered in the <Diagnosis Code> field.
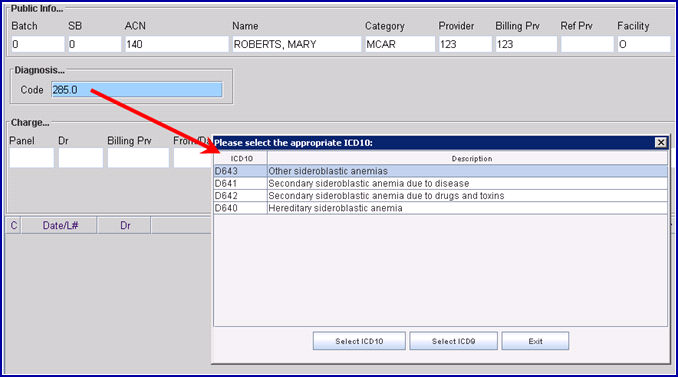
NOTE: A selection window is not displayed if ICD-10 codes have not been linked to the ICD-9 code on the Utility --►Diagnosis --►Crosswalk screen.
14.21.1 [Select ICD10] adds the highlighted ICD-10 code to the multi-line display posting area.
- OR -
14.21.2 [Select ICD9] allows the entering of the ICD-9 code to continue without choosing a replacement ICD-10 code.
- OR -
14.21.3 [Exit] to closes the selection box and returns to the <Diagnosis Code> field without making a selection.
14.22 PCM users only. As of version 15.06.10, after the ICD-10 is selected, if Intellect’s Utility --►Set Up --►Parameter <Update ICD10 Equivalent> field is set to ‘YES’, PCM tracks the usage for that code. Note: To enable this feature, the Utility --►Category <ICD10> field should also be set to ‘YES’ (the default) for the patient’s category.
14.23 The <Diagnosis Code> field is 40 characters to allow entry of ICD-10 codes or descriptions.
14.24 Information associated with each entered diagnosis code displays in the multi-line display area.

14.25 After entering the first diagnosis, continue entering diagnosis code(s), if appropriate.
14.25.1 Only the first twelve (12) diagnosis codes print on the CMS 1500 form in box 21 or the electronic equivalent.
14.25.2 When diagnosis lines exceed the maximum of 12 diagnoses and/or include diagnosis code(s) NOT related to this posting session, those diagnosis code(s) must be deleted. See Multi-line Display Posting Area option ‘D’ for more information.
14.26 Various pop up alerts may appear after entering a diagnosis code, as noted below. Click [OK] to return the focus to the <Diagnosis Code> field.
14.26.1 When an attempt is made to enter an ICD-9 code and an ICD-10 code during a posting session.
img src="image7707.gif" alt="" style="border: none;" border="0" />
For example, if during a visit an ICD-9 diagnosis code is posted, Intellect does not allow an ICD-10 diagnosis code to be posted in that same visit unless the previously-posted ICD-9 code is modified or deleted.
14.26.2 When Utility --►Diagnosis --►Diagnosis <Gender> is set to ‘F’ or ‘M’ and the patient’s gender on the Registration screen does not match.
Effective version 19.05.01: Since all diagnosis codes now being used are ICD10 and not ICD9, the program's pop-up message has been changed to:
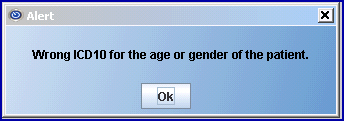
Versions prior to 19.05.01 display this message:
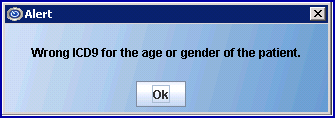
14.26.3 When the patient’s age is not within the Utility --►Diagnosis --►Diagnosis <Age From> and <Age To> range.
Effective version 19.05.01: Since all diagnosis codes now being used are ICD10 and not ICD9, the program's pop-up message has been changed to:
Versions prior to 19.05.01 display this message:

14.27 After the last diagnosis is posted, press [Enter] again to send the focus to the <Panel> field.
14.28 When the focus moves to the multi-line display posting area, diagnosis codes may be added, modified, or deleted before committing the charge. See Mutli-line Display Posting Area below for details.
Note 1: For offices using the Claim Scrubbing feature, we recommend the office always use the modify diagnosis feature. If an invalid diagnosis is deleted and another ICD10 code posted to replace it, the Claim Scrubbing feature still submits the deleted ICD10 code.
For offices who no longer want to allow operators to delete diagnoses, the security level can be increased for that task. The executable name for this task is: Charge/Modify/Delete.
WARNING: This executable restricts deleting the diagnosis, charge, and remark.
Note 2: If the Utility --►Diagnosis --►Diagnosis <ICD10 Code> is modified for an existing Diagnosis Code, the change is retroactive; i.e., modifying an existing Diagnosis Code changes ALL the diagnoses that have previously been used in the charge records. Instead of modifying an existing Diagnosis Code, it is suggested to ADD a new Diagnosis Code as a replacement for the one to be changed.
15.1 When posting charges, the Panel/Procedure Code is used to determine many aspects of the claim.
15.2 Enter the Utility --►Procedure --►Procedure <Panel Code>, OR type up to 6 characters of the description and press the [F2] key to display the Searching screen. To select the code from the list, either highlight the record and press the [Enter] key, OR double-click on the record. Alternately, after clearing the field, press the [F2] key twice to view the entire list of codes. For additional information on using Searching screens, see Introduction to Intellect --►Intellect Characteristics and Features, Searching Screen.
15.3 There may be multiple procedures (i.e., exploding) within one code, allowing the posting of more than one charge by continuing to press [Enter] through the fields until all procedures with this code are posted. See Utility --►Procedure --►Procedure <Number of Procedure> for additional information on bundled/exploding procedure codes.
15.4 As of January 1, 2017, PQRS was replaced by the Quality performance category under the Merit-based Incentive Payment System (MIPS), allowing 74 Quality Measures to be reported through claims submission. In conjunction with this change, the actual CPT Category II code(s) and/or HCPCS Level II code(s) used for reporting the Quality measures are referred to as Quality Data Codes (QDCs) in CMS documentation.
Effective version 17.06.09, when a charge is posted with a procedure code linked to Quality Data Codes (QDCs), there is now the ability to control which QDCs (also known as G codes) display on the Charge screen in the Multi-line display posting area, and are subsequently reported.
Note: QDCs must be set up in Intellect to enable this option. See set up details in Charges --►Specialty Charges --►Quality Payment Program 2017, Set Up for Claims-based Reporting in Intellect.
15.4.1 With either 'Manual' or 'Both' selected in the <Quality Data Codes Method> field on the Utility --►Setup --►Parameter screen, when a charge is posted with a procedure code linked to a QDC, a window pops-up on the Charge screen which allows the selection of which Intellect QDCs should be reported. For example:
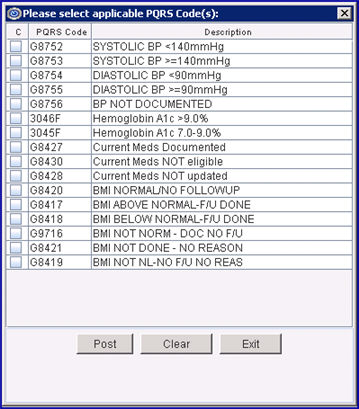
Click on each QDC that should be reported.
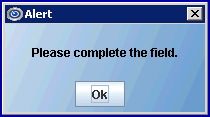
Note1: For the procedure to be posted, click on the box to the left of the procedure to display the ‘CHECK’ mark:  .
.
Note2: PCM posts the QDCs automatically.
[Post]: Click the [Post] button to include the selected QDC(s) on the multi-line display on the Charges --►Charge screen. For example, assume set up has been completed for panel code 99205. Entering 99205 on the Charge screen places 99205 on the multi-line display (see sample below) and pops up the window listing all the QDCs set up for 99205.

Click on the QDCs in the pop-up window ...
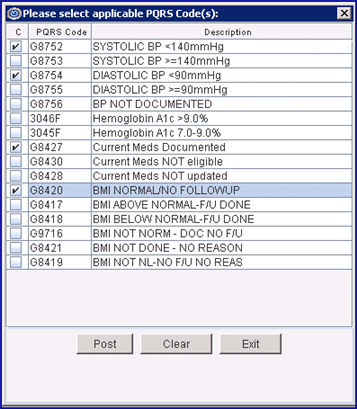
... and then click [Post] adds the QDC codes to the multi-line display:

[Exit]: Click [Exit] to close the screen without adding QDCs to the multi-line display.
[Clear]: If QDC codes have been selected; i.e., there is a check mark in the box to the left of the procedure, clicking [Clear] removes all selections/check marks from the screen.
Note: QDCs may be deleted on the Charges --►Charge Review screen.
15.5 Effective version 9.12.12, when a Panel/Procedure Code needs to be modified, delete the existing record and post the correct code.
NOTE: In regard to the Medicare E-Prescribing Incentive, G-codes (known as Quality Data Codes as of January 1, 2017) are entered in this field.
15.5 Effective Version 9.12.14 - New feature: Facility POS error checking.
15.5.1 During charge posting as of version 9.12.14, Intellect verifies whether or not the place-of-service (POS) code in the <Facility> field on this screen (as set up in Utility --►Facility --►Facility <Place of Service>) matches the POS for the <Panel> code, as selected in the Utility --►Procedure --►Procedure <POS> field. If the POS codes do not match, a warning message displays as shown below when [Enter] is pressed at the <Panel> code field:
Using the above example:
Facility entered (11) comes from the <Facility> field completed at the top of this (Charges --►Charge) screen.
Procedure (21) came from the <POS> field, which was added to the Utility --►Procedure screen in version 9.12.14.
For more information on setting up this feature, refer to <POS>.
15.6 Effective Version 9.12.14 - New feature: Alternate Procedure Codes
15.6.1 When a Procedure Code is being retired, Alternate Procedure code(s) may be set up to use in place of the retired Procedure Code. For example, if Procedure Code 99210 is a retired code, substitute codes such as 99211, 99212, 99213, 99214 and 99215 may be entered in the Utility --►Procedure --►Procedure <Alternate Procedure> field.
15.6.2 When posting Charges, if a Retired Procedure Code is entered, this message displays:

For more information on setting up this feature, go to <Alternate Procedure>.
15.7 Effective Version 13.10.29 - Authorized Services for company accounts. See Company Accounts for details.
16.1 The provider code entered above in the <Provider> field displays in this field.
16.2 Either accept the entry OR press [Spacebar] or [Backspace] to clear the field and enter a different code.
16.3 This field may not be blank. If no code is entered, an error message displays:
17.1 The Billing Prv code entered above in the <Billing Prv> field displays in this field.
17.2 Either accept the entry OR press [Spacebar] or [Backspace] to clear the field and enter a different code.
17.2.1 If an invalid Billing Prv code is entered, an error message displays.
17.2.2 Press [Enter] OR click on [OK] to return the focus to the <Billing Prv> field.
NOTE: When posting a procedure where Utility --►Procedure <Calendar Display> = 'Y' (yes), a calendar displays after the <Billing Prv> field is entered. This allows the selection of multiple days to apply the charge for this procedure. The 'Y' setting is used for procedures which commonly have recurring charges such as Dialysis Treatments, Allergy Injections, Physical Therapy, Hospital Visits, etc.
18.1 This field displays the scheduled dates of service (DOS) for offices using a Superbill.
18.2 If no Superbill is used, this field displays the current system date.
18.3 When entering a date later than the current system date, a warning displays:
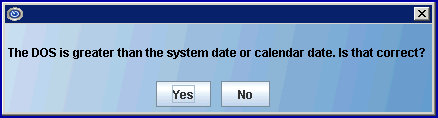
Select [Yes] to continue.
Select [No] to return the focus to the <From/Date> field.
18.4 Either accept the date OR press [Spacebar] or [Backspace] to clear the field and enter a different date.
18.5 Intellect uses these dates to complete CMS 1500 (HCFA) Box 24A:
![]()
Or CMS 1450 (UB-04) Box 45:
![]()
19.1 This field is used
• to indicate the end of a hospital stay.
• to post the same procedure to consecutive dates of service.
19.2 If the <From/ Date> equals the system date, then this field is disabled.
19.2.1 The <From/Date> field must be set to a date prior to the system date and the beginning DOS to enable this field.
19.3 This field also works in conjunction with the Utility --►Procedure --►Procedure <Global (Y/N/X)>, <Qty Calculation>, and <Charge Global> fields. See link for examples affecting <To>.
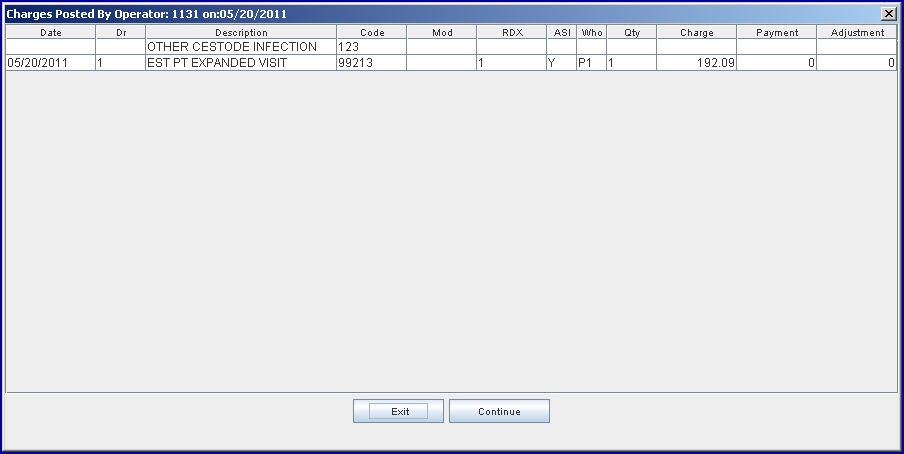
19.4 Effective version 9.12.08 New feature - When posting charges in Charges --►Charge, a pop-up displays when posting a duplicate charge. This feature works similar to the pop-up warning that displays for a duplicate entry in the <SB> field.
After filling the <Panel>, <From/Date>, and <To> fields, the system displays this pop-up message if a charge for the same Panel, DOS, and Provider were previously posted:

Click [Yes] to allow the operator to continue posting the service.
Click [No] to return the focus to the <Panel> field.
Click [View Charges] to display a screen with the previously posted charges. For example:
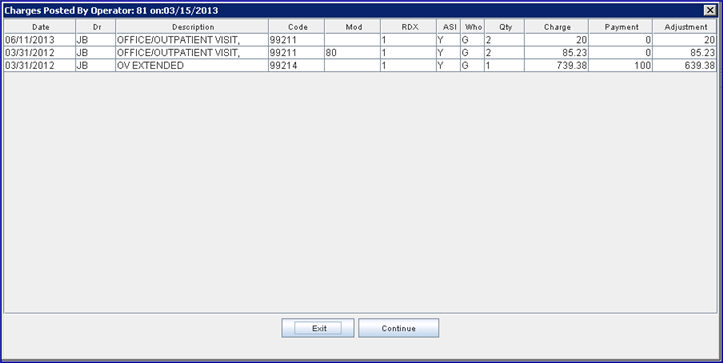
• Select [Exit] to return the focus to the <Panel> field.
• Select [Continue] to allow the operator to continue posting the service.
20. RDX 
20.1 This required field links the diagnosis code(s) related to the procedure line.
20.1.1 The L# (line number) displayed in the <Date/L#> column in the multi-line display posting area is used as the diagnosis pointer in the <RDX> field.
20.1.2 This field prints on the CMS1500 form in Box 24E or the electronic equivalent. NOTE: The numeric values (1 through 12) are converted to alpha characters (A through I) on the CMS1500 form.
20.2 Enter the L# for up to 4 diagnosis pointers separated by commas or periods but no spaces.
20.2.1 The default value is ‘1.’ Diagnoses are assigned an L# number in the order they are posted; i.e., the first diagnosis posted is always L# ‘1,’ the second diagnosis posted is ‘2,’ the third diagnosis posted is ‘3,’ etc.
20.2.1.1 NOTE: When a diagnosis is deleted from the multi-line display posting area, the remaining diagnoses are automatically renumbered based on entry order, so the <RDX> field may need to be updated.
20.2.2 Any combination of values between 1 and 12 are valid. For example, ‘1,2’ points to the diagnoses on lines one and two while ‘12’ points to the diagnosis on line twelve.
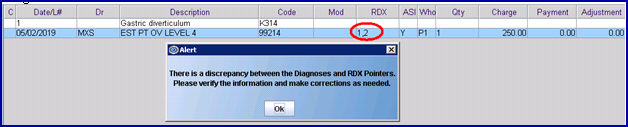
20.3 Press [Enter] to pop up a warning if the <RDX> field contains pointers for which there is no diagnosis with the associated L# or the pointer is greater than 12. In the example below, ‘1,2,3’ was entered in the <RDX>, but diagnosis codes are only listed on line numbers 1 and 2, so the warning displays:
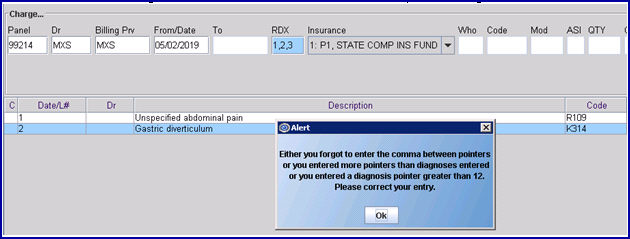
20.3.1 Click [Ok] to return to the <RDX> field and enter the appropriate diagnosis pointer(s).
20.4 When posting charges for a <Panel> with more than one procedure, the Utility --►Set Up --►Parameter <Pass Procedure> field determines whether or not the system should stop in the <RDX> field.
20.4.1 If the <Pass Procedure> field is set to 'No', Intellect stops on the <RDX> field for every procedure.
20.4.2 If the <Pass Procedure> field is set to 'Yes', Intellect stops on the <RDX> field for only the first procedure of the panel.
20.5 After charge posting is completed and [Commit All] or [Commit Charge] is selected, a warning pops up if the <RDX> field contains pointers for which there is not a diagnosis associated with the L#. For example, the <RDX> field is set to ‘1,2’ but there is only one diagnosis line listed.
20.5.1 Click [OK] to close the pop up and modify the <RDX> field.
21.1 The Utility --►Procedure <Hold(Y/N)> field must be set to 'Y' (yes) for the focus to stop here.
21.2 If the drop-down is enabled, a selection may be made of which patient's insurance carriers or cash patient (guarantor) to bill.
21.3 The order in which the patient's insurances display are:
• Active Primary Insurances, beginning with P1, then P2, then P3, etc.
• Terminated Primary Insurances
• Active Secondary Insurances
• Terminated Secondary Insurances
• Active Tertiary Insurances
• CASH
21.4 Effective Version 13.03.01: A <Pass Procedure> field was added to the Utility --►Set Up --►Parameter screen which determines whether or not the system should stop on the <Insurance> field when posting charges for a panel code with more than one procedure.
21.4.1 If the <Pass Procedure> field is set to 'No' (the default), Intellect stops on the <Insurance> field for every procedure.
21.4.2 If the <Pass Procedure> field is set to 'Yes', Intellect stops on the <Insurance> field for only the first procedure of the panel.
22.1 The primary use for this field is to place a hold on billing by entering a 'Y' in this field.
22.2 The Utility --►Procedure <Stop for Insurance> field must be set to 'Y' (yes) for the focus to stop here.
22.3 The default value depends on whether or not the patient has insurance and the value set in the patient's Utility --►Category <Responsibility (G/P/X)> field.
22.4 This field displays the selection from the previous <Insurance> field; however, pressing the [Spacebar] clears the field which allows a new value to be typed.
22.5 If an invalid entry is typed, Intellect displays an error message:
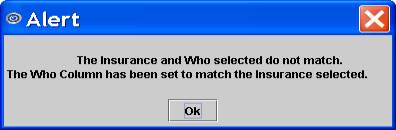
Select [OK] to return the focus to the <Who> field and resets the default selection.
22.6 Effective Version 13.03.01: A <Pass Procedure> field was added to the Utility --►Set Up --►Parameter screen which determines whether or not the system should stop on the <Who> field when posting charges for a panel code with more than one procedure.
22.6.1 If the <Pass Procedure> field is set to 'No' (the default), Intellect stops on the <Who> field for every procedure.
22.6.2 If the <Pass Procedure> field is set to 'Yes', Intellect stops on the <Who> field for only the first procedure of the panel.
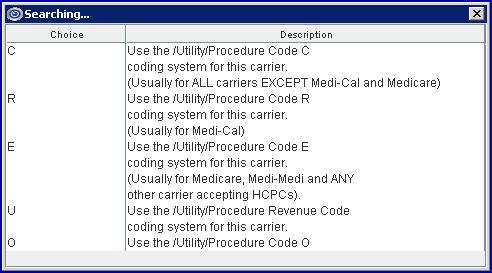
23.1 This field displays the Utility --►Procedure --►Procedure <Code R>, <Code C>, <Code E>, or<Code U> as requested in Utility --►Insurance --►Insurance <Code (R/C/E/U)>.
23.2 If the requested Utility --►Procedure --►Procedure <Code R or C or E> is blank, the focus moves to the next field without completing this field.
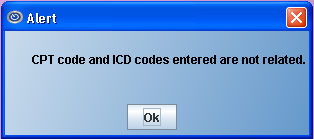
23.3 If the code entered in the <Diagnosis Code> field does not match the code entered in the <Panel> field, and if a 'Y' is entered in the <ICD Check> field on the Utility --►Procedure --►Procedure screen, a warning message displays:
24.1 The focus bypasses this field unless Utility --►Procedure --►Procedure <Stop for Modifier> = 'Y.'
24.2 If Utility --►Procedure --►Procedure <Modifier (Y/N)> = 'Y', then the modifier code(s), if any, are entered in the set up of Utility --►Procedure --►Procedure <Modifier R>, <Modifier C>, <Modifier E>, or <Modifier U> (dependent on Utility --►Insurance --►Insurance <Code R/C/EU>), and display in the <Mod> field.
24.3 Accept the default OR add a new code. For more details on Modifiers, see MODIFIERS in this documentation.
24.4 Effective Version 9.12.35: On the Charge screen and Charge Modify screens, the punctuation and spaces were removed from the Modifier Code. Also, if the Modifier Code is not valid, the system gives the option to edit or continue. Additionally, the system only accepts modifier codes that have 2, 4, 6, or 8 characters.
24.5 Effective Version 9.12.27: When posting charges, Intellect can send an alert when a Modifier is required for the posted procedure. The set up is located on the Utility --►Procedure --►Procedure screen in fields <Requires Modifier> and <Modifier (Y/N)>. This edit is dependent on the set up of the <Requires Modifier> and <Modifier (Y/N)> fields as noted below:
<Requires Modifier> = Y & <Mod Y/N> = N
When posting a charge where <Requires Modifier> is set to 'Y' (yes) AND <Stop for Modifier> = N (do not stop at modifier when posting), this message pops up as charge posting finishes:
In the message box, either type in the Modifier code OR search for the appropriate modifier by placing the cursor in the <Modifier> field and using the same searching steps used in other fields; i.e., type in part of the modifier description and press [F2], OR press the [F2] key twice for the entire list.
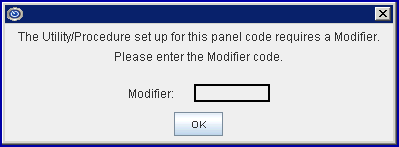
<Requires Modifier> = Y & <Mod Y/N> = Y
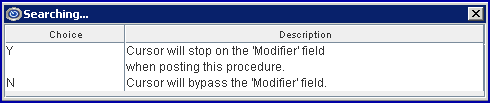
When posting a charge where <Requires Modifier> is set to 'Y' (yes) AND <Stop for Modifier> = Y (stop at modifier when posting), this message pops up when the focus reaches the <Mod> field:

Press [OK] and the focus returns to the <Mod> modifier code field.
Note: The <Requires Referring Prv> and <Requires Modifier> are both hard edits; i.e., a valid code MUST be entered to post the charge.
Reminder: If a Modifier Code, or set of Modifier Codes, is entered during charge posting and it is not set up in the Utility --►Procedure --►Modifier table, this message displays:
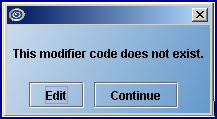
Click [Edit] to return the focus to the Modifier field.
Click [Continue] to continue posting with the Modifier Code(s) entered even though they are not in the Utility --►Procedure --►Modifier table.
24.6 Version 9.12.16 - Modification. In versions prior to 9.12.16, the program accepts any Modifier entered in the Charges --►Charge or Charges --►Modify screens, and does not validate the modifier code. Effective update 9.12.16, the program cross-checks the Modifier entered in Charges --►Charge and Charges --►Modify against the Utility --►Procedure --►Modifier table. If the Modifier is not set up in the Utility --►Procedure --►Modifier table, a warning message displays:
24.6.1 Click [Edit] to return to the Modifier field.
24.6.2 Click [Continue] to be able to post the Modifier entered even though it is not set up in Utility --►Procedure --►Modifier.
24.7 When two Modifiers for the same charge are entered, the combination needs to be entered in the Utility --►Procedure --►Modifier table; if not, a warning message displays.
NOTE: It is important to know that if the combination of two modifiers affect the charge; i.e., reduces the charge amount or should bill the Professional fee, etc., the combination must be set up in the Modifier screen. For example, if the patient is a high risk and the provider was the assistant surgeon, the office might bill with the combination of 2280. The Modifier Code 2280 must be set up in the Utility --►Procedure --►Modifier table for the system to calculate the assistant surgeon fee.
24.8 Effective Version 13.03.01: A <Pass Procedure> field was added to the Utility --►Set Up --►Parameter screen which determines whether or not the system should stop on the <Mod> field when posting charges for a panel code with more than one procedure.
24.8.1 If the <Pass Procedure> field is set to 'No' (the default), Intellect stops on the <Mod> field for every procedure.
24.8.2 If the <Pass Procedure> field is set to 'Yes,' Intellect stops on the <Mod> field for only the first procedure of the panel.
25.1 This field controls the assignment of benefits; i.e., whether or not to mark HCFA Box 27 as Yes or No. OnStaff defaults the value assigned to the patient in the patient’s primary insurance screen.
25.2 The focus bypasses this field if Utility --►Procedure --►Procedure <Assignment(Y/N)> = 'N'.
25.3 If Utility --►Procedure --►Procedure <Assignment(Y/N)> = 'Y' then the field may be modified.
25.4 Intellect completes Box 27 HCFA (CMS 15000) with the assignment designation.
![]()
26.1 This field is used to designate the quantity to be billed. The use might include multiple injections.
26.2 Depending upon the procedure (see Utility --►Procedure --►Procedure <Qty Calculation>), the system may or may not multiply the quantity by the charge amount.
26.2.1 The focus bypasses this field if Utility --►Procedure --►Procedure <Qty Calculation> = 'N'.
26.2.2 If Utility --►Procedure --►Procedure <Qty Calculation> = 'X' then Intellect multiplies the quantity times the charge amount.
26.2.3 Effective Version 12.12.06: After posting a charge on the Charge screen, if the <QTY> is modified, Intellect checks the <Global (Y/N/X)> and <Qty Calculation> fields on the Utility --►Procedure --►Procedure screen. If <Global (Y/N/X)> = Y, OR if <Global (Y/N/X)> = X and <Qty Calculation> = X, and the Panel Code is not an Anesthesia procedure, then changing the <QTY> changes the charge amount, approved amount, and cost for that charge record.
26.3 This field is also dependent on the value assigned to the procedure in <Global>.
26.4 Effective Version 13.03.01: A <Pass Procedure> field was added to the Utility --►Set Up --►Parameter screen which determines whether or not the system should stop on the <QTY> field when posting charges for a panel code with more than one procedure.
26.4.1 If the <Pass Procedure> field is set to 'No' (the default), Intellect stops on the <QTY> field for every procedure.
26.4.2 If the <Pass Procedure> field is set to 'Yes,' Intellect stops on the <QTY> field for only the first procedure of the panel.
27.1 The charge for this procedure, as previously determined, displays. This amount usually defaults from the Utility --►Procedure --►Procedure <Charge Global> field.
27.2 The focus bypasses this field if the Utility --►Procedure --►Procedure <Stop For Charge Amount (Y/N)> field is set to 'N' and thus the charge amount cannot be modified in this field.
27.2.1 The amount charged may be modified in the posting area by typing 'M' in the line command column of a procedure and then moving the focus to the <Charge> column.
27.3 When Fee Schedules are linked to the patient, the fee defaults from that table.
![]()
27.3.1 Press [Enter] one time to move the focus back to the <Panel>field where a new procedure may be entered.
27.3.2 Press [Enter] twice to move the focus to the Multi-line Display Posting Area Command Column.
27.4 Version 9.12.14 - New feature: Add CLAIM_REQUIREMENT screen. The purpose of this new feature is to alert the operator when additional information is required for a charge which may not have been entered in the Encounter record, or when an Encounter record has not been created.
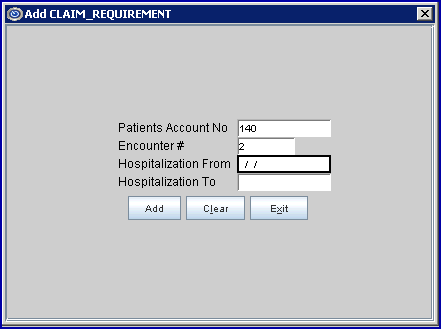
27.4.1 The Add CLAIM_REQUIREMENT screen is generated based on how the <Encounter Screen> and <Claim Requirement> fields on the Utility --►Procedure --►Procedure screen (effective version 9.12.14), Utility --►Facility (effective version 9.12.31), and Utility --►Category are set. An Add CLAIM_REQUIREMENT screen displays if a <Panel> code is entered that is missing information required for billing; i.e., Hospitalization From and To dates, Authorization Number, Unable to Work From and To dates, Related to Accident, etc.
27.4.1.1 If the Who is set to G, or if the patient does not have insurance, the program does not prompt for Claim Requirements.
27.4.2 Each office decides the requirements for the procedures they post. For example, if charges are posted for In-Patient Hospital visits, the Utility --►Procedure records for those CPT codes can be set up to prompt for the Hospital From date.
27.4.3 The Add CLAIM_REQUIREMENT screen always includes the <Patient Account No> and <Encounter #> fields. The remaining fields are dependent on what is required for the claim form (i.e., HCFA) and on the choices selected through the <Encounter Screen> field on the Utility --►Procedure --►Procedure and/or Utility --►Facility screen. In order for the claim to go through, the fields on the Add CLAIM_REQUIREMENT screen must be entered.
27.4.3.1 In the sample Add CLAIM_REQUIREMENT screen above, Hospitalization From and Hospitalization To were selected in the <Encounter Screen> field so those fields are included on the Add CLAIM_REQUIREMENT screen.
27.5 Version 9.12.14 - New feature: Global Period Warning. This is used for global follow-up care after a surgical procedure, or for procedures allowed only after a specified length of time. Examples would be if a mammography is only allowed once every 2 years, if a patient has an appendectomy and is required to come in for several follow-up appointments within 60 days of the operation, etc.
27.5.1 This feature is dependent upon the set up of the <Global F/U Days> and <Global Warning Y/N> fields added to the Utility --►Procedure --►Procedure screen in version 9.12.14.
27.5.2 Press [Enter] at the <Charge> field to display an Alert message if a charge is posted for a service that falls within the charge-exemption period:

27.5.3 Select from the available options:
[Continue Posting]: Click on this button to allow a charge to be posted for the patient. This is used if the patient comes in for an appointment that is not related to the original appointment for which the <Global F/U Days> field on the Utility --►Procedure --►Procedure screen was set. For example, if an appendectomy patient comes into the office within 60-days for a sprained ankle instead of follow-up for surgery, the patient is charged.
[Post Zero Charge]: Click on this button to continue posting the procedure code, but modifies the charge amount to zero for the procedure.
[Post Diff Procedure]: Click on this button to return the focus to the <Panel> field to allow the procedure code to be changed.
[View Last Surgery]: Click this button to allow the charge that was initially set up with a Global Period Warning to be seen.
[Exit]: Click this button to return to the Charges --►Charge screen.
Effective version 15.04.28 - Global Period Warning modification:
In updates prior to version 15.04.28, if a patient was seen by two doctors with different specialties (i.e., pain management vs. surgery), each specialty may have different global period rules and, therefore, both doctors may or may not be alerted when posting charges. As of version 15.04.28, the global period warning message is given only if the doctor who performed the procedure with the global warning period has the same taxonomy code as the doctor that visited the patient for the follow-up.
27.6 Effective Version 9.12.26: If in the middle of entering a charge, or modifying charge information, an attempt is made to click on the multi-line display area, this message displays:
Click on [OK] and press [Enter] through the remaining fields to save the change.
27.7 Effective version 9.12.31 - New Feature: Add CLAIM REQUIREMENT based on Facility requirements. New <Encounter> and <Claim Requirement> fields were added to the Utility --►Facility screen in order to expand the use of the Claim Requirements feature added in version 9.12.14 (see 27.4 above).
27.7.1 This feature may now be used as a reminder when posting charges of required Encounter information based on the Facility or Place of Service. For example,the <Encounter Screen> and <Claim Requirement> fields may be used to set up the Facility Code for a hospital so that the Claim Requirement screen pops-up on the Charges --►Charge screen if there is no Admission Date for the claim.
27.7.2 The set up for the feature works the same as the Claim Requirement for Procedure in version 9.12.14 (see 27.4 above). If there is a Claim Requirement set up for Facility, or Procedure, or both, the system asks for all required information at the same time - just after completing the charge row information. For additional information, please refer to the online documentation for the <Encounter Screen> and <Claim Requirement> fields in Utility --►Procedure --►Procedure or Utility --►Facility.
27.8 Effective Version 13.03.01: New '☐ Encounter Description' option added. Because most organizations rely on the description field to distinguish between encounters, the CLAIM_REQUIREMENT screen may include a field where a description of the encounter may be entered. Select '☐ Encounter Description' on the pop up generated by the <Encounter Screen> field on the Utility --►Procedure --►Procedure, Utility --►Facility, or Utility --►Category screens.
Multi-line Display Posting Area
The multi-line display posting area appears after pressing [Enter] with the focus in the Charge field. This area shows an itemization of information waiting to be committed:

Effective Version 9.12.28, the mouse can be used to select a line in the multi-line display, as is the case in Charges --►Modify.
Items in the multi-line display may be modified. Refer to these areas for additional information:
Multi-line display posting area column descriptions:
28. C (Command Column): Press [F2] with the focus in this column to display the Key's Help pop-up. Key's Help provides a list of the various actions that may be performed by entering the specified key in the 'C' Command Column.
29. Date/L#: When the record is a diagnosis, a line number is displayed (used to relate the diagnosis to the pointer). When the record is a procedure, the DOS displays.
30. Dr: This column displays the Provider of service, not the Billing Provider.
31. Description: This column displays the description of the Utility --►Procedure --►Procedure <Panel Description> or Utility --►Diagnosis --►Diagnosis <Description>.
32. Code: This column displays the billingUtility --►Procedure --►Procedure<Code R>, <Code C>, <Code E>, or <Code R> as requested in Utility --►Insurance --►Insurance<Code (R/C/E/U)>.
33. Mod: This column displays the attached modifier, if any.
34. RDX: This column displays the line order number of any attached diagnosis. If medication is added, that quantity displays in this column.
35. ASI: This column displays the Assignment designation: Y (yes) or N (no). Used only for procedures.
36. Who: This column displays the responsibility designation. See the <Who> field on this screen and the Utility --►Category <Responsibility (G/P/X)> field for additional information.
37. Qty: This field displays the quantity of procedures or number of units within a procedure. If this is a medication item, the column displays the refill amount.
Effective Version 12.12.06: After posting a charge on the Charge screen, if the <QTY> is modified, Intellect checks the <Global (Y/N/X)> and <QTY Calculation)> fields on the Utility --►Procedure --►Procedure screen. If <Global (Y/N/X)> = Y or, if <Global (Y/N/X)> = X and <QTY (Y/N/X)> = X, and the Panel Code is not an Anesthesia procedure, then changing the <QTY> changes the charge amount, approved amount, and cost for that charge record.
38. Charge: This field displays the dollar amount which is billed to the insurance. The Charge amount may be modified by pressing 'M' (Modify) at the command column. Press the [Enter] key until the focus is at the Charge column.
39. Payment: If a payment was collected at the time of service, it may be posted by pressing 'M' (Modify) at the command column. Press the [Enter] key until the focus is at the Payment column. If the charge is a ‘Capitated’ service and is adjusted off at time of posting charges, Intellect does not allow modification of this field.
40. Adjustment: If the charge is a ‘Capitated’ service and is adjusted off at time of posting charges, Intellect does not allow modification of this field.
For ease in using the multi-line display posting area, these short cut keys may be accessed by pressing [F2] with the focus anywhere on the multi-line display posting area. Remember that a line must be selected to perform an action.
Note: In addition to the options shown above, Q, U, and J are also valid
Specific information for each option is given below.
41. A: Type 'A' in the Command Column to move the focus to the Add Options section at the bottom of the screen, with the focus on the [Charge] button.

42.M: Type 'M' in the Command Column
• For a diagnosis line, the focus is moved to the <Diagnosis Code> field. Press the [Delete] key to remove the existing diagnosis, type the new/correct diagnosis, then press the [Enter] key.
• For a procedure line, modification is allowed for <Date>, <Dr>, <Mod>, <ASI>, <QTY>, and <Charge>,and the entry of a payment and/or an adjustment is allowed.
43. D: Type 'D' in the Command Column to allow the deletion of an entire line. When using the command line entry to delete, Intellect displays this message:
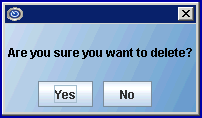
When a charge is deleted, the system deletes the next line, in addition to the charge, if that line is a remark.
Effective Version 9.12.27: If a diagnosis is deleted, the program now shows the renumbering of the diagnoses on the screen in the Date/L# column. Prior to this update, the L# for Diagnosis Pointer would show the original numbering. Refer to this example:
Originally 3 diagnoses were posted:

The second diagnosis, 836.0 TORN MEDIAL CARTILAGE, was deleted. What was originally L# 3 became L# 2:

44. [Esc]: Press [Esc] to display this message:
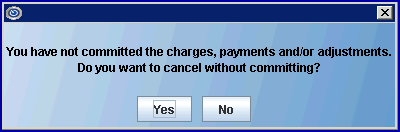
Select [Yes] to clear the screen and return the focus to the <Batch> field.
Select [No] to return the focus to the Command Column.
45. I: Type 'I' in the Command Column to move the focus to the <Diagnosis> field.
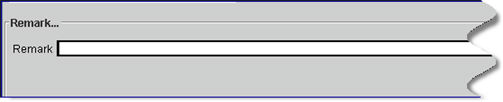
46. R: Type 'R' in the Command Column for the same result as a click on the [Remark] button in the Add Options section at the bottom of the screen; i.e., the area to add charges is replaced with a Remark area and the focus is in the <Remark> field. See the [Remark] button documentation for details.
47. H: Type 'H' in the Command Column to move the focus to the <Panel>field to add additional charges.
48. E: Type 'E' in the Command Column for the same result as a click on the [Medication] button in the Add Options section at the bottom of the screen; i.e., the area to add charges is replaced with the Medication area and the focus is sent to the <Code> field. See the [Medication] button documentation for details.

49. P: Type 'P' in the Command Column to move the focus to the Receipt box in the Post Options section.
50. C: Type 'C' in the Command Column to commit all charges, payments, and adjustments.
51. G: Type 'G' in the Command Column to commit Charges.
52. X: Type 'X' in the Command Column to display this message:
Select [Yes] to clear the screen and return the focus to the <Batch> field.
Select [No] to return the focus to the Command Column.
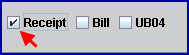
53. B: Type 'B' in the Command Column to check the Print box in the Post Options section.
54. T: Type 'T' in the Command Column to check the Receipt box in the Post Options section.
55. N: Type 'N' in the Command Column with a procedure highlighted to display the Information panel for that procedure:

Effective version 18.10.02 - Field modification:
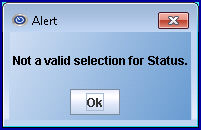
When the Information Panel is edited, Intellect checks the value entered in the <Status> field. The system displays the message shown below if any value other than A, C, P, or O are entered. If the <Status> field is left blank, Intellect restores the <Status> to its' previous valid value.
Note1: Some software versions differ in the order of the fields.
Effective version 12.12.14 - New fields:
<Cost>: The information for this field is pulled from the <Cost> field on the Utility--►Procedure--►Procedure screen. This field is also affected by the <Global (Y/N/X)> and <Qty Calculation> fields on that screen. For example, if <Global (Y/N/X)> = 'X' and <Qty Calculation> = 'X', or <Global (Y/N/X)> = 'Y', the <Cost> field on the information panel displays the amount of the <Cost> field on Utility --►Procedure --►Procedure screen multiplied by <Quantity> or <Days/Units>.
<Revenue>: This field pulls information from the <Revenue Code> field on the Utility --►Procedure --►Procedure screen.
Effective version 12.12.14 - Field change:
The <Panel Code> and <Payment Date> fields are now read-only.
Effective version 12.12.14 - Field removed
The <Billing Date> field was removed.
Note2: Attention: Changes may be made to the displayed information. Click on the field to change, type in the new values, and press [Enter] through the remaining fields to save the change. When the detailed information panel is no longer visible, then the changes have been saved, otherwise the field(s) reverts back to the data that was previously entered.
Effective version 12.12.14 - New button:
A [Save] button was added to the detailed information panel. Press the [Save] button to save changes made in the fields on this panel.
56. S: When an 'S' is entered on a line that has a charge, after the [Commit all] button is pressed a printer window pops up:

Click on [Print] to print a form.
57. Q: Type 'Q' in the Command Column to remove the current charges without committing and return the focus to the <Batch> field. Note: Q is not shown in Key's Help but is a valid option.
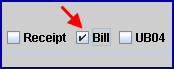
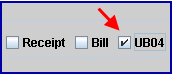
58. U: Type 'U' in the Command Column to check the UB04 box in the Post Options section. Note: U is not shown in Key's Help but is a valid option.
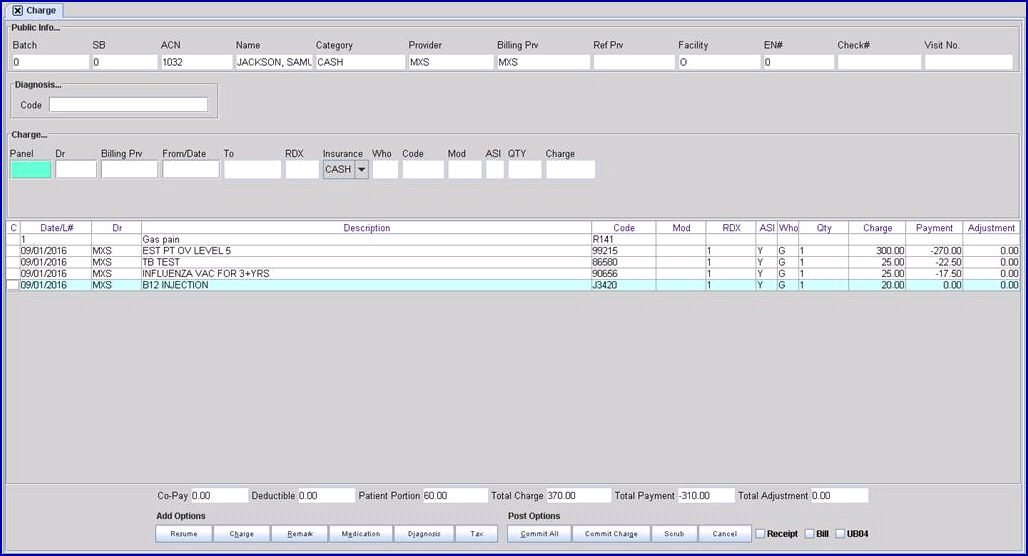
59. J: Effective version 16.10.11: Used to select multiple lines sequentially to apply one payment and/or adjustment amount. Type 'J' in the Command Column to display:
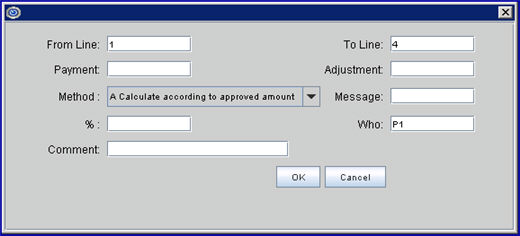
J Option pop-up screen field definitions:
59.1 <From Line>: This defaults to the line number of the selected line. Keep the defaulted number, OR enter the beginning number of the range.
59.2 <To Line>: Enter the ending number of the range.
59.3 <Payment>: Fill as desired/needed.
59.4 <Adjustment>: Fill as desired/needed.
59.5 <Method> is selected from the drop-down list:
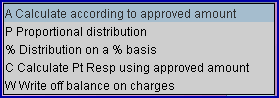
See notes below for guidelines for each method when using the J (jump) option:
a. A Calculate according to approved amount: This option is NOT recommended if a fee schedule with approved amounts is not set up. Please note:
• Payments are distributed to the first line, based on the approved amount, then the next line until the total payment amount is distributed.
• If a fee schedule was NOT set up, the charge amount is used as the approved amount.
• If the <Adjustment> amount entered is greater than the difference between the <Charge> and the approved amounts, the adjustment is posted to the last line.
Example:


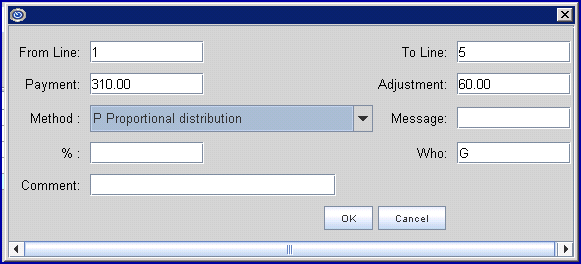
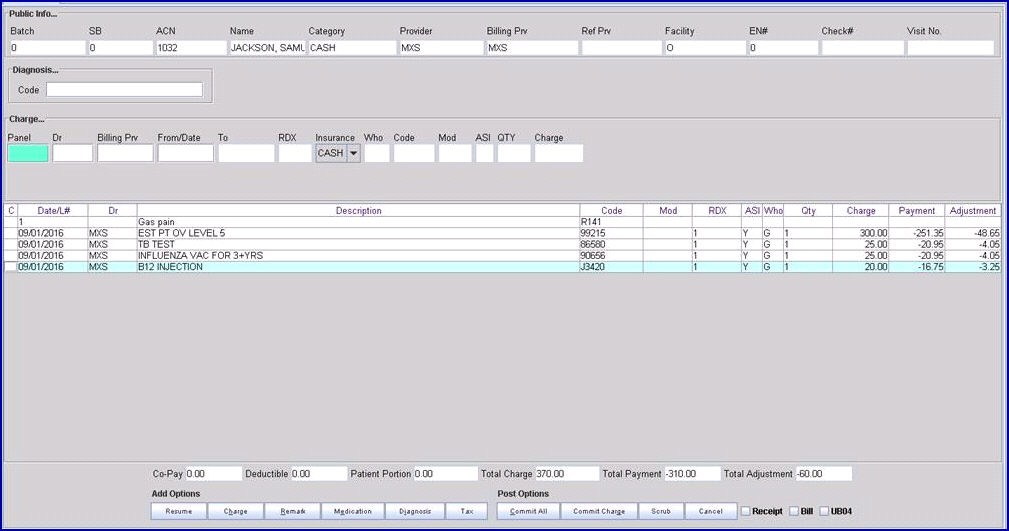
b. P Proportional distribution: This is most likely the option that will be selected to post the patient/payments/adjustments.
Example:
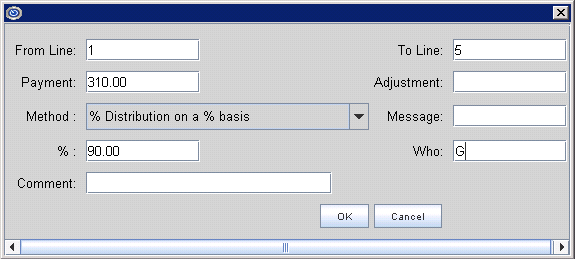
c. % Distribution of a % basis: This option is NOT recommended if a fee schedule with approved amounts is not set up. Please note:
• Payments are distributed to the first line based on a percentage of the allowed amount, then the next line until the payment is posted.
• If a fee schedule was NOT set up, the charge amount is used as the approved amount.
• If the <Adjustment> amount entered is greater than the difference between the <Charge> and approved amounts, the adjustment is posted to the last line.
• The <%> field must be filled.
Example:
d. C Calculate Pt Resp using approved amount: This option is NOT recommended if a fee schedule with approved amounts is not set up. Please note:
• The entire payment is posted to the last line
• <Adjustment> field is left blank
Example:


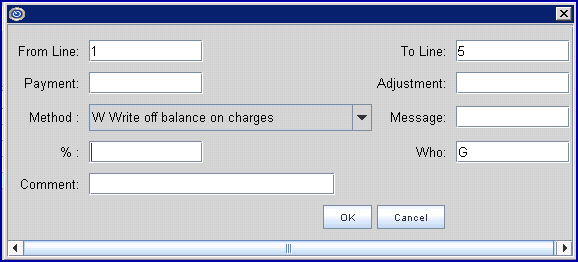
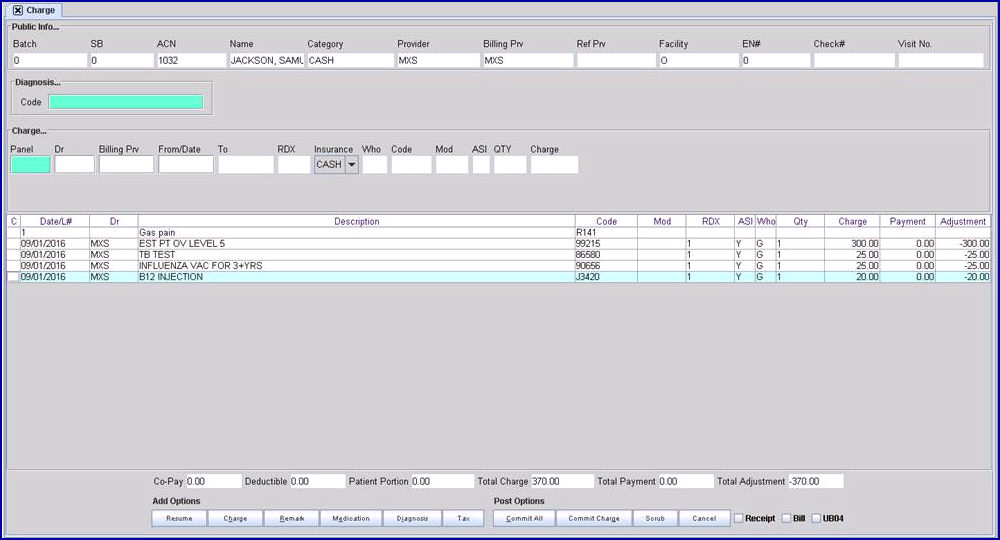
e. W Write off balance on charges: This option writes off the balances for the <From Line> and <To Line> range. Please note:
• <Payment> and <Adjustment> are left blank
Example:
J Option pop-up screen field definitions continued:
59.6 <Message>: Fill as desired/needed.
59.7 <%> requires an amount if '% Distribution on a % basis' is selected for the <Method>.
59.8 <Who>: Fill as desired/needed.
59.9 <Comment>: This <Comment> field provides an area in which to type an appropriate comment up to 40 characters in length. This <Comment> field works the same as the <Comment> field displayed in the Payment --►Open Item screen in that it provides an area in which to type an appropriate comment. Dependent upon the Utility --►Set Up --►Parameter <Payment Comment on Stmt> option selected, the Comment may be printed on patient statements.
This comment is displayed in the patient’s Accounting and Open Item Ledger under the Payment History. It is not displayed in the Charges --►Charge or Payment --►Open Item Comment column after clicking the [OK] button.
Click [OK] after completing the necessary fields.
Intellect applies the payment amount for the sequential lines selected.
In the Multi-line display posting area, right-click in a highlighted field to display the Context Menu with additional options:
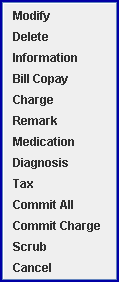
60. Modify: Results are the same as typing 'M' in the Command Column; i.e., it allows modification of a diagnosis or procedure line.
61. Delete: Results are the same as typing 'D' in the Command Column; i.e., it allows the deletion of an entire line. See 'D' for more information.
62. Information: Results are the same as typing 'N' in the Command Column; i.e., with a procedure highlighted, Intellect displays the Information Area for that procedure. See 'N' for more information.
63.Bill Copay*: Effective version 9.12.32 - New Option. As of version 9.12.32, it is now possible to bill patients for unpaid co-pays using the new Bill Copay option on the context (right click) menu. This can be used if a patient has a co-pay, as indicated on the Charges --►Charge screen (an example of a $10.00 co-pay is shown below), but does not pay it at the time of his/her appointment.
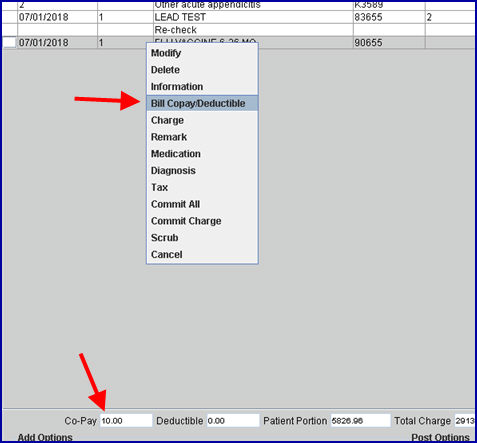
Highlight the line with the charge and click on the Bill Copay option to tag the co-pay amount, add the co-pay amount to the billing statement, and identify it as 'Co-payment Due' on the statement.
* Effective version 15.03.10: The name of this option was changed to Bill Co-pay/Deductible.
Effective version 15.03.10: After a charge is selected on the multi-line display posting area, when 'Bill Co-Pay/Deductible' is chosen from the right-click/context menu, a window pops up with 3 fields: 'Expected Co-Pay', 'Expected Deductible', and 'Expected Co-Insurance' (see below).
<Expected Co-Pay>: If payment on the selected charge is 0.00 (see below), <Expected Co-Pay> defaults to the co-pay from the patient insurance screen. If there is a payment on that charge, the default value for <Expected Co-Pay> is 0.00.
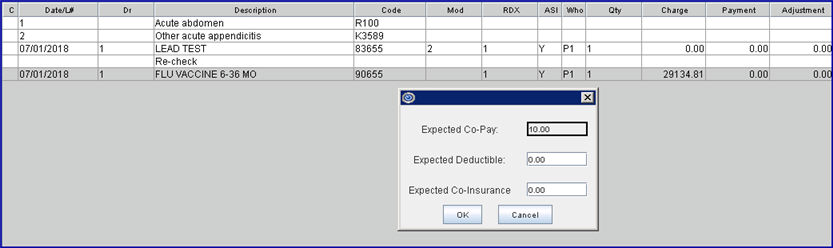
When printing statements, if there is a charge with Who other than ‘G’ which has any of the <Expected Co-Pay>, <Expected Co-Insurance>, or <Expected Deductible> fields filled, Intellect prints a charge line on the billing statement labeled "Co-payment/Deductible due" which displays the total and description of those amounts.
<Expected Deductible>: The amount expected to go toward the deductible may be entered here, as applicable.
<Expected Co-Insurance>: If the patient does NOT have a secondary insurance, and the clinic knows how much the patient will have to pay, the payment amount is entered here. If the clinic does not know how much the patient will have to pay after the insurance pays, this field should be left blank. If the patient has a secondary insurance, nothing should be entered in this field.
64. Charge: Results are the same as clicking the [Charge] button in the Add Options section at the bottom of the screen; i.e., the focus is sent to the <Panel> field in the Charge area.
65. Remark: Results are the same as clicking on the [Remark] button in the Add Options section at the bottom of the screen; i.e., an area to add charges is replaced with the Remark area and the focus is in the <Remark> field. See the [Remark] button documentation for details.
66. Medication: Results are the same as clicking on the [Medication] button in the Add Options section at the bottom of the screen; i.e., an area is displayed in which to input medications for prescriptions.
67. Diagnosis: Results are the same as clicking on the [Diagnosis] button in the Add Options section at the bottom of the screen; i.e., selecting Diagnosis returns the focus to the <Diagnosis Code> box to add another diagnosis.
68. Tax: Results are the same as clicking on the [Tax] button in the Add Options section at the bottom of the screen; i.e., selecting Tax inserts the Sales Tax charge in the multi-line display posting area.
69. Commit All: Results are the same as clicking on the [Commit All] button in the Post Options section at the bottom of the screen; i.e., selecting Commit All commits all of the information. It is essential to commit if saving.
70. Commit Charge: Results are the same as clicking on the [Commit Charge] button in the Post Options section at the bottom of the screen; i.e., selecting Commit Charge commits only charge information.
71. Scrub: Results are the same as clicking on the [Scrub] button in the Post Options section at the bottom of the screen; i.e., selecting the Scrub button causes an XML file to be submitted to the vendor via sftp (secure file transfer protocol), and a file returned with any errors. For additional information on Claim Scrubbing, refer to the documentation under Charges --►Claim Scrubbing Feature.
72. Cancel: Results are the same as clicking on the [Cancel] button in the Post Options section at the bottom of the screen.
Effective version 17.06.09, when a charge is posted with a procedure code linked to Quality Data Codes (QDCs), which QDCs (also known as G codes) display on the Charge screen in the Multi-line display posting area and are subsequently reported can be controlled. QDCs must be set up in Intellect to enable this option. See set up details in Charges --►Speciality Charges --►Quality Payment Program 2017, Set Up for Claims-based Reporting in Intellect.
Summary Area in the Bottom Region of the Screen

1.1 Amounts are populated from the Patient’s Insurance Registration screen reflecting the value of the <Co-Payment> and <Deductible Met>.
2. Patient Portion 
2.1 Automatically computed by Intellect using pay plan percent configuration from the Patient Insurance <Pay Plan> field for the current insurer or the default plan selected in the Utility --►Set Up --►Parameter <Default Pay Plan> field. See example below. If neither Pay Plan is set, this field value is zero.
![]()
3. Total Charge 
3.1 The total of all charges posted for this patient in this session.
4. Total Payment 
4.1 The total of any payments added in the posting area in this session.
5.1 The total of any adjustments added in the posting area in this session.

Note: Except for the [Resume] and [Tax] buttons, these buttons may also be selected from the keyboard by typing the underlined letter on the button after highlighting the appropriate line on the multi-line display. For example, to add a remark for a procedure, highlight the procedure and then type the letter R (it does not matter if the R is upper or lower case).
1. [Resume]: Effective Version 12.12.06. When modifying a line, click on the column to be changed to disable all the buttons except [Resume] and [Cancel] until the change is completed. Once the change is entered, click on [Resume] to save the change and enable the other buttons. This differs from the 'M' (modify) option in that if a change is made using modify, other entries may be made that causes the change to be lost. Use the [Resume] option to prevent other changes from being made until the [Resume] button is clicked.
For example: To enter or change a Payment, Who, or any other field related to a highlighted line item, simply click on that column (disabling the buttons at the bottom of the screen), enter the change/addition, and then click on [Resume] to save the change and re-activate the buttons/options at the bottom of the screen.
2. [Charge]: Click this button, OR type 'h,' to send the focus to the <Panel> field in the Charge area.
3. [Remark]: Highlight the procedure with which to associate the remark, then click this button (or type 'R') to display the <Remark> field.
3.1 Type a remark OR press [F2] to search for a pre-loaded remark in Utility --►Messages --►Message.
3.2 This field prints above the procedure in Box 24 on the CMS 1500 form or electronic equivalent.
3.3 Note: Characters such as *, :, ~, /, \ may not be used in remarks.
4. [Medication]: Click this button, OR type 'e,' to add an area in which to input medications for prescriptions.
4.1 Medications are added and maintained in Utility --► Procedure --►Medication.
4.2 Version 9.12.10 - New Feature - In versions prior to 9.12.10, before posting a Medication, a diagnosis or charge has to be posted first. In version 9.12.10 or later, a Medication may be posted without entering a diagnosis or charge first.
Code: Type the medication code. Use [F2] to search to find the available options.
DOS: Date of service is defaulted from current system date.
Dosage: Displays the value from Utility --►Procedure --►Medication <Usual Dosage> field. This field may be modified here.
QTY: Type the quantity for the medication as desired.
Ref: Refills allowed default from medication set up; the quantity may be added or modified in this field.
Remark: Information entered here displays in and on any printed prescription.
5. [Diagnosis]: Click this button, OR type 'i,' to return the focus to the <Diagnosis Code> box to add another diagnosis.
5.1 Effective version 9.12.08 - New Feature - A Diagnosis Code may be modified.
Note: If an office is using the Claim Scrubbing feature, PCS recommends the office always use the modify diagnosis feature. If an invalid diagnosis is deleted and another ICD10 code posted to replace it, the Claim Scrubbing feature still submits the deleted ICD10 code.
If an office no longer wants to allow operators to delete diagnoses, the security level can be increased for that task. The executable name for this task is: Charge/ Modify/Delete.
WARNING: This executable restricts deleting the diagnosis, charge, and remark.
5.1.1 To modify a diagnosis from the Command Column, press the letter M (modify); the focus moves to the <Diagnosis> field.
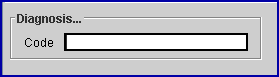
5.1.2 Press the [Delete] key to remove the existing diagnosis, type in the new/correct diagnosis, then press the [Enter] key.
6. [Tax]: Effective version 9.12.18 New Feature: Click this button to insert the Sales Tax charge in the multi-line display posting area.
Depending on the type of practice, products and supplies may be available for patients to purchase which are taxable. For example, dermatology supplies, prenatal vitamins, hearing aide batteries, etc. With minimal set up, Intellect can now calculate the sales tax. This feature needs to be set up before it can be used:
a. Go to Utility --►Procedure and set up an ST (sales tax) Procedure/Panel code as shown below, making sure to fill in the <Panel Code>, <Panel Description>, <Code R>, <Code C>, <Code E> and <Description> fields, which are mandatory.

b. On that same screen, go to the  field and enter the tax percentage (e.g., 8.75). This should be done for each procedure code that may be taxed.
After posting the charges as usual, and before pressing the [Commit] button, click on the [Tax] button. The Sales Tax is inserted, as shown below. Also notice in our example we posted charges for 2 separate providers and the sales tax is calculated and auto-posted separately as well:
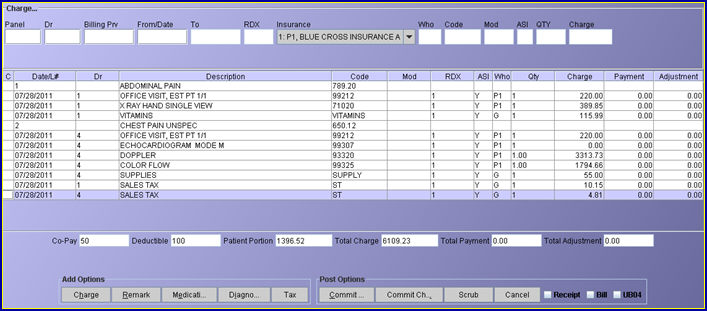

1. [Commit All]: Click this button to commit all info. It is essential to commit if saving. This button should be used when there are payments on the screen.
Effective version 13.12.12 - New Feature: Per this software version, when a check number is entered but a payment is not entered before pressing [Commit All], Intellect displays the message:
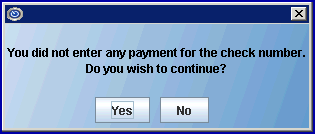
• Select ‘Yes’ to continue posting charges without entering a payment.
• Select ‘No’ to enter a payment amount before posting charges.
2. [Commit Charge]: Click this button to commit only charge information.
Effective version 9.12.18 - New Feature: Warning Message: If the charges entered are linked to an Encounter, and if at the time of committing the charges the number of visits authorized has been exceeded, this warning displays:
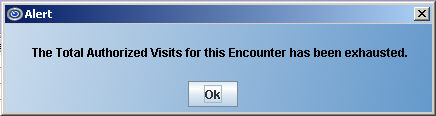
Before billing for charges, verify if the Encounter linked to the charges is correct, or if an Encounter needs to be added or modified in Charges --►Modify.
3. [Scrub]: Effective version 9.12.1 - New Option: Once Claim Scrubbing is set up, click this button to submit an XML file to the vendor via sftp (secure file transfer protocol), and a file returned with any errors. For additional information on Claim Scrubbing, refer to the documentation under Charges --►Claim Scrubbing Feature
Note: In regard to End of Day Procedures, a pre-billing report should be used instead of using the [Scrub] button.
4. [Cancel/Exit]: Click this button to display this error message:
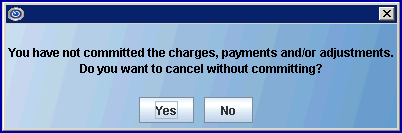
4.1 Click [Yes] to clear the screen and return the focus to the <Batch> field without committing.
4.2 Click [No] to return to the filled-in screen.
NOTE: When posting charges or payments, the Patient Registration (Worker or Regular) Add or Modify screens must be closed or an error occurs.
5. Receipt check box 
5.1 Check this box to allow a receipt to print after clicking on either [Commit All] or [Commit Charge].
5.2 Effective version 12.12.14: Receipts may be printed for patients regardless of the account balance. For example, receipts print whether the patient pays off the entire balance, or whether the patient makes a partial payment toward the balance.
6. Bill check box 
6.1 Check this box to allow a bill to print after clicking on either [Commit All] or [Commit Charge].
6.2 Effective version 9.12.18 - New Feature: The program has been modified so it prints the claim form when the Bill check box is selected when the Who is 'G', provided the patient has a current primary insurance. In software versions prior to 9.12.18, the Bill check box was not intended or programmed to print the claim form from the Charges --►Charge screen when the Who column was set to 'G', regardless if a patient payment was or was not posted.
7. UB04 check box 
7.1 Check this box to allow a UB04 to print after clicking on either [Commit All] or [Commit Charge]. Do not check UB04 if the claims are going to be printed or transmitted at the end of the day.