
Intellect™
UTILITY MENU OPTIONS

Messages
Message
The Intellect program includes an assortment of letters and messages. The Message option is used:
• to add to and maintain the existing library
• to set up codes to trigger the generation of, or print on, various forms
• to create and store the text of messages and letters
Video Available: Click Recall Letter Setup to access the link. Depending on the system set up, the media player may need to be activated. Speakers need to be attached to the workstation to hear the instructions.
Note: To view the videos, log-in through the www.primeclinical.com website. Current support is required.
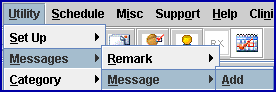
1. To add a Message Code in Intellect, go to Utility --►Messages --►Message --►Add:
The Add MESSAGE screen displays:

Since Message Codes are used for different purposes in Intellect, this documentation begins with general instructions and then includes information specific to different places where Message Codes are used. Follow the applicable directions:
Send Recall Letter for a Diagnosis/Procedure Code
Dispute Resolution Request Form
DWC Independent Bill Review Form
For additional information on entering the actual message, see 3. Message Text below.
2.1.1 Enter the user-defined code to identify the message. Up to 6 letters or numbers may be used.
2.1 2 When entering comments, the word 'TODAY' may not be used in all capital letters as that format is reserved for programming; however, it may be entered as 'today' or 'Today.'
2.1.3 This field is mandatory and must be completed. If left blank, an error message displays:
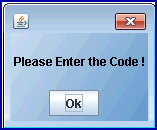
Press the [OK] button to return to the <Message Code> field.
2.2.1 In some instances, to utilize a message, letter, or comment, a Utility --►Messages --►Remark must be attached by using the same <Remark Code>. In other words, to attach this message to a Remark, the <Message Code> must be the same as the <Remark Code>. See Utility --►Messages --►Remark <Remark Code> for additional information.
2.3 Send Recall Letter for a Diagnosis/Procedure Code
Effective version 16.02.22, a recall letter may be automatically sent to all patients for whom a particular diagnosis or procedure code is posted in Charges --►Charge. This feature is most useful for annual or biannual appointments/tests such as a general adult medical exam (diagnosis code Z0000) or a CBC blood test (procedure code 85024).
2.3.1 Set up is required before a recall letter is automatically sent.
For example, to send a recall letter to all patients for whom a diagnosis code of Z0000 is posted:
• On this screen, enter Z0000 in the <Message Code> field and type the body of the recall letter in the large area on the screen.
• Go to the Utility --►Messages --►Remark screen. Enter the diagnosis code (for example, Z0000) in the <Remark Code> field, enter a short concise description of the recall letter in the <Description> field, and select ‘R’ from the drop-down list for the <Remark Type> field.
• Go to the Utility --►Diagnosis --►Diagnosis screen and enter the diagnosis code (for example, Z0000) in the <Diagnosis Code> field. In the <Recall in Month(s)> field, use the drop-down list to select when the patient should receive the recall letter; i.e., select 11 if a recall letter should be sent 11 months after the patient's charge with the Z0000 diagnosis code was posted. Once set up, patients for whom a diagnosis or procedure code are used receive a recall letter in the number of months indicated in the <Recall in Month(s)> field.
Note: For recall letters for a procedure code, go to Utility --►Procedure --►Procedure and set up the <Panel Code> and <Recall in Month(s)> fields, following the guidelines indicated above for diagnosis codes.
2.3.2 This feature is NOT retroactive.
2.3.3 This type of recall letter does NOT require set up on the Schedule --►Recall screen.
2.4 DWC Second Bill Review form
Effective version 14.04.15, when setting up a <Message Code> for use with a 2-page DWC Second Bill Review form:
2.4.1 Codes must start with SBR to display a description in the section titled "Reason for Requesting Second Bill Review and Description of Additional Supporting Information/Documentation" on the Second Bill Review form.
2.4.2 Codes may be numbered from 1 - 999; i.e., SBR1, SBR2, SBR3 ... SBR999.
2.4.3 The description of the SBR code should include details of why the appeal should be made. The length of the description is limited only by the space allotted on the SBR form itself.
2.5 Dispute Resolution Request form
Effective version 16.02.22, a Dispute Resolution Request form was added for use by the office to dispute payments or underpayments. Before a dispute resolution form may be requested via the <Form Type> on the Billing --►Insurance --►Batch of Patients screen, each provider for whom a dispute resolution form is generated must have his/her own unique PDR message code set up on this screen.
2.5.1 Codes must start with PDR and not exceed 6 characters or numbers.
2.5.2 Special characters such as *, -, &, etc. may not be used.
2.5.3 A space is optional between the letters PDR and the remainder of the code.
2.5.4 It is suggested that a logical format should be used when setting up multiple providers in a clinic so that codes may be easily remembered. For example, using each providers' initials such as PDREFG for Dr. Evan F. Green, and PDRRST for Dr. R. Sally Thomas.
2.5.5 When requesting a Dispute Resolution Request form, the appropriate PDR code must be added in the Message column on either the Payment --►Open Item screen or the Ledger --►Open Item screen for the charge/payment in dispute.
2.5.6 For codes beginning with PDR, the text entered in the large white portion of this screen displays in the field labeled 'Description of Dispute' on the Provider Dispute Resolution Request form. This field can only display four lines of text.
2.6 DWC Independent Bill Review Form
Effective version 16.02.22, the DWC Request for Independent Bill Review (DWC Form IBR-1) was added as an option to print from the Payment --►Open Item screen when the <Message> field begins with ‘IBR’ and Independent Bill Review selected at the bottom of the screen. If an ‘IBR’ code set up in Utility --►Messages --►Remark and Utility --►Messages --►Message is entered in Payment --►Open Item <Message>, then the Utility --►Messages --►Message description prints in the ‘Reason for Disputing Reduction or Denial of Full Payment’ field on the IBR form.
2.6.1 Codes must start with ‘IBR’ to print a description in the section titled ‘Reason for Disputing Reduction or Denial of Full Payment’ on the Independent Bill Review form.
2.6.2 Codes may be numbered from 1 through 999; i.e., IBR1, IBR2, IBR3 … IBR999.
2.6.3 The message text for the IBR code should include a detailed reason for disputing the payment or denial. The length of the description is limited only by the space allotted on the IBR form itself.
3.1.1 When typing a message, keep in mind that when generating the message the program looks for the end of the word to determine when to drop the message text to the next line. For this reason, a long string of characters without a space, such as a line of asterisks (******), causes statements to not print as the program does not know where to stop the message line.
3.2.1 Effective version 13.06.24, a Text to Voice message option was added to the drop-down list for the <Print Type> fields on the Schedule --►Recall --►Print --►Batch of Patients/Group of Patients screens. Twilio reads the message indicated in the <Remark Code> field, as set up in Utility --► Messages --►Remark and entered here in Utility --►Messages --►Message.
Text to Voice messages may be in any language that Twilio supports. As of 06/2013, English, Spanish, French, and German are supported. To send a message in a language Twilio does not support, the message needs to be recorded in MP3 file format and sent using the Voice Message option on the <Print Type> fields' drop-down list.
Note: For this option to work, offices must have a Twilio account, and Twilio must be set up in Intellect. To open a Twilio account, go to www.twilio.com. See Voice Message Set Up (sections A and B) for additional information.
Text To Voice sends a voice message to patient(s) selected in the <Account No> field on the Schedule --►Recall --►Print --►Batch of Patients or Group of Patients screens. Text to Voice messages are sent based on selected criteria; if the criteria are not met, the message is not sent.
Enter the Text to Voice message in this field, keeping the following in mind:
3.2.1.1 The Text to Voice message may include database fields like PA_ACCOUNT, or PA_FIRST_NAME, with the following format: %{DB_FIELD}. Intellect replaces the database field with the appropriate value to personalize the message for each patient. See 3.2.1.4 for a complete list of available database fields.
For example, if the following message was typed in Utility --►Messages --►Message, when the message is read by Twilio, the data base fields in the message would be replaced by the actual name of the patient and the date of his/her next scheduled appointment:
Hello %{PA_FIRST_NAME}. This is just a reminder that your next appointment is scheduled for %{NEXT_APP}.
Note: It is recommended that the message be typed in lowercase.
3.2.1.2 Since Utility --►Messages --►Message does not have right-click capability to add database fields, if typing messages that way is preferred, type the message in the <Message> field on the Management --►Letters --►News Letter screen and then copy/paste it into the Utility --►Messages --►Message screen.
Note: Different database fields are available for Utility --►Messages --►Message and Management --►Letters --►News Letter. A complete list of available database fields for Utility --►Messages --►Message is in section 3.2.1.4.
3.2.1.3 Current recall letters may be used as templates for personalized messages. Simply copy and paste the desired recall letter to personalize and insert the appropriate database fields.
For example, if the recall letter for <Remark Code> RC9 was:
We have been unable to reach you in regards to your recent laboratory results received in our office.
Please contact our office at your earliest convenience to make an appointment to discuss these results with your doctor.
We look forward to hearing from you.
A <Remark Code> of TRC9 could be set up (with 'T' indicating it is a Text to Voice template), then, using TRC9 in the <Message Code> field of Utility --►Messages --►Message, a copy of RC9 could be pasted in and personalized with database fields as follows:
,,,,,,Hello %{PA_NAME} We have been unable to reach you in regards to your recent laboratory results received in our office.
Please call our office at %{CL_PHONE} at your earliest convenience to make an appointment to discuss these results with your doctor.
We look forward to hearing from you.
3.2.1.4 The database fields on the table below may be used in Utility --►Messages --►Message.
Note: The column on the left shows the field name as displayed on Intellect's Add Patient screen. The column on the right shows the same field as recognized by the Intellect program.
To request information for the field shown on the left, the information shown on the right should be entered, enclosed in brackets, and preceded by %. For example, to include in the message the patient's first name as displayed in the <First Name> field on the Add Patient screen, enter %{PA_FIRST_NAME} in the message.
|
Field Name |
Intellect Database Field |
|
<Patient Account No> |
PA_ACCOUNT |
|
<DOB> |
PA_DOB |
|
<Prefix> |
PA_TITLE |
|
<Last Name> |
PA_LAST_NAME |
|
<First Name> |
PA_FIRST_NAME |
|
<Middle Initial> |
PA_MIDDLE_INITIAL |
|
Next Appointment Date * |
NEXT_APP |
* When %{NEXT_APP} is used in the message, Intellect replaces it with the patient's next scheduled appointment.
Text to Voice messages may be used in automation too. To have messages automated, please contact Prime Clinical Support.
4. Select one of the following options:

4.1 Click [Save] (or [F4] if using the keyboard) to save the text, but not clear or exit.
4.2 Click [Clear] (or [Esc] if using the keyboard) to clear all information and return the focus to the <Message Code> field without saving changes.
4.3 Save before clicking [Exit] to clear the screen and return the focus to the main Intellect screen.
Select [Exit] without saving to display this message:
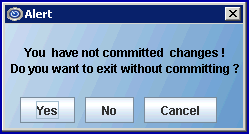
4.3.1 Click [Yes] to close the screen and return the user to the main Intellect screen without saving changes.
4.3.2 Click [No] to save changes, close the screen, and return to the main Intellect screen.
4.3.3 Click [Cancel] to close the screen and return to the main Intellect screen without saving changes.