Intellect™
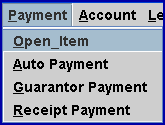
PAYMENT MENU OPTIONS

Open Item
This menu option allows the manual posting of payments and adjustments to patients' accounts.
Videos Available: Click Payment Open Item Part 1 Basics and Payment Open Item Part 2 Advanced to access the links. Depending on the system set up, the media player may need to be activated. Speakers need to be attached to the workstation to hear the instructions.
Note: To view the videos, log-in through the www.primeclinical.com website. Current support is required.
Get up-to-speed with one of our webinars/workshops. For more information, contact PCS support.
In this Topic Hide
1. To manually post payments to a patient's account in Intellect, go to Payment --► Open Item
The Payment screen displays:
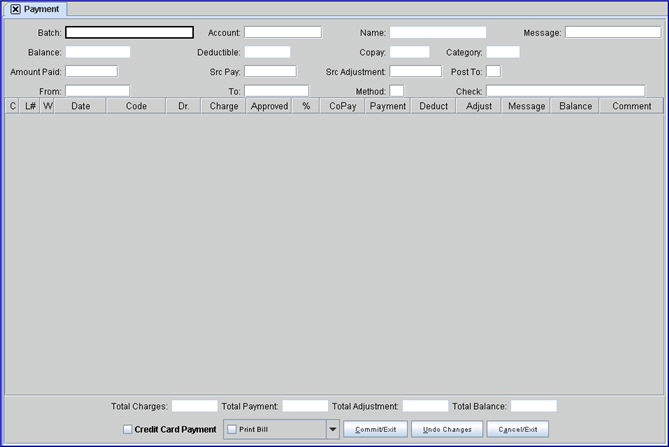
2.1 The batch entry can be designated in any format: a date, a word, a number, or any combination.
2.2 Prime Clinical Systems recommends the assignment of a Batch No when using the bulk payment methods. If a posting error occurs (e.g., posting the wrong amount, the same check twice, etc.), or if a Batch No. was entered when applying the payments, or the payment and adjustment transactions, then the error may be reversed/removed using Utility --► Maintenance --► Reverse Entry, provided the clinic date has not been changed.
2.3 This is used as a future reference to look up payments.
3.1 Type the Account No of the patient whose account is to be posted.
3.2 The system may default to the most recently used Account No.
3.3 Accept this default OR use the [Spacebar] or [Backspace] to clear and enter the desired number.
4. Name 
4.1 The associated name displays from the entered account number as Last, First. When posting payments for a company account, the <Name> field value changes to display the patient name of the highlighted record. Company accounts previously displayed the company name throughout the posting session. See Charges --►Specialty Charges --►Company Accounts for additional information.
4.2 This read-only field may not be modified.
5. Message 
5.1 Displayed automatically to a default value. Type the desired code; a blank field (null value) is also accepted. Changing the Message code requires a transaction posted to the record (a payment, an adjustment, or a comment entered) and committed.
5.2 If the patient's Utility --►Category <Message> is set to 'Y,' Intellect uses the message code entered here to print the corresponding message on the statement.
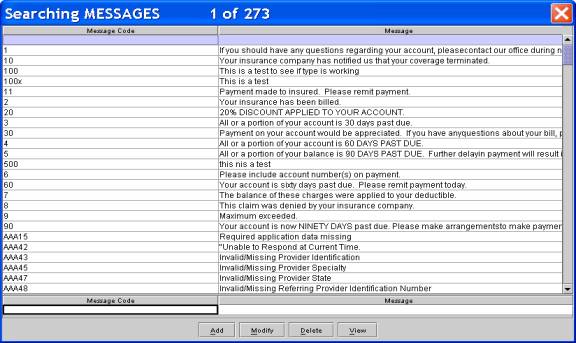
5.3 Press the [F2] key in the <Message> field to display the list of records in the Message table. This list includes all records in the table, not just the statement messages. It is important to select only statement message records and not follow up or recall letters as the latter could be very long and therefore not fit in the statement message box.
6. Balance 
6.1 Intellect displays the amount due from the total of all charges minus all payments for this account.
6.2 This read-only field may not be modified.
7.1 Intellect displays the <Deductible Met> information from the Patient Insurance screen.
7.2 This read-only field may not be modified.
8.1 Intellect displays the <Co Payment> value from Patient Insurance screen.
8.2 This read-only field may not be modified.
9. Category 
9.1 Intellect displays the patient's financial <Category> from Patient Registration.
9.2 This read-only field may not be modified.
9.3 Intellect displays the most recent patient Utility --► Category <Category Code> for this account.
10.1 This amount is used as a balancing figure compared to the amount of payments to be posted below.
10.2 Type the amount planned to pay in this session.
10.2.1 Press [Enter] on your keyboard after entering an amount in this field to display a popup screen to select the payment source. An example is shown below:

10.2.2 Choose the desired source and press [Enter] again to populate the <Deductible> and <Copay> fields.
Effective version 9.12.03: Users may see what the deductible and copay are for insurances other than the primary (P1) insurance. For example, in the sample screen above, when selecting the secondary (S1) insurance the <Deductible> and <Copay> fields are populated with the deductible and copay of the S1 insurance. If CPAY, GUAR, or REFUND are selected, the program displays the deductible and copay for the patient's current primary (P1) insurance.
11. Src Pay 
11.1 Intellect displays the Source of Payment code from the Utility --►Insurance --►Insurance <Payment Source> field set up for the selected payment source.
11.2 Either accept this OR clear the field and make a new entry.
12.1 Intellect displays the Source of Adjustment code from Utility --►Insurance --►Insurance <Adjustment Source> set up for the selected payment source.
12.2 Either accept this OR clear the field and make a new entry.
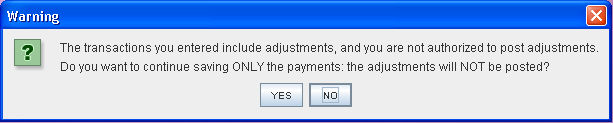
12.3 If the Utility --►Set Up --►Security --►Login Users is NOT authorized to post adjustments, when the [Commit/Exit] button is pressed, Intellect displays:
12.4 If the Utility --►Set Up --►Security --►Login Users is authorized to post adjustments, Intellect verifies if the operator's security level is high enough to allow posting with the Adjustment Remark code entered in the Payment --►Open Item <Src Adjustment> field. The operator's Utility --►Set Up --►Security --►Login Users <Security Level Group X> is compared to the Utility --►Messages --► Remark <Security Level>. The Utility --►Set Up --►Security --►Login Users <Security Level Group X> must be higher than the Utility --►Messages--► Remark <Security Level> to allow posting with the entered Remark Code. If not, this warning displays at the Payment --►Open Item <Src-Adjustment> field:
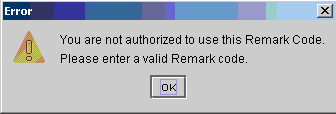
Select [OK] to return the focus to the <Src Adjustment> field. Enter an Adjustment Code where the Utility --►Messages --► Remark <Security Level> is lower than the security of the operator. Please note:
• Because the <Src Adjustment> field may not be left blank, PCS suggests adding a Remark Authorization Code to use when an adjustment will not be posted.
• This feature is NOT implemented if posting Adjustments through Charges --►Charge.
• This feature works ONLY with Utility --►Set Up --►Security --►Login Users <Security Level Group 1>.
• The Invoice number has NOT been added to your Company Statement. To have the Invoice number added, call our support department for assistance.
13.1 Enter 'G' to only post to Guarantor balances.
14. From 
14.1 This field always defaults to the current system date.
14.1.1 Accept, modify, or clear this field.
14.1.2 Type a 'T' to enter today's date.
14.2 Enter the beginning date of service from which to apply the payments.
14.2.1 If a date is entered later than the system date, an error message displays:
15. To 
15.1 This is the last date for the record of charges displayed.
15.2 Type a 'T' to enters today's date.
16.1 Type the desired method of posting.
16.2 There are five available methods to post with varied results.
16.3 Press the [F2] search key to display the valid choices:
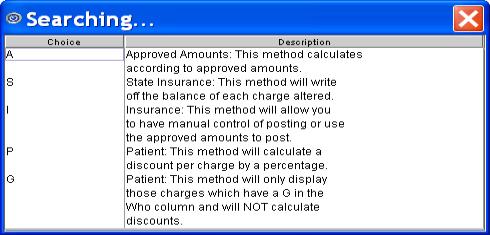
16.3.1 Method I is the system default value.
16.3.1.1 This option gives manual control of payments and adjustments.
16.3.2 Method A is for approved amounts.
16.3.2.1 When used in conjunction with the 'A' command, it adds a message code and, based on contractual set ups, automatically calculates Payment, Adjustments, and Balance.
16.3.2.2 Effective version 9.12.1, when used in conjunction with the 'M' command:
• If a 0 (zero) is entered in the Payment column, the program does not over-ride the entered zero payment calculated by the Approved times the Percentage.
• If a deductible amount is entered, the program calculates the payment by multiplying the Approved by the Percentage then subtracting the deductible. In this case do NOT enter a zero in the payment column.
16.3.3 Method S is used primarily for state plans, but also has secondary uses.
16.3.3.1 Use the 'M' command, enter paid amount, and the system adjusts the balance effectively creating a write off.
16.3.4 Method P calculates a discount per charge by a percentage.
16.3.5 Method G is not available.
Instead, to display only charges that have a 'G' in the Who column, enter 'G' in the <Post To> field.
17.1 If paid by check, enter the check # ; if by credit card, enter the card number; or, if by cash, enter 'CASH'.
17.1.1 This prints to the Check Slip Report. See Management --►Check Slip for more information.
17.1.2 This also displays in Ledger --► Open Item by typing 'I' with the focus in the Command Column for a procedure.
17.2 Effective version 14.08.28, this field was expanded to accept check or credit card numbers up to 25-characters in length.
Press [Enter], [Tab], or [↓] while in the <Check> field to display the Posting Section with the focus in the first line of the command column:


Commands are entered in column 'C'. With the focus in this column, press [F2] to display the available commands.

Note: Effective version 16.02.22, option 'B' is no longer active.
18.1 M: Manual mode: Type 'M' to allow entries or modifications to <Who>, <Approved>, <Payment>, <Deductible>, <Adjustment>, <Message>, and <Comment> fields.
18.2 A: Automatic payment based on approved amount. Users may edit <Message> and <Comment> only.
18.3 J: Used to select multiple lines sequentially to apply one payment and/or adjustment amount. Type 'J' in the Command Column to display:
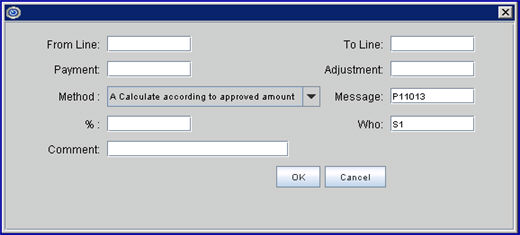
18.3.1 From Line: This defaults to the line number of the selected line. Keep the defaulted number, OR enter the beginning number of the range.
18.3.2 To Line: Enter the ending number of the range.
18.3.3 Payment, Adjustment, Message, and Who may be filled as desired/needed.
18.3.4 Method is selected from the drop-down list:
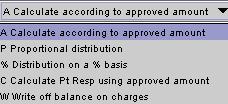
18.3.5 % requires an amount if '% Distribution on a % basis' is selected for the <Method>.
18.3.6 Comment: Effective version 09.12.14, a 40-character <Comment> field was added. This <Comment> field works the same as the <Comment> field displayed in the Payment --►Open Item screen in that it provides an area in which to type an appropriate comment. Depending on the Utility --►Set Up --►Parameter <Payment Comment on Stmt> option selected, the Comment may be printed on patient statements.
This comment is displayed in the patient’s Ledger --►Accounting and Ledger --► Open Item under the Payment History. It is not displayed in the Payment --►Open Item Comment column after clicking the [OK] button.
18.3.7 Click [OK] after completing the necessary fields. Intellect applies the payment amount for the sequential lines selected.
18.4 T: Used to Tag multiple procedures for payment and/or adjustment, then type command 'J.' To remove the tag, type 'T' again. Intellect displays this dialog box to configure:
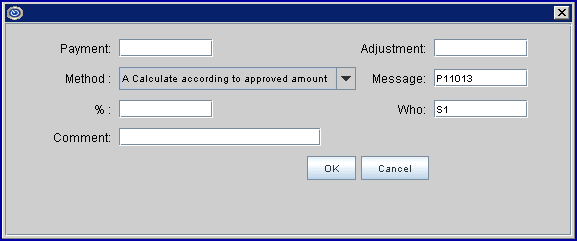
18.4.1 Enter the <Payment> and/or <Adjustment> amount.
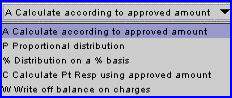
18.4.2 Select a Method:
18.4.3 Populate <Message> and <Who> as desired.
18.4.4 <%> requires an amount if '% Distribution on a % basis' is selected for the <Method>.
18.4.5 Click the [OK] button and Intellect configures the tagged lines.
18.5 I: Displays a pop-up payment history screen for this procedure.

18.5.1 When using the 'I' command to view previously posted adjustments, in order to display the Adjustment Remark, enter the 'Adj Src' in the <Src Pay> and the <Src Adjustment> fields.
18.5.2 Note: The default for the <Src Pay> field pulls from the Utility --►Insurance < Payment Source> field and the default for the <Src Adjustment> field pulls from the Utility --►Insurance <Adjustment Source > field.


18.6 D: Moves the focus to the Deductible column. Making an entry marks this account to be aged.
![]()
18.7 B: Effective version 16.02.22, this option is no longer active.
18.8 C: Entering a 'C' in the command column commits all payments.
18.9 U: Reverses all uncommitted changes for this session.
18.10 S: Effective version 16.02.22, this option is no longer active.
19. 
19.1 Indicates line number per individual procedure.
19.2 This read-only field may not be modified.
20.1 'W' stands for 'Who.' This field determines 'Who' is responsible for the charges.
20.2 Intellect defaults the entry from the Charges --► Charge screen <Who> field.
20.3 When making an entry with the 'A' or 'M' commands, this entry changes to the next payer in the hierarchy. For example, P1 to S1 to G.
20.4 This field may be modified when the 'M' command is used.
20.5 This field can be affected by the Utility --►Category <Hold Who> field.
21. 
21.1 Date of service for the billed procedure as entered on the Charges --►Charge screen <From/Date>.
22. 
22.1 This is the code of the posted procedure pulled from Charges --►Charge <Code>.
22.2 This read-only field may not be modified.
23. 
23.1 The Utility --► Provider <Provider Code> of the doctor from the Charges --►Charge screen panel <Dr> field.
24. 
24.1 Indicates the charge for the procedure as committed when posting on the Charges --►Charge screen.
25.1 The system defaults an Approved value dependent on the set up of fee schedules and pay plans for this patient and the primary insurance.
25.2 If the defaulted Approved does not match the approved on the Explanation of Benefits, enter the actual approved amount from the EOB.
25.3 This information is required as part of the secondary electronic claim.
25.4 For more detailed explanations of Intellects' calculation, see the document on Approved Amounts.
26. 
26.1 The system defaults the percentage of the approved amount which the primary insurance is expected to pay. The percentage displayed is dependent on the set up of fee schedules and pay plans for this patient and the primary insurance.
26.2 If the defaulted percentage is not correct, enter the actual approved amount in the <Approved> field.
26.3 This read-only field may not be modified.
27. 
Effective version 9.12.26 - New field: The CoPay information can be entered two ways:
27.1 Payment --►Auto Payment: When posting an ERA/ERN file, the program inserts the CoPay when the electronic file indicates there is a copayment due from the patient.
27.2 Payment --►Open Item: When manually posting payments, at the drop-down list containing the patient's insurance, select the 'CPAY' code/record. The program inserts the amount entered in the Payment column into the CoPay. You must first save the payment, then, when viewing the record again, the CoPay column reflects the amount applied to the patient's copayment for the charge.
This field is accumulative; i.e., each time a Copayment is posted, the newest amount paid is added to the previous amount paid.
28. 
28.1 If using a manual entry (not typing 'A'), type in the amount to be crsedited against the procedure charge.
28.2 Effective version 19.03.26, Intellect displays a warning when the amount entered in the <Payment> column is less than the amount entered in the Utility --► Procedure --►Procedure <Cost>. Note: This does not stop payments from being posted, it just makes them aware that the payment is less than the cost of the procedure.

Click [OK] to close the pop-up.
29.1 This is an optional information field.
29.2 Enter the amount applied to the deductible. There are no calculations for this field, meaning that if $50.00 was previously applied to the deductible, then the next time the charge is displayed in Payment --►Open item, the $50.00 is displayed in the Deduct column.
29.3 To add additional money to the deductible, add the original $50.00 to the additional amount and type in the new deductible amount.
29.4 The deductible is informational only and does not print on any item other than Statement Form 24.
29.5 This shows on Ledger --► Open Item.
Effective version 12.12.06 - Modification: After committing a charge, the amount may be modified in this column.
Effective version 9.12.04 - New feature: The program displays the amount the primary insurance applied to the patient's deductible in the 837 (outgoing claims) file, Loop 2300, CAS 6 Segment. This occurs when either:
• The deductible was manually entered by the operator when posting payments through Payment --►Open item
• Payments and adjustments were applied using the Payment --►Auto Payment feature and the deductible was defined in the ERA/ERN file
30.1 Displayed from Charges --► Charge <Adjustment> at the time of posting.
30.2 Type any adjustments when using the 'M' command.
30.3 When typing 'A' in the command column, Intellect automatically makes any programmed adjustments.
31.1 Indicates a default billing status code inserted on the command entry by the system to represent the activity type appended by the activity date.
31.2 This is always available for manual input for the last activity on this charge.
31.3 When typing the 'M' or 'A' command in the command column, this field defaults to a code indicating who paid appended with the current clinic date. NOTE: The payment source selected on the popup screen (see <Amount Paid> field above) determines if the code starts with ‘P1’ for primary insurance, ‘S1’ for secondary insurance, ‘T1’ for tertiary insurance, ‘G’ for guarantor/patient, ‘C’ for copayment, or ‘R’ for refund.
![]()
31.4 To print a State of California DWC Second Bill Review (SBR) form to appeal Worker's Compensation payments, enter the appropriate 'SBR' code in this <Message> field and select the Second Bill Review option at the bottom at the screen. NOTE: If codes beginning with ‘SBR’ are setup in Utility --►Messages --►Message then the pre-typed text populates the ‘Reason for Requesting Second Bill Review and Description of Additional Supporting Information/Documentation’ on the SBR form.
Note the differences in various software versions:
31.4.1 Effective version 14.07.24. To comply with institutional requirement guidelines which state that an SBR may only be one page, as of this update, when an SBR is requested and there are multiple procedures, Intellect now generates 'one date of service' in the area below 'List of disputed goods, services', along with the remarks attached to the date of service. Note: Only the first three lines of the remark print in the box ‘Reason for Requesting SBR’.
The maximum dates of service per page is two. For additional dates of service, Intellect generates a complete SBR form with the additional dates of service. Note: The procedure for generating SBR forms has not changed.
31.4.2 Effective version 14.04.15. The SBR form prints on two pages. The first page includes the charge information, and the statement ‘See attached’ in the section titled ‘Reason for Requesting Second Bill Review and Description of Additional Supporting Information/Documentation’. The top portion of the second page is identical to the first page; however, the section titled ‘Reason for Requesting Second Bill Review and Description of Additional Supporting Information/Documentation’ displays the description for the SBR code as set up in Utility --►Message --►Message --►Add.
Note: As of version 14.04.15, SBR codes set up in Utility --►Message --►Remark --►Add are for information only, and only display in the Comment column on the Payment screen; they do not display on the Second Bill Review form.
Only one code may be entered for the charge. If additional charges need different descriptions, a separate SBR must be requested using a different SBR code.
When requesting an SBR, note:
• The DWC Second Bill Review form may not be sent electronically.
• The SBR form may not be customized.
• If a provider’s information is not completely filled-in, the SBR form does not print.
• If insurance information is not completely filled-in, the SBR form does not print.
31.4.3 Effective version 13.06.24. The SBR form prints on one page. SBR codes are set up in Utility --►Message --►Remark --►Add.
31.5 Effective version 16.02.22, to print a State of California DWC Independent Bill Review (IBR) form to submit a Workers’ Compensation payment review to an independent company, enter the appropriate ‘IBR’ code in this <Message> field and select the Independent Bill Review option at the bottom of the screen. NOTE: If codes beginning with 'IBR' are set up in Utility --►Messages --►Message then the pre-typed text populates the ‘Reason for Disputing Reduction or Denial of Full Payment’ field on the IBR form.
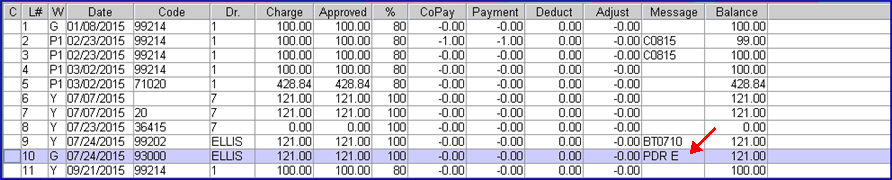
31.6 To include the charge line on a Dispute Resolution Request form to dispute payments or underpayments, enter the appropriate ‘PDR’ code in this <Message> field. NOTE: If codes beginning with ‘PDR’ are setup in the Utility --►Messages --►Message then the pre-typed text populates the ‘Description of Dispute’ on the Provider Dispute Resolution Request form.
31.6.1 Effective version 16.02.22: After committing the payment, select <Form Type> ‘Dispute Resolution Request’ on the Billing --►Insurance --►Batch of Patients screen to print the form.
31.6.2 Each provider for whom a dispute resolution form is generated must have their own PDR code set up in the <Message Code> field of Utility --►Messages --►Message.
For example, if the PDR code for Dr. Ellis was set up as PDR E, and there is a dispute regarding a payment for a charge on 07/24/2015 for a service provided by Dr. Ellis, PDR E would be entered in the Message column for the payment in question, as shown below.
32. 
32.1 Indicates the line total for a procedure; i.e., amount owed or credited.
32.2 Intellect automatically updates the total when payments and/or adjustments are made.
32.3 This is a read-only field and may not be accessed.
33.1 Area available to type any appropriate comment.
33.2 If Utility --►Set Up --►Parameter <Show Remark on Stmt?> is set to ‘Y’, then the comment is printed on Patient Statements.
33.3 Effective version 20.06.11, this field was increased from 40 to 80 characters.
33.4 If the Message column begins with ‘SBR’, 'IBR', or ‘PDR’, this field is populated with an informational only comment if the code is setup in Utility --►Messages --►Remark which does not print on the form.
33.5 Effective Version 9.12.14. Prior to version 9.12.14, entering special characters, such as the percentage symbol %, was not allowed in the Comment column and an error message would display at the time of committing the payment. Versions 9.12.14 and greater accept special characters in the Comment field.
Right clicking anywhere in the line area of the posting section displays this context menu:
34. Post Payment: Performs the same function as typing 'M' in the Command column; i.e., entries or modifications are allowed to the <Who>, <Approved>, <Payment>, <Deductible>, <Adjustment>, <Message>, and <Comment> fields.
35. Apply Payment Based on Approved Amount: Applies the payment based on the <Approved> and <%> fields in the posting section.
36. Post Payment to a Range of Charges(s): This function is similar to the 'Jump' function on other screens. Select this option to perform the same function as typing 'J' in the Command column; i.e., a pop-up screen displays on which to select multiple lines sequentially to apply one payment and/or adjustment amount.
37. Apply Payment to Selected Charges(s): Select this option to perform the same function as typing 'T' in the Command column; i.e., a pop-up screen displays to tag multiple procedures for payment and/or adjustment. Once tagged, type command 'J' OR click on Post Payment to a Range of Charges(s). See command column 'T' for more information.
38. View Payment History: Select this option to perform the same function as typing 'I' in the Command column; i.e., a pop-up payment history screen is displayed for this procedure. See command column 'I' for more information.
39. Apply to Deductible: Select this option to go to the <Deduct> field in the posting section to enter the amount applied to the deductible.
40. Print Bill: Select this option to perform the same function as typing 'B' in the Command column; i.e., it places a check mark in the ☐ Print Bill box at the bottom of the screen. After committing this session, this prints a CMS 1500 for procedures with an 'S' in the Who column. See the ☐ Print Bill option in the next section for additional information.
41. Commit Payments(s): Select this option to perform the same function as typing 'C' in the command column; i.e., it commits all payments.
42. Undo Payment(s): Select this option to >erform the same function as typing 'U' in the command column; i.e., it reverses all uncommitted changes for this session.

43.  : A read-only display reflecting the total of all charges in the current date range selected for this session.
44.  : A read-only display that always starts at zero and updates instantly as payments are added to the line item.
45.  : A read-only display that always starts at zero and updates instantly as adjustments are added to the line item.
46.  : A read-only display that always reflects the total owed or credited for the date range of the current session.
47.1 Effective version 14.02.04
47.2 To use this option, the clinic and/or providers must be registered with authorize.net. If only some of the providers in a clinic are registered with authorize.net, credit card payments are only made for the providers who are registered.
47.3 Before using this option:
47.3.1 To ensure that credit card information is stored and encrypted, go to Registration --►Worker --►Workers Comp Lien and click the [Setup] button at the bottom of the screen. The button label changes from [Setup] to [Show Settings]. Note: If the button already displays as [Show Settings], no further action is required.
47.3.2 Credit card information must already be entered in Intellect, via Registration --►Credit Card, for each patient for whom a credit card payment is requested. Family accounts require the credit card information to be added separately for each individual family member.
47.4 This option may be selected while posting a payment from the payer, but ONLY when the <Who> column = ‘G’. Intellect applies the payment to the ‘entire’ balance of the displayed charges where <Who> = ‘G.’
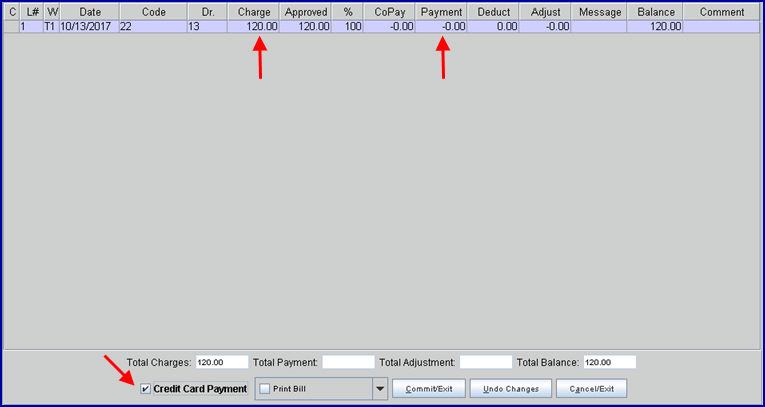
When using a stored credit card to make a payment on the Payment --►Open Item screen (see sample below), please note:
• the <Who> value must be set to 'G'
• there must be a balance on the account
• the amount shown in the <Charge> field is the amount that is charged to the credit card
• the <Payment> field should be blank
• the ☐ Credit Card Payment option at the bottom of the screen should be selected
• the system looks at the Utility --►Provider the charge is applied to and uses the credentials saved on that screen to process the credit card through authorize.net
48. 
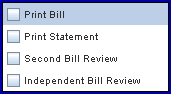
Effective version 16.02.22, the Print Bill, Print Statement, and Second Bill Review options are on a drop-down menu, along with an Independent Bill Review option added in version 16.02.22.
Note: Print Bill is highlighted when the Payment --►Open Item screen is initially opened, but it is not selected.
Selected options have a check mark in the box  .
.
48.1.1 Select this option to print a CMS 1500, after committing this session, for procedures with an 'S' in the Who column.
48.1.2 All versions prior to 9.12.10: When posting Primary Insurance payments through Open Item and the patient has secondary insurance, if the Print Bill box is checked, the claim will have all charges on the screen where Who = S1 (or S2, etc.) prints on the claim.
Effective version 9.12.10: Only the charges which had a change made to them print. For example, a patient has five charges displayed for the same date of service and one had already been paid by the primary insurance with Who = S1. Today, post the primary payment to the remaining 4 and click Print Bill. The claim for the secondary insurance prints ONLY the 4 changes where payment was posted today.
48.1.3 Effective version 16.02.22, this option is no longer selected by entering 'B' in the command column (see 18.7).
48.2.1 Effective version 9.12.14 - New option.
48.2.2 This is used to print a statement on demand, or can be used for printing statements for a secondary insurance.
Effective version 12.12.14: A statement prints regardless of whether or not the Utility --►Set Up --►Parameter <Include Zero Charges> field is set to ‘N.’
48.2.3 When this box is selected and the the [Commit/Exit] button is clicked at the bottom of the screen (see description below), a printer dialog box displays, allowing a printer to be chosen on which to print the statement:
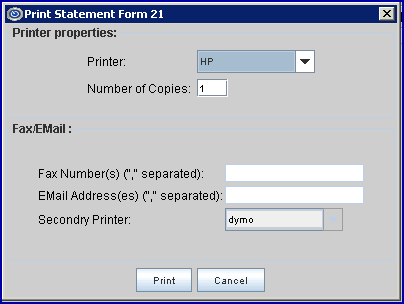
48.2.4 Effective version 16.02.22, this option is no longer selected by entering 'S' in the command column (see 18.10).
48.3.1 Effective version 13.06.24
48.3.2 When this option is selected, a DWC Second Bill Review form prints for payments with an 'SBR' code in the <Message> column.
48.4.1 Effective version 16.02.22
48.4.2 When this option is selected, an Independent Bill Review form prints for payments with an 'IBR' code in the <Message> column.
49.1 This button clears all information after committing.
49.2 It returns the focus to the <Batch> field with the most recent patient account number visible in the <Account> field.
49.3 If the Print Statement box is selected (see description above), click this box to display a printer dialog box from which to choose a printer.
50.1 This button cancels entries and reverts to original line values.
51. ![]()
51.1 This button clears all information without committing.
51.2 The focus is returned to the <Batch> field with the most recent patient account number visible in the <Account> field.
NOTE: When posting charges or payments, the Patient Registration (Worker or Regular) Add/Modify screens must be closed or an error occurs.


 (Command Column)