Intellect™
UTILITY MENU OPTIONS

Messages
Remark
This option is used to define various remarks used in Intellect, such as the source of a payment or adjustment, appointment block type, type of recall or follow up letter, as well as defining the <Category> codes for procedures. This table also contains records classifying other remark type codes, such as a management report, department code, eligibility response codes, or revenue code.
Intellect includes an assortment of default remarks in its program. These may be modified or deleted as needed. Do not delete remarks which have been used, or have a <Remark Type> of E.
Access the Remark screen through Utility --►Messages --►Remark --►Add
The Add REMARK screen displays:
Since Remark Codes are used for different purposes in Intellect, this documentation begins with general set up instructions and then includes information specific to different categories where Remark Codes are used. Follow the applicable directions:
Add Procedure <Category> Codes
Send Recall Letter for a Diagnosis/Procedure Code
Set up a Group Code for OSHPD Reporting
1.1 Type a unique user-defined code up to 6 characters. A combination of letters and numbers may be used.
1.2 If not unique, Intellect displays an error message:
Press the [OK] button to return the focus to the <Remark Code> field.
1.3 The field is mandatory and must be completed. If left blank, an error message displays:
. 
Press the [OK] button to return the focus to the <Remark Code> field.
1.4 Although it is not required, the code can be used to indicate its functionality.
For example:
1) Append an 'A' after an Insurance company abbreviation to indicate an Adjustment Remark or a 'P' for Payment Remark.
2) Use 'RC' for a Recall Remark.
3) Use a 'T' at the beginning to indicate a Text to Voice message (effective version 13.06.24).
2.1 Type a short concise description of the recall letter in the <Description> field.
2.2 A short concise description of the remark is useful when selecting which Remark Code to use.
3.1 This field is used to define the Type of the remark.
3.2 To view the list of codes with descriptions, press the [F2] key to display the Searching screen. To view the list of only the codes, either click on the arrow, OR press the → (right arrow) on the keyboard. To select, double-click on the correct code, OR use the ↑ (up) and ↓ (down) arrows to highlight the correct code, and then press the [Enter] key to select.
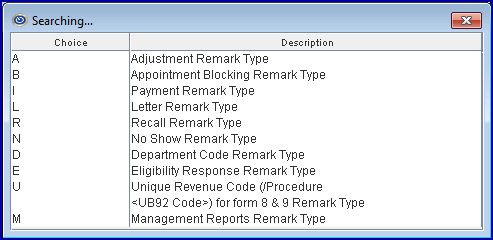
Note:
Option 'B' is used when creating new Appointment Block Remarks.
Option 'R' is:
• used with Text to Voice messages (effective version 13.06.24).
• required when sending recall letters based on diagnosis or procedure codes (effective version 16.02.22).
4. Security Level 
4.1 This field allows clinics to determine who may post adjustments using specific Remark Adjustment Codes. An example where this could be useful is if only the office manager is authorized to post Doctor Courtesy or Bad Debt Write Off adjustments. NOTE: Please refer to Payment --►Open Item for more details.
5. When the information is completely entered, select one of these options:

5.1 Click [Add] to save the information, clear the screen, and return the focus to the <Remark Code> field.
5.2 Click [Clear] to clear all information and return the focus to the <Remark Code> field without saving.
5.3 Click [Exit] to clear the screen and return the focus to the main Intellect screen without saving.
1.1 When setting up a <Remark Code> to generate a DWC Second Bill Review form:
1.1.1 The <Remark Code> must begin with SBR (effective version 13.06.24).
1.1.2 The code may not exceed 6 characters in length. A combination of letters and numbers may be used.
2. When the information is completely entered, select one of these options:

2.1 Click [Add] to save the information, clear the screen, and return the focus to the <Remark Code> field.
2.2 Click [Clear] to clear all information and return the focus to the <Remark Code> field without saving.
2.3 Click [Exit] to clear the screen and return the focus to the main Intellect screen without saving.
Send Recall Letter for a Diagnosis/Procedure Code
Effective version 16.02.22, users may have a recall letter automatically sent to all patients for whom a particular diagnosis or procedure code is posted in Charges --►Charge. This feature is most useful for annual or bi-annual appointments/tests such as a general adult medical exam (diagnosis code Z0000) or a CBC blood test (procedure code 85024).
Set up is required on 3 screens before a recall letter is automatically sent:
A. Utility --►Messages --►Remark --►Add screen
B. Utility --►Messages --►Message screen
C. Utility --►Diagnosis --►Diagnosis OR Utility --►Procedure --►Procedure screen
A. Utility --►Messages --►Remark --►Add screen
1.1 Enter the diagnosis or procedure code for which a recall letter should be sent.
1.1.1 For example, to send a recall letter to all patients for whom a diagnosis code of Z0000 is posted, enter Z0000 in the <Remark Code> field.
2.1 Type a short concise description of the recall letter in the <Description> field.
2.1.1 A short concise description of the remark is useful when selecting which Remark Code to use.
2.2 Remarks display in the Comment column on the Payment --►Open Item screen.
3.1 This field is used to define the Type of the remark.
3.2 Assigning the appropriate type assists in obtaining specific remarks when searching from various areas of Intellect. For instance, press [F2] from the S_Pay field of the Intellect payment screen to display the Selection Screen for Remark. By selecting to continue the search on Type I, Intellect displays only payment remarks.
3.3 To view the list of codes with descriptions, press the [F2] key. To view the list of only the codes, either click on the arrow, OR press the → (right arrow) on the keyboard.
To select, double click on the correct code, OR use the ↑ (up) and ↓ (down) arrows to highlight the correct code, and then press the [Enter] key to select.
4. Security Level
4.1 This field allows clinics to determine who may post adjustments using specific Remark Adjustment Codes. An example where this could be useful is if only the office manager is authorized to post Doctor Courtesy or Bad Debt Write Off adjustments. NOTE: Please refer to Payment --►Open Item for more details.
5. When the fields are populated, select one of these options:

5.1 Click [Add] to save the information, clear the screen, and return the focus to the <Remark Code> field.
5.2 Click [Clear] to clear all information and return the focus to the <Remark Code> field without saving.
5.3 Click [Exit] to clear the screen and return the focus to the main Intellect screen without saving.
6. Go to the Utility --►Messages --►Message screen and complete the instructions below.
B. Utility --►Messages --►Message screen
NOTE: Follow Up, Recall, and No Show letters added in Utility --►Messages --►Message must be linked to corresponding <Remark Codes> set up in the Utility --►Messages --►Remark menu option. This is done by using the same <Remark Code> in both options.
7. In the <Message Code> field, type the diagnosis/procedure code entered in the <Remark Code> field on the Utility --►Messages --►Remark --►Add screen (see Step 1).
8. Type the body of the letter in the large area on the Message screen.
9. Go to the Utility --►Diagnosis --►Diagnosis screen and complete the instructions below.
C. Utility --►Diagnosis --►Diagnosis OR Utility --►Procedure --►Procedure screen
If the code entered in the <Remark Code> field on the Utility --►Messages --►Remark --►Add screen (see Step 1) was a diagnosis code, go to Utility --►Diagnosis --►Diagnosis.
10. Enter the same Diagnosis Code in the <Diagnosis Code> field that was entered in the <Remark Code> field on the Utility --►Messages --►Remark --►Add screen.
10.1 For example, Step 1.1 populated the <Remark Code> with a Diagnosis Code of Z0000; therefore, a user would enter Z0000 in the <Diagnosis Code> field on the Utility --►Diagnosis --►Diagnosis screen.
10.2 Go to step 12.
- OR -
If the code entered in the <Remark Code> field on the Utility --►Messages --►Remark --►Add screen (see Step 1) was a procedure code, go to Utility --►Procedure --►Procedure.
11. Enter the same Procedure Code in the <Panel Code> field that was entered in the <Remark Code> field on the Utility --►Messages --►Remark --►Add screen.
12. In the <Recall in Month(s)> field on either the Utility --►Diagnosis --►Diagnosis or Utility --►Procedure --►Procedure screen, use the drop-down list to select when the patient should receive the recall letter.
12.1 For example, if Diagnosis code Z0000 was entered in the <Remark Code> field in Step 1, select 11 if a recall letter should be sent 11 months after the patient's charge with a Z0000 diagnosis code was posted. Once set up, patients for whom a diagnosis or procedure code are used will receive a recall letter in the number of months indicated in the <Recall in Month(s)> field.
13. This type of recall letter does NOT require set up on the Schedule --►Recall screen.
14. This feature is NOT retroactive.
Add Procedure <Category> Codes
This option allows user-defined codes to be added for the Utility --►Procedure --►Procedure <Category> field. Assigning <Category> codes to similar procedures allows Intellect to generate several Management Reports where charges, payments, and adjustments are grouped by Utility --►Procedure --►Procedure <Category>.
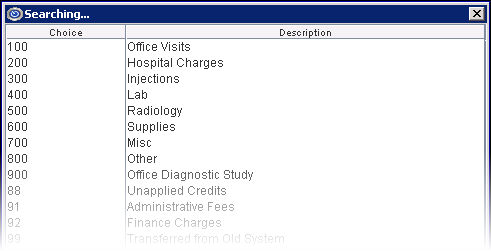
Example of Procedure Category codes:
When a new user-defined Utility --►Procedure --►Procedure <Category> is added, Intellect requires set up on two screens:
• Utility--►Messages--►Remark--►Add
• Utility--►Set Up--►Field Choices
1. Utility --►Messages --►Remark --►Add
Add the new code to Utility --►Messages --►Remark --►Add which is used to identify the remark codes used for management report tracking, and indicate the description that will appear on Management Reports as described below.
1.1 <Remark Code>: Enter a maximum of 6 alpha-numeric characters for the procedure category code. As shown in the example above, the field is usually a numeric value.
1.2 <Description>: Enter a description for the procedure category which will appear on Management Reports.
1.3 <Remark Type>: Select 'M' from the drop-down list to indicate this code is used for Management Reports.
1.4 <Security Level>: Not used for this type of remark code. Leave blank.
1.5 When the information is completely entered, click on the [Add] button to save the record. See General Information for an explanation of the other buttons.
1.6 Repeat steps 1.1 through 1.5 for each new procedure category, then press [Exit] to close the screen.
2. Utility --►Set Up --►Field Choices --►Modify
Add the new code to Utility --►Set Up --►Field Choices --►Modify to include it in the drop-down list and [F2] lookup for Utility --► Procedure --► Procedure <Category>.
2.1 <Field Name>: Type PR_GROUP and press [Enter] to display the list of existing Procedure Category codes.
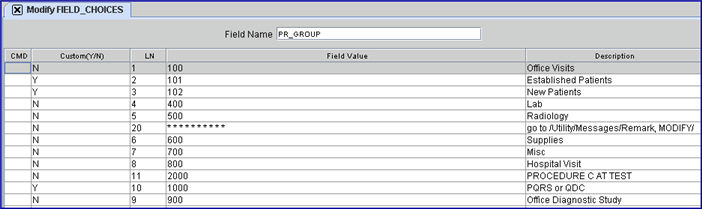
NOTE: The list of procedure category codes set up in each clinic's system may be different from the above example.
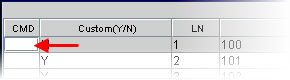
2.2.1 <CMD>: With the focus in the command column, press the letter A on the keyboard to add a new record at the end of the list, OR press M to modify an existing blank line, if applicable.
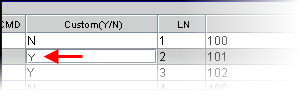
2.2.2 <Custom (Y/N)>: Type Y (yes) to flag the record as customized so future updates will not change this record.
2.2.3 <LN>: The focus skips this column which displays the automatically assigned line number.
2.2.4 <Field Value>: Type the same code entered in the Utility --►Messages --►Remark --►Add <Remark Code> field (see step 1.1).
2.2.5 <Description>: Type the same description entered in the Utility --►Messages --►Remark --►Add <Description> field (see step 1.2).
2.2.6 After entering the <Description>, the focus returns to the <Custom (Y/N)> column.
2.2.6.1 If more than one new code is being added, continue by repeating steps 2.2.2 through 2.2.5 until all new codes are entered.
2.2.6.2 If there are no additional codes to enter, press the [Esc] key until the screen is closed.
Set up a Group Code for OSHPD Reporting
For OSHPD reporting of Diagnosis Group Codes, appropriate Group Codes need to be set up on Utility --►Messages --►Remark. The first three fields are required:
1. <Remark Code>: Enter a name for the new <Group> code.
1.1 The name may not exceed 6 characters in length.
1.2 Note: With the focus in this field, press [F2] twice to display previously set-up codes on the Searching Remark table. For more information on the Searching screen, see Introduction to Intellect --► Intellect Characteristics and Features -- Searching.
1.3 This code displays on the Utilization by Diagnosis Group (type 'D') OSHPD Management Report.
2. <Description>: Enter a description for the <Group> code as it should appear on the Utilization by Diagnosis Group (type 'D') OSHPD Management Report.
3. <Remark Type>: Select 'M' for Management Reports.
4. When the information is completely entered, click on the [Add] button to save the record:

• Click [Add] to save the information, clear the screen, and return the focus to the <Remark Code> field.
• Click [Clear] to clear all information and return the focus to the <Remark Code> field without saving.
• Click [Exit] to clear the screen and return the focus to the main Intellect screen without saving.
Effective version 16.02.22, the DWC Request for Independent Bill Review (DWC Form IBR-1) was added as an option to print from the Payment --►Open Item screen when the <Message> field begins with ‘IBR’ and Independent Bill Review selected at the bottom of the screen. If an ‘IBR’ code set up in Utility --►Messages --►Remark and Utility --►Messages --►Message is entered in Payment --►Open Item <Message>, then the Utility --►Messages --►Message description prints in the ‘Reason for Disputing Reduction or Denial of Full Payment’ field on the IBR form.
1. Remark Code ![]()
1.1 When setting up a <Remark Code> to generate a DWC Independent Bill Review form, the <Remark Code> must begin with IBR.
2. When the information is completely entered, select one of the following options:
![]()
2.1 Click [Add] to save the information, clear the screen, and return the focus to the <Remark Code> field.
2.2 Click [Clear] to clear all information and return the focus to the <Remark Code> field without saving.
2.3 Click [Exit] to clear the screen and return the focus to the main Intellect screen without saving.
![]()