
Intellect™
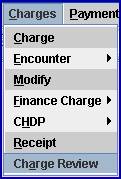
CHARGES MENU OPTIONS

Charge Review
This option allows users to view all charges, whether they were entered in Intellect or imported from an outside source such as PCM.
• The Edit Charge Review Screen is used to select the charges to view.
• Charges are displayed on the Multi-line Charge Table. Note: The Intellect screen for the multi-line charge table is labeled Charge Review.
• The Action Buttons at the Bottom of the Multi-line Charge Table allow users to perform command tasks, and serve as quick links to corresponding tables.
Video Available: Click Charge Review to access the link. Depending on the system set up, the media player may need to be activated. Speakers need to be attached to the workstation to hear the instructions.
Note: To view the videos, log-in through the www.primeclinical.com website. Current support is required.
Updates:
Effective version 19.09.23:
In previous versions, when users updated information via Charge Review, the maximum amount of records allowed was 1000. As of version 19.09.23, there is no record limit.
Effective version 15.02.17 - Modification
Intellect saves the operator code and the clinic date whenever a user modifies a charge in Charges --►Charge Review, Ledger --►Create Collection, and/or the Ledger --►Review Collection screens.
Effective version 14.07.01, an administrator fee may be charged to patient accounts on a yearly basis via Automated Tasks. This task must be run by each office either at the beginning of each year or at the end of each year, and always around the same time. The Charges --►Charge Review option may be used to review accounts to which the administrator fee was applied.
Enter the information in the Charges --►Charge Review Edit Charge Review screen as shown below, verifying the <From Date> indicates the correct year, changing <To Date> to the Clinic Date for when YOUR office ran the Task, and entering the appropriate operator code:

For additional information on charging administrator fees, see the <Administrator Fee> field on the Utility --►Category screen.
Effective version 9.12.30 - Outside Vendor Charge Import HL7
If importing charges from a vendor, not from Patient Chart Manager, 'map' the codes provided in the HL7 file to the codes set up in Intellect using the HL7 Mapping table. Complete the appropriate screen as indicated for each code to be imported in the HL7 file.
If the vendor includes the Modifier Codes, they do not need to be mapped. PCS posts them with the charge exactly as they are provided in the HL7 file. This means Modifier speed codes may be imported if the speed codes are set up in Utility --►Procedure --►Modifier.
If an imported record does NOT include a Modifier, and the Utility --►Procedure code which the record is mapped to has a default Modifier set up, Intellect posts the Modifier code. Whether the Modifier is included in the HL7 file, or pulled from the Utility --►Procedure table, the program applies the conditions set up in the Utility --►Modifier table when applicable. For example, if the Modifier code is 24 and Utility --►Modifier <Charge (G/P/T/R)> = P (professional), the program posts the Utility --►Procedure <Professional Charge>. If a Fee Schedule applies, the program posts the Utility --►Procedure --►Fee Schedule <Professional Charge> and <Professional Approved>.
Charges imported from an outside vendor have the Who column set as follows:
P1 When the patient has current primary insurance
G When the patient is a cash patient or does not have a current primary insurance.
To review imported charges on screen, and make needed corrections prior to billing, go to Charges --►Charge Review and select the appropriate task button to easily modify claim information, or to place the claim on hold, or transfer the responsibility to the patient or insurance. Using the Charge Review screen replaces the need of a paper report to list the imported charges, and simplifies the correction process. For example:
• If the wrong diagnosis was imported, click on the [Diagnosis] button to delete the imported diagnosis and enter the correct one.
• If a modifier is needed, click on the [Claim Info] button to add the modifier.
• If there is missing Encounter information; i.e., Admission Date, Hospitalization From and To Dates, or Authorization Number, click on the [Encounter] button.
• To hold billing on charges imported as P1, tag the charge(s) and click on the [Put on Hold] button.
• If the patient’s insurance was not set up at the time of importing but is now, tag the charge(s) and click on the [Transfer to Insurance] button.
When setting up the HL7 Mapping table (see Utility --► Messages --► HL7 Mapping), complete the fields as noted:
<Source>: Enter the name of the vendor/entity from which the HL7 data is being imported. The name must be entered the same each time, therefore we suggest support or training be contacted to have a default name set up in Utility --►Set Up --►Field Choices. When in Modify mode, press [F2] to list the codes already entered.
<Table Name>: Select the table to which the record being entered should be mapped. For example, for diagnosis codes select Diagnosis. If the code is a doctor or other provider of service select Doctor, etc.
|
* the Procedure Code must match the Utility --►Procedure --►Procedure <Panel Code>. If the Panel Code has several pr_procedures set up, the program posts all the pr_procedure records.
<HL7 Code>: Enter the code provided in the HL7 file
<Code>: Enter the corresponding code from the Intellect table selected in field Table Name.
Effective version 9.12.21, the latest encounter can be attached to a charge when a charge is imported into Intellect via the new <Attach Encounter> field on the Utility --►Set Up --►Parameter --►Modify screen. The <Attach Encounter> field has the choices of Y or N. Selecting 'Y' (the default), attaches the latest encounter to a charge. If 'N' is selected, an encounter is not attached to a charge.
Effective version 9.12.12 - New Menu option
Charge Review is a new feature designed for clients who post charge data in Patient Chart Manager or WebSTAFF and import them into Intellect. This option allows clinics to review the claims on screen and then change the responsibility to either put the claims on hold or release them for billing. Most clinics who import charges have the Who column (responsibility) set to Y when imported so the claims may be reviewed before billing. The Charge Review feature easily lets charges be 'tagged' to set the Who to P1, P2, P3, etc, or G. If the office imports charges with the Who column set to P1, use Charge Review to 'Tag' charges on which to Hold billing.
When charges are imported to Intellect, the primary and secondary insurance in the charge record is set to the P1 and S1 insurances. When using the Charge Review feature to change the responsibility to P2, the primary and secondary insurance in the charge record is automatically changed to the P2 and S2 insurances.
This screen allows the selection of the charges to be viewed. Charges are displayed on the multi-line charge table.
1. To select charges, go to Charges --►Charge Review
The Edit Charge Review screen displays:
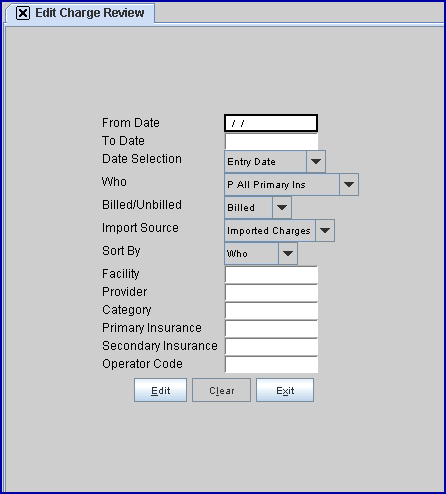
1. From Date 
1.1 Enter the beginning date for the range of charges to review.
1.2 Intellect's default is to select by the entry date of charges. This can be changed in the <Date Selection> field.
2. To Date 
2.1 Enter the ending date for the range of charges to review.
2.2 Intellect's default is to select by the entry date of charges. This can be changed in the <Date Selection> field.
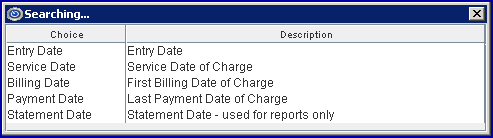
3.1 This field defaults to the Entry Date.
3.2 Accept the default OR use the drop-down list to make an alternate selection.
3.3 Click on the field, OR press the [F2] key to display the valid choices.
To view the list of only the codes, click on the arrow. To select, click on the correct code, OR use the ↑ (up) and ↓ (down) arrows to highlight the correct code and then press the [Enter] key to select.
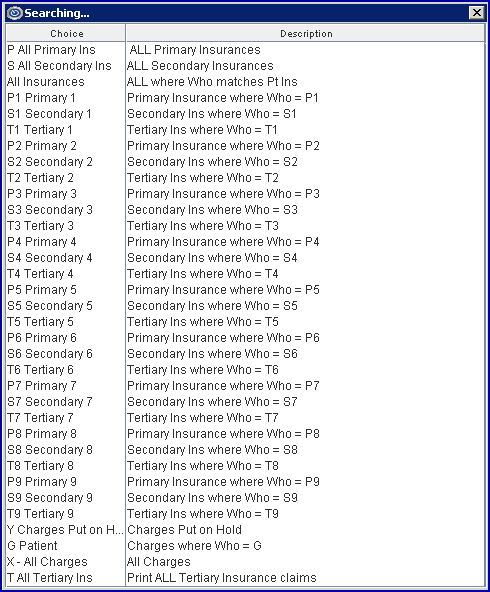
4. Who 
4.1 Select which Who values to review.
4.2 Accept the default P All Primary Ins OR use the drop-down list to make an alternate selection.
4.3 All charges may be selected by choosing X-All Charges from the drop-down menu.
4.4 Note: The All Insurances option on the drop-down menu does NOT include cash patients.
4.5 Click on the field, OR press the [F2] key to display the valid choices.
To view the list of only the codes, click on the arrow. To select, click on the correct code, OR use the ↑ (up) and ↓ (down) arrows to highlight the correct code and then press the [Enter] key to select.
5. Billed/Unbilled 
5.1 Select which type of charges to review.
5.2 Accept the default Billed OR use the drop-down list to make an alternate selection.
5.3 Click on the field, OR press the [F2] key to display the valid choices.
To view the list of only the codes, click on the arrow. To select, click on the correct code, OR use the ↑ (up) and ↓ (down) arrows to highlight the correct code and then press the [Enter] key to select.
6. Import Source 
6.1 Select which type of charges to review.
6.2 Accept the default Imported Charges OR use the drop-down list to make an alternate selection.
6.3 Click on the field, OR press the [F2] key to display the valid choices.
To view the list of only the codes, click on the arrow. To select, click on the correct code, OR use the ↑ (up) and ↓ (down) arrows to highlight the correct code and then press the [Enter] key to select.

6.4 Charges coming from WebStaff are in XML format
The remaining fields are used to view specific types of accounts.
7. Sort By 
7.1 This field defaults to the Who.
7.2 Accept the default OR use the drop-down list to make an alternate selection.
7.3 Click on the field, OR press the [F2] key to display the valid choices.
To view the list of only the codes, click on the arrow. To select, click on the correct code, OR use the ↑ (up) and ↓ (down) arrows to highlight the correct code and then press the [Enter] key to select.
8. Facility 
8.1 Limits the results by specific charge facility.
9. Provider 
9.1 Limits the results by specific charge provider.
10. Category 
10.1 Limits the results by specific patient category.
11. Primary Insurance 
11.1 Limits the results by specific primary insurance.
12. Secondary Insurance 
12.1 Limits the results by specific secondary insurance.
13. Operator Code 
13.1 To identify who requested the charge review, the operator's code may be entered in this field.
Effective version 15.02.17, Intellect saves the operator code and the clinic date whenever a user modifies a charge in Charges --►Charge Review, Ledger --►Create Collection, and/or the Ledger --►Review Collection screens.
14. When the information is completely entered, select one of these options:

[Exit]: Click to return to the main Intellect menu.
[Clear]: Click to remove all information and settings entered on the screen.
[Edit]: Click to begin the process of generating a multi-line charge table.
When the task is completed, the Multi-line Charge Table displays (see next section for additional information).
Note: The Intellect screen for the multi-line charge table is labeled Charge Review -- see sample below.
The multi-line charge table is displayed by clicking on the [Edit] button at the bottom of the Edit Charge Review screen. The multi-line charge table allows users to view all charges, whether they were entered in Intellect or imported from an outside source such as PCM, as requested on the Edit Charge Review screen.
The information in the fields at the top of the screen change, based on which patient record is highlighted.
Charges on this screen may be modified. For example, many clients who enter charge data in PCM and import the data to Intellect choose to have the Who set to Y to hold the billing until they are able to review the charges and release them to bill.
For information on using this screen, see
Action Buttons at the Bottom of the Multi-line Charge Table
Updates:
Effective version 19.03.26, a <Primary Copay> field was added to the Charge Review screen to display the copay for the primary insurance.
Effective version 15.09.28, ICD-10 codes may display in the <Diag> field as either black or red print. For each diagnosis code, the setting of the <Billable> field on its Utility --►Diagnosis screen affects how the code displays. If the <Billable> field is set to 'Yes', the diagnosis code displays in black; if the <Billable> field is set to 'No' (the default), the diagnosis code displays in red.
Effective version 13.08.20 - When importing charges from PCM to Intellect, Intellect’s <Billing Dr> field uses PCM’s Billing Provider field instead of the Treating Provider field, as in the past. See examples below:
PCM Charge Posting:
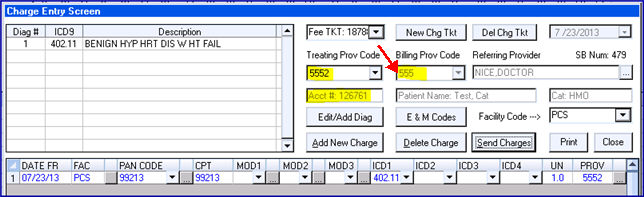
Intellect/Charge Review (for charges posted via PCM Charge Posting):
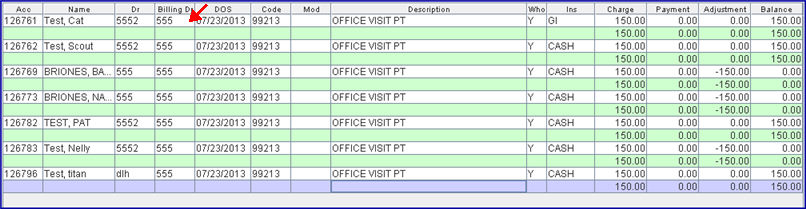
Multi-line Charge Table Column Descriptions:
15. Acc 
Displays the patient's account number.
16. Name 
Displays the patient's name.
17. Dr 
Displays the Provider of service, not the Billing Provider.
18. Billing Dr: 
Displays the Provider who is billing the service.
19. DOS 
Displays the date the service was provided.
Displays the procedure code.
21. Mod 
Displays the attached modifier, if any.
22. Description 
Displays the description of the Utility --►Procedure <Panel Description> or Utility --►Diagnosis <Description>.
23. Who 
Displays the party responsible for payment.
24. Ins 
Displays the insurance associated with the charge.
25. Charge 
Displays the dollar amount which is billed to the insurance. To modify the Charge amount, press 'M' (Modify) at the command column. Press the [Enter] key until the focus is at the Charge column.
26. Payment 
Displays payments.
27. Adjustment 
Displays adjustments.
28. Balance 
Displays the account balance.
The Key's Help keys are shortcut keys for ease in using the multi-line charge table. They may be accessed when modifying charges on the multi-line charge table by pressing [F2] with the focus anywhere on the multi-line charge table. Remember that a line must be selected to perform an action.
Several of these shortcut keys perform the same function as the Action Buttons at the bottom of the Edit Charge Review screen.
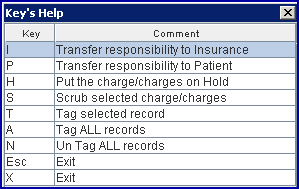
29. I: Performs the same function as the [Transfer to Insurance] action button.
30. P: Performs the same function as the [Transfer to Patient] action button.
31. H: Performs the same function as the [Put on Hold] action button.
32. S: Performs the same function as the [Scrub] action button.
33. T: To tag multiple line items and/or multiple patients, highlight the record and press the letter 'T' to select charges for modification.
34. A: To tag all records, click anywhere in the multi-line charge table and press the letter 'A'.
35. N: To untag all records, click anywhere in the multi-line charge table and press the letter 'N'.
36. Esc: Press the [Esc] button anywhere on the multi-line charge table to close the multi-line charge table and return to Intellect's main menu.
37. X: Press 'X' anywhere on the multi-line charge table to close the multi-line charge table and return to Intellect's main menu.
To display the context menu, select/tag the charge to modify, right-click on the mouse, and click on the applicable menu option.
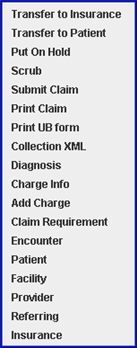
With the exception of the Collection XML and Add Charge options, each of the right-click options perform the same functions as similarly-named action buttons at the bottom of the Multi-line Charge Table (Note: the screen is labeled Charge Review). See Action Buttons at the Bottom of the Multi-line Charge Table for more information on each option.
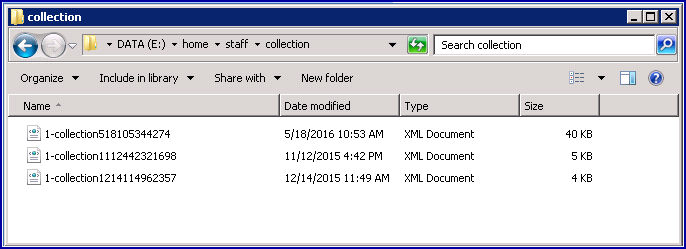
38. Collection XML (Effective version 15.02.17): With a charge tagged, click on Collection XML to create an xml file for that charge. This context menu option performs the same function as the [Create XML] button.
38.1 The first time this feature is used, it automatically creates a 'collection' folder in the designated Utility --►Set Up --►Parameter <Path File>. Each subsequent time charges are tagged and this option is selected, an XML file is created in the 'collection' folder.
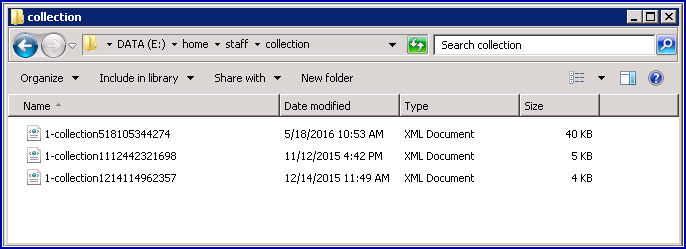
38.2 The Collection XML file is formatted as an electronic statement file; it contains information about the patient, provider, insurance and charge details such as CPT codes, diagnosis codes, charges, payments, and adjustments.
39. Add Charge (Effective version 15.06.10): With a charge tagged, click on Add Charge to display a Charge Entry pop-up window where a charge may be added by using information from the tagged charge:
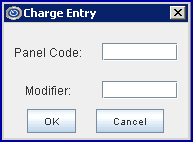
Enter the panel code to add and also a modifier, if needed. Click [OK] to copy the rest of the information from the selected charge. Note: This feature should only be used to add simple charges like office visits.
Action Buttons at the Bottom of the Multi-line Charge Table
Note: The Intellect screen for the multi-line charge table is labeled Charge Review. Fourteen buttons at the bottom of the Charge Review screen are divided into 'Tag Options' and 'Highlight Options.'

Tag Option buttons perform command tasks such as those listed in the Key's Help screen accessed in the multi-line charge table section above. Some Tag Option buttons have an underlined letter in their titles which correlate to the options in the Key's Help screen. For example, 'I' is underlined in [Transfer to Insurance] and performs the same action as pressing the 'I' key, after selecting a line, or multiple lines.
The 'Tag Option' buttons perform as indicated below for selected charges. Note: Before clicking on a button, select a line, or multiple lines.
40. [Transfer to Insurance] defaults to P1 Primary 1. Selecting one of the options from the drop-down changes the Who value and shifts the responsibility to the patient's insurance:
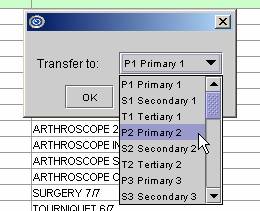
You must select a valid option for the highlighted records. For example, if selecting P2 Primary 2 from the drop-down window, and the patient has only P1 insurance set up in registration, this message displays:

41. [Transfer to Patient] changes the Who value to G and shifts the responsibility to the patient.
42. [Put on Hold] changes the Who value to Y, meaning the charges are on hold. No billing or statements are generated for the charges until the Who column is changed to either an insurance responsibility or patient responsibility.
Note: Statement Form 50 prints charges where the Who column is set to Y.
43. [Scrub] (effective version 9.12.24) submits an XML file to the vendor via sftp (secure file transfer protocol), and a message file returned with the results. When a claim is scrubbed, the program inserts a copy of the message into the second screen of the ledger - both Accounting and Open Item.
44. [CreateXML] (effective version 15.02.17) creates an XML file for the tagged line(s). This button performs the same function as the context menu option Collection XML.
44.1 The first time this feature is used, it automatically creates a 'collection' folder in the designated Utility --►Set Up --►Parameter <Path File>. Each subsequent time charges are tagged and this option is selected, an XML file is created in the 'collection' folder.
44.2 The Create XML file is formatted as an electronic statement file; it contains information about the patient, provider, insurance and charge details such as CPT codes, diagnosis codes, charges, payments, and adjustments.
45. [Submit] (effective version 9.12.24): After tagging the records to bill, click on [Submit] to open this screen:
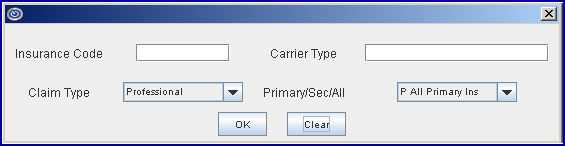
45.1 <Carrier Type> is the same as what would be entered in the <Carrier Type> field of Billing --►Tele Com --►Submit Claim and is the same as in the Utility --►Insurance --►Modify <Electronic Billing> for the code entered in the <Insurance Code> field on this pop up screen.
45.2 [OK] saves the entered information.
45.3 [Clear] clears the data entered so correct information can be entered.
45.4 To close the window, click on X in the top right corner of the box.
46. [Print Claim]: After tagging the patient(s) records for which to print claims, click the [Print Claim] button. Tagged records should have charges, a balance, and Who = G.
47. [Print UB Form]: After tagging the patient(s) records for which to print UB forms, click the [Print UB Form] button. Tagged records should have charges, a balance, and Who = G.

Highlight Options serve as quick links to corresponding tables for tagged charges/patients.
48. [Diagnosis] (Effective version 9.12.24) displays this window where Diagnosis codes may be added, modified, or deleted:

48.1 [Add] - To add a diagnosis to the list, enter the Diagnosis code and then click on the [Add] button.
Effective version 15.09.28: For the diagnosis code to add, if the <Billable> field on a diagnosis code’s Utility --►Diagnosis screen has been set to 'Yes,' and there are higher levels of specificity for that diagnosis code, then when adding that diagnosis code, this pop up displays:
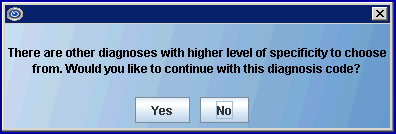
o Click [Yes] if it is OK to bill with that diagnosis code.
o Click [No] to return to the <Diagnosis> field to change the diagnosis code.
48.2 [Modify] - To modify an existing code; i.e., change it to a different code, click on the diagnosis code to change, click on [Modify], type in the correct code, and press Enter.
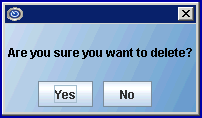
48.3 [Delete] - To delete a diagnosis code from the list, click on the diagnosis, and then click on [Delete]. After clicking on [Delete], the following window displays. Click [Yes] to delete the diagnosis code OR click [No] to return to the Charge Review screen.
48.4 [Exit] - Click [Exit] to return to the Charge Review screen. Changes made are automatically saved.
[Diagnosis] button update, effective version 15.08.06: If the date in the <ICD10 Effective Date> field on the Utility --►Set Up --►Parameter screen is equal to or greater than October 1, 2015, two selection boxes are available for the <Diagnosis> field:
1. If an ICD-9 code is entered in the <Diagnosis> field, Intellect displays a selection list from which to choose an appropriate ICD-10 code. Users may highlight the appropriate ICD-10 code and click the [Select ICD-10] button, OR click [Exit] to close the selection screen.
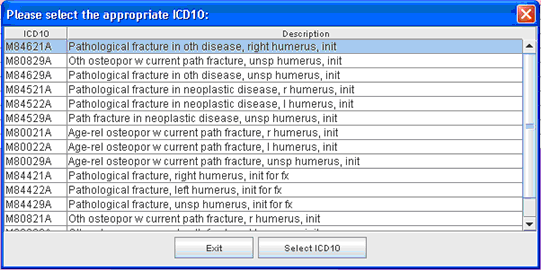
2. When users enter either a keyword or partial ICD-10 diagnosis description in the <Diagnosis> field, Intellect displays an ICD-10 Lookup screen which includes ICD-10 code options for the keyword/description displayed in the <Search Phrase> field. For example, enter hand fracture in the <Diagnosis> field and press [Enter] to display:
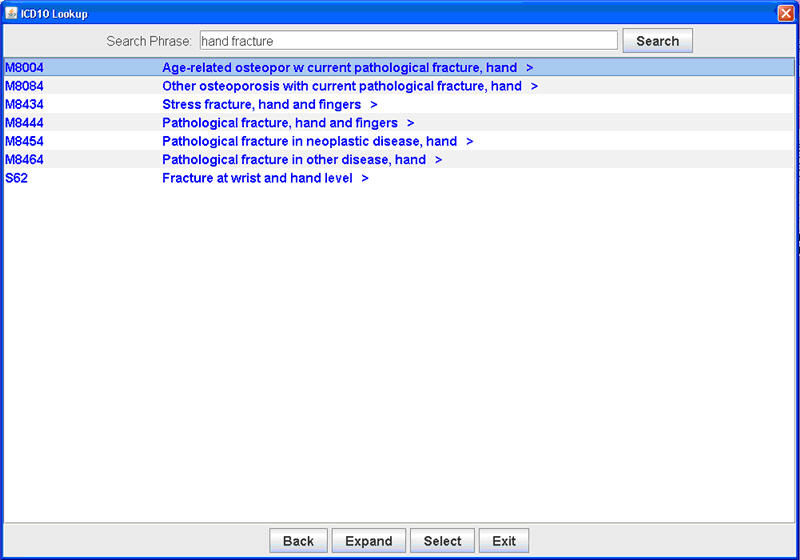
Options that are displayed in blue, as shown above, may be expanded to the next level by double-clicking on the code OR clicking the [Expand] button at the bottom of the pop up window with the code selected. The next level of codes is then displayed:
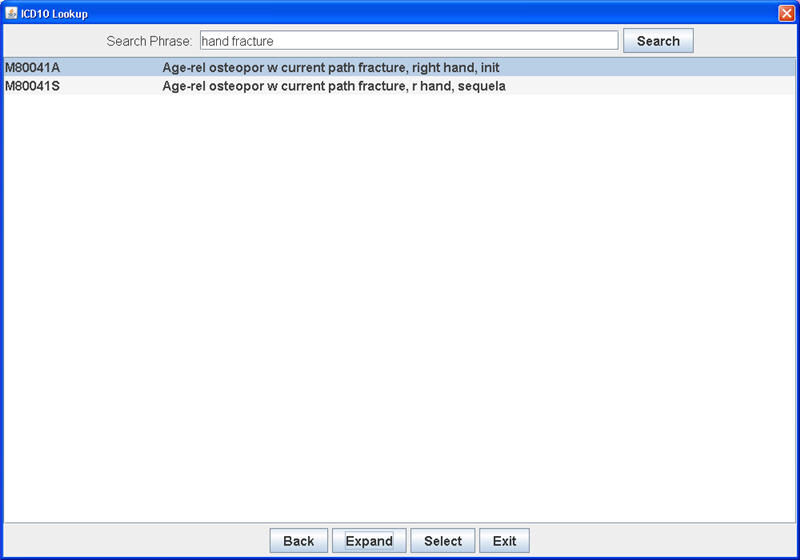
Click [Back] to return to the original list, click [Select] to choose the highlighted code for the charge, OR click [Exit] to close the ICD10 Lookup screen.
49. [Charge Info] (Effective version 9.12.24) displays the fields most commonly modified when correcting charge information on rejected claims. After making the changes, click [Modify] to save the changes, OR click [Exit] to return to the Charge Review screen without saving changes.
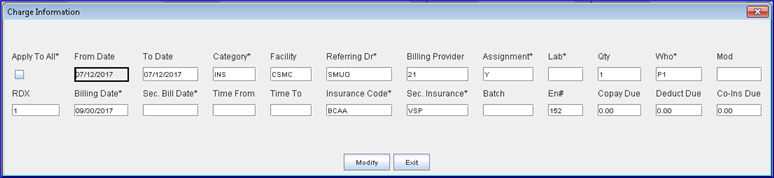
Note: If the Apply To All box is selected, the changes are applied to all the charges currently selected. This option works only with the fields with asterisks: <Referring Dr>, <Who>, <Assignment>, <Lab>, <Billing Date>, <Sec. Bill Date>, <Insurance Code>, and <Sec. Insurance>.
The operation of this screen and the fields on it are dependent on the version of software being used, as noted below:
49.1 Effective version 19.03.26 - Three new fields. The <Copay Due>, <Deduct Due>, and <Co-Ins Due> fields were added to the Charge Information screen to allow the user to modify the unpaid copay, deductible, and co-insurance for a charge.
49.2 Effective version 18.07.18 - New field. Prior to this release, it was found that when posting charges with an encounter that also had a lab in the encounter and the encounter was no longer attached to the charge, the lab was still attached to the charges and printing in Box 32 and was also being included in the electronic 837 submission in NM1-77. As of version 18.07.18, a <Lab> field was added to the Charge Information window to allow the user to remove the LAB from the charge history.
49.3 Effective version 15.09.02 - New field. The <EN#> field was added to this screen, allowing users to enter an encounter that does not already exist.
49.4 The <Billing Provider>, <Facility>, <Referring Dr>, <Category>, <Insurance Code>, and <Sec. Insurance> fields require validation of entered values. In the past, pressing [Enter] was the only method to check the validity of the field input. Effective version 13.08.20, field input can be validated regardless of whether a mouse or the [Enter] key is used.
49.5 Effective version 13.04.10 - Modification: The number of characters allowed to be entered in the <RDX> field was increased to accommodate 2-digit pointers with comma separators.
49.6 Effective version 12.12.06 - New field. The <Category> field was added to this screen, eliminating extra steps.
49.7 Effective version 9.12.31 - New field. The <Batch> field was added to this screen, enabling users to modify the Batch number.
50. [Claim Requirement] (Effective version 9.12.24) takes the user to the Modify CLAIM REQUIREMENT screen. The fields on this screen vary per claim (see Utility --►Procedure --►Procedure --►Modify for set up instructions). Information may only be added in the available fields. Information may not be modified on this screen.
After completing the claim information, click [Modify] to save the changes, [Clear] to clear all the fields on the screen, OR click [Exit] to return to the Charge Review screen without saving changes.
51. [Encounter] (Effective version 9.12.24) takes the user to the Modify Encounter screen linked to the charge(s) tagged. If the charge was not linked to an Encounter, the program opens an 'Add Encounter' screen.
After making changes, click [Modify] to save the changes, [Clear] to clear all fields on the screen, OR click [Exit] to return to the Charge Review screen without saving changes. After selecting [Clear] or [Exit], this pops up:
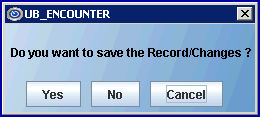
• [Yes]: Click to save the changes.
• [No]: Click to NOT save the changes. Intellect returns to the Charge Review screen.
• [Cancel]: Click to return the focus to the Modify Encounter screen. Any changes that were made are still reflected on the screen.
52. [Patient] (Effective version 9.12.24) takes the user either to the Registration --►Regular --►Patient --►Modify or Registration --►Worker --►Worker --►Modify screen, as applicable, where information may be modified or added as needed. Note: The program determines whether to open the Regular or Worker screen based on the patient's Utility --►Category code <Type>. If the <Type> is W or F, the Worker screen is opened; all other <Types> open the Regular screen. Changes to insurance may also be made at this time.
After making changes, click [Modify] to save the changes, [Clear] to clear all fields on the screen, OR click [Exit] to return to the Charge Review screen without saving changes. After selecting [Clear] or [Exit], this pops up:
• [Yes]: Click to save the changes.
• [ No]: Click to NOT save the changes. Intellect returns to the Charge Review screen.
• [Cancel]: Click to return the focus to the Modify Patient screen. Any changes that were made are still reflected on the screen.
53. [Facility] (Effective version 9.12.24) takes the user to the Utility --►Facility --►Modify screen where information may be modified or added as needed.
After making changes, click [Modify] to save the changes, [Clear] to undo changes which were modified on the screen, OR click [Exit] to return to the Charge Review screen without saving changes. After selecting [Clear] or [Exit], this pops up:
• [Yes]: Click to save the changes.
• [No]: Click to NOT save the changes. Intellect returns to the Charge Review screen.
• [Cancel]: Click to return the focus to the Modify Facility screen. Any changes that were made are still reflected on the screen.
54. [Provider] (Effective version 9.12.24) takes the user to the Utility --►Provider --►Provider --►Modify screen where information may be modified or added as needed.
After making changes, click [Modify] to save the changes, [Clear] to clear all fields on the screen, OR click [Exit] to return to the Charge Review screen without saving changes. After selecting [Clear] or [Exit], this pops up:
• [Yes]: Click to save the changes.
• [No]: Click to NOT save the changes. Intellect returns to the Charge Review screen.
• [Cancel]: Click to return the focus to the Modify Doctor screen. Any changes that were made are still reflected on the screen.
55. [Referring] (Effective version 9.12.24) The function of this button is dependent on whether or not the <Referring> field on the Charge Review screen is populated.

55.1If the <Referring> field on the Charge Review screen is populated, the user is taken to the Utility --►Referring --►Modify screen where information may be modified or added as needed. After making changes, click [Modify] to save the changes, [Clear] to clear all fields on the screen, OR click [Exit] to return to the Charge Review screen without saving changes. After selecting [Clear] or [Exit], this pops up:
• [Yes]: Click to save the changes.
• [No]: Click to NOT save the changes. Intellect returns to the Charge Review screen.
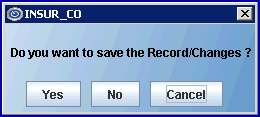
• [Cancel]: Click to return the focus to the Modify Referring screen. Any changes that were made are still reflected on the screen.
55.2 If the <Referring> field on the Charge Review screen is NOT populated, this message displays:
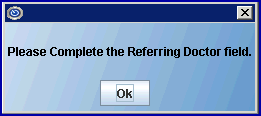
Click on [OK] to close the pop-up, and then click on the [Charge Info] button, add a referring doctor in the <Referring Dr> field, and click on [Modify] to save the addition.
56. [Insurance] (Effective version 9.12.24) takes the user to the Utility --►Insurance --►Insurance --►Modify screen where information may be modified or added as needed.
After making your changes, click [Modify] to save your changes, [Clear] to clear all fields on the screen, OR click [Exit] to return to the Charge Review screen without saving changes. After selecting [Clear] or [Exit], this pops up:
• [Yes]: Click to save the changes.
• [No]: Click to NOT save the changes. Intellect returns to the Charge Review screen.
• [Cancel]: Click to return the focus to the Modify Insur_Co screen. Any changes that were made are still reflected on the screen.

