Intellect™
BILLING MENU OPTIONS

Tele Com
Verify
Eligibility Verification Overview
and
SCHEDULE MENU OPTIONS
Eligibility Verification
Updates:
Effective version 21.04.14
New Inovalon/Ability All Ease Payer integration for Eligibility Verification is now available.
Prime Clinical Systems developed another API solution for the Eligibility Verification for the Inovalon/Ability All Ease Payer Solution to function the same as the current method of OnStaff/Intellect Eligibility Verification. Contact PCS for details.
Announcement in the version 18.03.14 release note:
Eligibility TLS/TPS Changes for Cognizant/TriZetto Clients
New requirements were assigned by Cognizant/TriZetto for TLS in using the ELIGIBILITY features in the Intellect software. Cognizant stated, "In an effort to enhance our current product functionality and capabilities, we are in the process of upgrading your Master Eligibility Web Service (MES) offering. TPS will disable TLS 1.0 security protocol by end of year 2018, and is requesting clients upgrade their systems to accommodate TLS 1.1 and/or 1.2 protocols prior to this date." (emphasis added). In response to Cognizant's changes, Prime Clinical Systems made the necessary changes to our software to comply with Cognizant/TriZetto's product. If an office uses Cognizant/TriZetto as their Clearing House Solution, the office will require an Intellect update to a version date greater than 2/28/2018. This change is seamless and requires no action on the part of the office once the software is updated. Failure to update to an Intellect version date greater than 2/28/2018 prior to December 2018 results in a non-functioning Eligibility feature within Intellect.
Video tutorial available: Click Real-Time Eligibility Verification to access the link. Depending on the system set up, the media player may need to be activated. Speakers need to be attached to the workstation to hear the instructions.
Note: To view the videos, log-in through the www.primeclinical.com website. Current support is required.
In this Topic Hide
2. Setting Up Eligibility Verification
3. Using Eligibility Verification
3.1 Real Time: From the Appointment Schedule
3.2 Batch Mode: Submitting/Picking Up Verification Files Daily
This feature can improve productivity, lower costs, and can reduce the need to print results as the data is stored in electronic format attached to the patient account. You may validate this information:
• Eligibility status (active/inactive), begin, and term dates
• Demographic information; e.g., first name, last Name, date of birth (DOB), etc.
• Subscriber ID & group number
• Co-pays, Co -insurance, and deductibles (in-network and out-of-network)
• Patient address
• PCP name (if applicable)
• Primary insurance information if Medicare is the secondary payor
• Managed Care Organization information (MCO/HMO), if patient is enrolled
As explained in the sections below, eligibility may be verified either in real time through the appointment schedule or in batch mode by submitting a batch file, through automation or manually.
Note: Before this feature may be used, set up is required.
To use this feature, these steps must be completed:
2.1 Set up an account with an approved third-party vendor who supports eligibility verification. See Third-Party Vendor Options --►Electronic Claims & ERA and Eligibility Verification for vendor information.
2.2 Contact your clearinghouse to either sign up to do eligibility, or to verify that you are already signed-up to do eligibility.
2.3 Create a Utility --► Insurance --► Insurance record for the Verification vendor. The <Eligibility> field should include the Carrier Type, and <Eligibility Receiver> must have the proper code.
2.4 Create a Utility --► Insurance --► Tele Com record for the Verification vendor with the <270 Script> field set for this vendor.
Eligibility may be verified either from the Add Appointment screen at the time the appointment is scheduled OR right-click on an already-scheduled appointment and select either Inquire or Eligibility (both of which go to the Inquire Appointment screen), and then click on the [Eligibility] button located at the bottom of the window. Both the Add and Inquire screens have a button for [Eligibility] located at the bottom of the window.
![]()
Effective version 9.12.09 Verification per Calendar Date. Many insurances verify eligibility for dates of service within 24 hours of the request. Some verify within 1 week, or 2 weeks, and some do not apply restrictions. Prior to version 9.12.09, Intellect submitted the scheduled appointment date in the eligibility request file (270), which meant eligibility could only be requested for current appointments. Effective in version 9.12.09, the program now sends the Calendar Date instead of the scheduled appointment date. It is important to know that the eligibility response is verifying the patient eligibility for the current calendar date and does not assure that the patient is eligible for future appointments. This change not only applies to Real Time Eligibility (from the appointment schedule) but also to Batch requests for eligibility either sent via automation or manually sent through Billing --►Tele Com --►Eligibility.
Click the [Eligibility] button to submit a Request 270 file via sftp to the vendor and, in real time, receive a reply via a Verification 271 file. The information is inserted into a table and may be viewed by selecting the Eligibility History tab on either the Add or Inquire Appointment screens. Detailed Eligibility history information for the highlighted/selected record displays:
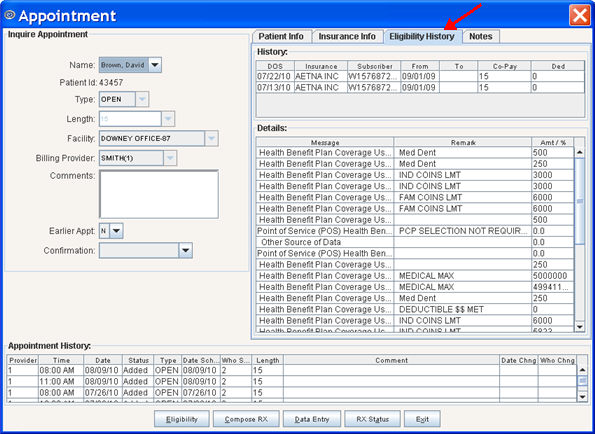
Note: Eligibility responses vary from payer to payer. Some payer responses are very robust and include quite a bit of benefits information in addition to the eligibility response. Others are more limited in the information that they provide. If the information is not required in a 271 response, there is no way to make the payer send it. For example, Cognizant (formerly Trizetto) always returns all of the information to the office that they receive from each payer. Please remember that this is just an Eligibility verification. This tells the provider if the patient is eligible for services on the date submitted.
For detailed information on the Eligibility History tab, see Schedule --►Appointment --►Full Day --►Appointment Booking and Management --►Add Appointment Dialog Box - Eligibility History Tab.
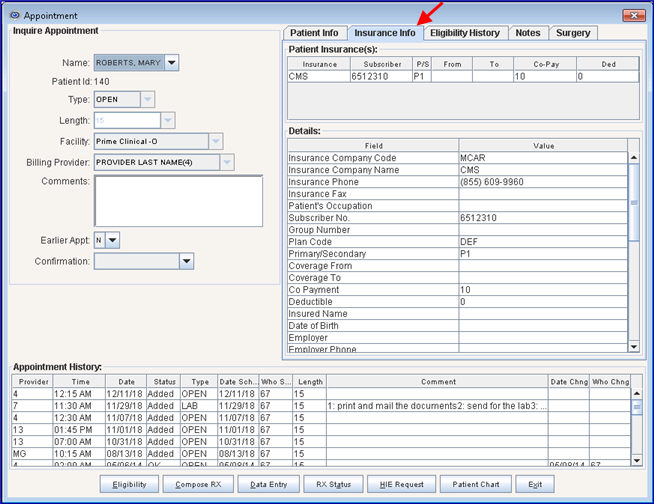
If needed, select the Insurance Info tab on either the Add or Inquire Appointment screens to display the patients’ insurance(s) and the details of the insurance(s). A sample screen follows. More information for this tab is available in Schedule --►Appointment --►Full Day --►Appointment Booking and Management --►Add Appointment Dialog Box - Insurance Info Tab.
Another option is to submit a batch file for all patients with an appointment scheduled for a single day. This method of Eligibility Verification is usually set up as an automated task, but could be run manually (see below). Typically, the automated task would run either the night before or two nights before the appointment.
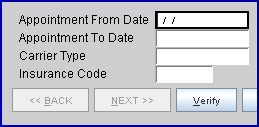
3.2.1 Go to Billing --►Tele Com --► Verify to create and manually send the request (270)
• Batch of Patients: Manually enter individual or small batches of patients for verification and click [Verify].
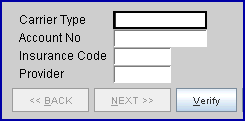
• Group of Patients: The scheduled patients for a selected date range are submitted.
The patient insurance information is sent in a Request 270 file to the vendor via sftp. When eligibility has been verified for all patients in the batch file, the Verification 271 file is ready to be picked up. Note: The turnaround time varies. Check with your clearinghouse.
Note: Effective version 16.10.11, in the third quarter of 2016, CMS made a mandated change related to eligibility verification. The change requires all eligibility transactions to exclude the patient gender. As of this update, OnSTAFF/Intellect no longer sends the patient gender in the eligibility request (270).
3.2.2 Go to Billing --►Tele Com --► Acknowledgement to pick-up the response (271). The <Status> field must be set to 'P.'

The information is imported into the same table used for the Real Time Eligibility Verification. To view, right-click on the patients' scheduled appointment and select either Inquire or Eligibility, or as shown below in View Existing Eligibility Records.
The eligibility information is kept indefinitely. To view it, go to Billing --►Tele Com --►Eligibility --►Modify and enter the date of service and account number in the <Date> and <ACN> fields, respectively. Both field entries must be correctly matched to modify/display a record.
See Billing --►Tele Com --►Eligibility --►Modify for field definitions and additional screen information.
Version 9.12.13 - Response Code Added. Prior to this update, Response Code AAA67, used by the insurance when the patient was not found in their eligibility records, was not programmed in Intellect. Therefore, nothing would show in Intellect's Eligibility History. Effective this update, the 271 Response Code AAA67 has been added to the eligibility verification programming, allowing the code to be inserted into the patient's Intellect eligibility record and the description to be displayed in the patient eligibility history.
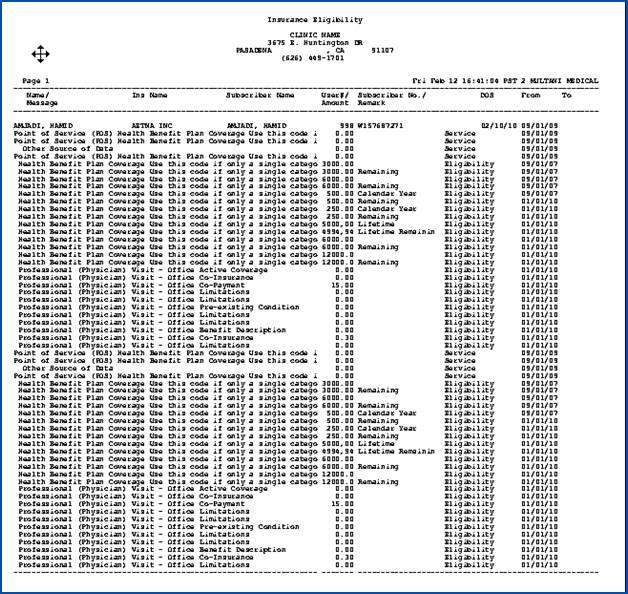
Records may be printed as follows:
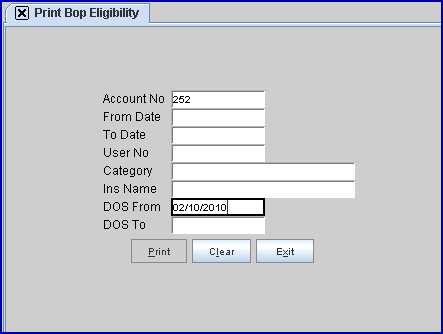
• Go to Billing --►Tele Com --►Eligibility --►Batch or Group of Patients (see Billing --►Tele Com --►Eligibility --►Batch for definitions of the fields shown on this screen).
• Enter the account number.
• Enter the date of service.
• Click on [Print]:
Sample printout: