
Intellect™
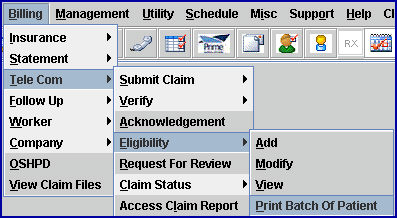
BILLING MENU OPTIONS

Tele Com
Eligibility
Print Batch of Patients
Updates:
Effective version 21.04.14
New Inovalon/Ability All Ease Payer integration for Eligibility Verification is now available.
Prime Clinical Systems developed another API solution for the Eligibility Verification for the Inovalon/Ability All Ease Payer Solution to function the same as the current method of OnStaff/Intellect Eligibility Verification. Contact PCS for details.
Announcement in version 18.03.14 release note:
Eligibility TLS/TPS Changes for Cognizant/TriZetto Clients
New requirements have been assigned by Cognizant/TriZetto for TLS in using the ELIGIBILITY features in the Intellect software. Cognizant stated, "In an effort to enhance our current product functionality and capabilities, we are in the process of upgrading your Master Eligibility Web Service (MES) offering. TPS will disable TLS 1.0 security protocol by end of year 2018, and is requesting clients upgrade their systems to accommodate TLS 1.1 and/or 1.2 protocols prior to this date." (emphasis added). In response to Cognizant's changes, Prime Clinical Systems has made the necessary changes to our software to comply with Cognizant/TriZetto's product. If an office uses Cognizant/TriZetto as their Clearing House Solution, the office requires an Intellect update to a version date greater than 2/28/2018. This change is seamless and requires no action on the part of the office once the software is updated. Failure to update to an Intellect version date greater than 2/28/2018 prior to December 2018 results in a non-functioning Eligibility feature within Intellect.
This menu option is used to print Insurance billing eligibility for a patient or small batch of patients. When a client's billing is set for Tele Com, the Eligibility screen populates with Verification Requests that have been sent via Billing --►Tele Com --►Verify (270) and picked-up by Billing --►Tele Com --►Acknowledgement (271). Also, specific patient accounts may be manually added to the file.
1. To print a batch of eligibility records in Intellect, go to Billing --►Tele Com --► Eligibility --►Print Batch Of Patient
The Print BOP Eligibility screen displays:
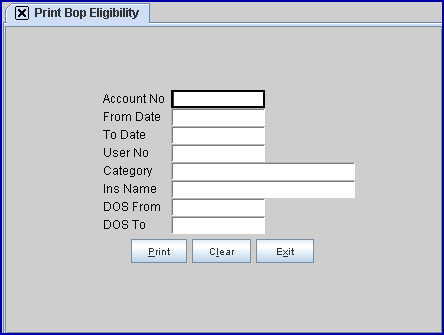
2.1 Enter the account number of the patient to be printed. This field is mandatory; if this field is empty when [Enter] is pressed, the system displays this message:
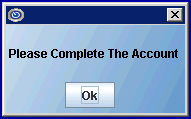
Click [Ok] to return to the <Account No> field.
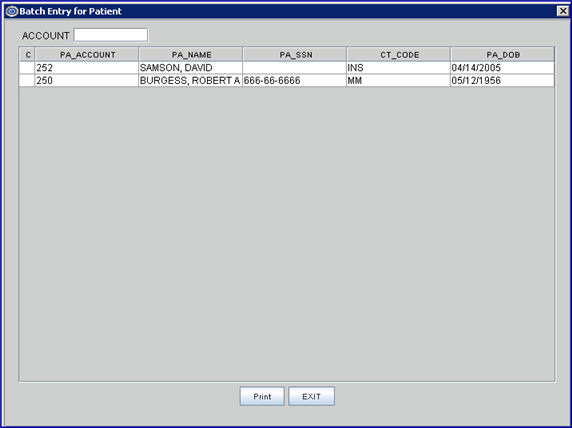
2.2 After entering an account number, press [Enter] to display the Batch Entry dialog screen, allowing more accounts to be individually added to process as a single batch.
2.3 Type any additional account numbers (one at a time), and press [Enter] to add.
3. From Date 
3.1 Enter the beginning entry date of verifications to print.
- OR -
3.2 Leave this field blank to print all selected patient verifications.
4. To Date 
4.1 Enter the latest entry date of verifications to print.
- OR -
4.2 Leave this field blank to print all selected patient verifications.
5. User No. 
5.1 Enter the Utility --► Set up --► Security --► Login Users <User Number> to print verifications obtained by a specific user.
- OR -
5.2 Leave this field blank to use the current user’s number.
6. Category 
6.1 To request ALL categories, press [Enter] to bypass this field.
- OR -
6.2 Enter a specific Utility --► Category <Category Code> to limit the printing to a specific patient category.
6.3 This field also accepts multiple category codes separated by commas with no spaces. For example:

7. Ins Name 
7.1 Enter a specific Insurance company name to limit what is printed. This is the name as it appears in the Eligibility file whether returned in the 271 or user-entered (not necessarily the Utility --► Insurance name).
7.2 To request ALL insurers, press [Enter] to bypass this field.
8. DOS From 
8.1 This field limits the printing based on the eligible date of service.
8.2 Use this as the beginning date to include, OR leave blank to search back indefinitely.
9. DOS To 
9.1 This field limits the printing based on the eligible date of service.
9.2 Use this as the ending date to include, OR leave blank to search forward indefinitely.
10. When the information is completely entered, select one of these options:

10.1 Click [Print] to display the Print ELIGIBILITY_REPORT dialog box:
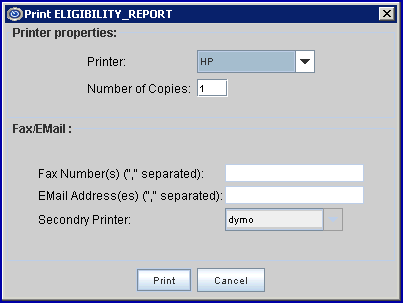
10.1.1 Printer Properties:
10.1.1.1 Printer: The default printer for the logged-in clinic and password is selected. To select a different printer, either click on the arrow, OR press the → (right arrow) on the keyboard to view the list of printer codes. In our example, the defaulted Printer is HP. This is just an example of a printer name and may or may not be set up on the system.
To select the printer type, click on the code, OR use the ↑ (up) and ↓ (down) arrows to highlight the correct code; then press the [Enter] key to select.
10.1.1.2 Number of Copies: This field defaults to either 0 (zero) or 1. Both print 1 copy. To print more than one copy, enter the number of copies.
10.1.2 Fax/Email:
In addition to printing reports, Intellect provides the capability to export reports to Email, Fax, Disk, or Archive. A secondary printer may also be selected, if one is set up, by clicking on the arrow to display the drop-down list.
10.1.3 Select the [Print] button to send the request to the printer (or as a Fax or email).
10.1.4 Select the [Cancel] button to clear the screen and return to the Print BOP Eligibility screen without saving or printing.
10.2 Click [Clear] to clear all information and return the focus to the <Account No> field.
10.3 Click [Exit] to clear the screen and return the focus to the main Intellect screen without saving.
