
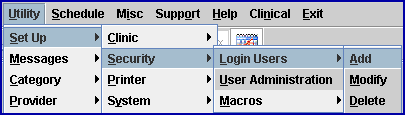
UTILITY MENU OPTIONS

Set Up
Security
Login Users
This option is used to assign new users passwords, security levels, macro groups, printer groups, and user numbers (unique to each user). The security level should at least meet the minimum security level required for the jobs assigned to the employee. The security levels are associated with menu functions seen throughout Intellect. These levels are maintained under Utility --► Set Up --► Menus --► Programs.
Note: Although Utility --►Set Up --►Security --►Login Users also has a Delete option, Prime Clinical recommends that instead of deleting users a date should be added to the <Operator Expire Date> field. Deleting a user eliminates the ability to track who used that operator number for posting.
See details for setting up security in Intellect.
For information on viewing a list of users and user numbers that have already been added in Intellect, see Viewing Set Up Users at the end of this document.
Video Available: Click Login Users & Security Set Up to access the link. In regard to access levels within E-Prescribing, these videos are also available: Compose RX and Renewing Prescriptions. Depending on the system set up, the media player may need to be activated. Speakers need to be attached to the workstation to hear the instructions.
Note: To view the videos, log-in through the www.primeclinical.com website. Current support is required.
Version 9.12.03 - New Feature - Management may now modify an operator's security, appointment group, etc. without knowing the operator's current password simply by using fields <User Number> and <Temporary Password> on this screen. See the descriptions for those fields below for directions. For additional information, contact PCS.
1. To set up security in Intellect, go to Utility --► Set Up --► Security --► Login Users --► Add:
The Add SECURITY screen displays:
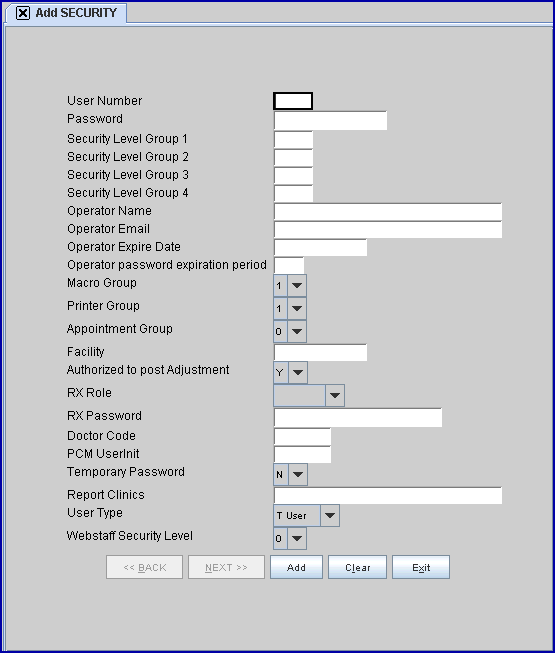
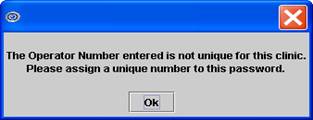
2.1 All <Password>s must be assigned a unique user number. The number is used to track work done by each person and can be viewed in places such as the Ledgers and Appointment Schedule. Intellect defaults a number that has sequentially increased from the last number assigned.
2.2 Although this entry may be modified, attempting to assign a previously-used number generates an error message:
NOTE: Do NOT change User Numbers 999 and 998.
2.3 Effective version 9.12.03 New feature - To allow management to access an operators' Login record without having the password, the <User Number> field was moved so it is now the first field on the screen.
2.3.1 If modifying a record and the User Number is known, enter it at the <User Number> field and press [Enter].
2.3.2 If the needed User Number is unknown, press the [F2] key twice to display a complete list of operators for the clinic in which you are working. Scroll down to the person whose record you wish to modify and press [Enter].
2.4 If the office is using Intellect's Task Manager feature (Effective version 16.05.20) and also using PCM, this field is required as every Intellect user of Intellect's Task Manager feature needs to be linked to a user in PCM. To link:
2.4.1 Enter the Intellect user number which should be linked to a PCM user.
3.1 Type a unique password for this operator. If not unique, Intellect displays an error message:
Press the [OK] button to return the focus to the <Password> field.
3.2 Use a minimum of three and a maximum of 10 characters (letters, numbers, or a combination) for the password.
3.3 This field is mandatory and must be completed. If left blank, the an error message displays:
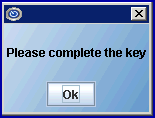
Press the [OK] button to return the focus to the <Password> field.
4.1 This is the first of four possible security groups used to limit menu access as determined by daily tasks.
4.2 Security Groups are added and maintained in Utility --►Set Up --► Menus --► Programs and can be a menu, an internal function, or an external function. For more information on Security Groups, refer to the Utility --►Set Up --►Security --►Security Groups: Understanding section of this manual.
4.3 Use this field to type in a security level value from 0-99 for this operator for this Security Group.
4.4 Assign numbers by job function for items in this group. The highest security level is 99. With a level of '99', the user has access to all menu areas of Intellect.
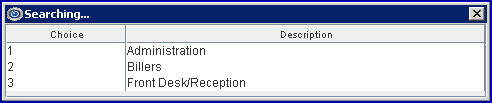
4.5 Security level defaults may be modified depending on the clinics particular needs. Recommended security levels to start with are Administrators-99, Billers-60, Front Desk/Reception-40.
4.6 From any menu, the security level defaults for the options of Add, Modify, Delete, and View are set as: ADD-50, MODIFY-40, DELETE-60, VIEW-10.
4.7 In software prior to version 14.12.30, if a user changed the system date to an incorrect date and needed to enter a new date, the user could do so regardless of his/her security level. Effective version 14.12.30, a security level check has been added on the Utility --►Set Up --►Clinic <Current Entry Date> field. With this change, only users with qualified security levels can change the <Current Entry Date> on the Modify CLINIC screen. Security is set via the <Security Level Group> fields on the Utility --►Set Up --►Security --►Login Users --►Modify screen. Permitted users must have a <Security Level Group> 1 greater than the value shown in the <Security Group> field on the Utility --►Set Up --►Menus --►Programs screen.
If a user with a low security level tries to change the date, he/she gets this pop up message:
"Your security level does not allow you to modify the Current Entry Date."
5. Security Level Group 2 
5.1 This is the second of four possible security groups used to limit menu access determined by daily tasks.
5.2 Use this field to type in a security level value from 0-99 for this operator for this Security Group.
6. Security Level Group 3 
6.1 This is the third of four possible security groups used to limit menu access determined by daily tasks.
6.2 Use this field to type in a security level value from 0-99 for this operator for this Security Group.
7. Security Level Group 4 
7.1 This is the last of four possible security groups used to limit menu access determined by daily tasks.
7.2 Use this field to type in a security level value from 0-99 for this operator for this Security Group.
8.1 Enter the operator's name.
8.2 This field may not be left blank.
8.3 Keep in mind that collection letters generated by Intellect identify the sender by the name entered in this field.
9.1 The email address entered here shows in the From header in all emails generated by this operator.
9.2 Enter the email address for this operator.
9.3 Offices using the email appointment reminder option should enter the email address registered by the DSL provider.
9.3.1 The security records of all users who intend to email must include the same <SmtpServer> address that was entered in the Utility --►Tools --►Configuration <SmtpServer> field.
10.1 This field allows management to designate the length of time a user has login privileges.
10.2 Type the date this password should expire.
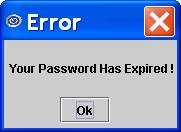
10.3 Anyone attempting to login with an expired password receives this error message:
10.4 Note: Although Utility --►Set Up --►Security --►Login Users also has a Delete option, Prime Clinical recommends that instead of deleting users, a date should be added to this field since deleting a user eliminates the ability to track who used that operator number for posting.
11. Operator password expire period 
11.1 Type the number of days until the user will be forced to change his/her password.
11.2 If completed, Intellect prompts the operator to enter a new password, and to enter it a second time to confirm. For example, if completed as 30, each 30 days the system prompts the user to enter a new password.
12. Macro Group 
12.1 This Macros selection option assigns the user to a standard Macro Group.
12.2 Macro groups may be defined for each operator to meet his/her requirements; however, it is recommended to assign one of the Standard Macro Groups shown when pressing [F2]:
12.3 Accept the default Macro Group Code '1' OR use the drop-down list to select an appropriate group for this operator
13. Printer Group 
13.1 Leave '1' as the default.
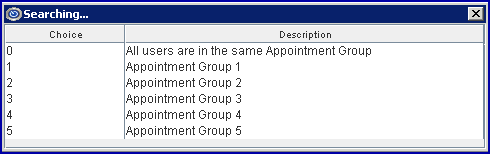
14.1 This is used to create an appointment scheduling group where this operator only sees and is able to schedule (Add, Modify, Delete, etc) providers or appointment types with this configured Appointment Group number.
14.2 To include specific providers in this group, use Utility --► Provider --► Provider <Appointment Group>.
14.3 To include specific types of appointments in this group, use Utility --► Set Up--► Appointment Type <Appointment Group>.
14.4 Accept the default '0' (all groups) OR use the drop-down list make an alternate selection. See the [F2] list below:
15. Facility 
15.1 This is used to create an appointment scheduling function where this operator only sees and is able to schedule (Add, Modify, Delete, etc) for this specified facility.
15.2 To view the list of codes with descriptions, press the [F2] key to display the Searching screen. To view the list of only the codes, either click on the arrow, OR press the → (right arrow) on the keyboard. To select, double-click on the correct code, OR use the ↑ (up) and ↓ (down) arrows to highlight the correct code, and then press the [Enter] key to select. For more information on the Searching screen, see Introduction to Intellect --► Intellect Characteristics and Features -- Searching.
16. Authorized to Post Adjustment 
16.1 Used for security when posting adjustments.
16.1.1. Click 'Y' (Yes) to allow the user to post Adjustments in Payment --►Open Item.
16.1.2. Click 'N' (No) to NOT allow the user to post Adjustments in Payment --►Open Item. If this <Authorized to post Adjustment> field is set to 'N' and an adjustment is entered through Payment --►Open Item <Src Adjustment>, this warning displays when selecting [Commit/Exit] on the Payment --►Open Item screen:
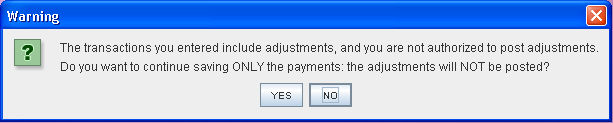
16.1.2.1 Click YES to save the payment(s) entered, but NOT save the adjustments.
16.1.2.2 Click NO to return to the Payment --►Open Item screen to the [Undo Changes] button. The transactions entered must be undone and the payments re-posted.
NOTE: Log out and log in for changes to this <Authorized to post Adjustments> to be implemented.
17. RX Role 
17.1 Effective version 9.12.1 - New field added
17.2 Once this field is set, it can not be modified. To change the selection in this field, contact PCS.
17.3 Use the drop-down list to select the appropriate RX role.
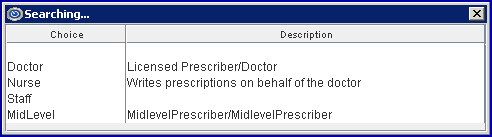
17.3.1 Doctor: The Doctor role indicates a real doctor; i.e., someone who has both an individual DEA and NPI number completed in the Utility --►Provider --►Provider record. He/She may compose and submit a prescription on his/her own.
17.3.2 Nurse: The Nurse role does not have a DEA or NPI number. The Nurse role is assigned by a Doctor to write a prescription on the Doctor's behalf.
17.3.3 Staff: Personnel who can connect to NewCrop and enter patient data but do not have the privilege to write or begin a prescription.
17.3.4 MidLevel: This role indicates someone without a DEA number but who has an NPI. In order to write prescriptions, this role requires a supervising provider with a DEA. Prescriptions written with this role stay pending until they are approved by the Doctor.
18. RX Password 
18.1 Effective version 9.12.1 - New field added
18.2 This password is unique and is not the same as the password used to access the system. The client defines his/her own password which may or may not be unique for each user.
19. Doctor Code 
19.1 Effective version 9.12.1 - New field added
19.2 This is required only when adding a record for a MidLevel role prescription writer. Enter the Provider Code of the supervising provider as set up in Utility --►Provider.
NOTE: Once the e-prescribing information has been set up, the information may not be modified or deleted.
PCM users only.
20.1 Effective version 9.12.1 - New field added
20.2 For offices using Intellect's Task Manager feature (effective version 16.05.20), this field is required as every Intellect user of the Intellect Task Manager feature needs to be linked to a user in PCM.
20.2.1 Enter the initials of the PCM user to whom the Intellect <User Number> should be linked. For more information on PCM user names, contact PCS support.
Note: The user type for the PCM user must also be entered in the <User Type> field.
20.3 After pressing [Enter] in this field, the <User Type> automatically defaults based on the PCM setup.
20.4 If a valid PCM UserInit is entered, after pressing [Add] (or [Modify] on the Modify Security screen), a pop-up prompt appears for entry of the PCM password:
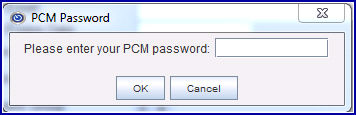
Since PCM passwords should NOT be shared with other users, the PCM user needs to be present to type in his/her password. The password is not displayed.
20.5 If an invalid PCM UserInit is entered, after pressing [Add] (or [Modify] on the Modify Security screen), this pop-up prompt appears:
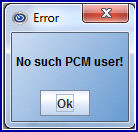
Click [OK] to return to the <PCH UserInit> field to enter a valid number.
21. Temporary Password 
21.1 Effective version 9.12.03 - New field added
21.2 This field allows an operator's password to be reset. The default of this field is 'N' (no). If set to 'Y' (yes), the next time the operator logs in, this message pops up, prompting them to enter a new password:
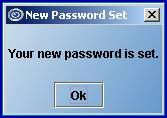
Using the Temporary Password feature maintains the same security levels, operator number, and set up of the original password. After completing the fields and selecting [Ok], this message pops up, confirming the new password has been set up successfully:
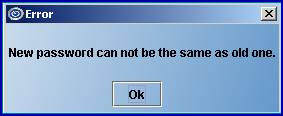
• If the operator attempts to enter the same password, this message pops up. After selecting [Ok], the focus returns to the Set new password window.
• In some circumstances the new password may not be accepted, in which case an error message pops up. Select [Ok] to return the focus to the Set new password window.
ATTENTION: Prime Clinical Systems recommends that immediately after the update, management assure that access is provided to only those individuals who should have it by checking these areas:
• Settings for the Login Users Menu
• Security levels of all operators in each clinic
Settings for the Login Users Menu
Verify the security setting for the Login User menu:
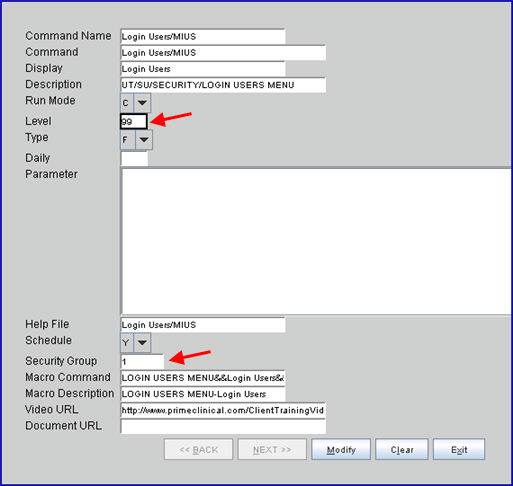
a. Go to Utility --►Set Up --►Menus --►Programs. At the <Command Name> field, enter Login Users/MIUS. The screen should look similar to the following. Note the security level and security group assigned to the Login User menu in the system in fields <Level> and <Security Group>.
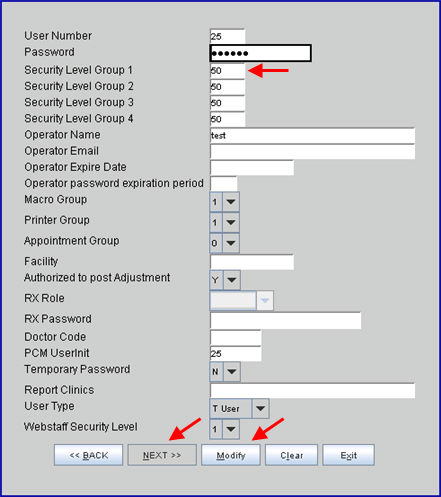
b. Go to Utility --►Set Up --►Security --►Login Users --►Modify. At the <User Number> field, press [F2] and then, from the Search window, press [F2] again. This lists all of the users in this clinic. See example:

c. Highlight the first record and press [Enter] and then press [Enter] a second time to display the operator’s login record. Verify the Security Level for the applicable group. In our example, it is Security Level Group 1.
d. Verify the security levels of all operators in each clinic as described below.
Levels of All Operators
For this procedure, start where you ended above and refer to the sample screen given in step 3.
To verify each operator's login record, click on the [Next] button to go to the next record in the list. If the operator's security level is modified, click on the [Modify] button to save the change before clicking [Next].
NOTE: Do NOT change User Numbers 999 and 998.
For assistance in verifying or modifying the security levels on your system, please contact our Training Department.
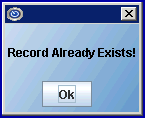
NOTE: Because of changes to the Login User table, duplicate User (Operator) Numbers are not permitted. Therefore, if the office has multiple Login User records with the same User Number, the update reassigns a new User Number to all but the first record it encounters with a duplicated User Number.
22. Report Clinics 
22.1 Effective version 9.12.32 - New field.
22.2 For practices with multiple clinics: electronic billing, statements, management reports, and billing reports may be requested for more than one clinic at a time, as of version 9.12.32. The clinic number must be separated by a comma. For example, enter 1,5 (with no space after the comma) to request statements for both clinics 1 and 5.
PCM users only.
23.1 Effective version 16.02.22 - New field.
23.2 For offices using Intellect's Task Manager feature (effective version 16.05.20), this field is required. Every Intellect user of Intellect's Task Manager feature needs to be linked to a user in PCM. To link:
23.2.1 Enter the PCM user name in the <PCM UserInit> field on this screen.
23.2.2 In this field, select the user type for the PCM user from the drop-down list. The user type is indicated on PCM's Password Login Screen in the Cat column for each user; i.e., T User, Provider, and Other.
24.1 Effective version 17.07.21 - New field.
24.2 This field sets the security level for WebStaff users. Offices who do not use WebStaff may leave this field set to '0' (the default).
24.3 Use the drop-down list to select the appropriate security level for this user:
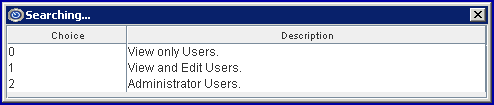
The drop-down options correlate to the levels used in WebStaff:

25. When the information is completely entered, select one of these options:

25.1 Click [Add] to clear the screen and return the focus to the <Password> field, saving the new referral.
25.2 Click [Clear] to clear all information and return the focus to the <Password> field without saving.
25.3 Click [Exit] to clear the screen and return the focus to the main Intellect screen without saving.
26. Verify that the default printer is set correctly at Utility --► Set Up --► Printer --► Report --►Modify and modify, if needed.
An administrator can get a listing of users and user numbers that have been added in Intellect as follows:
• Go to Utility --► Set Up --► Security --► Login Users --► View.
• Enter your own password in the <Password> field and press [Enter] to populate the screen.
• Press [F2] to display the Searching Security screen. Note: If the pop-up error message 'Match not Found' displays, press [Enter].
• Click on the <Operator Name> field, enter an asterisk *, and press [F2] to see all the users. Note: Only the Login Users within the clinic where you are working are shown in the [F2].


