Intellect™
UTILITY MENU OPTIONS

Task Manager
Add
Intellect is designed to have tasks automatically performed as designated on a daily, monthly, quarterly, yearly, or a periodic basis. Any task configured to daily (or on selected days) runs automatically without any user involvement. The monthly, quarterly, and yearly tasks must be activated through the Date screen, or Management --► Run Tasks.
This document has two functions:
• Step-by-step directions to add a task to automation on the Add Task Manager screen. Additional information is available in Utility --►Task Manager --►Tasks for Twilio and Email.
• A brief summary of the most common tasks for automation.
Note: Click on each task's name for a parameter list with the various options.
Updates:
Effective Version 21.03.04 - Billing --►Statement
In previous versions of Intellect when an Automated Task was set to send patients statements via email, patients without an email address were only printed to the secondary printer when the patients' email address was blank and when the statement was PCL-designed.
As of the current version, the same functionality is also available for PDF-designed statements.
Effective version 19.09.23, when an appointment is added and a task created, the documents from PCM are also available to view in the Tasks. PDF documents with Autofill fields are also included.
Effective version 17.06.09, clients can change what displays in the Subject line of the email for reports and/or files sent via the Task Manager. Please contact Support for more information.
Effective version 16.10.11, voice reminder messages sent via Twilio may include co-pay and deductible information based on the Registration --►Regular --►Patient --►Modify --►Modify Insurance <Co Payment> and <Deductible Met> fields.
• If the <Co Payment> field is greater than zero, the reminder message can include the following sentence, where '|| ins.ins_co_pay ||' is filled with the amount in the <Co Payment> field.
'Please prepare to pay your co-payment of $' || ins.ins_co_pay || ' for this visit.
• If the <Deductible Met> field is greater than zero, the reminder message can include the following sentence, where '|| ins.INS_DEDUCTIBLE ||' is filled with the amount in the <Deductible Met> field.
'Please keep in mind that you are responsible for your unmet deductible of $' || ins.INS_DEDUCTIBLE '.
To use this option, contact PCS support to set it up.
Effective version 16.02.22, clinics may have PCS set up a task to send a birthday wish to every patient who has been seen in the last two years. Birthday emails are sent the day before the patients' birthday. Additionally, a New Year's wish may also be scheduled to be sent on December 25th. When initially setting up this feature, PCS needs a .jpg file of the clinics logo. The text and images included with the update are customizable.

In software versions prior to 15.02.17 when [Ctrl+J] was pressed, the user was able to see only the jobs that he/she requested. Effective version 15.02.17, when [Ctrl+J] is pressed, the user sees his/her own jobs and also sees all the automated jobs set to run at night (i.e., the jobs with the word 'SCHEDULED:' in front of them). This feature allows anyone in the office to check the backup and export results, as well as any other scheduled task.
Effective version 14.07.01, clinics may have an administrator fee charged to patient accounts on a yearly basis. Before this option may be used, a Yearly Task must be set up by Prime Clinical. To use this option, please notify PCS Support. Additional set up is also required. Please see the <Administrator Fee> field in Utility --►Category for set up information.
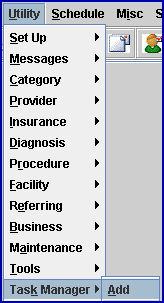
1. To add automated tasks in Intellect, go to Utility --►Task Manager --►Add
The Add Task Manager screen opens:
(Effective Version 9.12.18, a General Notes section was added to the Task Manager feature)
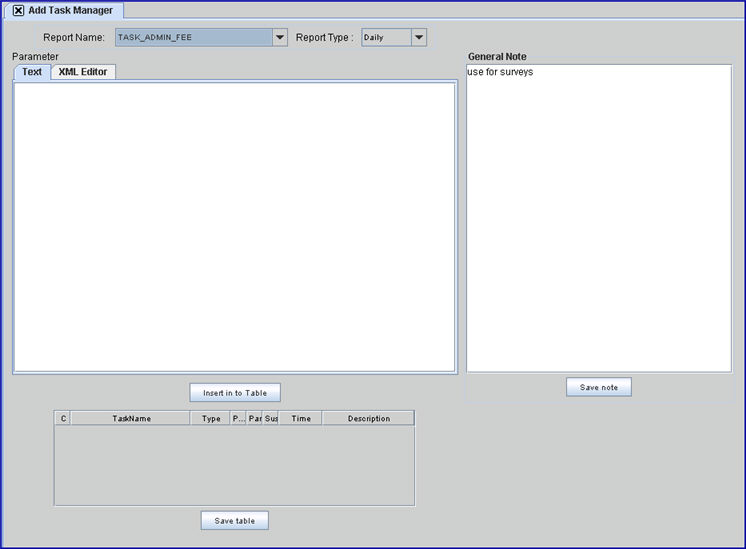
2.1 Use the down arrow to select a report to add and configure the runtime properties.
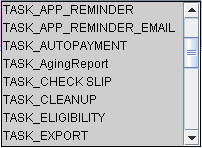
Sample abbreviated list of tasks:
2.1.1 Effective version 21.01.27, two tasks were added for PCM users:
• Archive PCM LOG_FILE
• TASK_DRUGDATA
See detailed information in Utility --►Task Manager --►Tasks for PCM Users Only.
2.1.2 Effective version 9.12.28, a Task Cleanup feature was added to the Automated Tasks (see above). By default, this feature runs monthly. Looking back 365 days from the current date, the program creates a zip file of old files and archives them. Task Cleanup takes place in the ERA, Acknowledgement, 997, 270, 271, and 277 directories, which speeds up the Billing search function.
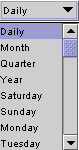
3.1 Select the frequency for the report.
3.2 Selecting any report more than one time, with different frequencies, causes the report type to run each period.
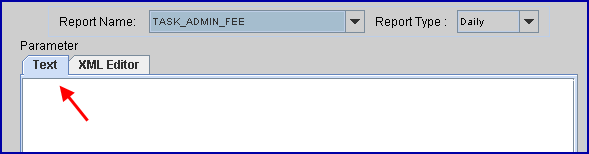
4. Parameter
This field has two tabs:
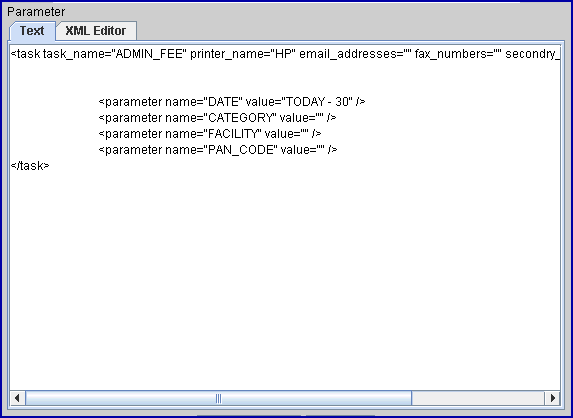
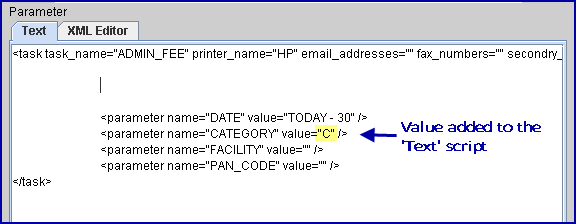
Click the 'Text' tab to display:
After selecting a <Report Name> and <Report Type>, the parameters for the selected report are displayed. For example:
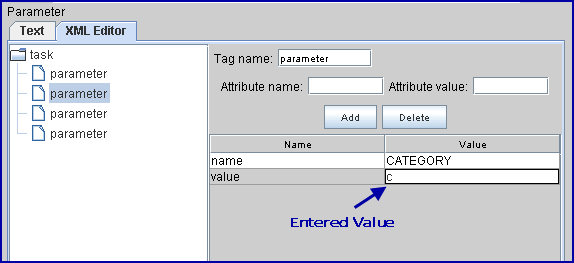
Click the 'XML Editor' tab to display:
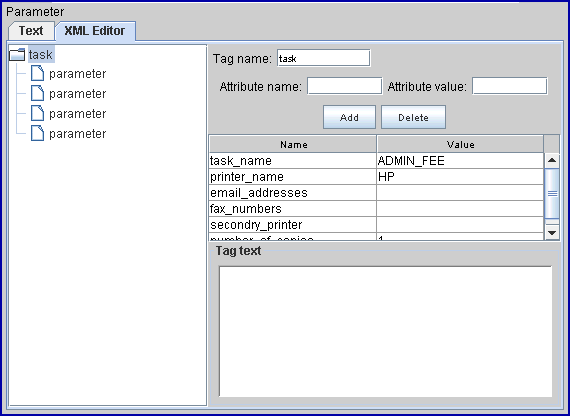
The 'XML Editor' is simply an alternate way to edit or add to the 'Text' script. Entries made in the right hand pane of the editor, as shown below, are added. See 'XML Editor' field definitions.
Effective version 9.12.28 and greater, Intellect's scheduled jobs accepts the following date formats, in addition to the relative date parameters in the form of 'TODAY' or 'TODAY - 3' (as examples), as in prior versions:
[BEGINNING OF|END OF] [WEEK | MONTH | QUARTER | YEAR | JAN | FEB | ... | NOV | DEC | FIRST QUARTER | SECOND QUARTER | THIRD QUARTER | FOURTH QUARTER] [+ | -] [DIGITS]
There is 1, and only one, space between each part.
Following are a few examples, all of which assume the current date is 02/21/2012:
BEGINNING OF YEAR -> 01/01/2012
END OF YEAR -> 12/31/2012
BEGINNING OF QUARTER -> 01/01/2012
END OF QUARTER -> 03/31/2012
BEGINNING OF MONTH -> 02/01/2012
END OF MONTH -> 02/29/2012
BEGINNING OF WEEK -> 02/19/2012
END OF WEEK -> 02/25/2012
BEGINNING OF JAN -> 01/01/2012
END OF JAN -> 01/31/2012
BEGINNING OF DEC -> 12/01/2012
END OF DEC -> 12/31/2012
BEGINNING OF FIRST QUARTER -> 01/01/2012
END OF FIRST QUARTER -> 03/31/2012
BEGINNING OF THIRD QUARTER -> 07/01/2012
END OF THIRD QUARTER -> 09/30/2012
BEGINNING OF FOURTH QUARTER -> 10/01/2012
END OF FOURTH QUARTER -> 12/31/2012
----------------- +3 ------------------
BEGINNING OF YEAR + 3 -> 01/01/2015
END OF YEAR + 3 -> 12/31/2015
BEGINNING OF QUARTER + 3 -> 10/01/2012
END OF QUARTER + 3 -> 12/31/2012
BEGINNING OF MONTH + 3 -> 05/01/2012
END OF MONTH + 3 -> 05/29/2012
BEGINNING OF WEEK + 3 -> 03/11/2012
END OF WEEK + 3 -> 03/17/2012
BEGINNING OF JAN + 3 -> 04/01/2012
END OF JAN + 3 -> 04/30/2012
BEGINNING OF DEC + 3 -> 03/01/2013
END OF DEC + 3 -> 03/31/2013
BEGINNING OF FIRST QUARTER + 3 -> 10/01/2012
END OF FIRST QUARTER + 3 -> 12/31/2012
BEGINNING OF THIRD QUARTER + 3 -> 04/01/2013
END OF THIRD QUARTER + 3 -> 06/30/2013
BEGINNING OF FOURTH QUARTER + 3 -> 07/01/2013
END OF FOURTH QUARTER + 3 -> 09/30/2013
----------------- -8 ------------------
BEGINNING OF YEAR - 8 -> 01/01/2004
END OF YEAR - 8 -> 12/31/2004
BEGINNING OF QUARTER - 8 -> 01/01/2010
END OF QUARTER - 8 -> 03/31/2010
BEGINNING OF MONTH - 8 -> 06/01/2011
END OF MONTH - 8 -> 06/29/2011
BEGINNING OF WEEK - 8 -> 12/25/2011
END OF WEEK - 8 -> 12/31/2011
BEGINNING OF JAN - 8 -> 05/01/2011
END OF JAN - 8 -> 05/31/2011
BEGINNING OF DEC - 8 -> 04/01/2012
END OF DEC - 8 -> 04/30/2012
BEGINNING OF FIRST QUARTER - 8 -> 01/01/2010
END OF FIRST QUARTER - 8 -> 03/31/2010
BEGINNING OF THIRD QUARTER - 8 -> 07/01/2010
END OF THIRD QUARTER - 8 -> 09/30/2010
BEGINNING OF FOURTH QUARTER - 8 -> 10/01/2010
END OF FOURTH QUARTER - 8 -> 12/31/2010
'XML Editor' field definitions:
4.1 Tag name ![]()
4.1.1 This field displays the Tag selected in the tree on the left as seen in this graphic:

4.1.2 Do not change this entry.
4.2 Attribute name ![]()
4.2.1 Used only when adding a new parameter to the script.
4.3 Attribute value ![]()
4.3.1 Used only when adding a new parameter to the script.
4.4 Add 
4.4.1 Used only when adding a new parameter to the script.
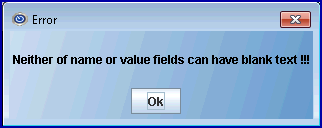
4.4.2 Click the [Add] button after entering the appropriate information into the <Attribute name> and <Attribute value> fields.
4.4.3 If the necessary information is not entered before clicking on [Add], an error message displays:
4.5 Delete 
4.5.1 Used only when deleting a parameter from the script.
4.5.2 Please check with PCS Support before deleting a parameter.
4.6 Name 
4.6.1 Name of the parameter.
4.6.2 Please contact PCS Support for additional information.
4.7 Value 
4.7.1 Value for the parameter displayed in the Name column.
4.7.2 Please contact PCS Support for additional information.
4.8 Tag Text 
4.8.1 Not used at this time.
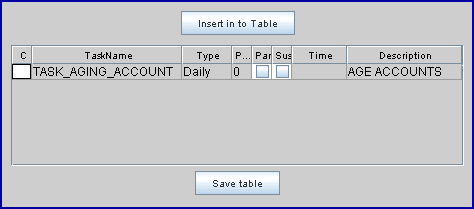
5. Insert in to Table 
This button is located beneath the 'Text' and 'XML Editor' tabs. See sample Add Task Manager screen.
5.1 When satisfied with the parameters, click the [Insert in to Table] button, or clear a field by highlighting the text and pressing [Backspace].
Select [Insert in to Table] to add the new task to the Task Table:
5.1.1 Command Column ![]()
Any line in the 'Insert' area may be modified by entering 'M,' or removed by entering 'D' prior to committing.
5.1.2 Task Name ![]()
Displays the name of the task as selected in step 2. <Report Name>.
5.1.3 Type ![]()
Displays the frequency of the report as selected in step 3. <Report Type>.
This field dictates the order by which tasks are run for those tasks of the same type (i.e., parallel or sequential). For an example of how this applies, refer to the Sample Scenario in the <Time> field.
This is a check box option used to specify whether or not the next task should wait for the current one's completion. If checked for a task, the scheduler would run the subsequent task immediately after launching the current one. In effect, this task would run concurrently with the previously cued task, thus improving the efficiency of the process. For an example of how this works, refer to the Sample Scenario in the <Time> field.
5.1.6 S ... (Suspend) 
When this box is checked, the associated task is suspended, i.e., it will not run/process until the check mark is removed.
5.1.7 Time 
Effective version 16.10.11 - New Field. The addition of this field allows each task to have its' own start time. The <Time> column works in conjunction with the Utility --►Set Up --►Clinic <Schedule Time> field. In prior releases all automated tasks began according to the time entered in the <Schedule Time> field. As of version 16.10.11, tasks are handled as described below.
For the sample scenario, assume the Utility --►Task Manager Task Table is as follows:
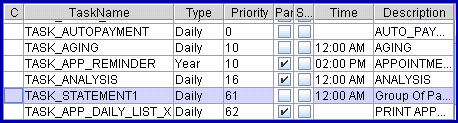
Also assume that the time entered in the <Schedule Time> field is 09:00 PM. This means the Intellect program 'clicks on' at 9:00 PM and begins looking for tasks to complete.
The order in which the tasks run is determined by the <Priority>, <Par>, and <Time> fields.
5.1.7.1 Tasks with a blank <Time> field start immediately at the time in the <Schedule Time> field. In the sample Task Table above, the first, and sixth tasks would run at 9:00 PM. If there are multiple tasks with blank <Time> fields, the order is determined by:
a. Tasks with a checkmark in the <Par> field are called parallel tasks and are run before sequential tasks, which are indicated with no boxes checked.
b. Multiple parallel tasks are started in order based on the number in the <Priority> field. These tasks are run concurrently with other parallel tasks. The ability to run tasks in parallel improves the efficiency of the process.
Referring to the sample Task Table above, the sixth task would begin before the first task.
5.1.7.2 Tasks with a time in the <Time> field are run at the time in the <Time> field. If there are multiple tasks set to run at the same time, the order is:
a. Parallel tasks are run first, followed by sequential tasks.
b. Each type of task is run in order based on the number in the <Priority> field.
Referring to the sample Task Table above, the fourth task would begin first, followed by the second and fifth tasks.
Please note the following when setting the time for tasks:
• If the Utility --►Set Up --►Clinic <Schedule Time> field is left blank, automated tasks will not run.
• HCFA tasks should never have the <Par> field marked.
• The HCFA electronically billed charges should be set to run before the HCFA charges printed to paper.
• Tasks such as aging and statements should NOT have the <Par> field marked
• Do not change the <Time> for appointment reminders. Appointment reminders sent via Twilio or SMS should have the <Par> field marked.
• Tasks with neither the <Par> nor <S> field marked run sequentially.
• A checkmark in the <S> field indicates the task has been suspended and will not run.
5.1.8 Description ![]()
This column usually has the same value as the Task Name column and is used internally by the program.
5.1.9 Save 
Click [Save table] to commit, OR use [Esc] on the keyboard to exit without saving.
6. General Notes 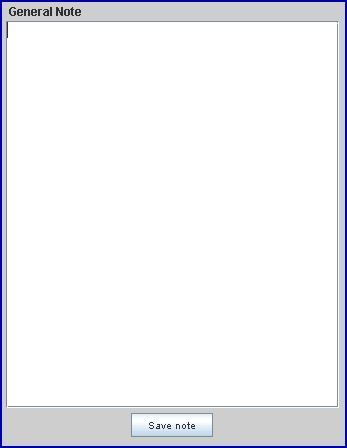
This section is located to the right of the 'Text' and 'XML Editor' tabs. See sample Add Task Manager screen.
6.1 Effective Version 9.12.18, this section was added to the Task Manager feature. As automated tasks are usually set up and maintained by Prime Clinical, this feature may not be of interest to most clients. This section may be entered per task and per clinic, and can be used to track any applicable information regarding the task; i.e., who requested the set up, when it was added, the conditions which should be applied to the task, etc.
6.2 Save note 
Click this button to save information entered in the General Notes section.
Most Common Tasks for Automation
This section includes:
Tasks Involving the Printing Parameters
Alphabetized List of Automated Functions
1. Tasks Involving the Printing Parameters
Automated tasks which produce a printout; i.e., statements, HCFAs, reports, etc. always have a printer parameter which should be completed.
Example: <report report_name="Statement Form 21" printer_name="HP" email_addresses=""
fax_numbers= "" secondry_printer="" number_of_copies="1">
1.1 Select one of the following options depending on whether the plan is to print, email, or fax the output.
• To have the automated task always print the output, click Print Paper Statements for instructions.
• To have the automated task EMAIL the output when an email address is available, and print the output to the printer when there is not an email address on file, click Email Statements for instructions.
• To have the automated task FAX the output when a fax number is available, and print the output to the printer when there is not a fax number on file, click FAX Statements for instructions.
1.2 Statement Printing Grid:
|
TASK TASK_Statement21 |
|
| <report report_name="Statement Form 21" | Never change. |
| printer_name="HP" | For tasks that have printing, set the value for the 'Printer Name' using the name of the Printer. |
| printer_name="EMAlL" email_addresses="PA_ADDRESS1" fax_numbers="" secondry_printer="Your Printer" |
If this is for Email, type 'EMAIL.' This is the Registration Patient screen <Email Address> field value and the printer name for the 'Secondary Printer.' |
| printer_name="FAX" email_addresses="PA_FAX" fax_numbers="" secondry_printer="Your Printer" |
If this is for Fax type, 'FAX'. This is the Registration Patient screen <Fax> field value and the printer name for the 'Secondary Printer'. |
| number_of_copies="1"> | May change the number as desired |
2. Alphabetized List of Automated Functions
This automated function is designed for follow up letters addressed to the patient or insurance carrier for unpaid charges. It is suggested to have follow up letters print daily based on the calendar date versus printing on a weekly or monthly basis. If done this way, follow up letters are manageable in volume.
This automated function is designed for a laser printer to automatically print HCFA's for unbilled charges (the red or laser HCFA 1500). This function may be set up to run daily or weekly, monthly, or on specified days. CMS 1500,1492 (UB), !500 Red, and EOMB.
This automated function allows laser statements 2, 5, 12, 21, 22, 24, 28, 29, 30, 91, 92 to be printed based on the Utility --►Set Up --►Parameter <Statement Cycle>, and <Number of Cycle> field entries.
Version 9.12.09 - New Option. To accommodate clinics who would like to have the statement file created for the previous day's cycle instead of the current cycle, the statement cycle parameter can now be set as TODAY -X where X is a number. To have this change applied to automated statements, please contact our support department.
This automated function is designed to electronically transmit claims and patient eligibility verification to insurers or clearing houses and to pick-up response and/or status information.
2.4.1 Submit Claim: Used to automatically submit 837
2.4.2 Acknowledgement: Used to automatically pick-up claims, patient eligibility, and error reports.
2.4.3 Verify: Used to automatically submit patient eligibility requests.
2.5 CallSTAFF Telephone Appointment Reminder
2.5.1 Used for automatic telephone appointment verification. When hardware and subscription requirements are met, this task sets the dialing and voice options for this automated reminder.
2.5.2 Before any recording can be done, RecorderSetup.bat must be run. It is located in home/staff/app and is a batch file which sets up the recorder so the recordings are saved in the correct format.
Note: Before running the RecorderSetup.bat file, make sure the BinRegSet.exe file is in the directory as it is used by the RecorderSetup.bat file.
To run RecorderSetup.bat, simply click the icon to run the program.

Version 9.12.07 New Feature: CallSTAFF can now call either the Home Phone first and, if the Home Phone field is blank/null or if it has an invalid number of characters in the phone number, the system can then try the Cell Phone. This can be set up visa versa: Cell first, then Home. If the program attempts to call the first number and there is no answer, it does not call the second number. It only calls the second number if the first is blank or invalid.
Note: CallSTAFF does not call the second number if the first number was not answered or was busy. If the first number was busy, Call STAFF does not call the first number again.
Version 9.12.10 Modification: CallSTAFF accommodates clinics where dialing 1 before the area code is not needed. Offices where this applies should contact PCS support or training for assistance.
2.6 Misc/Backup
There is no Parameter XXX entry for this option.
Windows: Set up both TASK_BACKUP & TASK_EXPORT
Linux: TASK_TAPE_BACKUP
2.7 Misc/Load Forms
This option is used to send black and white forms to the physical printer. In the event of power failure, lost data, or new forms, use this option to load the forms to the printers memory. The only parameter is to set the correct system printer code:
<report report name="LOAD_FORMS_FONTS" printer_name="HP" />
Based on the parameters entered, this function automatically dials, picks up, and/or posts/prints the Electronic Remittance Advice.
2.9 Schedule/Appointment/Email Reminder with Confirmation
Used for Emailing an appointment reminder (with or without an attached document) that allows patients to respond to it.
For information on setting up email appointment reminders with confirmation, go to Schedule --►Appointment Reminder --►Email Appointment Reminder with Confirmation.
2.10 Schedule/Appointment/Email Reminder without Confirmation
Used for Emailing an appointment reminder with or without an attached document.
For information on setting up email, go to Schedule --►Appointment Reminder --►Email Appointment Reminder without Confirmation. Additionally, go to Utility --►Set Up --►Appointment --►Appointment Type <Email Message> and refer to the Appointment Email message. The message, when configured for automation, comes with a hard-coded body of text. Use <Email Message> to attach a custom header to the reminders with this Appointment type that meet any of the other parameters. The Utility --►Set Up --►Appointment --►Appointment Type <Email File> field is used to enter a path to a desired file to attach to the Email. Examples might include a map to the office, a registration form, pre-appointment preparations, etc.
2.11 Schedule/Appointment/Print
This task is designed to automatically print various appointment lists.
This option is used to print registration forms, super bills, sign-in sheets and several different types of appointment schedules for one or more dates for one or more providers.
2.12 Schedule/Appointment/Text Message Reminder
Used for text messaging an appointment reminder.
For information on setting up text messaging, go to Schedule --►Appointment Reminder --►Text Message Reminder.
This automated function is designed to automatically print recall letters.
This option is for printing a group of recall letters or a list of selected recalls. Intellect has a library of letters that advise the patient that it is time to schedule an appointment for the indicated care, their lab test was normal/abnormal, and more. This option is for printing a group of recall letters or a list of selected recalls.