
Intellect™
LEDGER MENU OPTIONS

Collection Report (Print)
The Collection Report is used to create a list of accounts with detailed activity for internal use or to send to a collection agency. After selecting the report criteria, the report may be printed, viewed, or emailed. The optional cover page for each patient includes demographic and insurance information.
Videos Available: Click Collection Report and/or Collection Overview to access the link. Depending on the system set up, the media player may need to be activated. Speakers need to be attached to the workstation to hear the instructions.
Note: To view the videos, log-in through the www.primeclinical.com website. Current support is required.
1. To create a Collection Report in Intellect, go to Ledger --► Collection Report:
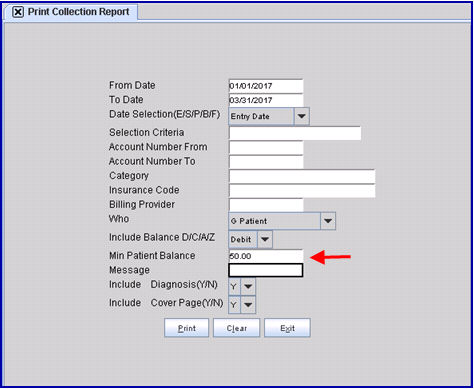
The Print Collection Report screen displays:
2.1 Type the beginning date of the range of charges to include in the Collections Report based on the <Date Selection> field criteria.
2.2 It is important to set this date, otherwise Intellect defaults the current calendar date and no results will be found.
3. To Date 
3.1 Type the ending date of the range of charges to include in the Collections Report based on the <Date Selection> field criteria.
3.2 Leave this field blank to include any charge from the <From Date> (above) to the present calendar date which meets all other criteria.
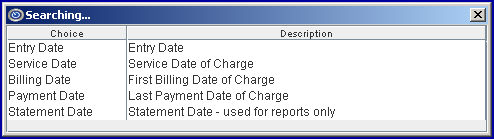
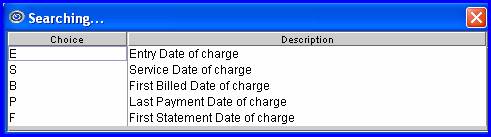
4.1 Accept the default 'Entry Date' (formerly 'E'), OR use the drop-down to make an alternate selection.
4.2 To view the list of codes with descriptions press the [F2] key. To view the list of only the codes, either click on the arrow, OR press the → (right arrow) on the keyboard. To select, double-click on the correct code, OR use the ↑ (up) and ↓ (down) arrows to highlight the correct code, and then press the [Enter] key to select.
Effective version 9.12.10
All versions prior to 9.12.10
5.1 Allows the accounts to be selected to print based on alphabetical criteria.
5.2 Leave blank to select all patients' accounts that meet all other criteria entered OR define the parameter using an alphabetical range hyphenated such as A-L to return patient accounts where the last name begins with any letters in the range of A-L.
6. Account Number From 
6.1 Allows the accounts to be selected to print based on account number, starting with this entry.
6.2 Leave this field blank to search all accounts starting from '1,' returning those that meet all other criteria.
6.3 It is not required to have a From/To set of dates.
7. Account Number To 
7.1 Allows the accounts to be selected to print based on account number, ending with this entry.
7.2 Leave this field blank to search all accounts starting from the <Account Number From> (above), returning those that meet all other criteria.
7.3 It is not required to have a From/To set of dates.
7.4 Although optional, when leaving the <Account Number> fields blank and the previous <Selection Criteria> field blank, Intellect displays this prompt:
7.4.1 Select [No] to return the focus to the <Selection Criteria> field.
7.4.2 Select [Yes] to send the focus to the <Category> field (see below).
8. Category 
8.1 This is used to limit the report to a particular Patient Category.
8.2 Type a Utility --► Category <Category Code> OR leave blank to select all patient categories. There is no default.
8.3 This field accepts multiple values:
• Category codes separated by commas with no spaces:

• an asterisk * to return all Categories starting with the portion of the code entered prior to the *. For example, M* prints all Categories whose code begins with M.

9. Insurance Code 
9.1 This is used to limit the report to a particular primary insurance company.
9.2 Type the Utility --► Insurance --► Insurance <Insurance Co. Code> OR leave blank to select all insurances. There is no default.
9.3 This field accepts multiple values:
• Insurance codes separated by commas with no spaces:

• an asterisk * to return all Insurances starting with the portion of the code entered prior to the *. For example, B* prints all Insurances whose code begins with B.

10. Billing Provider 
10.1 This is used to limit the report to a particular provider(s).
10.2 Type the Utility --►Provider --►Provider <Provider Code> OR leave blank to select all providers. There is no default.
10.3 This field accepts multiple values:
• Provider codes separated by commas with no spaces:

• a range of codes separated by a hyphen and no spaces:

• an asterisk * to return all providers starting with the portion of the code entered prior to the *. For example, 1* prints all providers whose code begins with 1.

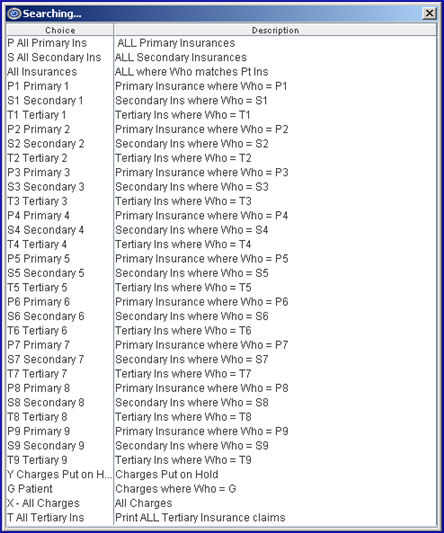
11. Who 
11.1 Accept the default 'P All Primary Ins' to indicate responsibility for the balance, OR use the drop-down to make an alternate selection.
11.2 To view the list of codes with descriptions press the [F2] key. To view the list of only the codes either click on the arrow, OR press the → (right arrow) on the keyboard. To select, double-click on the correct code, OR use the ↑ (up) and ↓ (down) arrows to highlight the correct code, and then press the [Enter] key to select.
All versions prior to 9.12.10 consisted of only letters and/or a combination of letters. For clarity, effective version 9.12.10 the drop-down includes a short definition:
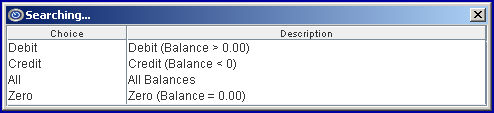
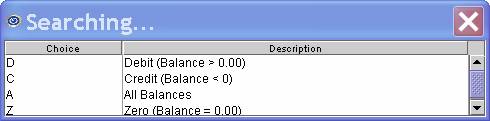
12. Include Balance 
12.1 This is used to determine which balance type accounts to include.
12.2 Accept the default 'Debit' OR use the drop-down to make an alternate selection.
12.3 To view the list of codes with descriptions press the [F2] key. To view the list of only the codes either click on the arrow, OR press the → (right arrow) on the keyboard. To select, double-click on the correct code, OR use the ↑ (up) and ↓ (down) arrows to highlight the correct code, and then press the [Enter] key to select.
Effective version 9.12.10:
All versions prior to 9.12.10:
13.1 Effective version 18.06.01 - New field.
13.2 In software versions prior to 18.06.01 when the Collection Report was generated, the program looked at the wrong field and also included credits. To correct this problem, the <Min Patient Balance> field was added. This field acts as a filter.
13.2.1 For example, with the Print Collection Report screen completed as shown below, the program pulls report information from the Ledger --► Accounting --► Display or Ledger --► Open --►Display screens where the <Who> field = G, the <From Date> falls between the 01/01/107 and 3/31/17, and the debit balance in the <Patient> field is greater than $50. If instead of being populated with 50.00, as shown in the screen shot below, the <Min Patient Balance> field is left blank and the other fields are populated as shown below, the report looks for <Who> = G, a <From Date> between 01/01/17 and 3/31/17, and a debit balance in the <Patient> field greater than $0.
14. Message 
14.1 This is used to limit the report to a particular Ledger --►Accounting <Message>.
14.2 Type the Ledger --►Accounting <Message> OR leave blank to select all records. There is no default.
15. Include Diagnosis(Y/N) 
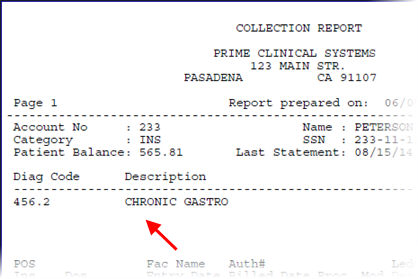
15.1 When the default 'Y' (yes) is selected, Intellect completes the central portion of the collection report with any attached diagnosis codes and descriptions:
15.2 When 'N' (no) is selected, Intellect does not print the diagnoses.
16.1 When the default 'Y' (yes) is selected, Intellect prints the Cover Page with the patient's demographic and insurance information.
16.2 When 'N' (no) is selected, Intellect does not print the Cover Page.
17. When the information is completely entered, select one of these options:

17.1 Click [Print] to display the printer dialog box:
17.1.1 Printer Properties:
17.1.1.1 Printer: The default printer for the logged-in clinic and password is selected. To select a different printer, either click on the arrow, OR press the → (right arrow) on the keyboard to view the list of printer codes. In our example, the defaulted Printer is HP. This is just an example of a printer name and may or may not be set up on the system.
To select the printer type, click on the code, OR use the ↑ (up) and ↓ (down) arrows to highlight the correct code, and then press the [Enter] key to select.
17.1.1.2 Number of Copies: This field defaults to either 0 (zero) or 1. Both print 1 copy. To print more than one copy, enter the number of copies.
17.1.2 Fax/Email:
In addition to printing reports, Intellect provides the capability to export reports to Email, Fax, Disk, or Archive. A secondary printer may also be selected, if one is set up, by clicking on the arrow to display the drop-down list. For more information, refer to Intellect Characteristics.
17.1.3 Select the [Print] button to send the request to the printer (or as a Fax or email).
17.1.4 Select the [Cancel] button to clear the screen and return to the <From Date> field without saving or printing.
17.2 Select [Clear] to clear all information and return the focus to the <From Date> field without saving.
17.3 Select [Exit] to clear the screen and return the focus to the main Intellect screen without saving.
Sample Collection Cover/Report
![]()


