
Intellect™
BILLING MENU OPTIONS

Company
Group of Patients (Companies)
This option allows the printing of bills when there are many Company Accounts.
When printing company statements, Intellect prints all the charges within the requested <From Date> and <To Date> range, and also charges that have a payment date within that range. For example, if
<From Date> = 01/01/2013
<To Date> = 02/15/2013
Date Selection = Service Date
Intellect prints all the charges that have a date of service between 01/01/2013 and 02/15/2013, or have a payment date between 01/01/2013 and 02/15/2013.
Note: Intellect now has the ability to have a unique, sequential Invoice number print on Company Statements. However, the Invoice number has NOT been added to your company Statement. To have the Invoice number added, call our support department for assistance.
1. To print bills for multiple company accounts via Intellect, go to Billing --►Company --► Group of Patients
The Print Group of Company Statement screen opens:
Effective Version 9.12.10 Field Modification. The one- and two-character code choices on the drop-down lists were replaced with explanatory choices, making the code selection more user-friendly and comprehensive.
Note: The drop-down list descriptions for the code choices have remained the same, allowing correlation between the old and new code choices.
2. Selection Criteria 
2.1 This field allows company accounts to be defined to bill based on alphabetical criteria using the first letter of the company name.
2.2 Leave this field blank to select all companies that meet any other criteria entered below OR define the parameter using an alphabetical range (for example, A-L) to return patient accounts where the last name begins with any letters in the range.
3. From Date 
3.1 Enter the beginning date of the date range for charges to be billed based on the <Date Selection> field criteria.
4. To Date 
4.1 Enter the latest date of the date range for charges to be billed based on the <Date Selection> field criteria.
5. Category 
5.1 This field limits the billing results by a specific patient category.
5.2 To use a CompanyUtility --►Category <Category Code>, the <Type> field must be = 'C.'
5.3 Press [Enter] to bypass this field and request ALL company categories.
5.4 This field accepts multiple values:
• separated by commas with no spaces:

• an asterisk * to return all Categories starting with the portion of the code entered prior to the *. For example, M* prints all Categories whose code begins with M.

6. Balance 
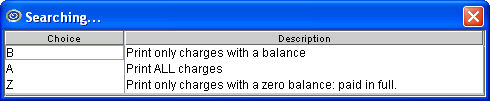
6.1 Accept the default 'Charges with Balance' (formerly 'B') to print all charges with a positive balance, OR use the drop-down list to make an alternate selection.
6.2 Click on the field, OR press the [F2] key to display the valid choices.
To view the list of only the codes, click on the arrow. To select, click on the correct code, OR use the ↑ (up) and ↓ (down) arrows to highlight the correct code and then press the [Enter] key to select.
Effective version 9.12.10
All versions prior to 9.12.10
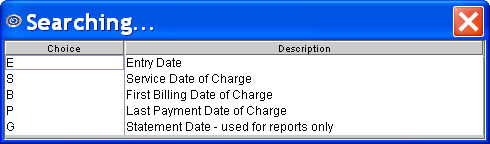
7.1 This field defaults to 'Entry Date' (formerly 'E').
7.2 Accept the default OR use the drop-down to make an alternate selection.
7.3 Click on the field, OR press the [F2] key to display the valid choices.
To view the list of only the codes, click on the arrow. To select, click on the correct code, OR use the ↑ (up) and ↓ (down) arrows to highlight the correct code and then press the [Enter] key to select.
Effective version 9.12.10
All versions prior to 9.12.10
8. Option 
8.1 This field is used to select the type of Company Statement.
8.2 Click on the field, OR press the [F2] key to display the valid choices.
To view the list of only the codes, click on the arrow. To select, click on the correct code, OR use the ↑ (up) and ↓ (down) arrows to highlight the correct code and then press the [Enter] key to select.
Effective Version 13.10.29 - New option: Company Statement. For this new option, please note:
• The amounts in the ‘Credit’ column include both payments and adjustments.
• The company address is pulled from the Utility --►Set Up --►Clinic screen.
• The statement may also be emailed if email is set up in the <Notification E-mail> field on the Utility --►Set Up --►Clinic screen.
9. Sort By 
9.1 This field selects the sort order of the bills.
9.2 Accept the default 'Name' (formerly 'N'), OR use the drop-down list to select 'Date' to sort by the date of service.
9.3 Click on the field, OR press the [F2] key to display the valid choices.
To view the list of only the codes, click on the arrow. To select, click on the correct code, OR use the ↑ (up) and ↓ (down) arrows to highlight the correct code and then press the [Enter] key to select.

10. When the information is completely entered, select one of these options:

10.1 Select the [Print] button OR press [Enter] to display a printer dialog box:
10.1.1 Printer Properties:
10.1.1.1 Printer: The default printer for the logged-in clinic and password is selected. To select a different printer, either click on the arrow, OR press the → (right arrow) on the keyboard to view the list of printer codes. In our example, the defaulted Printer is HP. This is just an example of a printer name and may or may not be set up on the system.
To select the printer type, click on the code, OR use the ↑ (up) and ↓ (down) arrows to highlight the correct code; then press the [Enter] key to select.
10.1.1.2 Number of Copies: This field defaults to either 0 (zero) or 1. Both print 1 copy. To print more than one copy, enter the number of copies.
10.1.2 Fax/Email:
In addition to printing reports, Intellect provides the capability to export reports to Email, Fax, Disk, or Archive. A secondary printer may also be selected, if one is set up, by clicking on the arrow to display the drop-down list.
10.1.3 Select the [Print] button to send the request to the printer (or as a Fax or email).
10.1.4 Select the [Cancel] button to clear the screen and return to the Print Group of Company Statement screen without saving or printing.
10.2 Click [Clear] to clear all information and return the focus to the <Selection Criteria> field.
10.3 Click [Exit] to clear the screen and return the focus to the main Intellect screen without saving.
To Print One or a Small Batch of Company Accounts
