
OnSTAFF 2000
NEW PATIENT MENU
This option allows the user to add a new patient, modify an existing patient’s information, delete expired and add new insurance coverage for a patient, print labels, patient registration forms and/or doctor’s first report. When the New Patient option is selected, On-Staff will display the following:
NEW PATIENT MENU

Menu options:
Add Add a new patient to On-Staff.
Modify Modify existing information about a patient.
View View demographic information about a patient.
Insur Add Add new insurance coverage to a patient.
Delete Insur Delete insurance information from a patient's file.
Labels Print patient chart or mailing labels.
Registration Print a blank or completed patient registration form.
Worker Add and print worker information about a patient.
Forms Add, maintain and print a standard authorization form for a patient.
Search PT Search for a patient using any combination of fields from the demographic screen.
Search Ins Search for Insurance using any combination of fields
Exit Returns you to the Main Menu.
To add a new patient select the Add option from the New Patient Menu. On-Staff will display the following:
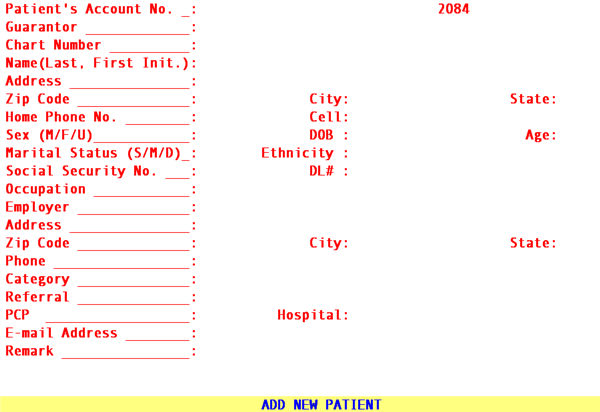
Patient's
Account No.: If the system is set to assign account numbers automatically ( Utility/Set Up Parameter <Auto Patient Number>), On-Staff will display the next available account number, otherwise, enter the patient's account number (from 1 to 7 digits). When the account number is unknown, you may search by entering all or part of the name (last name, first name format) and/or incorporate the Wild Card (*) then press the [F2] search key.
Guarantor: The Patient’s Account No. will automatically display here. If the patient is financially responsible for his/her own account, press [Enter]. If the patient is a minor, add the parent/guarantor as a patient first and enter that account number in this field. This field should NEVER be zero.
NOTE: When Y or A was entered in the /Utility/Set Up/Parameter <Guarantor> field, and the parent/guarantor account was added first, by entering the parent/guarantor account number here, the address, phone number, social security number, category and insurance (when applicable) will be automatically entered. <Guarantor> = Y DOES NOT allow the user to modify these to be different than the guarantor’s. <Guarantor> = A DOES allow the user to modify these to be different than the guarantor’s. /Utility/Set Up/Parameter <Guarantor>
Chart Number: This is an optional field and may be left blank. This field is 12 characters long and prints on the Summary Appointment List and may be programmed to print on super bills. The Selection Screen for Patient may be modified to include this field. Chart Number examples:
Ÿ Account number from previous system.
Ÿ For group practices, the initials of the physician this patient sees.
Ÿ For worker’s comp patients, their date of injury.
Ÿ The language of the patient.
Ÿ The name or initials of the lab covered by this patient’s insurance.
Name Enter the patient's name (last name, first name followed by the middle initial if available. Format Last Name comma space First Name space MI
![]()
Address: Enter the patient's address.
NOTE: Please note the order and functionality of the following Zip Code, City and State fields. The information regarding these fields is true throughout On-Staff. For additional information, refer to the Zip Code section of Getting To Know On-Staff included in Session III.
Zip Code: Enter the patient's zip code. When a zip code is unknown, press [Enter] through City and State. NEVER enter a city and state, while leaving the zip code field blank.
City: Displayed automatically if the zip code is known to On-Staff; otherwise enter the city attached to the zip code. NEVER enter a city and state, while leaving the zip code field blank.
State: Displayed automatically if the zip code is known to On-Staff; otherwise enter the state attached to the city and zip code. NEVER enter a city and state, while leaving the zip code field blank.
NOTE: When a zip code is entered and the displayed city and state are something other than what you want, you must return to the zip code field and re-enter the zip code using the four digit extension.
Home Phone No.: This field has been formatted, thus enter the patient’s phone number and On-Staff will place the numbers within the ‘( )’ and ‘ - ‘ for you. Using the [Spacebar] WILL NOT remove values from a formatted field. Thus, to change a phone number, simply type over the existing number or, to remove it, place the cursor at the end of the number and backspace it out.
Cell Type the patient’s cell phone number.
Sex (M/F/U): Enter the gender of the patient. U (unknown) is used on account’s that are not for an individual (i.e., a company account). Pressing the [F2] search key will display the following valid choices:
M Male
F Female
U Unknown
DOB: Date fields are also formatted. On date fields only, using the [Spacebar] WILL remove the date entered. Enter the birth date of the patient in MMDDYY format.
(S/M/D): Enter the marital status of the patient. Pressing the [F2] search key will display the following valid choices:
S Single
M Married
D Divorced
W Widowed
Ethnicity: Enter the ethnic background of the patient if required to do so by a state-financed program, otherwise, this field may be left blank. Pressing the [F2] search key will display the following valid choices:
1 American Indian 5 Mexican American/Hispanic
2 Asian 6 Caucasian
3 African American 7 Other
4 Filipino 8 Pacific Islander
Social Security
No.: This field has been formatted. Enter the patient’s social security number in ######### format and On-Staff will place the numbers within the dashes for you (###-##-####). Using the [Spacebar] WILL NOT remove values from a formatted field. Thus, to change a social security number, simply type over the existing number or, to remove it, place the cursor at the end of the number and backspace it out.
DL#: Enter the driver's license number of the patient (this is an optional field).
Occupation: Enter the occupation of the patient.
Employer: Enter the patient’s employer, or, enter a /Utility/Business <Company Code> which will automatically complete the following Address, Zip Code, City, State and Phone No. fields, as well as add insurance coverage when this information has been entered on the /Utility/Business screen. When the company code is unknown, you may search by entering all or part of the employer name and/or incorporate the Wild Card (*) then press the [F2] search key. Consult your system administrator for any special instructions regarding the use of /Utility/Business. /Utility/Business was covered during Session II.
Address: Enter the address of the employer.
Zip Code: Enter the zip code of the employer. When a zip code is unknown, press [Enter] through City and State. NEVER enter a city and state, while leaving the zip code field blank.
City: Displayed automatically if the zip code is known to On-Staff; otherwise enter the city attached to the zip code. NEVER enter a city and state, while leaving the zip code field blank.
State: Displayed automatically if the zip code is known to On-Staff; otherwise enter the state attached to the zip code. NEVER enter a city and state, while leaving the zip code field blank.
Phone No.: Enter the phone number of the employer.
Category: Press the [Spacebar] to clear the field and enter the /Utility/Category <Category Code> that designates the financial class of this patient or, after pressing the [Spacebar] you may search by pressing the [F2] search The value that may have first displayed in this field was set up during Session II when covering the /Utility/Set Up/Parameter <Default Category> field.
NOTE: The type of category assigned to the patient determines which screens (if any) should follow the patient’s demographic screen. For example, if the patient is given a cash type of category, no other screens will follow the demographic screen. If the patient is given an insurance type of category, then an insurance and encounter screen will follow the demographic screen. If the patient is given a worker’s comp type of category, then an insurance, worker comp encounter and dependent on the category set up, a doctor’s first report screen will follow the demographic screen. Category types were determined during Session II when covering the /Utility/Category <Type (C/P/W/O/F/G)> field.
Referral: Enter the /Utility/Referring <Referring Code> that designates the patient’s referring source. When this code in unknown, start the search by entering the first few letters of the referring source LAST name then press the [F2] search key.
PCP: Enter the /Utility/Referring <Referring Code> that designates their primary care physician. When this code is unknown, start the search as noted above at Referral. This is an informational field only and upon request may be programmed to print on super bills.
E-mail Address: Enter their E-mail address. This is an informational field only and will not print anywhere.
Hospital: Enter the /Utility/Facility <Facility Code> that designates the hospital assigned to the patient by their insurance contract. When this code is unknown, the [F2] search key may be used. This is an informational field only and upon request may be programmed to print on super bills.
Remark: On-Staff provides two lines of 40 characters each for entry of miscellaneous information about the patient. These fields may be programmed to print on super bills.
1) By starting the first remark field with forward slash (/), when that account is accessed anywhere throughout On-Staff, BOTH /New Patient <Remark> fields will display. See following example:
Remark: /TURP, prostate cancer 5/6/98
global over 8/6/98
2) Various entries may be made in these fields in order to assist or alert the scheduler during the scheduling process (these fields are always displayed at the time of scheduling an appointment when the /Utility/Set Up/Parameter <Appointment History> field is set to Y or F, covered during Session I). Example remarks could be:
Ÿ NEEDS PRIOR AUTH.
Ÿ DISCHARGED FROM PRACTICE as of 12/31/97.
Ÿ PASS CALL to COLLECTION MANAGER PRIOR to
making appointment!
Ÿ RETURNED MAIL - obtain new address.
Ÿ PHONE DISCONNECTED - obtain new number.
Ÿ Name of surgery, diagnosis, date of surgery
global time period over MM/DD/YY.
After the last field has been entered, the cursor will return to the Guarantor field, allowing the user to review the accuracy of the entered data. When satisfied, the user may press [“] or [End], after which:
Ÿ A cash or company category type will return to the Add New Patient screen with the cursor on the Patient’s Account No. field ready to add the next new patient. To exit this process, press [“] or [End] to return to the New Patient Menu.
Ÿ All other category types will prompt, Any Insurance Coverage (Y/N)?
Y Will display the insurance screen. Continue with the section Insurance Coverage.
N Will take you directly to the encounter screen:
Ÿ If there is no encounter information to be entered at this time, press [“] or [End] and On-Staff will return to the Add New Patient screen with the cursor on the Patient’s Account No. field ready to add the next new patient. To exit this process, press [“] or [End] to return to the New Patient Menu.
Ÿ When there is encounter information to be entered, continue with the applicable section Encounter Information, Worker’s Comp Encounter Information or UB Encounter Information.