
Intellect™
SCHEDULE MENU OPTIONS

Appointment Reminder
Text Message Reminder with Confirmation
Intellect offers the ability to automatically send a text message to patients to remind them of an upcoming appointment, eliminating the time and expense of manually reminding patients of their appointments, and reducing the cost of missed appointments.
NOTE: Patients may get charged to receive and send text messages, depending on their personal phone plan.
Note: Effective version 16.06.30, offices have the option of sending different text messages via Twilio, email SMTP, and regular email. This is a custom feature. For additional information, please contact PCS Support.
NOTE: No Patient Health Information (PHI) may be included in text messages.
Note: Effective version 16.05.20, offices may have multiple customized text messages. For additional information, please contact PCS Support.
There are two options for text message appointment reminders:
• Text message reminders which do not allow patient response/confirmation. This is the only option for users with software versions prior to15.05.12. If patients need to reschedule or cancel an appointment, they need to call the number listed on the reminder message. See Schedule --►Appointment Reminder --►Text Message Reminder without Confirmation for set-up and usage information for this option.
• Text message reminders which allow patient response/confirmation. This option became effective in version 15.05.12.
The following information applies to text message reminders with confirmation.
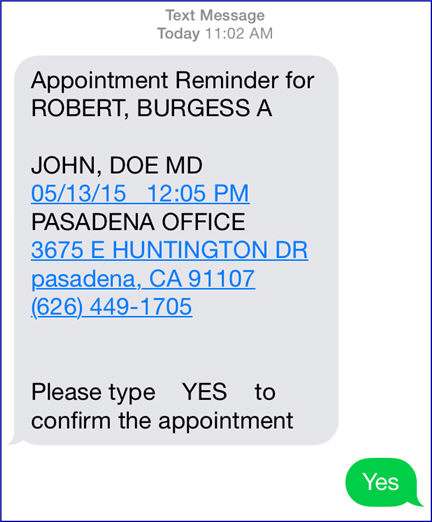
Standard-format text message appointment reminders are generated by Intellect by pulling patient appointment information from the system. As shown in the following sample, the message includes the doctor’s name, the date and time of the appointment, the telephone number and location of the medical facility where the appointment is scheduled, and the date and time the text message was sent.
NOTE1: In software prior to 16.02.22, when an appointment reminder text message was sent, the provider name displayed in the text message with the title of Dr, whether or not the provider was actually an MD. As of version 16.02.22, whatever is entered in the provider's <Title> field displays after the provider's last name. For example, John Doe + Title.
NOTE2: At this time, the text message cannot be customized and is limited to 160 characters by SMS constraints.
To send text message appointment reminders, no additional batch files are needed and no additional hardware is needed beyond requiring email capabilities in the system set up and on the server. However, the clinics system needs to be set up in these areas:
Immediate/Instant Text Message Reminder (optional)
Cell phone information needs to be entered for each patient on the Registration --►Patient --►Regular Patient --►Registration Patient Add/Modify screen.
• Enter the patient’s cell phone number in the <Cell Phone No.> field.
• Select a cell phone carrier from the <Cell Phone Carrier> field drop-down list.
2.1 Clinics who do not already have an account with Twilio should go to Schedule --►Appointment Reminder --►Twilio --►Twilio - User Set Up, Section I - Open a Twilio Account and complete steps 1 - 4.2.
2.2 After completing step 2.1 above, clinics who would like Prime Clinical to complete the remaining Twilio set up should contact support at 626-449-1705, or email support@primeclinical.com. Please include your name, client ID, contact information, Twilio log-in ID, and Twilio password.
Clinics who would like to continue setting up Twilio themselves should go to Schedule --►Appointment Reminder --►Twilio --►Twilio - User Set Up, and complete section II - Set Up a URL, Port, and Telephone Number in Twilio.
2.3 Steps 2.1 and 2.2 above must be completed to enable Twilio to generate the information needed for step 2.3. Twilio assigns ACCOUNT SID and AUTH TOKEN API credentials for YOUR account which need to be entered into Intellect. To do this, go to Schedule --►Appointment Reminder --►Twilio --►Twilio - User Set Up, and complete section III - Enter Your Twilio API Credentials into Intellect.
A mail server is required to forward outgoing text messaging. To set up a mail server, go to Utility --►Tools --►Configuration to display the Modify CONFIG screen and complete these fields:
3.1 SmtpServer 
Type the address for the mail server’s outgoing mail; for example, smtp.sbcglobal.yahoo.com.
3.2 Smtp Port 
The default is 25. Follow your mail provider setup instructions as this can vary per mail provider. Clinics whose SMTP server uses a port other than 25 should notify PCS.
3.3 Smtp SSL 
The default is 'N' which indicates no SSL (secured connection) is required. Follow your mail provider setup instructions as this can vary per mail provider. If SSL is required for this server (for example, 'gmail'), use the drop-down to select 'S'; if TLS is required for this server, use the drop-down to select 'T'.
3.4 UserName 
Type the user name for the mail server account, if required. For example, primesupport@sbcglobal.net
3.5 Password 
Type the password for the mail server account, if required.
Enter the Twilio-purchased phone number. See Schedule --►Appointment Reminder --►Twilio --►Twilio - User Set Up, II - Set Up URL, Port, and Telephone Number in Twilio, step 5.4.
3.7 To save information, press [Modify], shut down Intellect, and log-on again so the setting takes effect.

Otherwise, to leave the screen without saving changes, press [Exit]; to remove the information entered into the screen, press [Clear].
This reminder may be set for automation. For example, text message appointment reminders may be scheduled to be sent to patients 24- or 48-hours in advance of their appointments. See the On-line Help document on Tasks.
Prime Clinical should already have set up the text message appointment reminder; however, clinics who want to modify how the text message appointment reminder is set up should complete these steps:
4.1 Go to Utility --►Task Manager --►Modify to display the Modify Task Manager screen.
4.2 Scroll down through the TaskName list to find the appropriate Task. The TaskName should begin with TASK_APP_REMINDER.
NOTE: There may be more than one TaskName starting with TASK_APP_REMINDER. One may be used for scheduling email messages (TASK_APP_REMINDER_EMAIL), one may be used for text messages (TASK_APP_REMINDER_SMS or _TEXT), and one may be on a different time schedule.
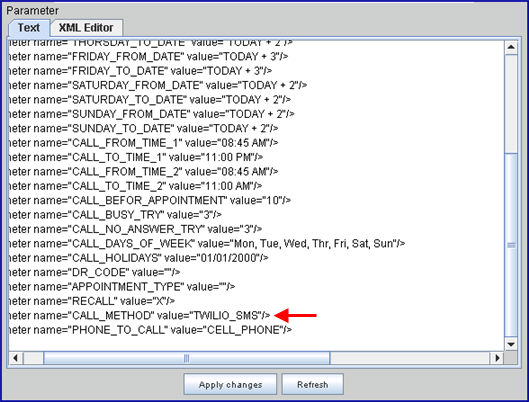
4.3 The Parameter field displays the task parameters. Edit the parameters as needed, making sure the CALL_METHOD is set to TWILIO_SMS (see red arrow below).
Do Not Modify the REMIND_METHOD and APPOINTMENT_SEQUENCE parameters.
NOTE1: If the task parameters include <parameter name="RECALL"value="Y"/>, be aware that automation will send a text message to the patient even if the patient has already confirmed his/her appointment from a previous text.
NOTE2: Additional information is available in Utility --►Task Manager --► Tasks for Twilio and Email.
4.4 After making changes, click on the [Apply Changes] button.
NOTE: There is not a screen or location on Intellect where clinics can verify that text message appointment reminders have been sent.
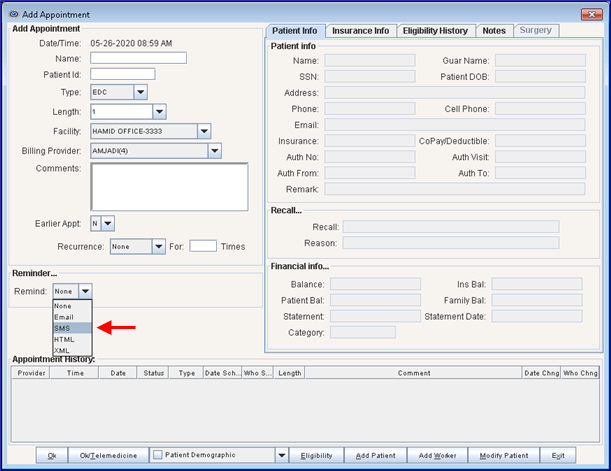
5. Immediate/Instant Text Message Reminder (Optional)
When the SMS option is selected from the <Remind> drop-down list when adding an appointment to Intellect's schedule, an instant text message appointment reminder is sent to the patient's registered cell phone after the appointment is scheduled.
For additional information, contact Prime Clinical support.
