
Intellect™
SCHEDULE MENU OPTIONS

Appointment Reminder
Twilio
Twilio - User Set Up
Twilio is a pre-pay program (pay-as-you-go) used by Prime Clinical clients to facilitate text messaging, Patient Portal, and telemedicine. Twilio set up must be completed before these features may be used.
Before setting up Twilio, please note:
1. Offices must be on Intellect version 17.11.08 or greater.
2. Offices must have a web domain name and renew their subscription for the domain name before its' expiration date. A domain name is required when setting up Twilio. See this document, section II - Set Up a URL, Port, and Telephone Number in Twilio, step 4.
3. Offices must have a current basic SSL certificate for IIS with 2048-bit encryption for the specified web domain name. An SSL certificate is required when setting up Twilio. See this document, section II - Set Up a URL, Port, and Telephone Number in Twilio, step 4.
4. On the Utility --►Tools --►Configuration screen, offices must:
• Enter their domain address in the <External IP> field
• Set the <Twilio HTTP Type> field to 'HTTPS'
Note: Offices who make changes to their external IP address should notify PCS support as the IP address will need to be updated in their Twilio account.
In this Topic Hide
II - Set Up a URL, Port, and Telephone Number in Twilio
III - Enter Your Twilio API Credentials into Intellect
Note: Because Twilio's website changes periodically, screen shots in this documentation may vary from Twilio's actual screens. For help with Twilio's screens, please contact Twilio directly.
1. Go to the Twilio website https://www.twilio.com.
2. When Twilio opens, click on the SIGN UP button:

3. Clicking on SIGN UP opens a page to enter demographic information:
3.1 Fill out the screen, entering your name, email address, and other fields as required.
3.2 Press the [Start your free trial] button to save your information and create a trial version Twilio account.
4. Once a trial version Twilio account has been set up, the account must be upgraded to a fully functioning account before it can be set up in Intellect.
4.1 If your account has not been upgraded, when you sign into your Twilio account an upgrade option displays on the top menu bar. For example:

4.2 To upgrade your account, click on [Upgrade Project] and fill in your account billing information as indicated on the Twilio screen.
Note: After completing steps 1 - 4.2 above, additional set up is required. To have Prime Clinical complete the remaining set up, contact support at 626-449-1705, or email support@primeclinical.com. Please include your name, client ID, contact information, Twilio log-in ID, and Twilio password.
1. If you are not currently in Twilio, log-in to the Twilio program. Your Twilio Dashboard will open.
2. On your Twilio Dashboard, scroll to the # Phone Numbers section and click on Manage Numbers:

2.1 The Phone Numbers section opens:
3. Verify the Number and Voice URL options are selected (see blue arrows below):
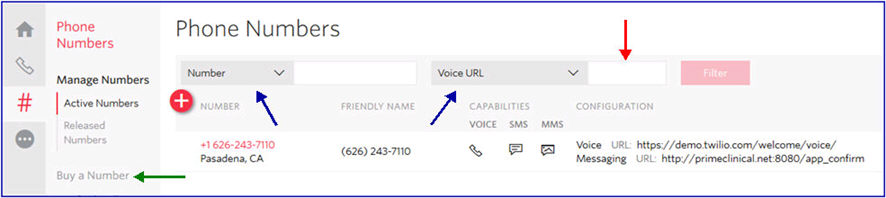
4. Request a URL by typing YOUR clinic's internet address and webserver port in the Voice URL field (see red arrow above).
4.1 YOUR URL must use this format:
https://domainname:port#/app_confirm
4.2 Replace domainname with YOUR clinic's domain that the SSL certificate is on. Replace port# with the SSL port (the default port is 8080). The recommended port is 8080, but if that port is already being used for another purpose, another port can be used as long as it is an open port through the firewall.
For example, Prime Clinical would enter https://primeclinical.net:8080/app_confirm.
5. Click on the [Buy a Number] option (see green arrow in step 3) to display the Buy a Number screen:
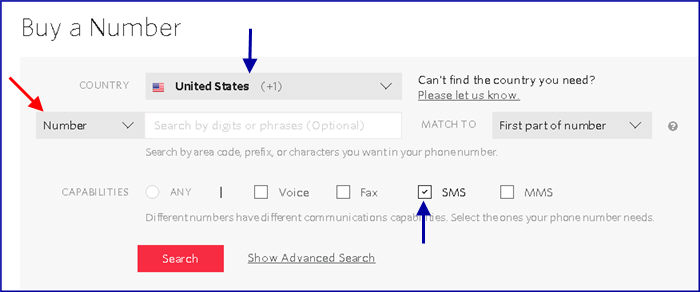
5.1 Verify that United States is selected as the Country, and the ☐ SMS box is checked (see blue arrows above).
5.2 The Number/Location field (see red arrow above) allows you to choose a phone number specific to your city or area. For example, select Number from the drop-down menu and then enter a specific area code, or select Location and enter a particular city; i.e., Pasadena, CA.
Advanced search capabilities are also available.
5.3 Click on the red [Search] button to generate a list of phone numbers from which to choose.
5.4 Click on the  button to the right of the phone number you wish to purchase. Once purchased, enter this phone number in the <Twilio Phone No.> field on Intellect's Utility --►Tools --►Configuration screen.
Note: Clinics who make changes to their external IP address should notify PCS support as their IP address will need to be updated in their Twilio account.
6. Verify that your Twilio number and URL are set up correctly:
6.1 Log-in to Twilio, if you are not already logged-in. On your Twilio Dashboard, scroll to the # Phone Numbers section and click on Manage Numbers (see screen save in step 2) to open the Phone Numbers screen.
6.2 On the Phone Numbers screen, verify that your purchased Twilio number (see blue arrow below) and the URL you requested in step 4 display (see red arrow below):
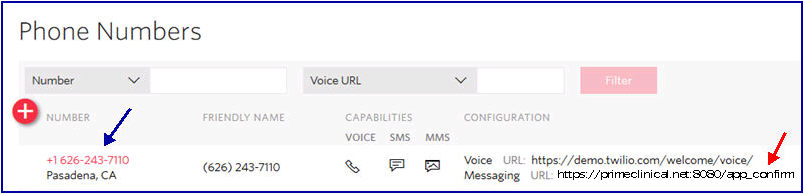
6.3 Click on your purchased Twilio number to display the details of your number and URL set up.
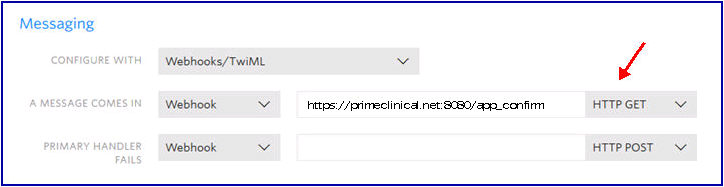
6.3.1 In the Messaging section, verify that YOUR URL is set up as HTTP GET. The sample below (see red arrow) shows Prime Clinical's URL where YOUR URL should display. If the URL for your office does NOT display here, return to step 4.
Note: After completing sections I - Open a Twilio Account and II - Set Up URL, Port, and Telephone Number in Twilio above, offices who would like Prime Clinical to complete the remaining Twilio set up for them should contact support at 626-449-1705, or email support@primeclinical.com. Please include your name, client ID, contact information, Twilio log-in ID, and Twilio password.
The Account SID and Auth Token API credentials generated by Twilio during set up for YOUR account need to be entered into Intellect.
1. Log-in to Intellect and open the Utility --►Tools --►Configuration screen.
2. Log-in to your Twilio account to display your Dashboard.
3. Locate the Project Info section (see sample below):

3.1 Copy the ACCOUNT SID information (see red arrow above) and paste/type it into the <Twilio Account SID> field on the Utility --►Tools --►Configuration screen. Note: The number shown above is a sample only - it is not a valid ACCOUNT SID number.
3.2 Copy the AUTH TOKEN information (see green arrow above) and paste/type it into the <Twilio Auth Token> field on the Utility --►Tools --►Configuration screen.
Note: You must copy the actual token. To see the actual token, click on the  symbol and then copy the token.
3.3 Remain in Twilio and go to section IV - Enter Your Clinic Phone Number into Twilio.
1. If you are not currently in Twilio, log-in to the Twilio program. Your Twilio Dashboard will open.
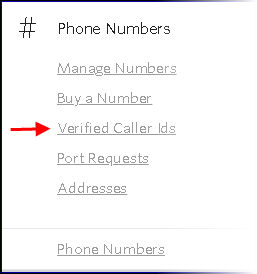
2. On your Twilio Dashboard, scroll to the # Phone Numbers section and click on Verified Caller Ids:
3. When the Verified Caller IDs screen opens, click on the round red button with the white plus sign  to open the Verify a Phone Number screen:
4. In the field marked with a green arrow above, enter the same clinic phone number that is in the <Phone> field on Intellect's Utility --►Setup --►Clinic screen (this is the number that patients see as the caller ID).
4.1 After entering the phone number, Twilio calls the number. Pick up the phone when it rings and enter the code displayed on the screen. For example:
This is only an example. The verification code shown above is not a valid number.
4.2 The phone number is added to the list of caller ID numbers.
Note: The above steps need to be completed for each clinic with different phone numbers that want to use Twilio. This must be done or calls will not be completed. If you change your phone number, these steps need to be done for the new number.
4.3 Save your changes, exit Twilio, and go to section V - Automate the Task.
Once sections I - IV of this document have been completed, contact Prime Clinical to open a reference asking to have the task automated, and to verify that your hardware is set up correctly.
Before you can use the Telemedicine video chat feature:
• Complete Sections I - V of this document before continuing with Section VI.
• Go to Schedule --►Appointment --►Full Day --►Special Features --►Telemedicine and complete Section I - System Requirements.
1. If you are not currently in Twilio, log-in to the Twilio program. Your Twilio Dashboard will open.
2. Go to Settings --►API Keys
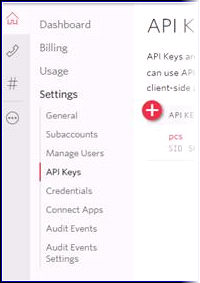
3. Press the  to generate a new API Key.
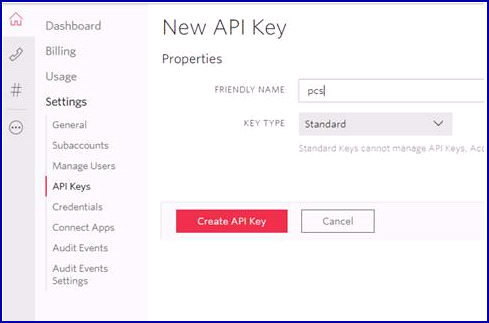
4. In the FRIENDLY NAME field, type pcs as the key name and press the [Create API Key] button:
The pcstestkey screen opens:
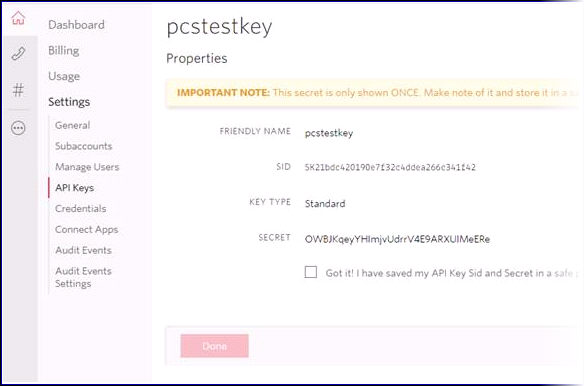
This is only an example. The SID and SECRET codes shown above are not valid.
5. Copy the SID displayed on the pcstestkey screen (see sample above) and paste it into Intellect's Utility --►Tools --►Configuration <Twilio API Key> field.
6. Copy the SECRET displayed on the pcstestkey screen and paste it into Intellect's Utility --►Tools --►Configuration <Twilio API Secret> field.
IMPORTANT: This secret is ONLY shown ONCE. Make note of it and store it in a safe place.
7. On Twilio's pcstestkey screen, check the box shown below:

8. Press the [Done] button, but do not exit Twilio.
9. In Twilio, go to Settings --►General, scroll to the bottom of the page, and click the 'Enabled' radio button in the SSL Certificate Validation section:
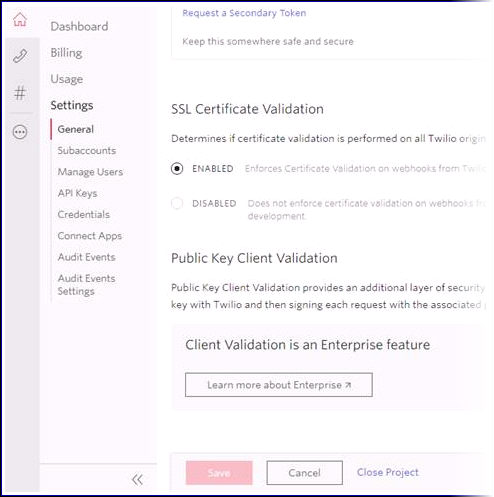
10. Click on the red [Save] button.
11. When you have completed these steps, contact Prime Clinical to set up a test chat to make sure everything is operating properly.